 NexStudio
NexUV Guide
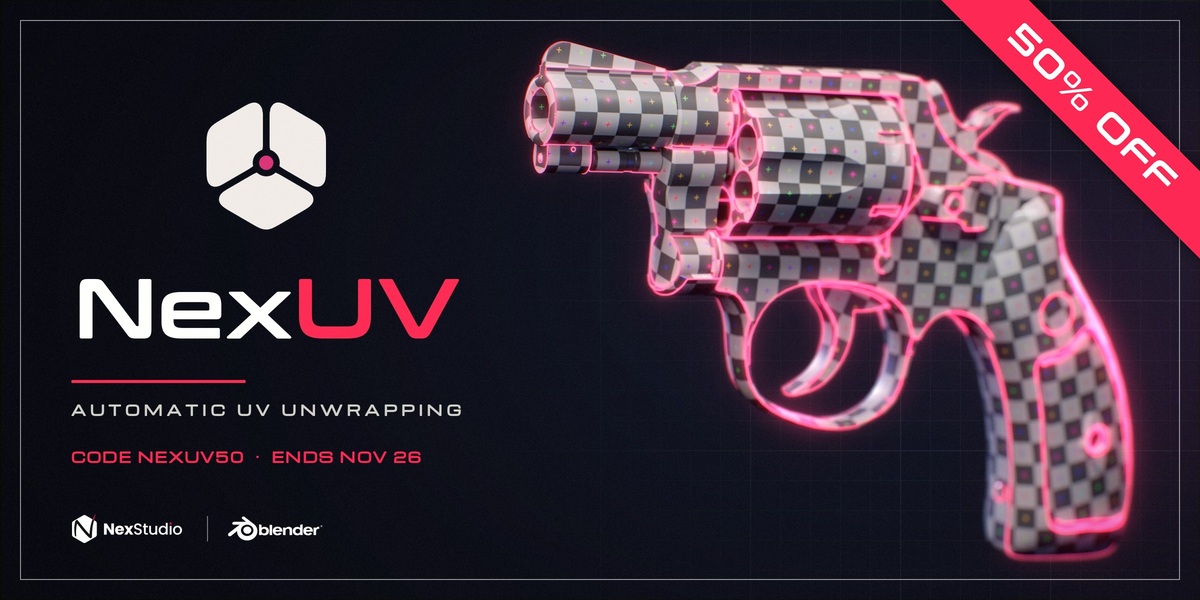
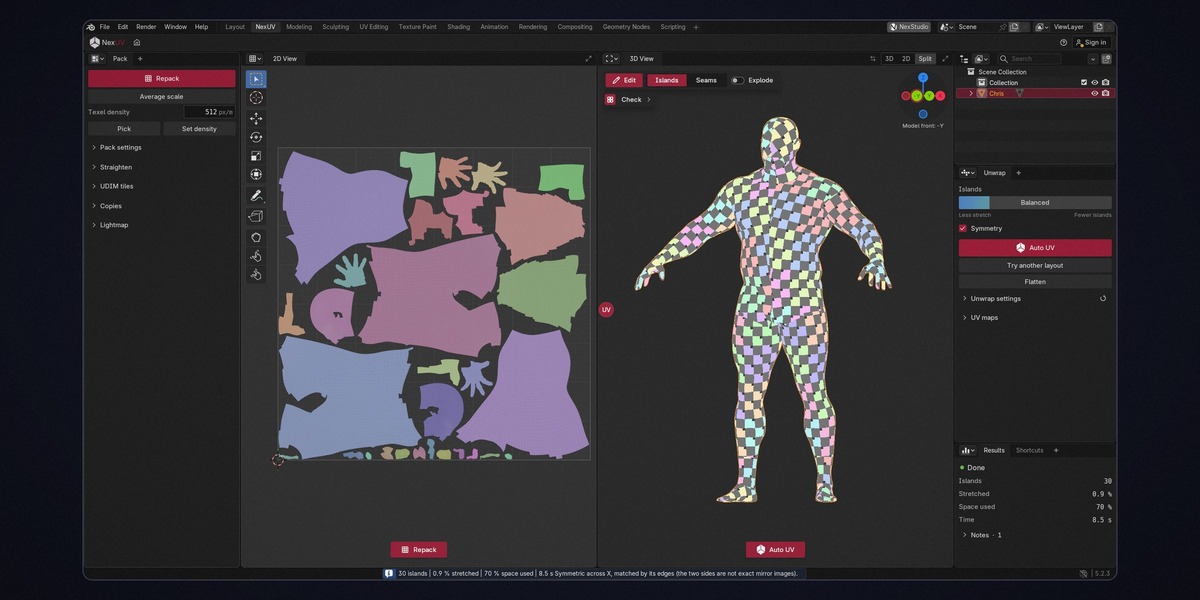
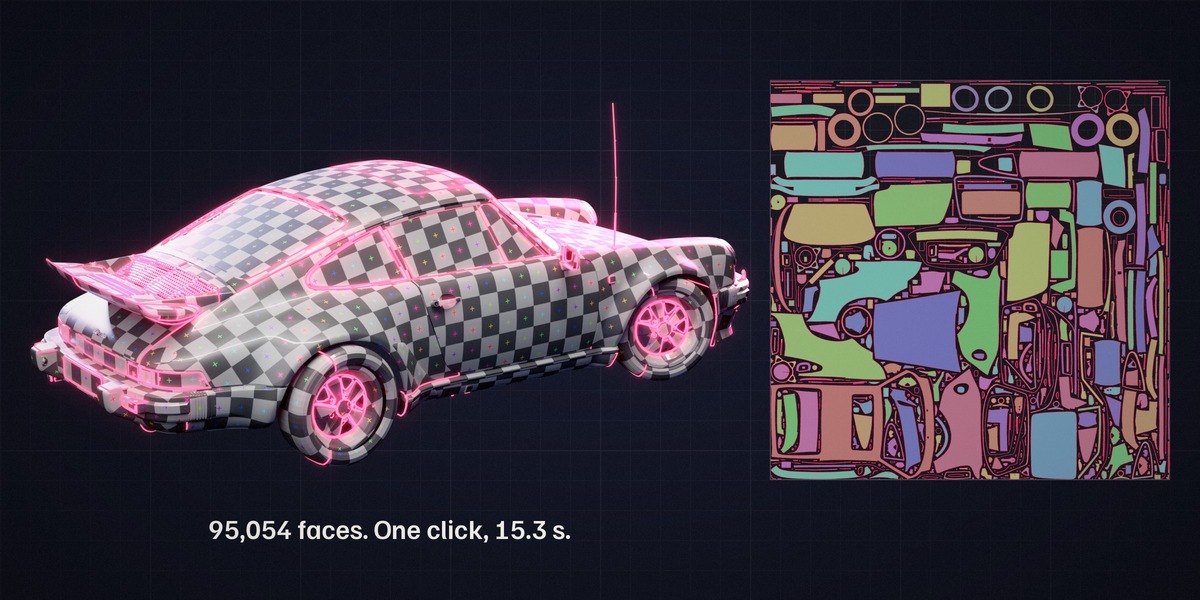
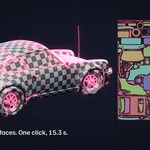
NexUV picks the seams, flattens the pieces and packs them in one click. Then you can edit the islands, straighten them, pack them into UDIM tiles and check the result, all without leaving the 3D view.
Getting started
- Open the NexUV tab in the sidebar (
N) of the 3D View. The first time, sign in and activate NexUV on this computer (Account & licence). - Select one or more mesh objects.
- Press Auto UV. NexUV writes the active UV map (a mesh without one gets a new
UVMap) and marks its seams.Escstops a running unwrap and changes nothing;Ctrl+Ztakes back a finished one. - Turn on Checker (Check UVs) to see the map on the mesh, and press Analyse for the numbers.
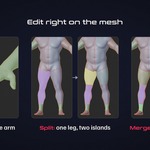
- Want changes? Press Edit manually in the Unwrap panel (the NexUV Edit tool) to select, merge, split, lock and move islands, then Repack.
Already marked your own seams? Press Flatten instead of Auto UV: it follows your seams and never cuts a new one. A piece that cannot lie flat as it is (closed, or it would overlap itself) is left as it was, and NexUV warns you.
Account & licence
NexUV works with your free NexStudio account on nexstudio3d.com. Everything is in the Account card (the person icon at the top right of the NexUV sidebar, or the NexUV workspace's Account panel); while NexUV is not activated, Auto UV is dimmed and says what to do with one button under it.
- Sign in. Your browser opens nexstudio3d.com and NexUV shows a short code: check that the browser shows the same code and approve it. (Open browser opens the page again.) Blender installs with Allow Online Access off: Sign in then asks first, and Allow and Sign in turns it on (Preferences > System).
- Activate. NexUV finds the licence on your account by itself. Bought it somewhere else (Superhive)? Press Redeem licence key and paste the key from your purchase: NexUV shows which licence it is and asks before it links it to your account (Link and activate). After that the licence follows your account, so you never need the key again. A key works for one NexStudio account only: a key another account already used is refused.
- Done: the Account section says Active with your name and Licence: Lifetime.
- Lifetime licence, no subscription. You buy NexUV once and the licence never ends.
- Offline. Your NexUV licence is lifetime. After activation NexUV works without the internet: it confirms your licence with nexstudio3d.com by itself whenever Blender is online, and keeps working offline for 45 days from the last time it did. Near the end the Account section asks you to connect to the internet once.
- Computers. Your licence runs on as many computers at a time as it has seats (a Personal licence: one). Sign out frees this computer; My devices opens the page on nexstudio3d.com where you can free any of them. To use NexUV in another Blender or on another computer, sign out here, then install it there and sign in.
- Move licence here. When every seat is in use on your other computers, NexUV asks at once whether to deactivate it there and activate it here (Yes, activate here; the Account section offers Move licence here too). NexUV stops on the other computer soon after. A licence can move a few times a month; after that NexUV says when it can move again.
- Privacy. Your meshes and UV maps never leave your computer. NexUV contacts nexstudio3d.com only to sign in, to activate and to confirm the licence. It sends the computer's name (shown in My devices), an anonymous computer id, the NexUV version, the Blender version and the operating system with its version.
- Check now confirms the licence at once (after you freed a computer or bought more seats).
- Other NexStudio add-ons. NexUV shares one sign-in with the other NexStudio add-ons (NexBake and more): sign in once in any of them. Each add-on still activates its own licence. Signing out in one asks first and then signs out all of them.
Support
Bought NexUV on Superhive? Message us on Superhive (the product page's message / inbox), so we can see your purchase.
Everyone else, or if Superhive is not an option: e-mail [email protected].
Please include: your Blender version, your operating system, what you pressed, and the text from Blender's system console (Windows: Window > Toggle System Console; macOS: start Blender from Terminal with /Applications/Blender.app/Contents/MacOS/Blender; Linux: start Blender from a terminal). If you can, attach the .blend file or the mesh.
Auto UV
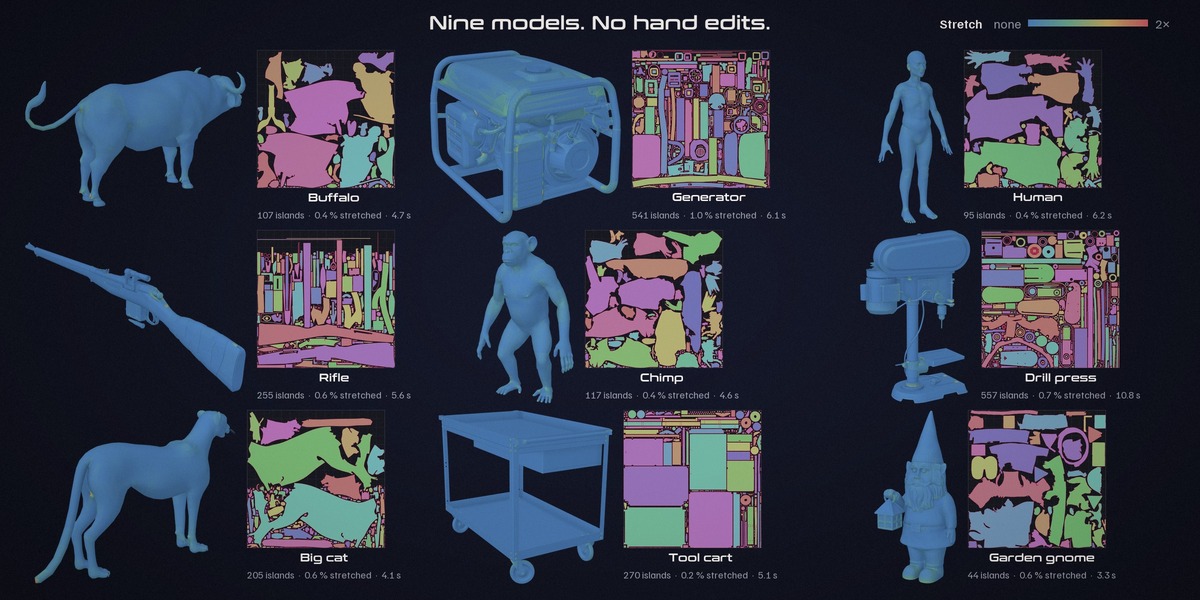
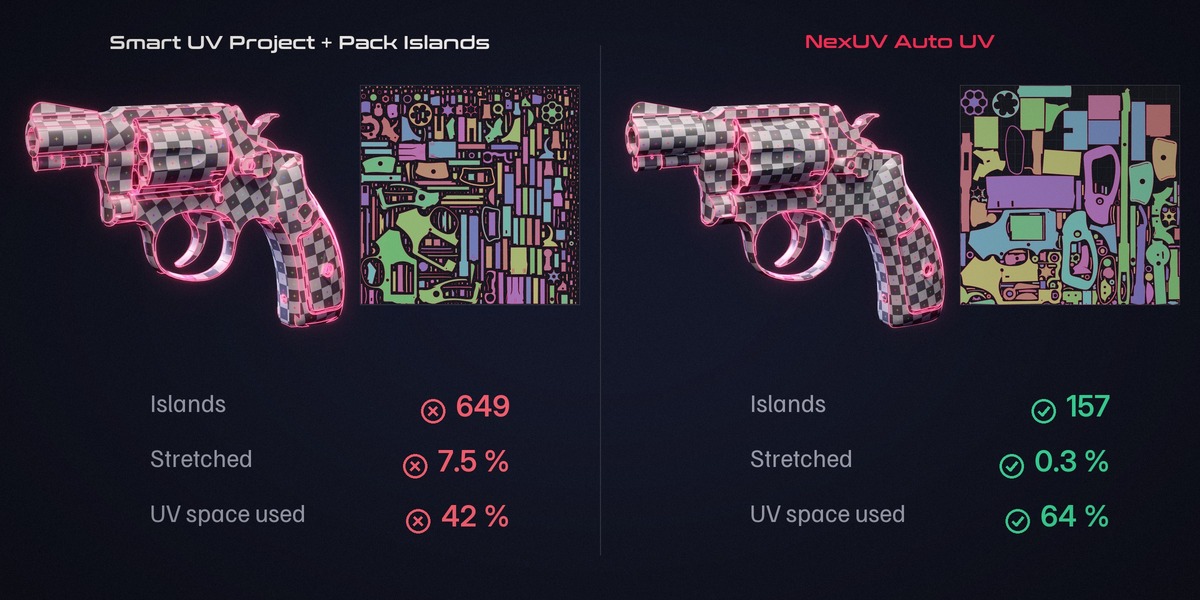
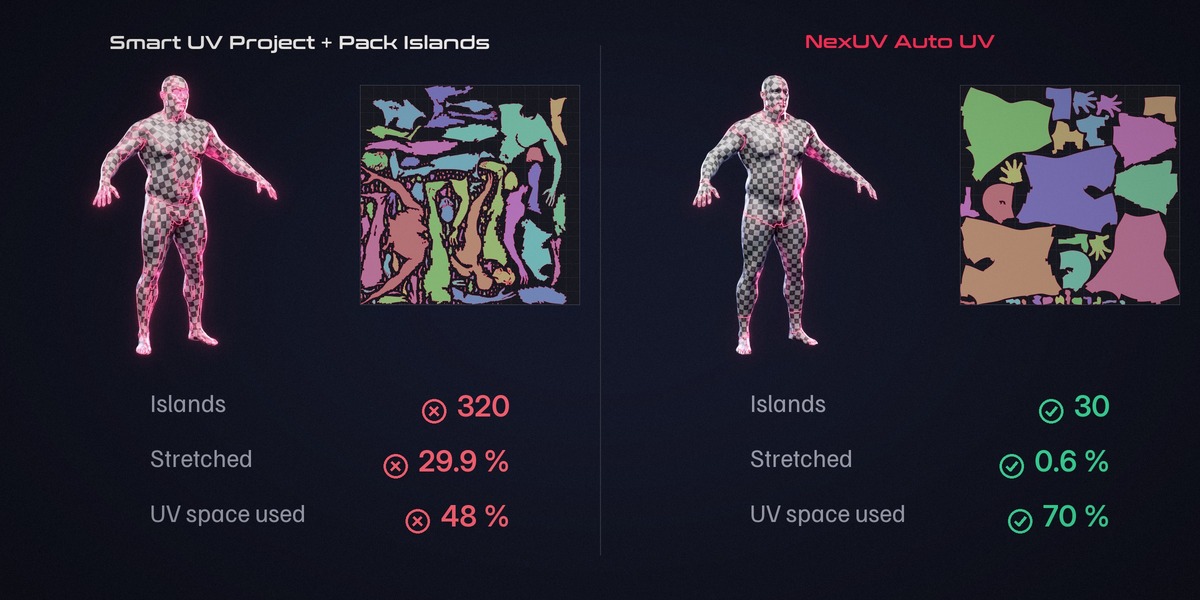
Unwraps every selected mesh object automatically: NexUV finds the parts of the model, places the seams, flattens each island with as little stretch as it can, makes the texel density even, and packs the islands into the 0-1 square with the padding from Settings. With several objects selected the button reads Auto UV · N and each object gets its own map. In Edit Mode it unwraps the whole mesh (Edit Mode: U > NexUV Auto UV).
- Your seams: Auto UV marks its own seams. When a mesh has seams you marked by hand, it asks first (Preferences: Ask before Auto UV replaces my seams). To keep your seams, use Flatten.
- Sharp edges: the first time, Auto UV asks what to do with edges marked sharp (see Settings > Sharp Edges). For baking normal maps, every sharp edge must also be a seam.
- Hard edges (corners of hard-surface parts) become seams, so the islands bake cleanly.
- Seams go to the back by default (Seams to the Back).
- Long islands that would leave the texture mostly empty are cut in two (Cut Long Islands).
- Copies: loose parts that are copies of each other (bolts, wheels, mirrored parts) get the same island layout, so they texture the same.
- Even texel density: every island gets the same texel density, and the polish step evens it inside each island too (no "fisheye" checker on round parts).
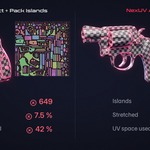
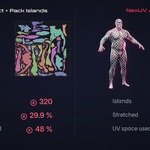
- The result card (bottom left) and the Notes fold under the button tell you what happened: islands, space used, joins, cuts, anything to check.
Auto UV always gives the same map for the same mesh and settings. Want another one? Press Try another.
Islands: from Less stretch to Fewest
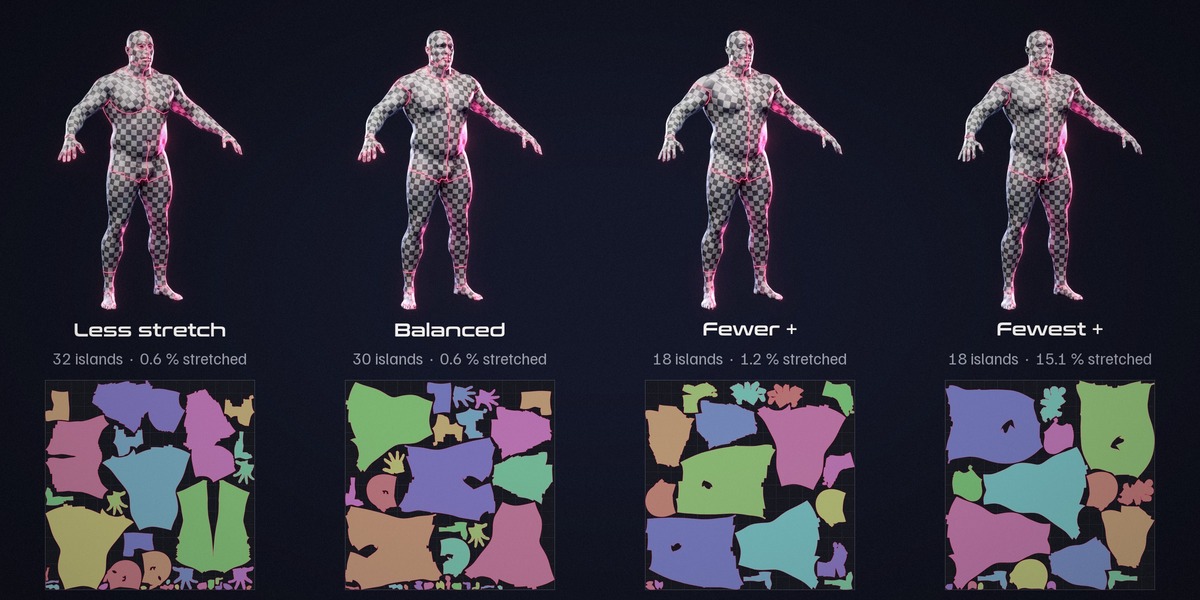
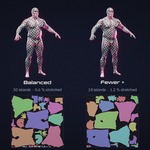
The Islands slider sets what Auto UV aims for: left gives less stretch and more islands, right gives fewer, bigger islands with more stretch. Merge and Apply accept as much stretch before they cut a seam. Saved in the .blend file. The six steps, left to right: Less stretch, Balanced (default), Fewer, Fewer +, Fewest, Fewest +.
| Choice | What you get | When to use it |
|---|---|---|
| Fewer | Fewer, bigger islands at about the same stretch: more islands that open flat with one hidden seam are joined (a hand with its fingers, halves, darts). Hard edges stay seams. About 8 % (hard surface) to 16 % (organic) fewer islands than Balanced. Takes about 1.5 times as long. | Hand painting, fewer seams to hide. |
| Balanced (default) | Few islands with little stretch: parts cut into many islands (a hand, a foot, a head) are unwrapped again as one or two; limbs and small loose parts that open flat with one hidden seam are joined, when the map still packs as full. | Most models. |
| Less stretch | About half the stretch of Balanced, with more islands. | Close-up textures, photo textures, text and patterns that must not bend. |
| Fewer +, Fewest, Fewest + | Fewer and bigger islands again, with 3, 4 and 8 times the stretch allowed. At Fewest and Fewest +, Auto UV cuts no long island only for the packing. | Stylised and hand-painted assets where few seams matter more than stretch. |
Try another
Runs Auto UV once more with a different but equally valid map of the same mesh: other seams, another island count, another layout. Press it again until you like one. It uses the same settings as Auto UV.
Symmetry
Turn on Symmetry next to Auto UV to unwrap a mirrored mesh as a symmetric one. NexUV finds the mirror plane (X, Y or Z), unwraps one half, gives the other half the mirrored islands, and joins the islands that cross the middle into one. A mesh with no mirror plane is unwrapped as usual. Faces without a mirror twin (an asymmetric detail) stay on their side. Both halves get the same island shapes, so a texture painted on one side matches the other. The price is a little more stretch than an unwrap without Symmetry, because both halves must share one layout (on a head, a few percent of the area instead of under one).
The note beside Symmetry tells you what NexUV found: Not symmetric (no mirror plane: Auto UV unwraps the mesh as usual) or Partly symmetric (some faces have no mirror image, such as a prop in one hand: the rest is mirrored, those faces get islands of their own). No note: the mesh mirrors.
With Symmetry on, every edit is symmetric too: selections, brush strokes and seam strokes reach the mirror side as you make them, and Merge, Split, Apply, Straighten and Average Scale give mirrored islands. Flatten follows your seams as they are and never copies a seam to the other side: its islands are mirrored where your seams are.
Stack copies
Stack copies (NexUV workspace, Pack panel, Copies fold) lets parts that are copies of each other share one place in the texture: their islands lie exactly on top of each other, so the rest of the map gets bigger (more texels). A copy is a loose part with the same shape as another, turned, moved or mirrored: wheels, bolts, chair legs, the left and right side of a prop. A mirrored copy lies on its original face down (mirrored UVs), as game artists usually do it.
- Works on Auto UV and on Repack of the whole map (one tile, no locked islands).
- A copy is stacked only when its islands match its original's one to one; other parts are packed as usual.
- Check UVs counts stacked islands under Stacked islands, not as overlaps.
- Each copy keeps its own islands for selecting, merging and splitting.
Lightmap UV (second UV map for game engines)
Lightmap UV (NexUV workspace, Pack panel, Lightmap fold; also in the 3D View's UV menu, U) makes a second UV map named Lightmap for baked lighting in Unity, Unreal and Godot. It is made from your texture map's islands, packed again for light; your texture map stays the active map, with its UVs and seams untouched. After you change the texture map, press it again. The lightmap map follows its own rules:
- No island overlaps another: stacked copies and mirrored halves get room of their own.
- Every island has the same texel density, even where the texture map made some smaller or bigger.
- Sharp edges that cut an island all the way through become seams, so light does not bleed across hard corners (a line of sharp edges that stops inside an island is not cut). When that would make too many islands for the Lightmap size, they are not cut and the result says so.
- Islands that fold over themselves in the texture map are flattened again.
- Islands turn freely to fill the square (orientation does not matter for light).
- The padding is measured on the lightmap itself (Lightmap size, 64 to 1024 px): 2 texels between islands below 256 px, 4 texels from 256 px.
- The same mesh and texture map always give the same lightmap map.
A mesh needs its texture UV map first (Auto UV it, or your own): the lightmap is made from it. In the engine, pick that map as the lightmap channel: Unity: Model import, turn off Generate Lightmap UVs (Unity reads the second map, UV1). Unreal: Static Mesh editor, Light Map Coordinate Index = 1. Godot: the second map is UV2; import with Light Baking: Static Lightmaps.
Many small islands fill a small lightmap poorly (every gap costs texels): for a mesh with hundreds of parts, use a bigger Lightmap size.
Flatten (your own seams)
Flatten follows the seams you marked (Edit Mode: Ctrl+E > Mark Seam) and unwraps into the active UV map. A seam that cuts nothing off stays a slit inside its island. It never asks and never adds a seam, with Symmetry on too: a piece that cannot lie flat along your seams (closed, or it would overlap or fold) is left as it was, with a warning (mark a seam on it, or use Auto UV). Each piece keeps an even texel density (a long curved band does not shrink towards one end) and is packed.
- With islands or faces selected, only those are flattened (the button reads Flatten selected); every other island keeps its shape and place.
- Edit Mode:
U> NexUV Flatten, or the UV Editor's UV menu. - With no seams marked, a piece that lies flat as it is (a strip, a ribbon, a plane, a box) is flattened whole. A shape that would stretch (a head, a ball) is left as it was, and NexUV says so: mark seams or use Auto UV.
The NexUV Edit tool
Press Edit manually in the Unwrap panel or Edit at the top left of the 3D View (Object Mode); in other workspaces pick NexUV Edit in the 3D View's left toolbar. While it is on, the bar at the top left of the 3D View has Islands | Seams, Explode, and Apply / Cancel when edits wait; Edit again leaves the tool. The islands of the active object are drawn on the mesh in colours, and you can edit them directly. Wireframe on the same bar (tool on or off) shows the mesh's edges in the 3D View.
| Action | How |
|---|---|
| Select an island | Click it. Shift+click adds or takes out, Ctrl+click takes out. |
| Box select | Drag starting off the mesh, or B then drag. |
| All / none / invert |
A / Alt+A / Ctrl+I, or the All / None / Invert buttons. |
| Whole mesh pieces |
L selects the connected piece under the mouse, Shift+L takes it out, Ctrl+L grows the selection to whole pieces. Linked in the sidebar makes clicks pick whole pieces. |
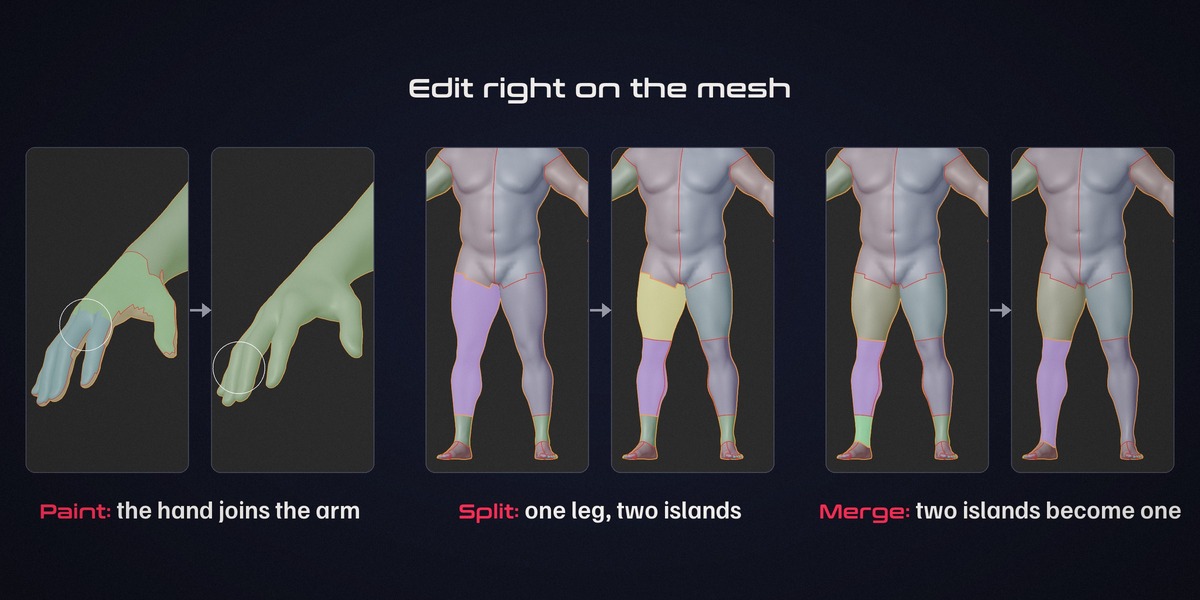
| Paint islands | Drag on the mesh: the island the stroke starts on grows under the brush. Shift+drag paints a new island. Alt+wheel (or [ and ]) changes the brush size. The result is a preview: Apply (Enter) makes the islands, Cancel (Esc) drops it. |
| Hide / unhide |
H hides the selected islands, Shift+H the others, Alt+H shows them all again. |
| Lock / unlock |
P locks the selected islands, Alt+P unlocks. |
| Merge / split |
M merges the selected islands, Y splits them. |
| Undo |
Ctrl+Z first takes back the last island selection or brush stroke, then Blender's undo. |
| UV Editor | Click, Shift/Ctrl+click, and drag a selected island to move it; the L keys work there too. |
Seams mode
Explode (in the bar at the top left of the 3D View, and in the tool's header) moves the pieces of the mesh apart while you edit, so pieces inside or through each other are easy to see and pick; the mesh itself does not change. Turn Explode off (or pick another tool) before you export: while it is on, an export that applies modifiers (FBX, glTF, OBJ) writes the mesh exploded.
The NexUV Edit tool has two modes: Islands (1, everything above) and Seams (2). In Seams mode you draw and erase UV seams on the mesh. Nothing changes until you press Apply (Enter): then only the islands your edits touch are unwrapped again along the new seams, and every other island keeps its UVs. Esc drops the edits (with a click path open, the first Esc only ends the path). When a piece would lie flatter with a seam you did not draw (or with a seam you erased), NexUV asks first, as after Merge: Keep the seam, No seam (exactly your seams, never a new cut; a piece that cannot lie flat so stays as it was) or Draw it myself (nothing changes; your edits stay).
Seams you mark or clear in Edit Mode (Ctrl+E) count too: when you leave Edit Mode, NexUV unwraps the islands they touch along them, as Apply does here (a new seam cuts an island, a cleared one joins two; every other island keeps its UVs; one undo step; with Symmetry on, on both sides). If you stop that (Esc) or undo it, Seams mode shows those seams as edits: Enter applies them, Esc puts the seams back as the map has them. A NexUV edit (Merge, Split, ...) changes the seams only where it changes the islands. Auto UV makes a new map and marks all of its own seams. A map from another tool (Smart UV Project, or one cut in the UV Editor) is not unwrapped again when you leave Edit Mode.
| Action | How |
|---|---|
| Draw a seam | Drag on the mesh: a seam along the edges under the stroke. |
| Seam along a path | Click, click, ...: a seam along the shortest edge path from the last point. Click the last point again (or press Esc) to end the path; Shift+click starts a new one. |
| Seam along an edge loop |
Alt+click an edge: a seam along its whole edge loop (it stops at a vertex without four edges and at the mesh's border). Ctrl+Alt+click erases the loop. |
| Seams at sharp edges |
E: a seam at every sharp edge (marked sharp, or made sharp by Smooth by Angle); on a mesh with none, at every edge whose faces turn more than 30 degrees. |
| Erase |
Ctrl+drag erases every seam the brush circle passes over (the drag may start beside the mesh); Ctrl+click erases the seam line under the mouse up to its ends or forks. |
| Undo |
Ctrl+Z takes back the last stroke or click. |
| Symmetrize | Symmetrize (the bar at the top left of the 3D View) asks which side to copy (-X to +X or +X to -X). With islands selected, they become the same pieces on the other side: their borders and the open seams inside them are mirrored there, and any other seam inside goes. With nothing selected, all seams are mirrored. Enter applies. It is greyed out on a mesh with no mirror plane. |
An edge on the mesh's border is never a seam. With Symmetry on, every stroke, path and erase is made on the mirror side too. Seams from islands (Unwrap tab, under UV maps) marks a seam at every border of the active UV map's islands on the selected objects and clears every other seam.
Merge, Split, Hide, Lock
| Button | What it does |
|---|---|
| Merge | Joins the selected islands that touch into one, as far as they lie flat without folding. Needs two or more islands. |
| Split | Cuts each selected island in two at its best seam. Edit Mode: along the selected edges. |
| Hide / Unhide | Hide islands to reach the ones behind them; Unhide shows them all again (they come back selected). |
| Lock / Unlock | A locked island keeps its shape (it is written as Blender's UV pin). Flatten, Merge, Split and Straighten leave it alone, Cut Long Islands never cuts it, and Repack moves it only as a whole. |
In Edit Mode, Merge and Split use the mesh selection and need UV Sync Selection on.
An island made by Merge or the island brush often lies flatter with a short new seam inside it. When that happens, NexUV asks: Keep the seam (the new seam is drawn in light blue on the mesh), No seam (never a new cut, more stretch; islands that would fold stay apart), or Draw it myself (nothing changes yet: Seams mode opens with the seams of the new islands; draw your seam, then press Enter). The choice NexUV thinks fits best is picked for you. Tick Don't ask again to keep your answer; you can change it in Preferences.
Pack & tiles
| Control | What it does |
|---|---|
| Repack | Packs the islands of the active UV map again, with the padding from Settings. Its label says what it will pack: Repack (the whole map), Repack selected (only the selected islands, into the free space of their tile), Repack tile 100X (one tile), or Pack N together (with two or more mapped objects selected: one shared texture, an atlas, every object at the same texel density). Islands keep their shapes and their sizes relative to each other. |
| Average scale | Gives the islands one texel density (UV size in step with 3D size); each keeps its shape. On a selection: the selected islands take the others' density. |
| Texel density · Set density | Gives the UV map of every selected object the texel density you type (pixels of the Texture size per metre, e.g. 512 px/m), as Check measures it, and packs it at exactly that size: islands keep their shapes and sizes against each other, the Padding stays, and the square is not filled (a lower density leaves room). When the islands do not fit, nothing changes and NexUV says how much bigger a texture holds them. Pick takes the active object's density, so other objects can match it. Repack and Auto UV fill the square again (and change the density), so Set density last. |
| Auto repack after edits | On: the whole map is packed after every Flatten, Merge, Split, Straighten and Average Scale. Off (default): only the islands an edit changes move; press Repack when you are done. |
| Cut long islands | When a long island (a handle, a blade, a pipe) spans the texture and leaves most of it empty, Auto UV and Repack (of one object's whole map) cut it in two, in the middle or where it is narrowest, and pack again. Kept only when the map fills clearly more. Locked islands are never cut. Repack asks first: Cut them or Keep them whole, with the space each uses. Off, or Islands at Fewest or Fewest +: no seams made only for packing. |
| UDIM tiles | One row per tile in use (1001 · n islands). Click a row to select its islands (Shift adds). Move here moves the selected islands into that tile and packs it. New tile moves them to the first free tile (up to 1100). |
Clean up: Straighten
| Button | What it does |
|---|---|
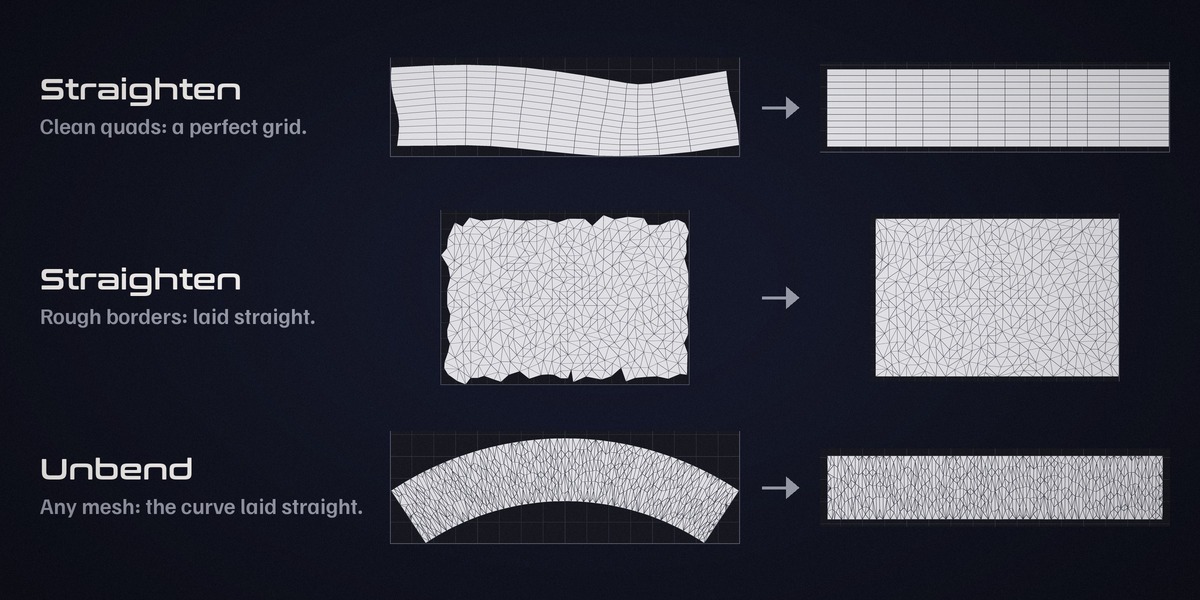
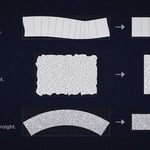
| Straighten | Lays the almost straight sides of the selected islands straight (none selected: all) and smooths the curved ones, then flattens each island again inside its new border. Ragged, stair-step borders become clean lines; a border that is mostly straight is turned onto the U/V axes. An island of clean quads in a grid (a pipe, a band, a panel) is laid on a perfect grid instead, every row and column straight, when that stretches no more than the clean border would. |
| Unbend | Lays each selected bent strip straight along its own middle: arcs, curved bands, kinked strips, gentle bends too. It works on the island's shape, whatever its mesh. Islands that are not one long strip (rings, branches, blocks, round shapes) are left as they are. |
| Force (no stretch limit) | Off: an island that would get new stretch keeps its shape, so both buttons only change what they can change cleanly. On: islands are laid out with the stretch that takes, unless they would fold, overlap or be crushed out of shape (a tenth or more of the island newly red on the checker). |
Straight islands are easier to texture with tiling materials and trim sheets, and they pack tighter.
Check UVs & Analyse
Check sits at the 3D view's top left, under Edit: its square turns the checker on and off, its title opens the controls below.
| Control | What it does |
|---|---|
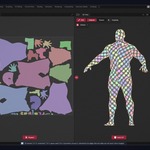
| Checker | Shows a checker texture on the mesh (the material is not changed). Checker cells sets its size. Even squares everywhere = even texel density and no stretch. |
| Colour faces by | Stretch: blue = none, red = 2x. Density: faces coloured by texel density. Overlaps: faces whose UVs overlap other UVs or are flipped, in red. Off. |
| Select stretched / Select overlaps | Selects the islands with the problem, ready for Split, Flatten or Straighten. |
| Analyse | A report of the active UV map, with a hint next to anything worth fixing (rows below). |
Analyse rows
| Row | Meaning | Good value |
|---|---|---|
| UV map | The map shown; it warns when rendering uses another map. | - |
| Islands | Number of UV islands. | Fewer is easier to paint. |
| UV space used | Share of the texture covered by islands. | 65-80 % is tight packing. |
| Stretched area | Surface whose checker squares stretch into rectangles 1.3x long or more (the Stretch colours). | Under 5 %. |
| Even texel density | Surface whose texel density is within 0.8-1.25x of the median. | Over 80 %. |
| Texel density | Pixels per metre at the texture size from Settings. | Match your project's standard. |
| Overlapping islands | Islands that overlap another. | 0. |
| Stacked islands | Islands lying exactly on a copy's islands (Stack copies). | Fine for textures; 0 for a bake or a lightmap. |
| Flipped triangles | Mirrored UVs; normal maps show them wrong. | 0. |
| Collapsed triangles | Triangles with no UV area. | 0. |
| Across tile borders | Islands crossing a UDIM tile border. | 0. |
| Tiny islands | Islands smaller than 4 pixels. | 0; merge them into neighbours. |
Settings
In the NexUV workspace: the Unwrap panel's Unwrap settings and the Pack panel's Pack settings (Texture is also in the sidebar). Saved in each .blend file.
| Setting | Default | What it does |
|---|---|---|
| Texture | 2048 | The texture size the padding is measured on (512 to 8192). |
| Auto padding | On | Padding follows the texture size as artists set it: 4 px at 512 and 1024, 8 px at 2048, 16 px at 4096, 32 px at 8192. |
| Padding | 8 px | Gap between islands in pixels at the Texture size (when Auto padding is off). |
| Rotate islands freely | Off | Islands may lie at any angle when that packs tighter. Off: quarter turns only, islands on the U/V axes (easier to paint). |
| Keep up direction | Off | Up on the model is up in the map for islands that stand up (walls, sleeves, planks), so wood grain, fabric and text run the right way. Uses a little more space. |
| Even texel density | On | Auto UV's last step lays curved islands out again (a tank, a belly, a vase) so the checker is the same size all over them, then packs the map again. Costs a little time (about 0.5 to 2 s on a character) and sometimes a little space. Off: faster; the checker may be bigger in the middle of a curved island than at its edges. |
| Seams to the back | On | Auto UV hides its cuts from the front: seams go round the back, the sides and under the arms. |
| Model faces | -Y | Which way the front of the model looks (Blender's front view, numpad 1, looks at -Y). Also the Front gizmo at the top right of the NexUV workspace's 3D view: click the ball the model's front looks along (that also turns Seams to the back on); the chosen one is solid with a ring. |
| Sharp edges | Ask | Cut UVs at my sharp edges: every sharp edge becomes a seam (with Shade Auto Smooth that often makes 2 to 8 times the islands). Mark sharp edges for me: NexUV keeps its own seams, marks the steep ones as sharp and shades the mesh smooth, so shading and seams match for baking. Don't care: sharp edges are not read (fine when you do not bake normal maps). Ask: asked once per session. |
| Stack copies (Game assets) | Off | See Stack copies. |
| Lightmap size (Game assets) | 256 | The lightmap resolution the Lightmap UV padding is measured on. |
Preferences
Edit > Preferences > Add-ons > NexUV.
- Ask before Auto UV replaces my seams (on): when a mesh has hand-marked seams, Auto UV asks first.
- When an edit cuts a seam you did not draw (Ask; Merge, the island brush and Apply seams): Ask shows the result with the seam and without it and lets you choose (or draw your own); Keep the seam and No seam answer without asking.
Keyboard
| Key | Where | Action |
|---|---|---|
Esc |
While a job runs | Stop; nothing changes. |
U |
Edit Mode | NexUV Auto UV / NexUV Flatten in the UV menu. |
A, Alt+A, Ctrl+I
|
Edit tool | All, none, invert. |
1, 2
|
Edit tool | Islands mode, Seams mode. |
B |
Edit tool | Box select. |
L, Shift+L, Ctrl+L
|
Edit tool | Linked pieces. |
H, Shift+H, Alt+H
|
Edit tool | Hide, hide others, unhide. |
P, Alt+P
|
Edit tool | Lock, unlock. |
M, Y
|
Edit tool | Merge, split. |
Alt+wheel, [, ]
|
Edit tool | Brush size. |
Enter, Esc
|
Edit tool | Apply or cancel a painted preview or seam edits. |
Ctrl+Z
|
Edit tool | Undo the last selection or stroke first. |
Tab, Enter
|
NexUV sidebar | Move focus and press controls; wheel, PgUp/PgDn and Home scroll. |
Where everything is
-
3D View sidebar > NexUV (
N, in any workspace): a quick map. Auto UV, Symmetry, Try another, Islands, Texture, Checker and Flatten. - UV Editor sidebar > NexUV: Repack, Average scale and Texture.
- NexUV workspace (the NexStudio button in the top bar, or Open the NexUV workspace in the sidebar): everything else. The 3D view and the 2D view side by side, editing islands and seams, packing, tiles, Straighten, Lightmap UV and every setting.
-
Edit Mode >
U: NexUV Auto UV, NexUV Flatten, NexUV Lightmap UV. - UV Editor > UV menu: Flatten, Merge, Split, Repack, Average Scale, Straighten, Unbend, Analyse.
- Left toolbar (Object Mode): the NexUV Edit tool.
- Bottom-left card: progress and the last result.
- ? in the sidebar: quick help and this guide.
Limits & requirements
- Blender 5.0 or newer. Blender 4.5 is not supported yet; support is planned for an update.
- Windows 10/11 (64-bit, Intel/AMD), macOS on Apple silicon (M1 or newer), or Linux (64-bit, Intel/AMD).
- A free NexStudio account and an internet connection to activate, then now and then so NexUV can confirm the licence.
- Meshes up to 2,000,000 triangles (a quad counts as two). Bigger: decimate it or unwrap it in parts.
- Memory: about 2.6 GB for 700,000 triangles and up to 7 GB at the 2,000,000 triangle limit; NexUV tells you when a mesh may need more than is free.
- The unwrapper runs as its own process next to Blender: Blender stays responsive,
Escstops it, and it uses up to 8 cores (two are left for Blender). - Linked objects, and objects whose mesh is a library override, must be made local first. The mesh must be welded (Mesh > Clean Up > Merge by Distance).
- Islands hidden with
Hin the NexUV Edit tool are hidden only while the tool is picked: pick another tool before you export or convert, or the hidden faces are left out of the export, and Convert to Mesh deletes them (Ctrl+Zbrings them back). An autosave made while islands are hidden keeps them hidden with aNexUV Hidemodifier: NexUV removes it when the file is opened; without NexUV, delete that modifier. -
Explode moves the pieces apart with a
NexUV Explodemodifier while the NexUV Edit tool is picked: turn Explode off or pick another tool before you export, or an export that applies modifiers (FBX, glTF, OBJ) writes the mesh exploded. Saving the .blend file is safe. An autosave made while Explode is on keeps the modifier: NexUV removes it when the file is opened; without NexUV, delete that modifier. - NexUV keeps the island levels Split uses on the mesh (the custom property
_nexuv_parts). An export with Custom Properties ticked (glTF, FBX) carries it too; leave that option off, or delete the property in Object Data properties > Custom Properties (Split then cuts without levels). - UDIM tiles: without locked islands, Flatten of the whole mesh packs every island into the first tile; with locked islands every island keeps its tile, and a locked island alone in a tile it fills may be made smaller to fit (Repack keeps its size). To keep islands in other tiles without locking, flatten a selection.
Troubleshooting
| Message | What to do |
|---|---|
| The mesh is not welded | Mesh > Clean Up > Merge by Distance, then unwrap again. |
| Too many triangles | The limit is 2,000,000. Decimate the mesh or unwrap it in parts. |
| Islands that overlap or fold | The map was written; Check > Select overlaps, then Flatten or Split them. |
| Could not load its libraries | Security software may have blocked a file. Reinstall the NexUV extension and allow it. |
| Ran out of memory | Close other programs, or unwrap a smaller mesh. |
| The mesh changed while it was being unwrapped | Press the button again without editing the mesh while it runs. |
| Rendering uses another map | Object Data > UV Maps: click the camera icon of the map NexUV wrote. |
| Sign in / Activate (Auto UV dimmed) | Open the Account card (the person icon of the NexUV sidebar) and follow its button. |
| Too many computers | Press My devices, free a computer you no longer use, then Try again. |
| Connect to the internet (offline too long) | Connect to the internet once; NexUV confirms your licence on its own (or press Check now). |
| Sign in does nothing / Allow Online Access is off | Press Sign in and choose Allow and Sign in, or turn on Allow Online Access in Preferences > System. |
| The clock is behind | Set the date and time automatically in the system settings. |
| Anything else | See Support; include the console text. |
Licence
NexUV is made by NexStudio (NexStudio3D.com). © 2026 NexStudio. All rights reserved, except as the licences below allow.
NexUV has two parts. The Blender add-on (the Python files that use Blender), copyright NexStudio, is free software under the GNU General Public License v3 or later, like Blender itself: see LICENSE. The NexUV engine (the engine folder: the unwrapper program and its native libraries) is a separate program that the add-on starts and talks to through files; it is licensed to you under the NexUV End User License Agreement (engine/EULA.txt). In short:
- One licence per person. Activate it on as many computers as your licence lists; free a computer with Sign out or on My devices. A studio or team needs one licence for each artist who uses NexUV.
- Personal and commercial work. The UV maps you make are yours, without restriction.
-
Do not share the engine. You may not resell, share or redistribute the
enginefolder, or offer it to others as a service. - Your data. The engine runs on your computer; meshes and maps never leave it. Only the add-on contacts nexstudio3d.com, to sign in and check the licence.
Third-party code and its licences are listed in THIRD_PARTY_NOTICES. Licence questions: [email protected] (bought on Superhive? message us there).
Have questions about this product?
Login to message
| Blender Extension Compatible | Yes |
| Sales | 10+ |
| Dev Fund Contributor | |
| Published | 1 day ago |
| Blender Version | 5.0 - 5.3 |
| Extension Type | Add-on |
| License | GPL |
Discover more products like this
Texturing game assets lightmap uv packing unwrap udim auto-uv baking uv uv unwrapping texel density seams