Smart Asset Placer
 CelladorProject



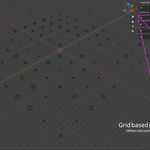
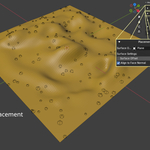
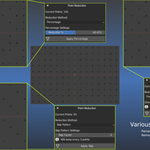
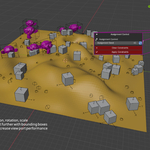
# Smart Asset Placer Tool Documentation
## Overview
The Smart Asset Placer Tool is a Blender add-on that creates intelligent placement systems using **Smart Points** and **Bounding Box Constraints**. Instead of manually placing assets, this tool generates a grid or surface-based array of smart points that can control the position, rotation, and scale of your objects through constraints.
## Table of Contents
- [Installation](#installation)
- [Core Concepts](#core-concepts)
- [User Interface](#user-interface)
- [Basic Workflow](#basic-workflow)
- [Smart Points](#smart-points)
- [Bounding Boxes & Constraints](#bounding-boxes--constraints)
- [Advanced Features](#advanced-features)
- [Practical Examples](#practical-examples)
- [Troubleshooting](#troubleshooting)
- [Technical Details](#technical-details)
## Installation
### Prerequisites
- Blender 4.2 or higher
- Python 3.9+ (included with Blender)
### Installation Steps
1. Download the Smart Asset Placer Tool files
2. Open Blender and go to `Edit > Preferences`
3. Navigate to the `Add-ons` tab
4. Click `Install...` and select the add-on folder or zip file
5. Enable the add-on by checking "Smart Asset Placer Tool"
6. The tool panel will appear in `3D Viewport > Sidebar > SmartAsset Placer` tab
## Core Concepts
### Smart Points
- **Empty objects** positioned in grids or on surfaces
- Act as **constraint targets** for your assets
- Can have randomized rotation, scaling, and positioning
- Named `Smart_Point_XX_YY` for grid layouts
### Bounding Box System
- **Wireframe visualizations** that encompass your asset geometry
- Created automatically when constraining objects to smart points
- **Hierarchy**: `Empty (constrained to Smart Point) -> Bounding Box -> Mesh Objects`
- Handles both **prepped meshes** and **instanced objects**
### Constraint-Based Control
- Uses Blender's constraint system for non-destructive positioning
- **Copy Location**, **Copy Rotation**, and **Copy Scale** constraints
- Individual axis control (X, Y, Z toggles)
- Adjustable influence values (0.0 to 1.0)
## User Interface
The Smart Asset Placer panel is located in the 3D Viewport sidebar under the "SmartAsset Placer" tab and contains five main sections:
### 1. Placement Mode
- **Surface Object**: Select a mesh to place points on its surface
- **Surface Offset**: Distance above surface for point placement
- **Align to Face Normal**: Points align to surface normal direction
### 2. Distribution/Grid Settings
- **Grid Size X/Y**: Number of points in each direction
- **Spacing X/Y**: Distance between points (grid mode only)
- **Scaling Control**: Random scaling with min/max ranges
- **Z-Axis Rotation**: Random rotation around Z-axis
- **Y-Up Orientation**: Switch from Z-up to Y-up local axis
### 3. Point Reduction
- **Reduction Method**: Choose from six different reduction algorithms
- **Percentage**: Remove random percentage of points
- **Skip Pattern**: Keep every nth point (e.g., every 2nd, 3rd point)
- **Checkerboard**: Create alternating checkerboard pattern
- **Border**: Remove points from grid edges
- **Center**: Keep only central region of points
- **Random Clusters**: Create organic clustered distributions
- **Method Parameters**: Each method has specific settings:
- **Reduction %**: Percentage of points to remove (0-95%)
- **Skip Factor**: For skip pattern (2-10, keeps every nth point)
- **Border Size**: Number of edge layers to remove (1-5)
- **Cluster Size**: Size of random clusters (2-8)
- **Real-time Preview**: Shows current point count and reduction results
### 4. Constraint Settings
- **Influence**: Global constraint strength (0.0-1.0)
- **Axis Controls**: Individual X/Y/Z toggles for Location, Rotation, Scale
- **Preset Buttons**: Quick axis combinations (XY, All, None, Z-only)
- **Bounding Box Options**: Hide/show mesh visibility
### 5. Assignment Control
- **Assignment Seed**: Randomize which object goes to which smart point
- **Auto Reassign**: Automatically update when seed changes
- **Clear/Apply Constraints**: Remove or bake constraint transforms
## Basic Workflow
### Step 1: Create Smart Points
1. Configure grid size or select a surface object
2. Adjust spacing, rotation, and scaling settings
3. Click **"Create/Update Smart Points"**
4. Points appear as sphere empties in the `Smart_Point_Collection`
### Step 2: Prepare Your Assets
- Ensure your assets are **Empty objects** with **mesh children**
- For instanced objects: Use `_Inst_X` naming for child empties
- For prepped meshes: Direct mesh children under the main empty
### Step 3: Apply Constraints
1. Select your asset empties
2. Configure constraint axes (Location: XY, Rotation: Z, etc.)
3. Set constraint influence (usually 1.0)
4. Click **"Constrain Selected to Points"**
### Step 4: Fine-tune
- Adjust **Assignment Seed** to reassign objects to different points
- Modify **Influence** to partially follow smart points
- Use **Point Reduction** to thin out distributions
- Toggle **mesh visibility** to see only bounding boxes
### Step 5: Finalize
- **Apply Constraints** to bake transforms permanently
- **Clear Bounding Boxes** to clean up visualization
- **Apply Mesh Constraints** to finalize mesh positions
## Smart Points
### Grid Mode (Default)
```
Grid Size: 10x10, Spacing: 5.0x5.0
Creates 100 smart points in a regular grid
```
### Surface Mode
```
Surface Object: Select terrain mesh
Grid Size: 5x8 = 40 target points
Points distributed randomly on surface faces
```
### Scaling Options
- **Scale Percentage**: Probability each point gets scaled (0-100%)
- **Min/Max Scale**: Range of scale factors (0.8 to 1.2)
- **Uniform Scaling**: Same scale on all axes vs. independent XYZ
### Rotation Options
- **Rotation Amount**: Percentage of points that get rotated
- **Max Rotation**: Maximum degrees of Z-axis rotation
- **Y-Up Orientation**: Rotate points 90° for Y-up assets
## Bounding Boxes & Constraints
### Automatic Hierarchy Creation
When you constrain objects to smart points, the tool creates:
**For Prepped Meshes:**
```
Smart_Point_01_05 (target)
├── AssetEmpty (constrained)
├── AssetEmpty_bbox (visualization)
├── Mesh_01
├── Mesh_02
└── Mesh_03
```
**For Instanced Objects:**
```
Smart_Point_02_03 (target)
├── AssetEmpty (constrained)
├── AssetEmpty_bbox (visualization)
├── AssetEmpty_Inst_1
│ ├── Mesh_A
│ └── Mesh_B
└── AssetEmpty_Inst_2
├── Mesh_C
└── Mesh_D
```
### Constraint Types
- **Copy Location**: Moves object to smart point position
- **Copy Rotation**: Rotates object to match smart point orientation
- **Copy Scale**: Scales object to match smart point scale
### Axis Control
- **Location XY**: Follow smart point position in X and Y, ignore Z
- **Rotation Z**: Only rotate around Z-axis (common for ground objects)
- **Scale XYZ**: Uniform scaling on all axes
## Advanced Features
### Assignment Control
- **Seed-based Randomization**: Same seed = same assignment pattern
- **Auto-reassignment**: Changes update automatically when seed changes
- **Manual Control**: Disable auto-mode for manual seed application
### Point Reduction Methods
The tool offers six sophisticated point reduction methods to create natural, varied distributions from regular grids:
#### 1. Percentage Reduction
```
Reduction: 30%
Removes 30% of points randomly across the grid
Result: Organic, natural thinning
```
#### 2. Skip Pattern
```
Skip Factor: 3
Keeps every 3rd point, removes the rest
Result: Regular but sparse pattern (67% reduction)
```
#### 3. Checkerboard Pattern
```
No parameters needed
Removes alternating points in a checkerboard pattern
Result: 50% reduction with regular alternating pattern
```
- **Grid Mode**: True checkerboard based on grid coordinates (i+j) odd/even
- **Surface Mode**: Spatial checkerboard using virtual grid overlay
#### 4. Border Removal
```
Border Size: 2
Removes 2 layers of points from grid edges
Result: Keeps only interior points, creates natural boundaries
```
#### 5. Center Keep
```
No parameters needed
Keeps only central quarter of the grid
Result: Concentrated center distribution
```
#### 6. Random Clusters
```
Reduction %: 40%, Cluster Size: 4
Creates clustered distributions with organic groupings
Result: Natural clustering effect with varied density
```
### Point Reduction Workflow
1. **Create Initial Grid**: Start with dense, regular smart point grid
2. **Choose Method**: Select reduction method based on desired pattern
3. **Set Parameters**: Adjust method-specific settings
4. **Apply Reduction**: Click "Apply [Method]" button to reduce points
5. **Iterate**: Apply multiple reductions or recreate grid to try different approaches
**Tips for Point Reduction:**
- Start with larger grids (15x15 or 20x20) for better reduction flexibility
- **Checkerboard** works well for architectural layouts
- **Border removal** creates natural edges for terrain scattering
- **Random clusters** mimics natural object distributions
- **Percentage** provides the most organic, random results
- Multiple reductions can be applied sequentially for complex patterns
### Visibility Management
- **Hide Original Meshes**: Show only bounding box wireframes
- **Toggle All Visibility**: Batch visibility control
- **Collection Organization**: Smart points and bounding boxes in separate collections
### Instanced Object Support
The tool detects and handles two object types:
- **Prepped Meshes**: Simple empty with direct mesh children
- **Instanced Objects**: Complex hierarchies with `_Inst_X` pattern children
## Practical Examples
### Example 1: Forest Scattering
```
1. Create 15x15 grid with 3.0 spacing
2. Enable 100% rotation with 180° max
3. Enable scaling: 80%-120% uniform
4. Select tree empties
5. Set Location: XY, Rotation: Z, Scale: XYZ
6. Constrain to points
7. Use 30% point reduction for natural thinning
```
### Example 2: Building Placement
```
1. Use terrain mesh as surface object
2. Target 20 points, face normal alignment
3. No rotation (keep buildings upright)
4. Select building empties
5. Set Location: XYZ, Rotation: None, Scale: None
6. Constrain to surface points
```
### Example 3: Natural Forest Distribution
```
1. Create 20x20 grid (400 points) with 2.0 spacing
2. Enable 100% rotation with 180° max
3. Enable scaling: 70%-130% uniform
4. Apply Checkerboard reduction (reduces to ~200 points)
5. Apply 25% Percentage reduction (reduces to ~150 points)
6. Select tree empties, constrain with Location: XY, Rotation: Z
7. Result: Natural forest with organic spacing and variation
```
### Example 4: Building District Layout
```
1. Create 12x8 grid (96 points) with 10.0 spacing
2. No rotation or scaling (keep buildings uniform)
3. Apply Border removal with size 2 (removes edge points)
4. Apply Skip Pattern with factor 3 (keep every 3rd point)
5. Select building empties, constrain with Location: XYZ only
6. Result: Realistic city block with proper spacing and boundaries
```
### Example 5: Rock Field Scattering
```
1. Use terrain mesh as surface object
2. Target 50 surface points with face normal alignment
3. Enable 60% scaling: 80%-200% non-uniform
4. Enable 80% rotation: 360° max
5. Apply Random Clusters: 35% reduction, cluster size 5
6. Select rock empties, constrain with all axes enabled
7. Result: Natural rock field with realistic clustering
```
## Troubleshooting
### Common Issues
**"No empties selected"**
- Solution: Select Empty objects, not mesh objects
- The tool constrains empties that contain mesh children
**"Not enough smart points for all selected objects"**
- Solution: Create more smart points or select fewer objects
- Each object needs its own unique smart point
**Objects not moving to smart points**
- Check constraint influence (should be 1.0 for full effect)
- Verify axis settings (Location XY enabled for ground placement)
- Check that smart points exist and are named correctly
**Bounding boxes appear in wrong locations**
- This can happen with complex hierarchies
- Use "Clear Bounding Boxes" and recreate constraints
**Mesh objects disappear after constraining**
- Check "Hide Original Meshes" setting
- Use "Toggle Mesh Visibility" to restore visibility
### Performance Tips
1. Use point reduction for large distributions (>100 points)
2. **Start dense, then reduce** rather than creating sparse grids initially
3. **Checkerboard** and **Skip Pattern** are fastest for large grids
4. **Random Clusters** provides most natural results but is slower
5. Apply constraints when positioning is final
6. Clear bounding boxes when no longer needed
7. Use collections to organize smart points and bounding boxes
## Technical Details
### Collections Created
- **`Smart_Point_Collection`** (Color: Blue): Contains all smart points
- **`Smart_BBox_Collection`** (Color: Yellow): Contains bounding box visualizations
### Naming Conventions
- Smart Points: `Smart_Point_XX_YY` (grid) or `Smart_Point_XXX` (surface)
- Bounding Boxes: `{EmptyName}_bbox`
- Constraints: `Smart_Point_Location`, `Smart_Point_Rotation`, `Smart_Point_Scale`
### Debug Information
- Enable `SHOW_DEBUG_INFO = True` in code for console output
- Tracks object hierarchies, bounding box creation, and constraint application
- Useful for troubleshooting complex asset setups
### Supported Object Hierarchies
1. **Simple**: Empty → Mesh objects
2. **Nested**: Empty → Empty → Mesh objects
3. **Instanced**: Empty → Empty (`_Inst_X`) → Mesh objects
4. **Mixed**: Combination of above patterns
### Supported Point Reduction Scenarios
1. **Grid-based Points**: Full support for all reduction methods with coordinate-based patterns
2. **Surface Points**: Spatial approximation for geometric methods (checkerboard, clusters)
3. **Mixed Distributions**: Sequential application of multiple reduction methods
4. **Large Grids**: Optimized algorithms handle grids up to 100x100 points efficiently
---
**Version**: 1.2.0
**Blender Compatibility**: 4.2.0+
**Author**: Cellador Project
For technical support or feature requests, contact the creator.
$24.99
Have questions about this product?
Login to message
| Dev Fund Contributor | |
| Published | 11 months ago |
| Blender Version | 4.2 - 4.5 |
| Extension Type | N/A |
| Render Engine Used | Blender-Internal, Blender-Game-Engine, Cycles, Eevee |
| License | Mit |
Discover more products like this
game-dev asset placement blender 3d blender addon 3D Art layout