 mashud008


Installation
Method 1: Manual Installation
Windows:
C:\Users\[Your Name]\AppData\Roaming\Blender Foundation\Blender\[Version]\scripts\addons\
Mac:
~/Library/Application Support/Blender/[Version]/scripts/addons/
Linux:
~/.config/blender/[Version]/scripts/addons/
- Copy the
snap_alignfolder to the above path - Launch Blender
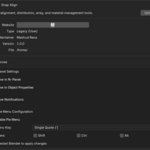
- Go to Edit > Preferences > Add-ons
- Search for "Snap Align"
- Check the box to enable it
Quick Start
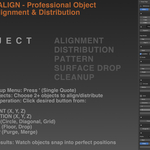
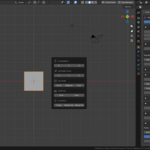
Open Popup Menu
Press: ' (single quote)
The popup menu will appear with all tools
N-Panel Access
Press: N Look for "Snap Align" tab All options are organized there
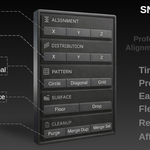
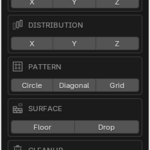
ALIGNMENT (Part 1)
What is Alignment?
Align multiple objects to a specific position on X, Y, or Z axis.
When to Use
- Line up multiple objects
- Create clean layouts
- Organize scattered elements
How to Use: Step by Step
Example: Align 3 boxes
Step 1: Select all 3 boxes
        (Click first box, Shift+Click others)

Step 2: Press ' (single quote)
        Popup menu appears

Step 3: Find "ALIGNMENT" section
        Three buttons: X, Y, Z

Step 4: Click X button
        All boxes align to same X position

Alternative for Y or Z:
        Same process, different axis
Reference Point Modes
1. Bounding Box (Default - Best Choice)
- Aligns to center of all selected objects
- Most versatile option
- Recommended for most situations
2. 3D Cursor
- Aligns objects to cursor position
- First, position your cursor at desired location
- Use Shift+S > Cursor to [location]
3. Active Object
- Aligns to the last selected object
- Use one object as reference
- Good for aligning to specific object
4. Median Point
- Aligns to average position of all objects
- Mathematical center
- Alternative to Bounding Box
5. World Center
- Aligns to 0,0,0 position
- World origin
- Rarely used
DISTRIBUTION (Part 2)
What is Distribution?
Space multiple objects equally along an axis.
Requirements
Minimum: 3 objects needed
How to Use: Step by Step
Example: Space 5 columns equally
Before:
Column1 --- Column2 --- Column3 --- Column4 --- Column5
(X=0)       (X=2)       (X=7)       (X=10)      (X=15)
Unequal spacing!

Step 1: Select all 5 columns

Step 2: Press ' (popup opens)

Step 3: Click "DISTRIBUTION" > X button

After:
Column1 --- Column2 --- Column3 --- Column4 --- Column5
(X=0)       (X=3.75)    (X=7.5)     (X=11.25)   (X=15)
Equal spacing achieved!
Distribution Modes
1. Origin Mode
- Distances measured from object origin
- Origin to origin spacing
- Default mode
2. Bounding Box Mode
- Distances measured from object edges
- Edge to edge spacing
- More accurate for varying sizes
Custom Gap Values
- Set in N-Panel under Gap value
- Controls space between objects
- Affects Gap distribution mode
PATTERN (Part 3)
What is Pattern?
Create organized arrangements of objects.
Three Options
1. Circle
Arrange objects in circular pattern
How to use:
Step 1: Select multiple objects
Step 2: Press ' for popup
Step 3: Click "PATTERN" > "Circle"
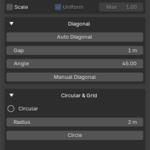
Step 4: Adjust radius in N-Panel if needed
Customize:
- N-Panel > "Circular & Grid" > "Radius"
- Larger radius = bigger circle
- Smaller radius = tighter circle
2. Grid
Arrange objects in grid pattern
How to use:
Step 1: Select objects
Step 2: Press '
Step 3: Click "PATTERN" > "Grid"
Step 4: Adjust in N-Panel:
        - Rows: how many rows
        - Columns: how many columns
        - X Offset: space between columns
        - Y Offset: space between rows
3. Diagonal
Arrange objects in diagonal line
How to use:
Step 1: Select objects
Step 2: Press '
Step 3: Click "PATTERN" > "Diagonal"
Step 4: Customize in N-Panel:
        - Angle: rotation angle (0-360°)
        - Gap: space between objects
SURFACE (Part 4)
Floor (Snap to Ground)
What it does: Snap objects to Z=0 (ground level)
When to use:
- Place objects on ground
- Snap scattered objects
- Fix floating objects
How to use:
Step 1: Select objects floating above ground
Step 2: Press ' (popup)
Step 3: Click "SURFACE" > "Floor"
Result: All objects snap to Z=0
Example:
Before: Sphere at Z=5, Cube at Z=3
After: Both at Z=0 (ground level)
Drop (Snap to Surface)
What it does: Drop objects onto surface below them
When to use:
- Place objects on terrain
- Snap to meshes below
- Realistic positioning
How to use:
Step 1: Create terrain/ground mesh
Step 2: Place objects above it
Step 3: Select objects
Step 4: Press '
Step 5: Click "SURFACE" > "Drop"
Result: Objects snap to surface below
Example:
Before: Ball floating at Z=10
After: Ball resting on terrain surface
CLEANUP (Part 5)
Purge (Remove Unused)
What it does: Remove all unused meshes and materials
When to use:
- Clean up project
- Reduce file size
- Improve performance
How to use:
Step 1: Press '
Step 2: Click "CLEANUP" > "Purge"
Result: Unused items removed
What gets removed:
- Meshes with 0 users
- Materials with 0 users
- Orphaned data
Merge Duplicate (Combine Materials)
What it does: Merge materials with same base name
When to use:
- Organize materials
- Reduce duplicates
- Clean material list
How to use:
Step 1: Press '
Step 2: Click "CLEANUP" > "Merge Dup"
Result:
Red
Red.001 → All become "Red"
Red.002
Merge Selected (Merge Object Materials)
What it does: Combine materials from selected objects
When to use:
- Use one material for multiple objects
- Simplify material setup
- Quick material unification
How to use:
Step 1: Select multiple objects
Step 2: Press '
Step 3: Click "CLEANUP" > "Merge Sel"
Result: First object's material applied to all
RENAME (Part 6)
What is RENAME?
Batch rename multiple objects at once with professional naming.
How to Use
Step by Step Example: Rename 5 trees
Before: Tree, Tree.001, Tree.002, Tree.003, Tree.004
Step 1: Select all 5 tree objects

Step 2: Open N-Panel (Press N)

Step 3: Find "RENAME" section at bottom

Step 4: Fill in settings:
        Prefix: "Pine"
        Start Number: 1
        Padding: 3

Step 5: Click "Rename" button

Result:
Pine001
Pine002
Pine003
Pine004
Pine005

Perfect professional naming!
RENAME Settings Explained
Prefix
- What comes at the beginning
- Example: "Wall" creates "Wall001", "Wall002"
- Can be anything: "Building", "Tree", "Chair"
Start Number
- What number to start from
- Default: 1
- Use 0 if you want "Wall000"
- Use 100 if continuing from previous batch
Padding
- How many zeros to add before number
- Padding 1: Wall1, Wall2
- Padding 2: Wall01, Wall02
- Padding 3: Wall001, Wall002
- Best practice: Use 3
Case Control
- Upper: All UPPERCASE
- Lower: all lowercase
- Keep: Keep original case
- Camel: Each Word Capitalized
Have questions about this product?
Login to message
| Blender Extension Compatible | Yes |
| Published | 5 months ago |
| Blender Version | 4.2 - 5.1 |
| Extension Type | Add-on |
| Render Engine Used | Cycles |
| License | GPL |
Discover more products like this
object alignment utilities modeling distribution batch operations productivity Allign tools professional snap alignment scene organization