Bake From Original
 Anvil Interactive Solutions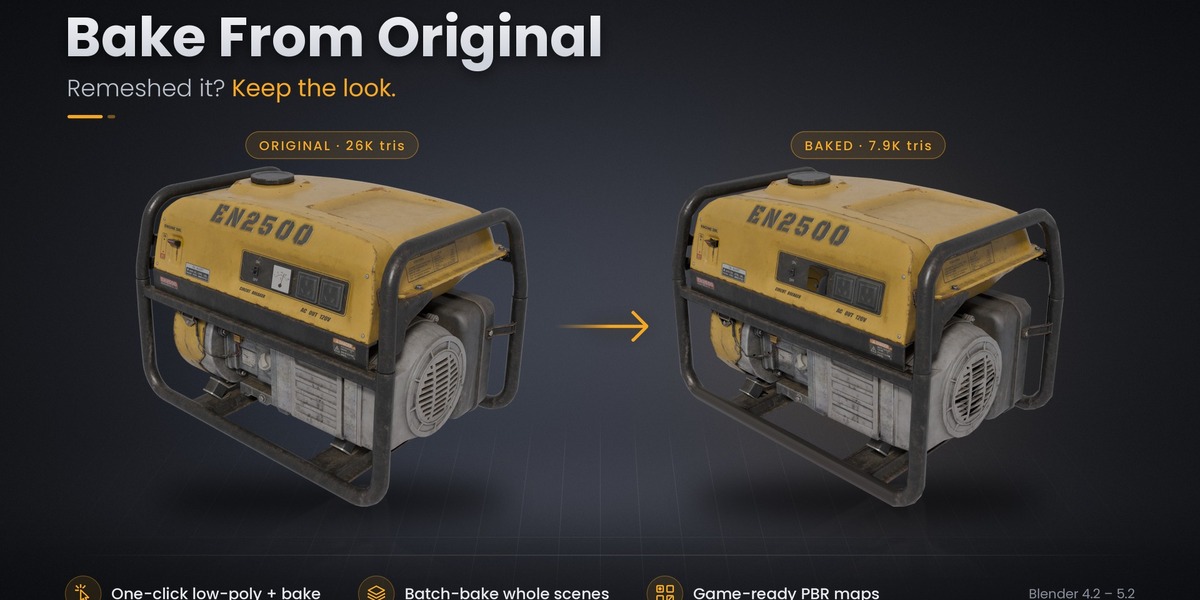
DOCUMENTATION & USER GUIDE
Bake From Original
Transfer the appearance of your detailed model onto a lightweight mesh.
Blender 4.2 LTS–5.2 • Cycles • Windows tested
Contents
- What the add-on does
- Installation and requirements
- Before your first bake
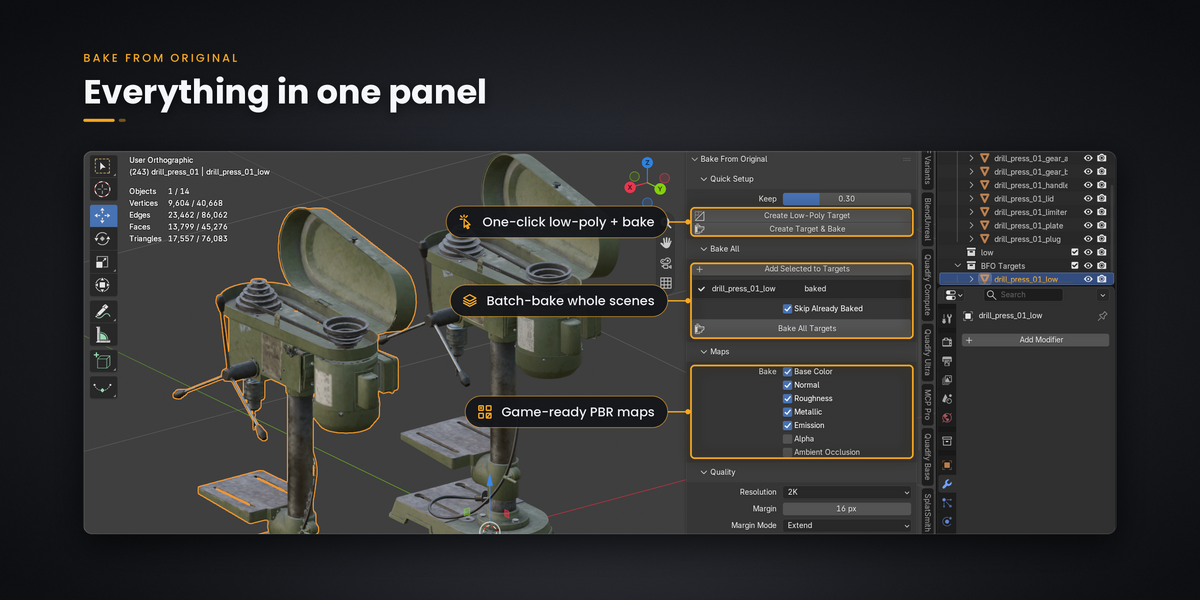
- Create Target & Bake
- Bake your own low-poly
- Batch baking with Bake All
- UV layouts and texture detail
- Texture maps and formats
- Resolution and projection settings
- Materials and saved textures
- Inspecting the result
- Re-baking and cancellation
- Practical workflows
- Troubleshooting
- Known limitations
- Frequently asked questions
- Reporting an issue
- Glossary
- Package and licensing
1. What the add-on does
Bake From Original transfers the appearance of a detailed source model onto a lighter target mesh. It generates the selected texture maps, saves them next to your .blend file and creates a new Principled BSDF material with the maps connected.
You can create a reduced target automatically, supply an existing low-poly mesh, or process multiple targets through the BFO Targets collection.
| Your starting point | Workflow |
|---|---|
| A detailed model without a low-poly target | Create Target & Bake |
| An original and a prepared low-poly target | Bake |
| Several targets with corresponding originals | Bake All |
Normal maps represent surface shading detail. They do not restore a missing silhouette, rebuild thin parts or generate animation-ready topology. Quick Setup uses Decimate; it is not a quad-remeshing tool.
2. Installation and requirements
- Blender: 4.2 LTS to 5.2.
- Bake engine: Cycles, included with Blender.
- Operating system: Windows tested. macOS and Linux are expected to work but have not yet been tested.
- Package: Blender Extension .zip.
- Connectivity: no internet connection or external dependencies required for operation.
Install the extension
- Download the Bake From Original extension ZIP from your purchase. Do not extract the extension archive.
- Open Edit → Preferences in Blender and go to Get Extensions.
- Open the menu in the upper-right area and choose Install from Disk.
- Select the extension ZIP and complete installation.
- Confirm Bake From Original is enabled in Preferences.
- Open the Bake From Original panel and locate Quick Setup, the bake controls and map options.
Blender also supports installing an extension by dragging its ZIP into the application. Menu placement can vary slightly between Blender versions.
Reference: Blender’s official extension installation notes.
If the panel is missing
- Confirm you installed the extension ZIP, rather than a parent archive containing documentation and other files.
- Search for Bake From Original in Preferences and confirm it is enabled.
- Read any installation error before retrying. Keep the full message if you need support.
3. Before your first bake
-
Save the .blend file.
Choose a writable project folder. Generated textures are saved next to the .blend file, so establish that location before baking. -
Check the original’s appearance.
Confirm its materials and required image files are available and display correctly. Baking cannot recover missing source textures. -
Choose a workflow.
Use Create Target & Bake for automatic reduction, or prepare your own low-poly for Bake or Bake All. -
Inspect the target shape.
Keep enough geometry for the silhouette, openings and thin components you need to preserve. -
Start with a test bake.
Use a modest resolution to check matching, UVs and projection before committing to a large texture set.
For your first test, use one uncomplicated asset. Once the result is correct, move to a more complex model or a batch.
4. Create Target & Bake
This is the shortest workflow when you have a textured original and want the add-on to create the reduced target.
- Select the original model. For a multi-part asset, you can select its root / parent.
- Open Quick Setup in the Bake From Original panel.
- Choose the target triangle count. Start conservatively if the source contains thin metal, narrow openings or small parts.
- Choose the texture resolution and enable the maps you need.
- Click Create Target & Bake.
- Wait for the operation to finish, then inspect the resulting low-poly and material.
- Use the comparison control, check the saved textures and save your .blend file.
What happens automatically
- The source is copied in place, leaving the original available.
- The copied parts are joined and reduced using Decimate.
- A suitable existing UV layout is retained, or new UVs are generated when needed.
- The selected maps are baked and saved.
- A new material is created with the baked maps connected.
Inspect the silhouette, small openings and thin parts. If reduction damages these areas, increase the retained geometry before adjusting the texture settings.
5. Bake your own low-poly
Use this workflow after Quadify, QuadriFlow, Instant Meshes, voxel remeshing or manual retopology.
- Keep the original model and its materials in the project.
- Prepare the low-poly target and its UV layout.
- Check that the target represents the same asset and is aligned appropriately with the source for a direct bake.
- Select the original first, then select the low-poly last, making the target the active object.
- Choose resolution, maps and projection options.
- Click Bake.
- Inspect the result before exporting or replacing a previous deliverable.
Your target UVs are used as they are and are not changed unless you request it. If the target has no usable UV layout, prepare one before baking.
The original supplies the appearance. The active low-poly receives it. If the wrong object receives the result, reselect the objects in the documented order.
For targets placed beside their originals, use the documented internal-alignment workflow in Bake All. Do not assume an arbitrary offset pair will project correctly in every direct-bake setup.
6. Batch baking with Bake All
Bake All processes targets in the collection named BFO Targets. Each target needs a corresponding original.
- Prepare your low-poly meshes and keep the original models available.
- Place the target meshes in BFO Targets. Keep source objects out of the target queue.
- Review the source / target matches shown in the panel.
- Resolve missing or incorrect matches before starting.
- Choose the bake settings and enabled maps.
- Click Bake All.
- Review the reported outcome and inspect each target’s material and textures.
Matching originals to targets
- Name: recognises patterns such as Car_low, Car_remesh and Car.001.
- Position: spatial relationships provide another matching cue.
- Size: dimensions help associate targets with their originals.
Use distinctive names when several objects have similar dimensions or positions. Always review the displayed match before starting the batch.
Side-by-side comparisons
The batch workflow aligns the temporary bake copies internally. Your low-poly objects can stay beside the originals in the working scene without being moved.
Interrupted batches
Review individual target outcomes after cancellation or failure. Do not assume that cancelling a batch reverses targets that completed earlier.
7. UV layouts and texture detail
A bake stores information in image pixels addressed by the target’s UV layout. The geometry can be lightweight while image textures carry colour and shading detail.
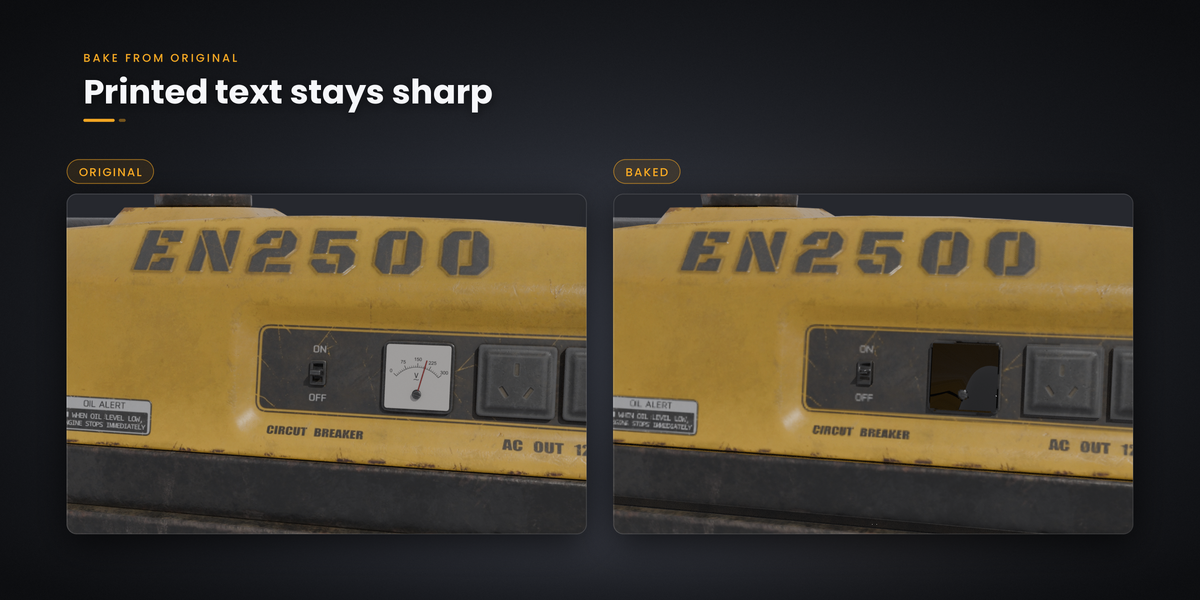
- Existing suitable UVs: preserving the layout helps retain texture placement, especially for printed labels and decals.
- New UVs: automatic unwrapping provides a layout when Quick Setup needs one, but texture-space distribution may differ from the original.
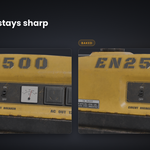
- Small details: fine lettering requires enough pixels. Increasing resolution helps only when the relevant UV islands receive sufficient texture space.
- Overlapping islands: different surfaces sharing the same texture area may compete for the same pixels. Only retain intentional overlaps when those surfaces can share the baked information.
A sharp source cannot compensate for an undersized output texture. Check labels and fine details at the scale at which the asset will actually be seen.
8. Texture maps and formats
Each map can be enabled or disabled. Bake only the channels required by the asset and its destination material.
Base Color
Transfers the original surface colour. The metallic-safe workflow avoids relying on a standard diffuse-colour bake that can return black on metal. Inspect labels, painted areas and exposed-metal colour.
Normal
Transfers surface shading detail onto the target. Check dents, seams and relief under consistent lighting. Normal maps do not restore missing geometry or alter the target silhouette.
Roughness
Transfers variation in reflection sharpness. Check that polished areas, worn patches and matte surfaces retain their intended response.
Metallic
Transfers the material information identifying metallic and non-metallic surfaces. Inspect boundaries between paint, exposed metal, rubber and other materials.
Emission
Includes emissive surface information. The appearance of emission in another application also depends on that application’s material and rendering settings.
Alpha
Includes transparency information. The receiving material must also be configured to use alpha appropriately.
Ambient Occlusion
Generates an AO texture for workflows that need it. Inspect recesses and narrow gaps for unwanted dark areas.
OpenGL and DirectX normals
Select the normal convention expected by your destination material or importer. The conventions differ in the normal map’s green-channel direction. A mismatch can make dents appear raised or produce incorrect lighting.
Use the appropriate convention and import configuration for your project. Avoid flipping channels in multiple places.
Packed ORM texture
Optional ORM packing stores three maps in one image:
- Red: Ambient Occlusion.
- Green: Roughness.
- Blue: Metallic.
Enable ORM when the destination shader expects this arrangement. Treat it as material data rather than display colour, and confirm the receiving application reads the channels correctly.
9. Resolution and projection settings
Texture resolution: 512 to 8K
Choose resolution according to the asset’s screen coverage, texture budget and smallest important details.
| Starting resolution | Suggested trial use |
|---|---|
| 512–1K | Quick checks, small props and tight texture budgets. |
| 2K | An initial test for a medium-detail prop. |
| 4K | Close-up assets or labels requiring more pixels. |
| 8K | Large or detail-sensitive assets when memory and delivery budgets allow. |
These are starting suggestions, not built-in presets or guarantees of quality.
Doubling both image dimensions produces four times as many pixels per map. Large resolutions across several maps and batch targets can substantially increase memory use and output size.
Bake margin
Margin adds padding around baked UV islands to reduce visible seams during texture filtering. Too little padding can expose seams. Closely packed islands also limit the space available between surfaces.
Inspect the result at the distances and texture sizes used in the final application.
Automatic ray distance
Projection must reach from the target to the corresponding source surface. If the reach is insufficient, detail may be missed. If it is excessive, neighbouring parts may contribute incorrect information.
Start with automatic ray distance and adjust projection settings to address a specific observed problem.
Optional auto cage
A cage controls the projection region around the target. Try the auto-cage option when the default projection misses surfaces, then inspect thin parts and closely spaced components.
A cage cannot repair collapsed geometry or restore a missing silhouette.
GPU or CPU
Use a Cycles device supported by your Blender installation. If a GPU bake reports a memory or device error, test a lower resolution or fewer maps, then try CPU if necessary.
Available acceleration depends on Blender, device configuration and hardware.
10. Materials and saved textures
A successful bake produces a target with a new PBR material and generated image textures saved next to the .blend file. Optional ORM packing adds the packed texture when selected.
- Save the project before starting so the output location is established.
- Confirm the destination folder is writable.
- Keep generated textures with the .blend when moving or archiving the asset.
- Save the .blend after baking to preserve the material and source association.
- Inspect the generated material in Blender before troubleshooting an external engine import.
Material creation
The add-on creates a Principled BSDF material, connects the generated maps and assigns the appropriate colour spaces. External engine material setup is still part of your export workflow.
Replacing a previous bake
Existing output textures are replaced only once the bake succeeds. Keep a separate copy of approved outputs if you need version history; a successful re-bake is intended to update the result.
11. Inspecting the result
- Use the comparison control to switch between the original and target under the same viewport lighting.
- Check the silhouette first. Baking cannot fix missing geometry.
- Inspect labels, seams, recesses, narrow gaps and thin sheet metal.
- Check roughness and metallic response, not only the colour map.
- Look for blank areas, dark triangles, visible UV seams or details projected from neighbouring parts.
- Confirm the texture files exist and are connected to the material.
- Test the asset in its destination engine or viewer before treating it as final.
Reference results
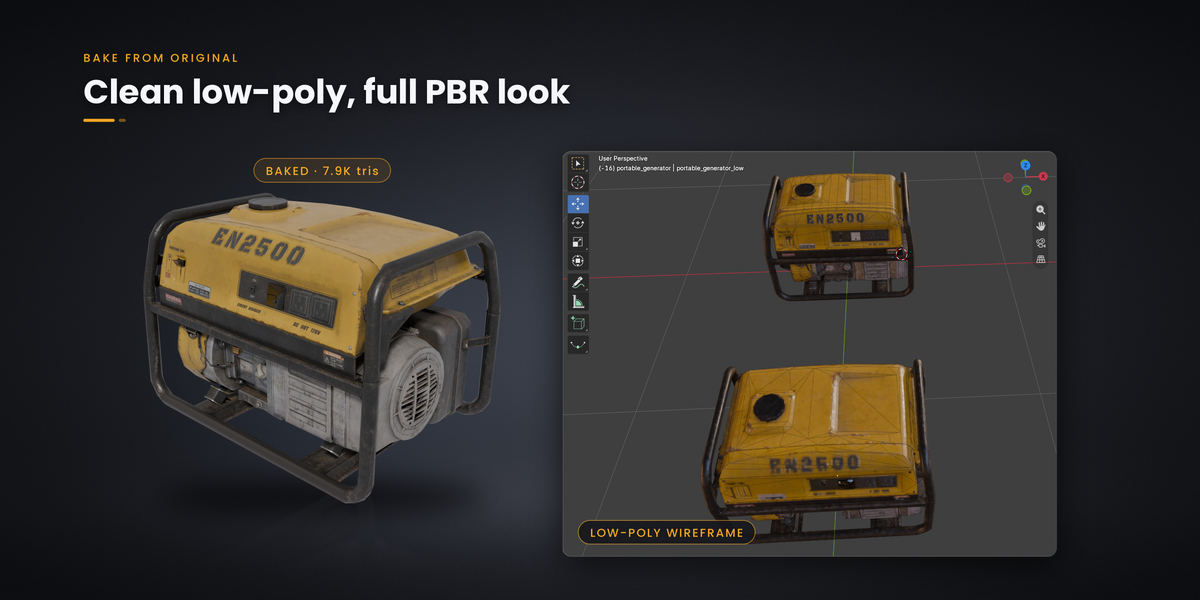
- Portable generator: 26,419 → 7,922 triangles, approximately 70% reduction.
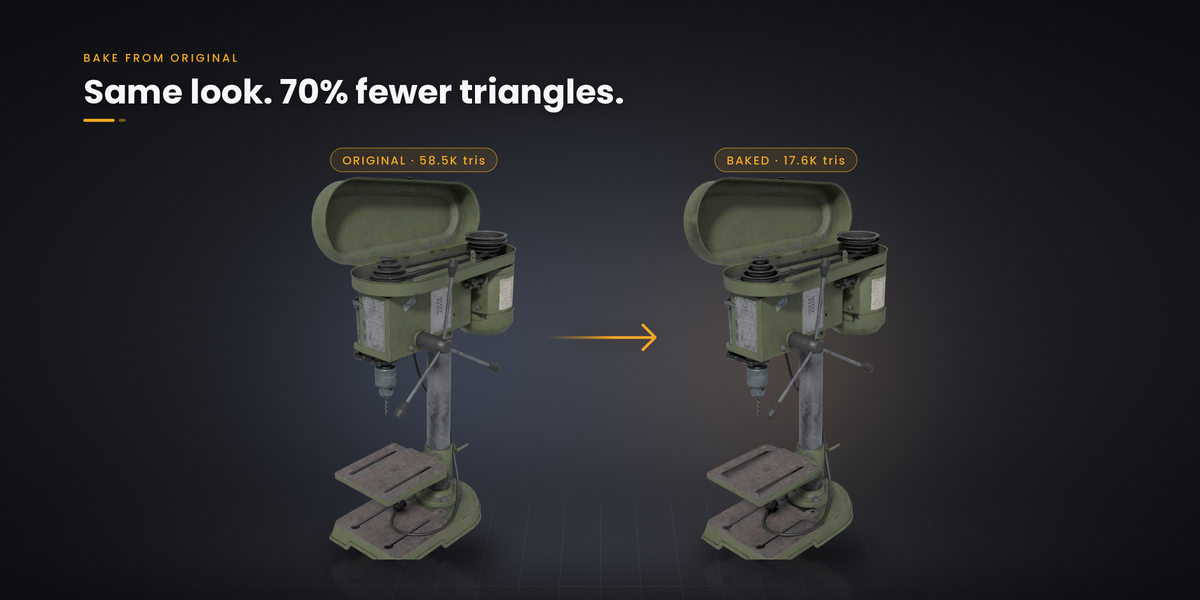
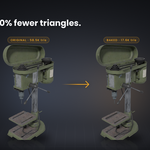
- Drill press: 58,526 → 17,557 triangles, with 13 source parts consolidated into one mesh and one texture set.
These are results from specific assets. The same reduction ratio may not be suitable for every model.
12. Re-baking and cancellation
Re-bake an existing target
- Keep the source model, materials and required textures available.
- Select the low-poly target. The add-on remembers its source association.
- Adjust the bake settings.
- Run the bake and inspect the updated result.
- Save the project after completion.
If the source cannot be resolved, check that it has not been removed or replaced. Re-establish the pair through direct selection or review the batch match before baking again.
Cancel a bake
Press Esc to request cancellation. Allow Blender to finish handling the cancellation before starting another operation.
Cancelled or failed bakes are designed to leave the existing result intact. Existing output textures are only replaced after the bake succeeds.
Scene preservation
The workflow uses temporary copies in a hidden scene. Original objects and materials remain unchanged, while render settings, selection and mode are restored after the operation.
Save the project before long runs so you also have a recovery point if Blender or the operating system closes unexpectedly.
13. Practical workflows
A textured industrial prop
Use Create Target & Bake with a conservative reduction. Preserve suitable UVs and inspect lettering and sheet-metal edges. If thin areas show dark triangles, increase the triangle count before increasing texture resolution.
A target from Quadify or another remesher
Keep the textured original, prepare the target’s UVs, select the source and then the target, and use Bake. Inspect both the silhouette and normal-map response.
A multi-part imported asset
Confirm the imported source materials display correctly. Select the root / parent in Quick Setup to create a joined, reduced target. Inspect small components and how texture space is distributed across the combined model.
A kit of props
Test one representative pair first. Add prepared targets to BFO Targets, check every source match and run Bake All. Use distinctive names for similarly sized props, then inspect individual results.
Several LOD targets
Create the required targets using your chosen reduction workflow. Give each usable UVs, confirm its source and bake it. Automatic LOD generation and engine LOD assignment are separate from appearance transfer.
14. Troubleshooting
No source match is found
Check that the original still exists and that the low-poly is in the correct target collection. Use clear source / target names, then review the displayed match before starting.
The wrong source is matched
Look for similar names, sizes or positions. Make the pair less ambiguous, or use the direct selection workflow for a single source and target.
The wrong object receives the bake
Check selection order. Select the original first and the low-poly last so the target is the active object.
A map is blank or mostly black
Check the original’s appearance, required source images, target UVs, selected maps and projection alignment. Read the reported error, fix that issue first and retry with one target at a modest resolution.
Thin metal has dark triangles
Inspect whether reduction collapsed or distorted thin surfaces. Increase retained geometry. Keeping around 30% of the source triangle count is a starting recommendation, not a guarantee for every asset.
Labels are blurry
Check texture resolution and the UV area assigned to the label. Preserve a suitable source layout or improve target UV allocation, then increase resolution if needed.
UV seams are visible
Check bake margin, island spacing and material settings. Adjust padding and inspect the asset under consistent lighting and at the intended viewing distance.
A nearby part appears in the wrong place
Projection may be reaching a neighbouring source surface. Review ray distance, cage settings and the target’s shape, especially around tight gaps.
Normal detail looks inverted
Check the normal convention and destination import settings. Use the expected OpenGL or DirectX format and avoid inverting the green channel twice.
Alpha looks opaque after export
Confirm Alpha was baked, inspect the resulting texture and configure the receiving material’s transparency settings.
Glass blocks detail behind it
This is a first-hit projection limitation. Increasing texture resolution will not reveal a surface hidden behind the glass.
The GPU reports a memory or device error
Reduce resolution or enabled maps and test one asset. Check your Cycles device configuration. Try CPU if the GPU remains unsuitable for the workload.
Images cannot be saved
Save the .blend in a writable folder and check directory permissions. Retry once the output destination is available.
The asset looks correct in Blender but wrong in an engine
Check texture colour spaces, normal convention, packed ORM channels and material wiring in the receiving application. Validate the import separately from the Blender material.
Reduce the scene to one source and one target, record the error, confirm UVs and source materials, then run a small test bake. Changing several unrelated settings makes the cause harder to identify.
15. Known limitations
- The original source is required. Missing texture information cannot be reconstructed from nothing.
- Projection records the first surface it hits. Transparent coverings can block the detail behind them.
- Reduction can damage thin parts. Texture baking cannot repair collapsed surfaces or missing silhouettes.
- Quick Setup uses Decimate. It does not generate quad retopology.
- UV layout and resolution limit texture detail. Automatic setup does not remove those constraints.
- macOS and Linux have not yet been tested. Expected compatibility is not the same as completed validation.
- Do not assume byte-identical output across all devices and Blender versions. Keep the bake environment consistent when comparing repeated outputs.
16. Frequently asked questions
Do I need to bake every map?
No. Enable only the channels required by your asset and destination material.
Does it work offline?
Yes. No internet access or external dependencies are required for operation.
Will it modify my original?
The bake workflow uses temporary copies and leaves original objects and materials unchanged.
Does it replace Quadify?
No. Use Quadify or another remesher for the topology you want. Bake From Original transfers the source appearance afterward. Its built-in quick reduction uses Decimate.
Does Bake All combine the entire scene into one atlas?
Bake All processes matched targets. The documented one-mesh / one-texture-set consolidation belongs to the joined-target workflow, not a scene-wide atlas operation.
Can I delete the source after baking?
The baked images are the result, but the source is needed for future re-bakes. Keep an archived original if you may revise the asset.
Does it create materials inside my game engine?
It creates a Blender Principled BSDF material and texture outputs. Normal formats and ORM packing support engine workflows, but you still configure the material in the receiving engine.
17. Reporting an issue
Include the following information so the problem can be reproduced:
- Blender version and installed Bake From Original version.
- Operating system and whether the bake used CPU or GPU.
- Workflow used: Create Target & Bake, Bake or Bake All.
- The exact error message.
- A screenshot of the relevant settings.
- Enabled maps, resolution and projection options.
- Source / target names, triangle counts and UV situation.
- Any deliberate position offset between the objects.
- What you expected and what happened instead.
- A minimal example .blend with required textures, if you can share it.
Use the seller contact or support route on your purchase page. Remove unrelated or confidential assets before sharing a project.
18. Glossary
- Source / original: the detailed model supplying the appearance.
- Target / low-poly: the mesh receiving the baked material.
- Bake: recording source material or shading information into image textures for the target.
- UV layout: the mapping between mesh surfaces and image coordinates.
- Cage: a projection envelope around the target.
- Margin: padding around baked UV islands.
- PBR: physically based rendering, using material channels such as colour, roughness and metallic to describe surface response.
- ORM: a packed texture containing AO in red, roughness in green and metallic in blue.
- LOD: a level-of-detail mesh prepared for a different geometry budget or viewing distance.
19. Package and licensing
- Bake From Original Blender Extension ZIP.
- README with quick-start instructions and troubleshooting.
- GPL-3.0-or-later licence.
- Free updates for this version line.
Bake From Original
Remeshed it? Keep the look.
Have questions about this product?
Login to message
| Blender Extension Compatible | Yes |
| Published | 2 days ago |
| Blender Version | 4.2 - 5.2 |
| Extension Type | Add-on |
| License | GPL |
Discover more products like this
optimization gltf game ready PBR retopology bake LOD decimate texture-baking quadify low poly remesh