Realistic Female Arms | Customizable Edition
 Antonio Solano
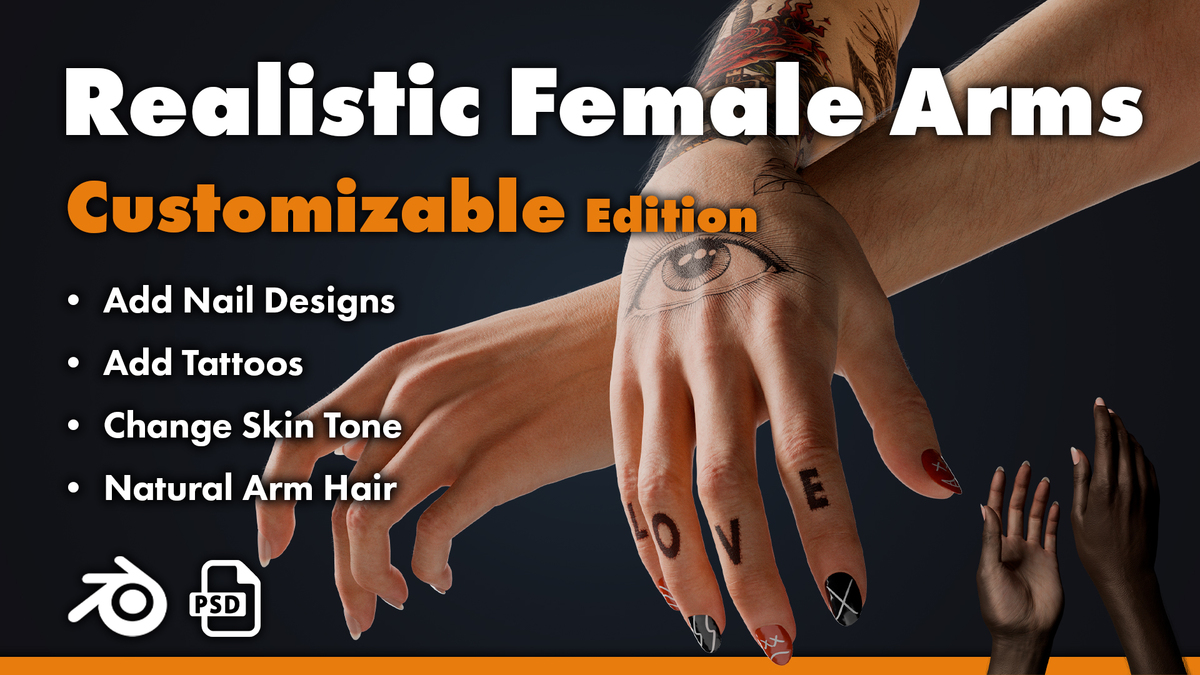
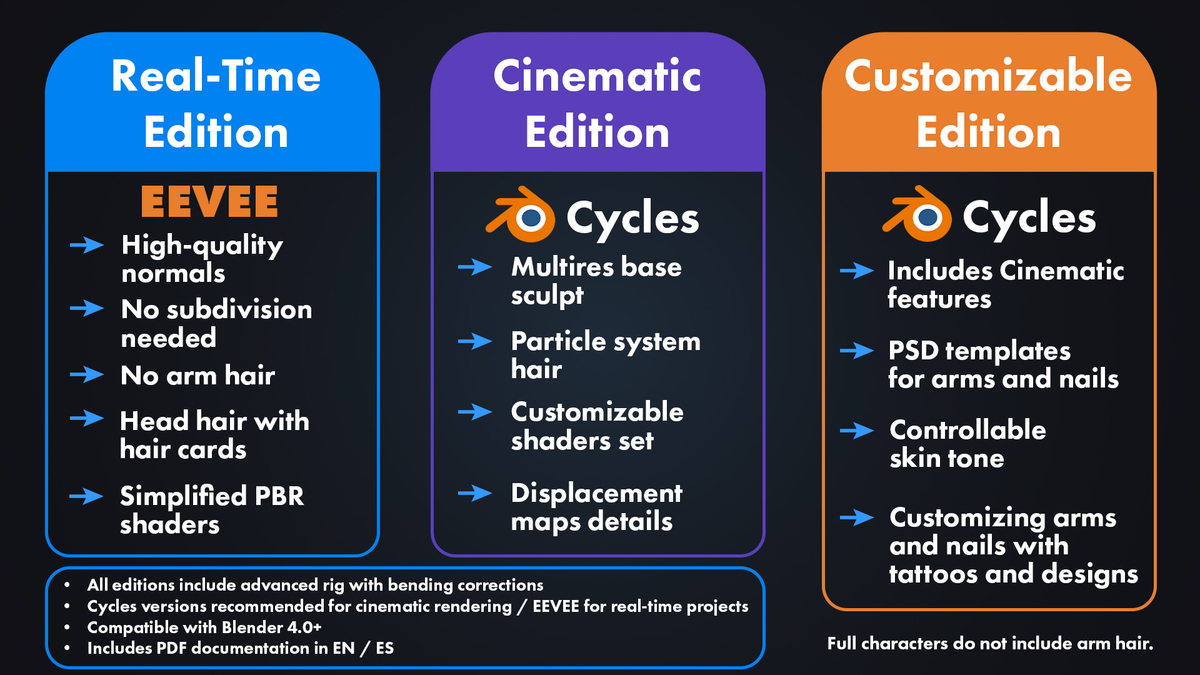

🎨 Arm Customization
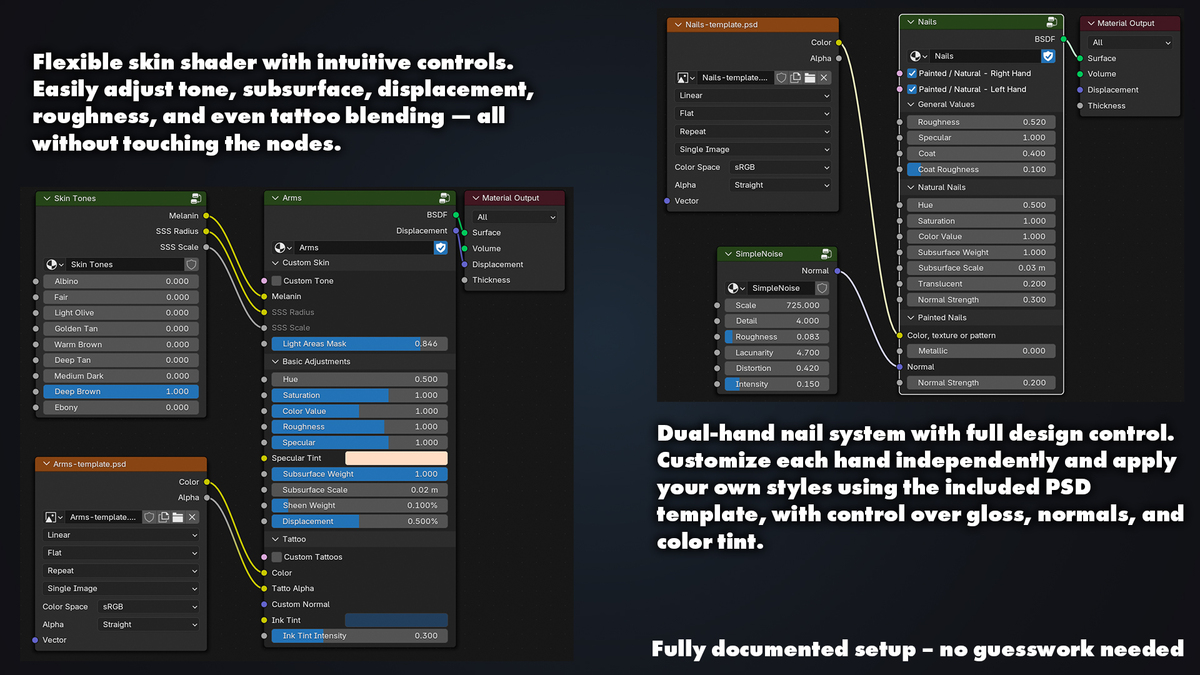
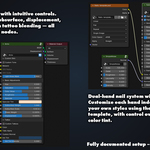
This model includes a material designed for visual customization directly from Blender’s Shader Editor. You can add your own tattoos or personalized graphics easily using the included template.
This model includes a material designed for visual customization directly from Blender’s Shader Editor. You can add your own tattoos or personalized graphics easily using the included template.
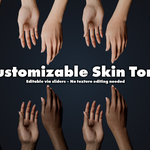
🧬 Custom Skin Tone
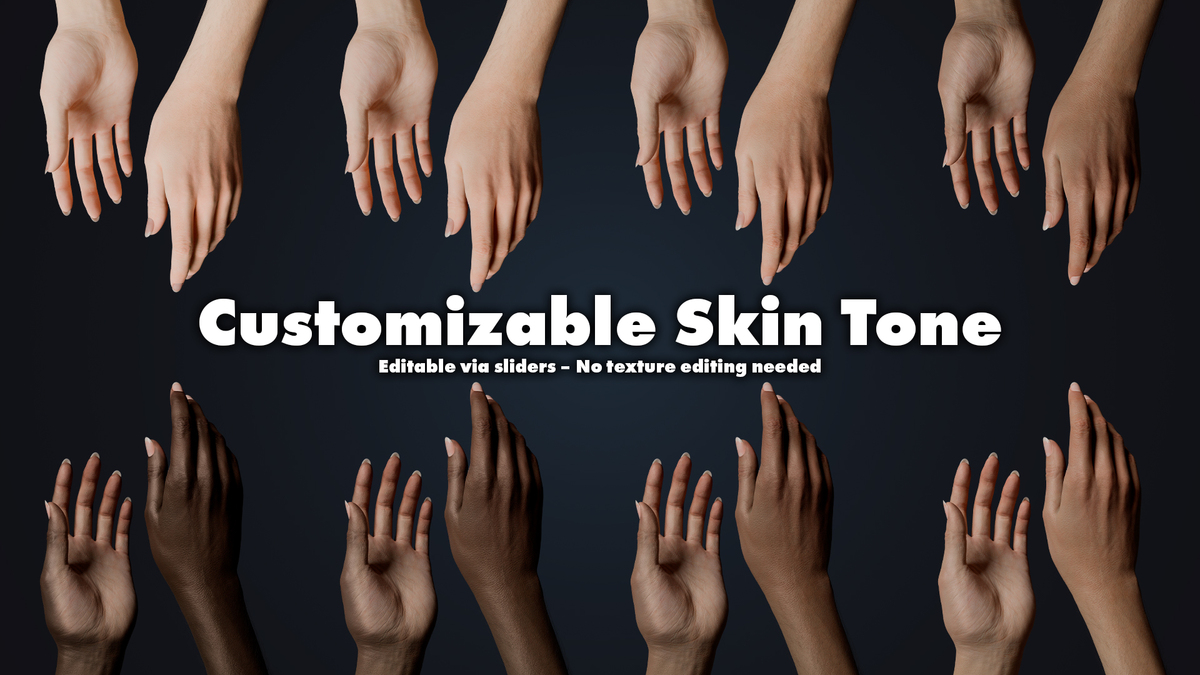
In the Custom Skin section, you can easily change the skin tone or ethnicity.
How to use it:
Check the Custom Tone box to enable tone customization.
Choose a skin tone from the Skin Tones node (already connected):
Options like Albino, Fair, Olive, Golden Tan, Warm Brown, Deep Tan, Ebony, etc.
-
Adjust the SSS (Subsurface Scattering) values if needed.
-
Use the Light Areas Mask slider to control the intensity of light areas on darker skins (such as palms or knuckles).
In the Custom Skin section, you can easily change the skin tone or ethnicity.
How to use it:
Check the Custom Tone box to enable tone customization.
Choose a skin tone from the Skin Tones node (already connected):
Options like Albino, Fair, Olive, Golden Tan, Warm Brown, Deep Tan, Ebony, etc.
-
Adjust the SSS (Subsurface Scattering) values if needed.
- Use the Light Areas Mask slider to control the intensity of light areas on darker skins (such as palms or knuckles).


🎛 Basic Adjustments
General visual controls grouped under the Basic Adjustments category in the shader:
Hue – changes the hue of the skin tone.
Saturation – increases or reduces the color saturation.
Color Value – adjusts overall brightness.
Roughness – controls the surface roughness.
Specular – controls specular brightness.
Specular Tint – allows you to tint the specular reflection.
Subsurface Weight / Sheen Weight / Displacement – parameters to improve skin realism.

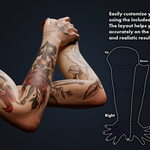
🖌️ Tattoo Section
All controls related to tattoos are grouped under the Tattoo category of the shader.
All controls related to tattoos are grouped under the Tattoo category of the shader.
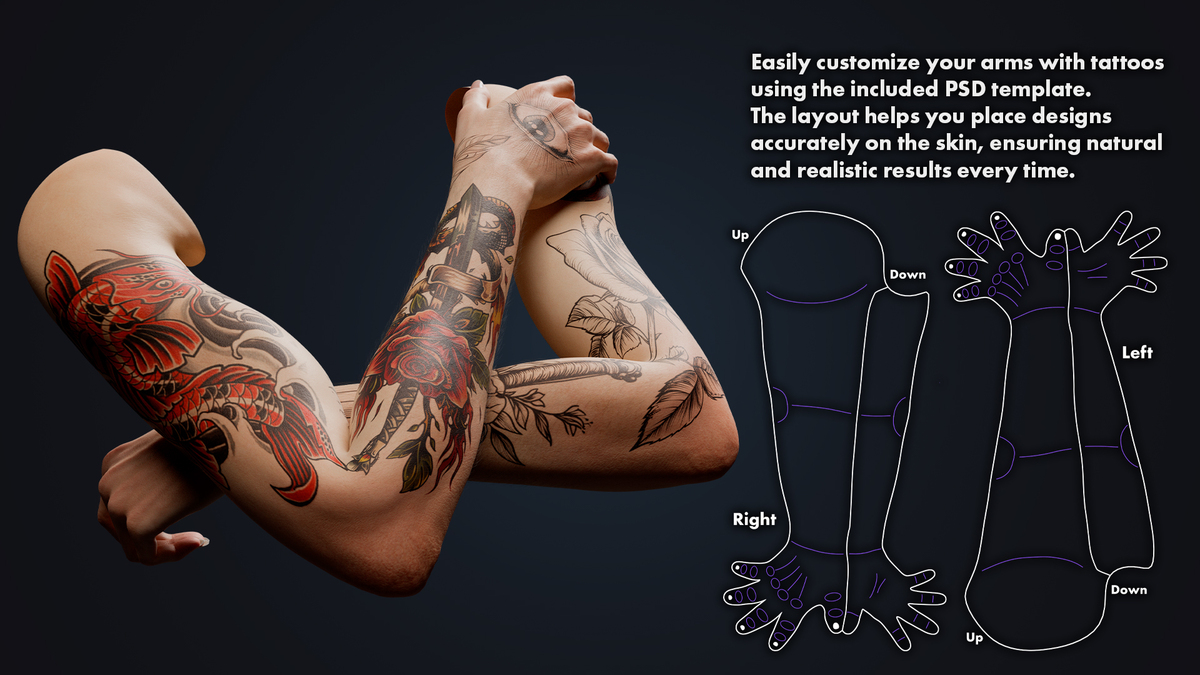
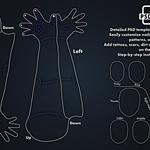
📁 Where is the template?
Inside the model’s textures folder, you will find the file:
Arms-template.psd
Inside it, you will find a guide layer to correctly position your designs.
The Left and Right arms are labeled separately.
Visual references (guidelines for the forearm, knuckles, etc.) are included to help with precise placement.
Inside the model’s textures folder, you will find the file:
Arms-template.psd
Inside it, you will find a guide layer to correctly position your designs.

The Left and Right arms are labeled separately.
Visual references (guidelines for the forearm, knuckles, etc.) are included to help with precise placement.
🛠 How to Add Tattoos
Step by step:
Open the file Arms-template.psd from the “textures” folder using Photoshop or any compatible software.
Add your designs (tattoos, symbols, etc.) on a separate layer.
Disable the guide layer before saving, so it doesn't appear on the model.
Save the .PSD file normally (File > Save or Ctrl+S).
Open the file Arms-template.psd from the “textures” folder using Photoshop or any compatible software.
Add your designs (tattoos, symbols, etc.) on a separate layer.
Disable the guide layer before saving, so it doesn't appear on the model.
Save the .PSD file normally (File > Save or Ctrl+S).


In Blender:
Open the Shader Editor of the arm.
Enable Custom Tattoos checkbox.
Switch to Material Preview or Rendered View mode to see the result in real time.
(Optional) If you use a normal map or bump map, connect it to Tattoo Normal using a Normal Map or Bump node in between.
Ink Tint Option:
You can select an aged ink color using the Ink Tint picker (greenish or bluish tones typical of old tattoos).
Control its visibility with the Ink Tint Intensuty slider.
Open the Shader Editor of the arm.
Enable Custom Tattoos checkbox.
Switch to Material Preview or Rendered View mode to see the result in real time.

(Optional) If you use a normal map or bump map, connect it to Tattoo Normal using a Normal Map or Bump node in between.
Ink Tint Option:
You can select an aged ink color using the Ink Tint picker (greenish or bluish tones typical of old tattoos).
Control its visibility with the Ink Tint Intensuty slider.

⚠️ Recommendations
The node group is configured to preserve the arm’s realism. If you choose to adjust parameters like brightness, roughness, or subsurface, do so with caution.
🧠 The entire system is designed to make visual customization easy without risking damage to the original material.
The node group is configured to preserve the arm’s realism. If you choose to adjust parameters like brightness, roughness, or subsurface, do so with caution.
🧠 The entire system is designed to make visual customization easy without risking damage to the original material.
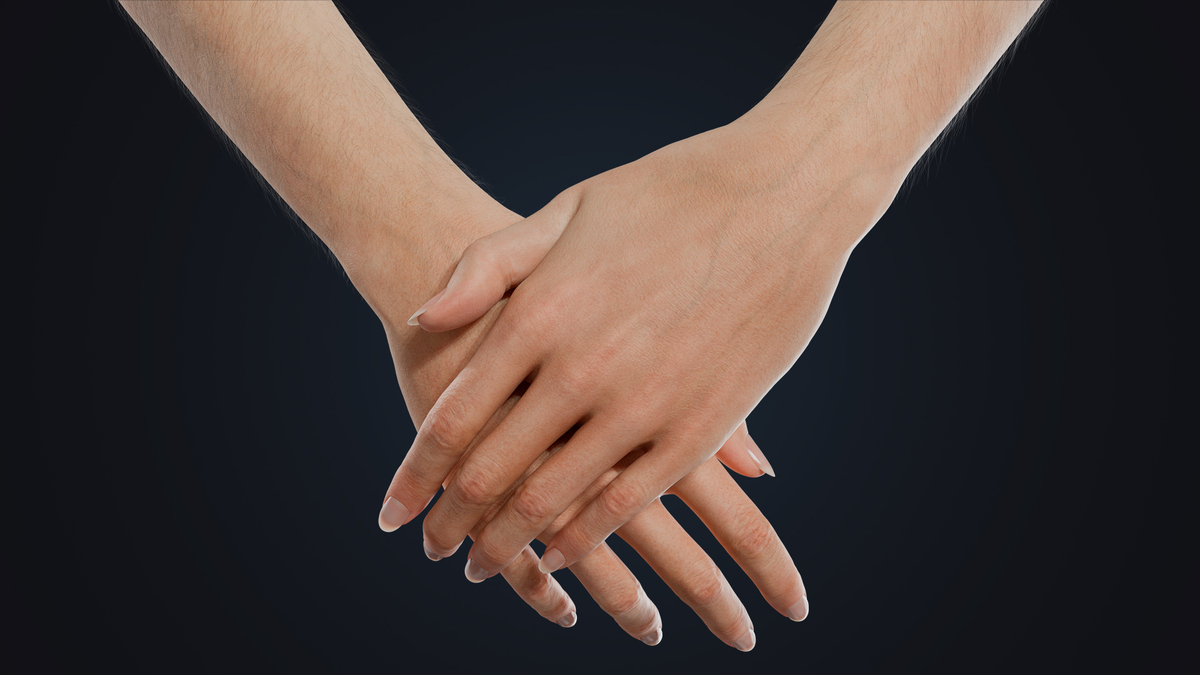
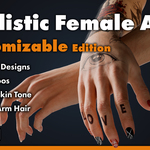
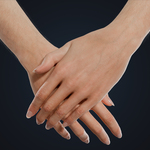
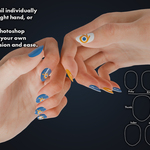
💅 Nail Customization
This model includes an advanced system to visually customize each hand’s nails, directly from the shader. Everything is organized into a node group with separate categories and independent options for each hand.
This model includes an advanced system to visually customize each hand’s nails, directly from the shader. Everything is organized into a node group with separate categories and independent options for each hand.
🧭 What can you do?
Change the general nail color.
Customize each nail with individual designs using a PSD template.
Add a painted relief effect.
Adjust physical properties like roughness, specular or translucency.
Change the general nail color.
Customize each nail with individual designs using a PSD template.
Add a painted relief effect.
Adjust physical properties like roughness, specular or translucency.
🧰 Nail Shader Structure
The material is divided into control categories inside a node group. Here’s a breakdown of each part:

✅ Enable Customization
Before applying any custom change, you must activate the initial checkboxes in the node group:
Painted / Natural - Right Hand
Painted / Natural - Left Hand
⚠️ If these aren’t activated, the customization settings will have no effect.
You can enable one hand and leave the other in natural mode if you only want to customize one.
⚙️ Shader Categories
1. General Values
These settings affect all nails, whether customized or not:
Roughness
Specular
Coat
Coat Roughness
These settings affect all nails, whether customized or not:
Roughness
Specular
Coat
Coat Roughness
2. Natural Nails
Controls for natural nails (without paint):
Hue
Saturation
Color Value (brightness/darkness)
Subsurface Weight
Subsurface Scale
Translucency
Normal Strength
💡 Just like with the arms, it’s recommended to use these adjustments carefully to maintain realism and harmony with the skin tone.
Controls for natural nails (without paint):
Hue
Saturation
Color Value (brightness/darkness)
Subsurface Weight
Subsurface Scale
Translucency
Normal Strength
💡 Just like with the arms, it’s recommended to use these adjustments carefully to maintain realism and harmony with the skin tone.
3. Painted Nails
Options available only when customization is enabled:
Base color selector (or image input for the PSD template)
Metallic slider for a metallic finish
Normal map input (you can connect the SimpleNoise relief node here)
Normal Strength slider to control the depth of the detail
You can use a flat color or a custom image to design each nail independently.
🖌 Paint Relief Node
This node uses a simple noise pattern to simulate paint relief
Connect it to the Normal input of the main group and adjust its sliders as desired.
🖼 Nail Template
This node uses a simple noise pattern to simulate paint relief
Connect it to the Normal input of the main group and adjust its sliders as desired.

🖼 Nail Template
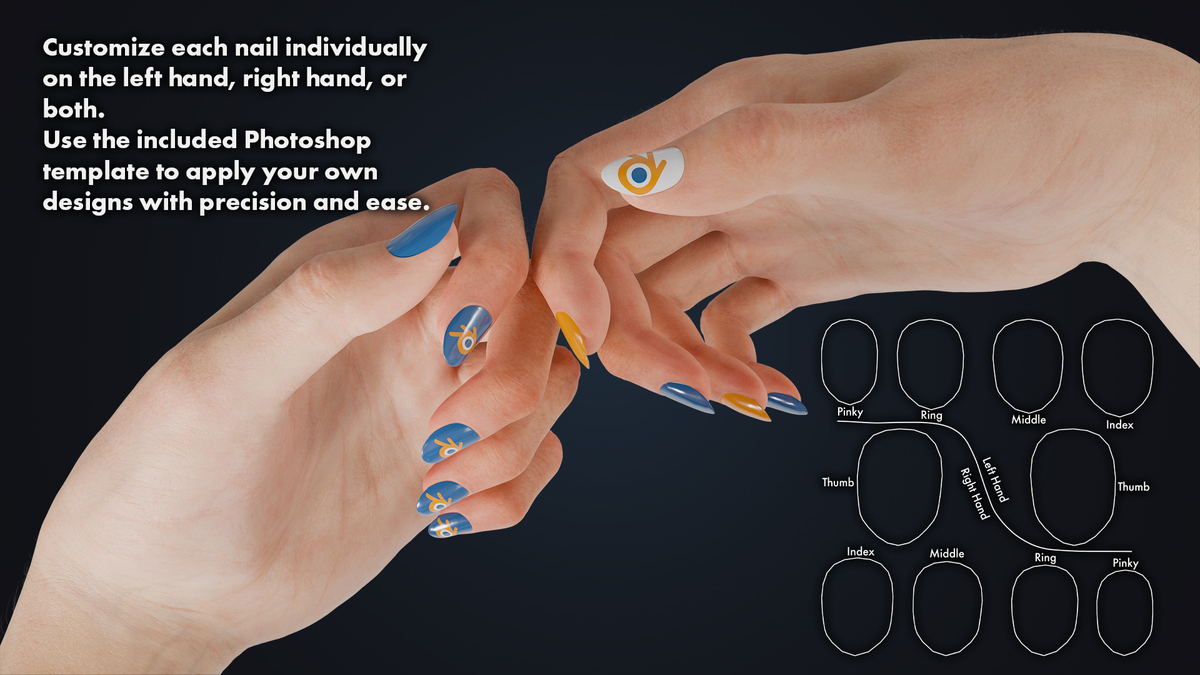
Inside the textures folder you’ll find the template:
Nails-template.psd
It contains the exact coordinates for each nail on both hands.
Inside the textures folder you’ll find the template:
Nails-template.psd
It contains the exact coordinates for each nail on both hands.

How to use it:
Open the file in Photoshop or another compatible editor.
Add your designs or colors on a separate layer.
Save directly (File > Save or Ctrl+S).
Blender will automatically update the texture if it’s connected to the shader.
✅ Just like with the tattoos, do not edit the internal nodes. Only work with the template and connect it properly.
Open the file in Photoshop or another compatible editor.
Add your designs or colors on a separate layer.
Save directly (File > Save or Ctrl+S).
Blender will automatically update the texture if it’s connected to the shader.


✅ Just like with the tattoos, do not edit the internal nodes. Only work with the template and connect it properly.
🔄 Not seeing the changes?
Blender doesn’t automatically update textures when editing an external image like a PSD template.
To see the changes reflected on the model:
Save the PSD file (Ctrl + S).
In Blender, temporarily switch to Solid View.
Then return to Material Preview or Rendered View.
This will force the shader to update the texture.
🔁 This step is necessary for both the nail and tattoo templates.
🔗 If the textures aren’t showing correctly…
Make sure the texture files are properly linked.
Check the textures folder and refer to the basic Blender documentation:
Extract the textures folder into the same directory as the .blend file.
Blender uses relative paths, so if the folder is located elsewhere, it won’t find the files.
You can easily relink textures from:
File > External Data > Find Missing Files.
👤 Author
A. Solano
A. Solano
📬 Contact
For support, questions or model-related inquiries, please use the messaging system of the marketplace where you made your purchase.
You can also write directly to:
📧 [email protected]
For support, questions or model-related inquiries, please use the messaging system of the marketplace where you made your purchase.
You can also write directly to:
📧 [email protected]
🛒 Official Stores
Here you can find more models and extended licenses:
ArtStation: https://www.artstation.com/a/43870984
SUPERHIVE: https://superhivemarket.com/creators/thecatempire
Turbosquid: https://www.turbosquid.com/Search/Artists/Antonio-Solano
Gumroad: https://thecatempire.gumroad.com/
RenderHub: https://www.renderhub.com/thecatempire
FlippedNormals: https://flippednormals.com/creator/thecatempire?tagIds=1
CubeBrush: https://cubebrush.co/a-solano
⚠️ Legal Notice
My models must not be used in offensive, violent, discriminatory or illegal content.
Responsible usage of the content is the buyer’s responsibility.
Using my models to train AI is not allowed.
My models must not be used in offensive, violent, discriminatory or illegal content.
Responsible usage of the content is the buyer’s responsibility.
Using my models to train AI is not allowed.
-
$34.99
For personal, non-commercial projects only. You may create renders, animations, or tests for educational purposes, personal practice, or portfolio.
-
$74.99
For commercial projects, including freelance work, advertisements, games, animations, and more.
-
$169.99
For studios, agencies, or companies, with multiple users and workstations. It is intended for professional workflows and client deliveries.
Have questions about this product?
Login to message
| Rating | 3 ratings |
| Published | about 1 month ago |
| Software Version | 4.4, 4.3, 4.2, 4.1, 4.0 |
| Render Engine Used | Cycles |
| Misc Data | Uvs-Unwrapped, Rigged, Low-High-Resolution, Normal-Mapped, Textured |
| License | Royalty Free |
Discover more products like this
template drivers Advanced Rigging hair custom blender 4k textures hands ultra-realistic corrective-shapekey shapekeys Human displacement nails 3d model psd-template rig Rigged arms tattoos Shader realistic Skin ik fk rigged customizable high detail Multires