 Armin

Requirements
- Blender 5.3 or newer. The extension does not install on 5.2 or older, which have no DLSS.
- An NVIDIA RTX graphics card, RTX 20 series or newer (compute capability 7.5). GTX cards and AMD, Intel or Apple graphics cannot run DLSS.
- NVIDIA driver 620 or newer. Blender 5.3 gets DLSS from the driver.
- Windows or Linux. DLSS in Blender does not exist on macOS, and the extension does not install there.
- Cycles on the GPU: OptiX or CUDA chosen in Preferences, and the scene's Device set to GPU Compute. The panel's buttons can set this for you.
- A scene camera, square pixels (pixel aspect 1:1) and a 3D Viewport anywhere in the window. The viewport goes full screen for the render, so Blender's window must be at least 256 px each way.
- For movies: free disk space for the temporary EXR frames, about 3-4 MB per 1080p frame on Half and about 20 MB on Full. The Movie section shows the estimate.
- Nothing else to install. numpy and OpenImageIO ship with Blender.
- Tested on Windows 11 with an RTX 5080 and Blender 5.3. Linux and other RTX cards have not been tested with the add-on yet.
Installation
- Download dlss_render_pro-1.0.0.zip. Do not unzip it.
- Turn off the free version first. If you have the smaller free add-on DLSS Render installed, go to Edit > Preferences > Add-ons, find "DLSS Render" and disable or uninstall it. Both drive the same viewport, so only one can be on. While the free one is on, the Pro panel shows only "Turn off the free DLSS Render add-on to use Pro".
- In Blender 5.3, go to Edit > Preferences > Get Extensions. Open the small arrow menu at the top right, choose Install from Disk... and pick the zip. Dragging the zip onto Blender's window also works. The extension is turned on right away.
- Update your NVIDIA driver to 620 or newer. Blender 5.3 gets DLSS from the driver, there is nothing else to download.
- Go to Edit > Preferences > System > Cycles Render Devices, choose OptiX (or CUDA) and tick your RTX card. The add-on's Turn On Graphics Card button can do this for you. A fresh 5.3 install starts on None, which also greys out DLSS.
- Open the Properties > Render tab. The DLSS Render Pro section sits at the top, below Render Engine (and Cycles' Device settings).
Getting started
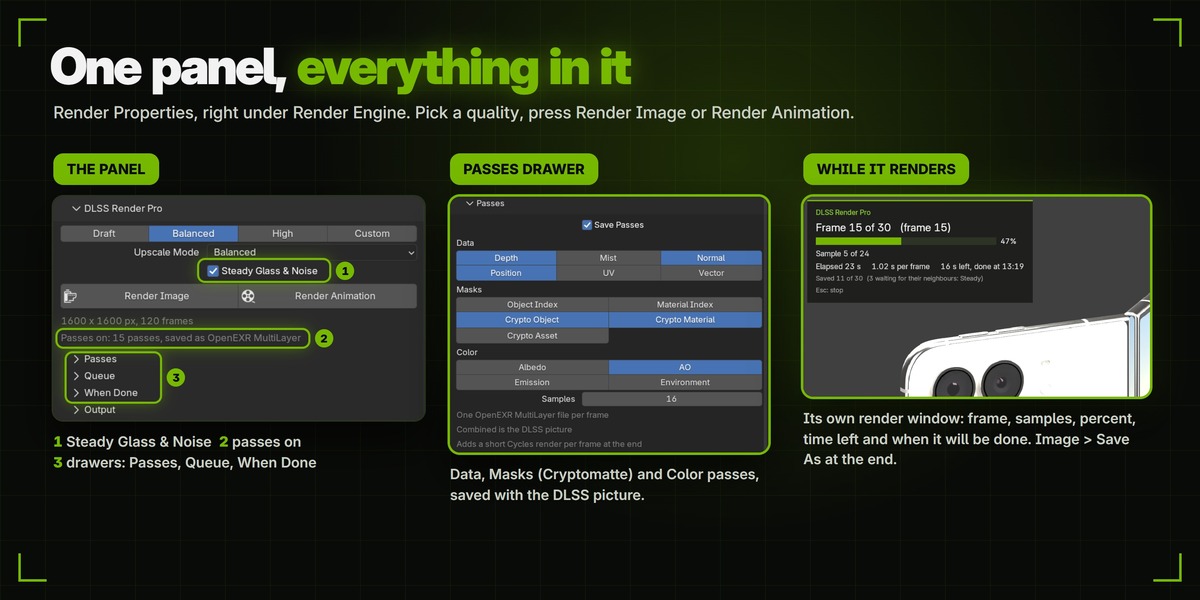
The panel is in Properties > Render tab > DLSS Render Pro. It is open by default and shown for every render engine. From top to bottom:
- Setup box (only when something is missing): the first thing that keeps a render from starting, with a button when one click can fix it: Switch to Cycles, Turn On Graphics Card, Use GPU Compute, Set Pixel Aspect to 1:1 or Turn Off Passes.
- Quality, Upscale Mode and Steady Glass & Noise.
- Render Image and Render Animation.
- Grey info lines: the output size and frame count, "Larger than this window: N tiles" when tiles are needed, "Passes on: ..." when passes are on, and notes about what a DLSS render of this scene leaves out (compositor nodes, sequencer pictures, camera markers).
- Folding sections: Passes, Movie (only when the output is a movie), Queue, When Done and Output.
Your first render:
- If a setup box shows, follow it (press its button when it has one) until it is gone.
- Open Output and set the resolution, the folder and the file format.
- Leave Quality on Balanced and press Render Image.
- Compare the result with a normal render of the same frame before you start a long animation.
Quality and Upscale Mode
- Quality sets how many viewport samples each frame gets before it is saved: Draft (8, for fast checks of timing and framing), Balanced (24, the default), High (64, cleaner glass and fine shadows) or Custom (Samples 1 to 4096).
- A frame whose picture has stopped changing is saved early, so flat, noise-free scenes go faster.
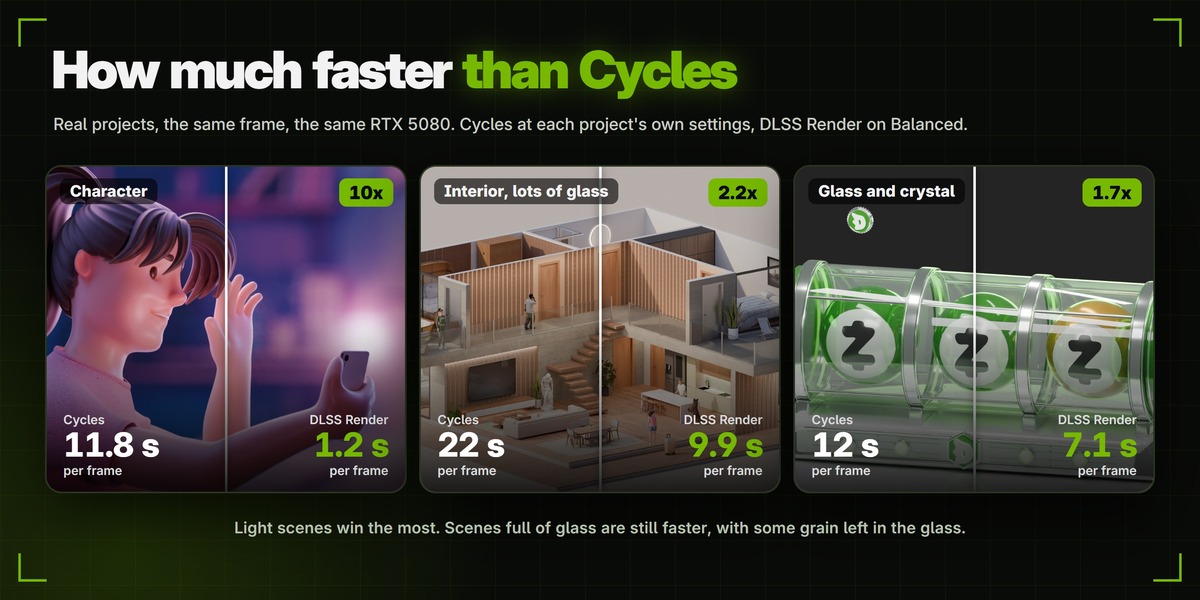
- More samples mean cleaner glass and shadows but slower frames. On a heavy glass scene, High can even be slower than normal Cycles.
- Upscale Mode is Blender's own DLSS setting, shown in the panel. It sets how much of the output resolution (per axis) Cycles renders before DLSS upscales it: None 100%, Quality about 67%, Balanced 58% (Blender's default), Performance 50%, Ultra Performance 33%. A lower value renders fewer pixels per frame.
Render Image and Render Animation
Render Image renders the scene's current frame. Render Animation renders Frame Start to End with the scene's Step.
- When you press a button, the window with the 3D Viewport goes full screen (top bar and status bar hidden), the viewport is locked to the camera at one output pixel per screen pixel, and the render window opens with the progress.
- Esc stops. Keyboard and mouse are blocked in Blender's main window while it renders; the render window still pans and zooms.
- Each picture is read from the graphics card and saved through Blender's own image saving, as scene-linear colour with real alpha, so colour management, transparency and file format match a normal render.
- A repeated Render Image never overwrites an earlier still: it saves name_0001_2.png, then _3 and so on. Animations write over their own frames, like Blender.
- DLSS Render Pro renders into its own Render Result slot, so your own F12 picture stays.
For animations:
- The render starts 8 frames early without saving them, so the first saved frame already has DLSS history behind it.
- It restarts quietly every 50 frames and at gaps in the frame list; Queue jobs also restart at every camera cut. This prevents a Cycles viewport glitch that can turn parts black or show the wrong material on long animations. For shots with camera markers, use the Queue: it renders clean cuts.
- With Blender's Overwrite setting off (Output properties), frames that are already saved are skipped, so an interrupted render continues where it stopped.
- On Windows, a minimised Blender pauses the render instead of failing it. Restore the window to continue.
Steady Glass & Noise
- An optional filter that calms DLSS flicker on glass, fine detail and leftover noise. It is off by default and works on animations only.
- Each frame is blended with its 2 neighbours on each side, after they are lined up along the motion. Where a neighbour does not really show the same thing (parts moving apart, appearing or changing), the frame keeps its own picture. It never blends across a gap in the frames, or across a camera cut in a Queue job.
- It runs on the CPU while the graphics card renders the next frames, so frames are saved 2 frames late. It takes about 1.9 s per 4K frame on 4 CPU threads (measured on my computer). On light 4K scenes that render faster than that, the CPU becomes the limit.
- It works with every output: image files, movies and passes.
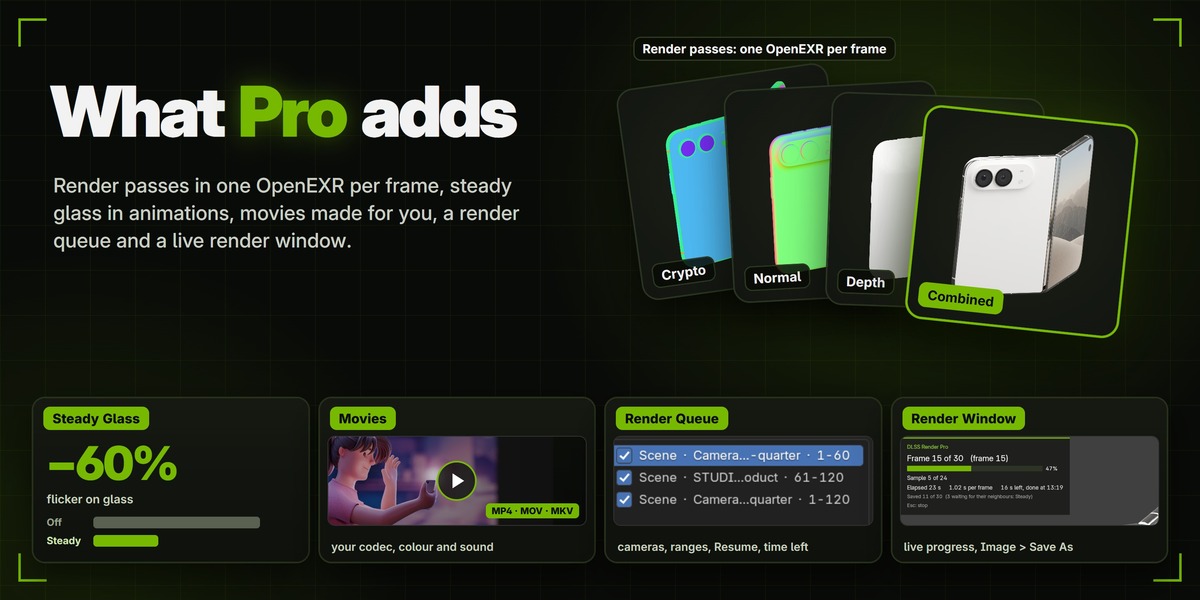
- In my tests it left 38% and 41% of the flicker on two animations (a hard-surface prop and a glass-and-crystal scene), so about 60% less, and about 35% less on a character shot without glass. The picture gets a touch softer. It calms the flicker; it does not make glass noise-free.
Render Passes
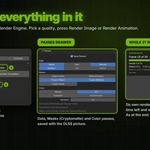
- Open Passes and tick Save Passes.
- Pick the passes:
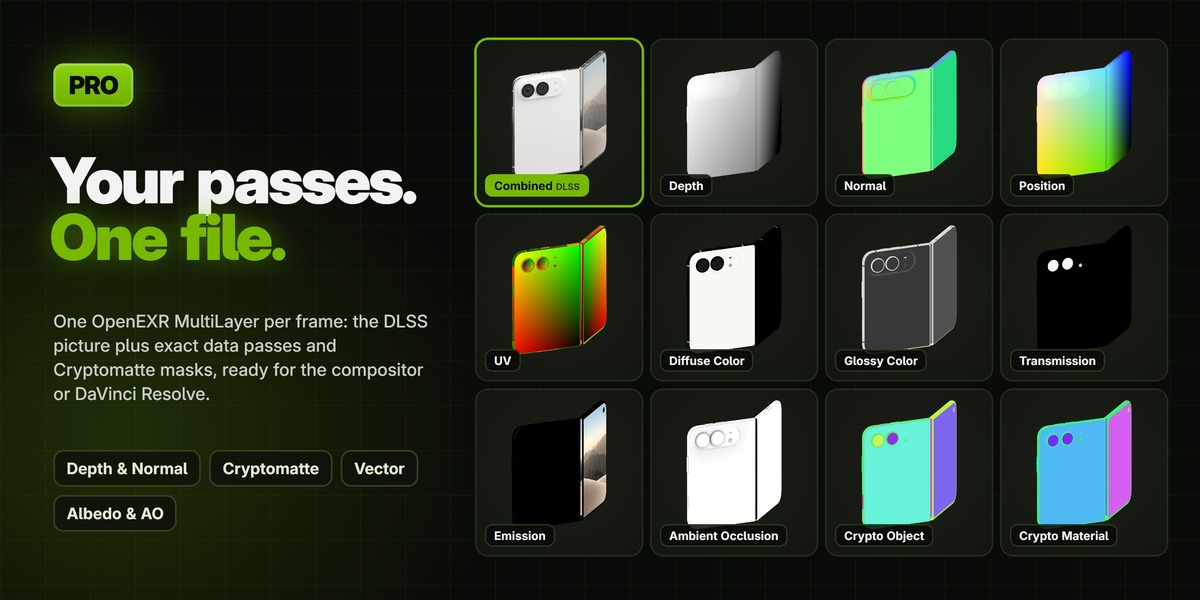
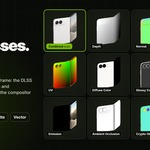
- Data: Depth, Mist, Normal, Position, UV, Vector.
- Masks: Object Index, Material Index, Crypto Object, Crypto Material, Crypto Asset (Cryptomatte).
- Color: Albedo (Diffuse, Glossy and Transmission Color), AO, Emission, Environment.
- Set Samples in the Passes section (the samples for the passes), from 1 to 256 (default 16). Depth, Position and the indexes are exact at 1; more samples smooth the edges of Normal, Mist, UV and Cryptomatte. AO wants 32 or more.
- Use an image output, not a movie, and render as usual.
Each frame becomes one OpenEXR MultiLayer file whose Combined layer is the DLSS picture. It is saved as 32-bit float with ZIP compression, or with your own lossless EXR codec. While the frames render, each file already holds a valid DLSS picture. After the last frame the add-on stops the viewport render to free the graphics card and runs one short Cycles render per frame (no bounces, no denoiser, no motion blur) to add the passes: about 1 s per frame at 2K in my tests. If you stop with Esc, the files keep a valid DLSS picture, and a resumed queue renders them again.
In DaVinci Resolve the passes are in Fusion under MediaIn > Image > Layer. Light passes (direct, indirect, shadow, volume, shadow catcher) and light groups are not available, because DLSS cleans only the Combined picture. Passes cannot go into a movie and do not work with Stereoscopy.
Movies
- Set Blender's output File Format to FFmpeg Video and choose the container, codec and quality as usual.
- The Movie section appears in the panel. It shows the codec and container, warns about the codec's size rules and estimates the disk space the frames take. Choose a Frame Precision: Half (16-bit, the default, about 3-4 MB per 1080p frame; the movie can be 1 level off in a few pixels) or Full (32-bit, exact, about 20 MB). Tick Keep Frames to keep the frames after the movie is made.
- Press Render Animation. Two checks run first: a one-frame test encode (about 0.2 s) that catches settings your encoder would refuse, and a free-space check. The frames go to a "_frames" folder next to the movie, as scene-linear EXR files.
- After the last frame Blender makes the movie through your scene's own Video Sequencer, so your container, codec, quality, bit depth, HDR, colour management (look, exposure, curves), stamp, metadata, frame rate and sound all apply.
- Make Movie from Frames (in the Movie section, when kept frames exist) makes the movie again from kept frames with the current movie and colour settings, without rendering again.
- Esc keeps the frames made so far, and Make Movie from Frames can turn them into a movie.
- Frames from an earlier render in the same folder are moved to "_previous" first.
- Render Image with a movie output saves a PNG.
Render Queue and Resume
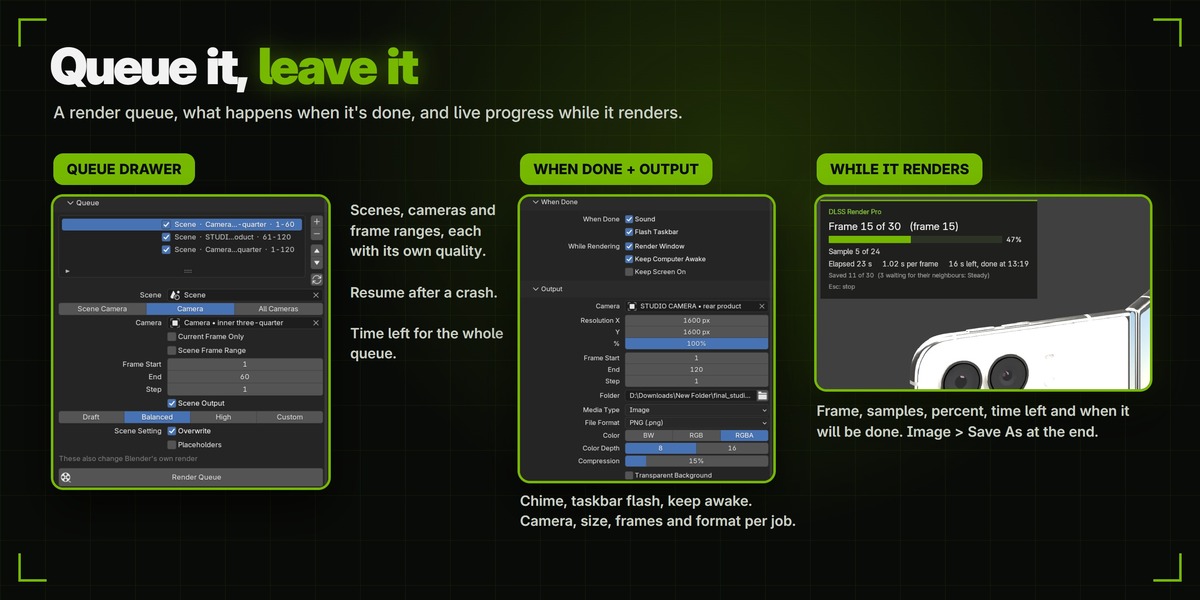
- Open Queue and press + to add the current scene with its camera, frame range, output and quality.
- Edit the selected job:
- Scene.
- Camera: Scene Camera (camera markers switch cameras, rendered as clean cuts), Camera (one chosen camera; markers are ignored) or All Cameras (the frames once through each camera, each camera into its own folder).
- Current Frame Only, or Scene Frame Range, or the job's own Frame Start, End and Step.
- Scene Output, or the job's own output path. # (the frame number) and {camera_name} work in the path.
- Quality.
- The job's scene's own Overwrite and Placeholders settings, shown under the job (they also change Blender's own render).
- Tick the jobs you want and press Render Queue. The arrows change the order, and the refresh button checks the saved frames again. Each row shows its saved and total frames, for example "312 / 1000".
- While it runs, the panel, the status bar and the render window show seconds per frame, the time left and the clock time it will be done, for the job and for the whole queue. Estimates use speeds measured in earlier runs of the same shot when there are any; otherwise they are scaled from the running job and shown with ~. Esc stops the queue.
- The queue follows each scene's Overwrite setting: with Overwrite off, frames already saved are skipped. DLSS Render Pro writes no placeholder files.
- A job that would save over the files of an earlier job in the list is refused with a message. Give each job its own output path, for example with {camera_name}.
- If one job fails, the queue carries on with the next one and reports the failure at the end.
- The list is saved with the .blend file.
Resume. After Esc, closing Blender or a crash, the Queue section says "The last run was stopped at job N of M" or "The last run stopped unexpectedly at job N of M" and shows a Resume button. Resume skips the frames that run saved, even with Overwrite on. Movie jobs render all their frames again, unless the stopped run already finished that movie. Save your .blend before a queue run: for an unsaved file, Resume works only in the same Blender session.
When Done / While Rendering
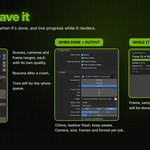
- When Done: Sound (on by default; a short chime, rising when done, falling when stopped or failed) and Flash Taskbar (on by default, Windows only).
- While Rendering: Render Window (on by default), Keep Computer Awake (on by default, Windows only) and Keep Screen On (off by default, Windows only).
- These options apply to Render Image, Render Animation and the queue alike. They last for one Blender session and are not saved in the .blend file.
Render Window
- Blender's own render window opens with the latest picture, refreshed at most every 2 s. It costs no measurable time in my tests (1.56 s per frame with and without it).
- The overlay shows: frame N of M (with the frame number), the tile, a % bar, "Sample n of goal", elapsed time, seconds per frame, the time left and when it will be done, the frames saved and those waiting for their neighbours (Steady), and the current queue job with the queue's time left.
- Esc in the render window stops the render. Other keys are held back; the mouse still pans and zooms.
- At the end it shows "DLSS Render Pro: Done", "Stopped" or "Failed" with a short summary, and the saved file. Image > Save As starts in your output folder, with "Save as Render" already ticked for EXR.
- To turn it off, untick Render Window in When Done > While Rendering.
Output
The Output section repeats Blender's own settings, so you can set everything in one place: Camera, Resolution X, Y and %, Frame Start, End and Step, Folder (the output path), the file format block (any image format, or a movie) and Transparent Background. Changing them here changes the scene's settings.
Transparent background: tick Transparent Background and save to a format with alpha, such as PNG with RGBA or EXR. The picture keeps real alpha.
What a render changes, and puts back. So that the viewport shows what a normal render would, the add-on changes these settings for the length of the job:
- Objects and collections hidden only in the viewport are shown, and those hidden only in renders are hidden.
- Modifiers that are off in the viewport follow their render setting.
- Subdivision and Multires use their render levels.
- Particles use 100% display and the render child count.
- Simplify uses its render values.
Everything is restored after the render, also after Esc or an error. If you save the .blend during a render, your own settings are saved, not the job's. Opening another file stops the render cleanly.
Output size and tiles
- The viewport shows one output pixel per screen pixel. The render runs full screen with the top bar and status bar hidden, so a 4K output on a 4K monitor is one tile.
- An output bigger than the viewport is rendered in tiles: the camera view is panned across the frame, and the tiles overlap by at least 64 px and are blended across a 48 px soft seam. The panel shows "Larger than this window: N tiles".
- More tiles mean slower frames. Use a bigger screen, or a lower Resolution % for test renders.
- Non-square pixels are not supported: press Set Pixel Aspect to 1:1.
Limitations
- No motion blur in the DLSS picture. Save the Vector pass and add motion blur in the compositor.
- Glass keeps some grain. Bright light seen through glass is grainier than in normal Cycles (about twice the grain on Balanced in my glass test). More samples help but cost time. Steady calms the flicker but does not remove the grain. This is a limit of Cycles' DLSS mode, not something an add-on can change.
- It renders what the viewport can show. Some render-only content can still be missing: in one project I tested, grass and trees made with particle instances. Render one frame and check it first.
- The result is not guaranteed to match a normal Cycles render. Known DLSS weak spots: ghosting in mirror reflections, fine shadows that appear late, some noise left in depth of field.
- Compositor nodes are not applied, and sequencer pictures are not used (sound is, for movies). The panel tells you.
- No light passes (direct, indirect, shadow, volume, shadow catcher) and no light groups. Passes cannot go into a movie and do not work with Stereoscopy.
- Blender's window is used full screen while it renders. Keyboard and mouse are blocked in that window (Esc stops); the render window still pans and zooms.
- Keep Blender open while it renders. On Windows a minimised Blender just pauses the render until you restore it. If the viewport stops updating for any other reason (or on Linux when minimised), the job stops after 120 s with a message.
- Do not run other work on the same graphics card at the same time: DLSS gets fewer samples per frame and the frames get grainier.
- An output bigger than your screen needs tiles, and more tiles mean slower frames. Non-square pixels are not supported (one click sets 1:1).
- Movies need evenly spaced frames in order, starting at frame 0 or later, and your encoder's own size rules (checked before the render starts). In the queue, movie jobs render all their frames again, also on Resume, unless the stopped run already finished that movie.
- Steady is for animations only and uses CPU time: about 1.9 s per 4K frame on 4 CPU threads (measured on my computer). On light 4K scenes that render faster than that, the CPU becomes the limit.
- Camera cuts are rendered clean only in the Queue. For shots with camera markers, use the Queue.
- Save your .blend before a queue run: Resume of an unsaved file works only in the same Blender session.
- Flash Taskbar, Keep Computer Awake, Keep Screen On and the pause while minimised work on Windows only.
Troubleshooting
Messages in the panel's setup box
- "Cycles is turned off. Enable the Cycles add-on in Preferences." The Cycles add-on is disabled. Enable it in Edit > Preferences > Add-ons.
- "DLSS renders with Cycles." The scene uses another render engine, such as EEVEE. Press Switch to Cycles.
- "DLSS needs an NVIDIA RTX graphics card." Cycles found no NVIDIA graphics card (no CUDA or OptiX), so DLSS cannot run on this computer. A GTX card shows "DLSS is not available here..." instead.
- "No graphics card is turned on for Cycles." Cycles Render Devices in Preferences is set to None, or the card is not ticked. Press Turn On Graphics Card: it picks OptiX if available, else CUDA, and ticks the card.
- "Cycles is set to render on the CPU." The scene's Device is CPU. Press Use GPU Compute.
- "DLSS is not available here. It needs an NVIDIA RTX card and driver 590 or newer." Blender cannot use DLSS with this setup. Check in this order: (1) update the NVIDIA driver to 620 or newer (Blender 5.3 needs it for DLSS); (2) check that OptiX or CUDA is chosen in Preferences; (3) a GTX card cannot run DLSS: it needs an RTX 20 series card or newer.
- "The scene has no camera." Add a camera and make it the scene camera (the Camera field in the add-on's Output section).
- "Non-square pixel aspect is not supported." Press Set Pixel Aspect to 1:1.
- "Open a 3D Viewport in this window." Switch any area of the window to a 3D Viewport. It can be small: it goes full screen for the render.
- "No pass is picked in Passes.", "Passes cannot be saved in a movie.", "Passes do not work with Stereoscopy." or "Passes need OpenImageIO, which comes with Blender 5.3." Pick a pass, choose an image file format in Output, or turn off Stereoscopy. Or press Turn Off Passes.
- The panel shows only "Turn off the free DLSS Render add-on to use Pro". See Installation, step 2.
Messages when a render stops (in Blender's status bar and the render window)
- "The viewport stopped updating. Keep Blender's window open (not minimised) while it renders." The viewport made no new picture for 120 s while waiting for samples: on Linux a minimised window, or the viewport stopped drawing for another reason. Keep Blender open and visible, then render again (with Overwrite off, saved frames are skipped) or press Resume in the Queue.
- "The viewport did not respond (redraw)" or "(reading the picture)". A redraw or a picture read got no answer for 10 s. Same fix as above.
- "DLSS is not available here. Check Render Properties > Sampling > Viewport > Denoise." Blender refused DLSS as the viewport denoiser when the render started. Check as for the setup message about DLSS above.
- "The 3D Viewport is too small to render in." After going full screen, the viewport is under 256 px wide or high. Make Blender's window bigger.
- "Every frame is already saved. Turn on Overwrite (Output properties) to render them again." Overwrite is off and every frame file exists. Turn on Overwrite or pick another output folder.
- "There are no frames to render." Check Frame Start, End and Step.
- "This output size cannot be shown 1:1 in the viewport.", "Could not match the camera view to the output size." or "Could not line the camera view up with the pixel grid." The camera view could not be zoomed or lined up to show the output pixel for pixel. Check the resolution and Resolution %, then render again. If it happens again, send me the message.
Passes
- "The passes render failed on frame N: ..." or "Saving the passes failed: ..." The frame files keep a valid DLSS picture. Fix what the message names and render again.
- "The view layer changed while rendering; the passes were not saved." Do not switch view layers while a render with passes runs. Render again.
Movies
- "These movie settings do not work: ..." The one-frame test encode was refused; the rest of the message names the reason, for example an odd width or height for H.264 or H.265, an odd width for ProRes, or the DNxHD size and bitrate rules. Change the resolution or the codec. The Movie section also shows the size rule before you start.
- "The frames need about ... until the movie is made, but the drive has only ... free." Free some space, point the output to another drive, or use Half precision.
- "A movie needs evenly spaced frames, in order." Use one plain Start, End and Step range.
- "A movie cannot start before frame 0." Start at frame 0 or later.
- "The output path does not work: ..." Blender cannot read the output path, for example because of an unknown {variable}. Fix the path.
- "The movie could not be made: ..." The frames are kept. Fix what the message names and press Make Movie from Frames; nothing is rendered again.
- Make Movie from Frames is greyed out. The output is not a movie, or a render is still running.
Queue
- "The queue has no ticked jobs." Tick at least one job.
- "Pick a scene.", "Pick a camera.", "Scene '...' has no camera.", "Camera '...' is not in scene '...'." or "The end frame is before the start frame." Fix the job's settings; the message shows under the job.
- "Job N would save over the files of '...'. Add {camera_name} to the output path or pick another output." Two jobs would write the same files, so only the first one renders. Give each job its own output path.
- "Cameras '...' and '...' would save to the same files." With All Cameras, two camera names become the same folder name. Rename one of the cameras.
Other problems
- Something is missing in the render, such as grass or other particle instances: the add-on renders what the viewport can show. Render one frame and compare it with a normal render before a long job.
- Glass is grainy: raise Quality to High or Custom, tick Steady Glass & Noise for animations, and close programs that use the graphics card. A heavy glass scene on High can be slower than normal Cycles.
- Frames are grainier than usual: do not run games or other renders on the same graphics card, because DLSS then gets fewer samples per frame.
- Frames are slow at large sizes: the panel shows "Larger than this window: N tiles". Use a bigger screen or a lower Resolution %.
- Compositor effects are missing: compositor nodes are not applied. Save passes and composite afterwards.
- Shots with camera markers: the panel notes "Camera markers: the Queue renders clean cuts". Render them with the Queue (Camera: Scene Camera); it starts fresh at every cut.
Support: send me a message through Superhive with your Blender version, graphics card, driver version and the exact message the panel or the status bar shows.
Licence
GPL-3.0-or-later. Everything you render with the add-on is yours, for personal and commercial work. No third-party code or assets are bundled: it uses only Python and modules that ship with Blender (numpy, OpenImageIO).
DLSS Render Pro is an independent add-on. It is not made by, affiliated with or endorsed by NVIDIA. NVIDIA, RTX and DLSS are trademarks of NVIDIA Corporation. Blender is a trademark of the Blender Foundation.
Have questions about this product?
Login to message
| Blender Extension Compatible | Yes |
| Published | about 19 hours ago |
| Blender Version | 5.3 |
| Extension Type | Add-on |
| Render Engine Used | Cycles |
| License | GPL |
Discover more products like this
Cycles viewport render batch render render queue render-passes fast render animation Denoiser GPU render Render DLSS cryptomatte