Face and Edge Align
 rfarencibia


2. Installing the Add-on
-
Download the ZIP containing Face & Edge Align.
-
In Blender, go to Edit → Preferences → Add-ons → Install…
-
Select the downloaded ZIP file and click Install Add-on.
-
Enable Face & Edge Align by checking the box next to its name in the Add-ons list.
-
Close Preferences. You’re ready to go.
Tip: You can assign a custom hotkey for the pie menu (default is Alt + A), or leave it as is.
3. Accessing the Tool
There are two ways to activate Face & Edge Align:
-
Pie Menu (default Alt + A)
-
Press Alt + A in the 3D Viewport.
-
A small radial menu appears. Click Face & Edge Align to start.
-
-
Sidebar Panel (N-panel)
-
Press N (or click the little ▶ icon on the right edge of the 3D Viewport) to open the sidebar.
-
Find the Face & Edge Align tab.
-
There’s a checkbox labeled Align Edges—turn it on if you want edge matching.
-
Click the Face Align button to begin.
-
4. Basic Workflow
-
Enable or Disable Edge Alignment
-
If you only need to snap faces, leave Align Edges unchecked.
-
If you need faces PLUS edges to match exactly, check Align Edges before clicking “Face Align.”
-
-
Select Face 1
-
After activating the tool, hover over the first face you want to move (on Object A).
-
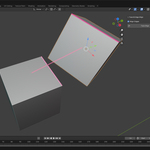
You’ll see a pink outline around that face and a small “Face 1” label.
-
Click to confirm. That face is now locked as Face 1.
-
-
Select Face 2
-
Next, hover over the face on Object B that you want to snap against.
-
A pink outline and “Face 2” label appear.
-
Click to confirm. At this point, if edge alignment is OFF, the add-on immediately aligns Face 1 to Face 2, and the operation ends.
-
-
(Optional) Select Edge 1
-
If Align Edges was checked, you’re now prompted to pick an edge on Face 1.
-
Hover near any edge of that face; a pink highlight and “Edge 1” label appear. Click to confirm.
-
-
(Optional) Select Edge 2
-
Finally, hover near a corresponding edge on Face 2. “Edge 2” highlights in pink. Click to confirm.
-
The tool rotates Object A around the newly aligned faces so those two edges become perfectly parallel (or anti-parallel), then the operation finishes.
-
-
Result
-
Object A is now snapped to Object B. Its chosen face sits flush, and—if you picked edges—those edges line up exactly.
-
All temporary pink markers disappear when the operation completes.
-
-
Cancel at Any Time
-
Right-click or press Esc while selecting to cancel and remove all highlights.
-
5. Visual Feedback
-
Pink Face Outlines
When your cursor hovers over a face that can be selected, you’ll see a pink outline around it. This shows you exactly which face will be chosen if you click. -
Colored Labels (“Face 1”, “Face 2”, “Edge 1”, “Edge 2”)
As soon as you confirm a face or edge, a little pink label appears at its center or midpoint, so you know which selection is stored. -
Connecting Line Between Faces
After selecting both faces (but before any edge selection), a semi-transparent pink line connects their centers. This preview helps you see how the faces will meet. -
Edge Highlights
If edge alignment is on, the hovered edge glows pink—thicker than the face outline—so you know which edge you’ll select.
These live visual hints ensure you’re never guessing which element will be snapped next.
6. Sidebar Controls (N-panel)
Inside the Face & Edge Align tab:
-
Align Edges (Checkbox)
Toggle on to activate the two-edge selection step (after faces) so those edges line up.
Toggle off to simply snap face centers without worrying about edges. -
Face Align (Button)
Click this to begin the selection flow. It runs exactly the same as the pie-menu invocation, just without needing a hotkey.
7. Pie-Menu Shortcut
-
By default, pressing Alt + A in the 3D View brings up a small radial menu with one item: Face & Edge Align.
-
If you prefer a different hotkey, go to Edit → Preferences → Add-ons → Face & Edge Align (arrow ▶) → Pie Menu Shortcut.
-
Pick a letter (A–Z, 0–9), and whether you want Ctrl, Shift, and/or Alt.
-
Close Preferences; your new key combo now summons the pie menu.
-
8. Tips & Best Practices
-
Ensure Different Objects
Face 2 must be on a different mesh object than Face 1. If you click on the same object, you’ll see a warning. -
Face Orientation
Both faces should be relatively planar. If a face is a complex n-gon or is very skewed, results may look unexpected. -
Edge Selection Precision
For edge alignment, hover close to the center of an edge segment (not just near a vertex). That way, the add-on can detect which edge you mean. -
Cancel Early
If you change your mind partway through picking, simply Esc or Right-click to revert and clear all markers. -
UV/Topology Considerations
If your faces have odd UVs or non-uniform scales, double-check in Edit Mode afterward to ensure everything lines up exactly as you expect. -
Multiple Uses
You can re-invoke Face & Edge Align as many times as you like on different pairs of objects. Each run resets marker states.

Discover more products like this
align 3D alignment tools best addon addon scripts face align addon blender edge align 2025addon aligner