FLICK PIE 0.17.0 · USER GUIDE
Getting started with Flick Pie
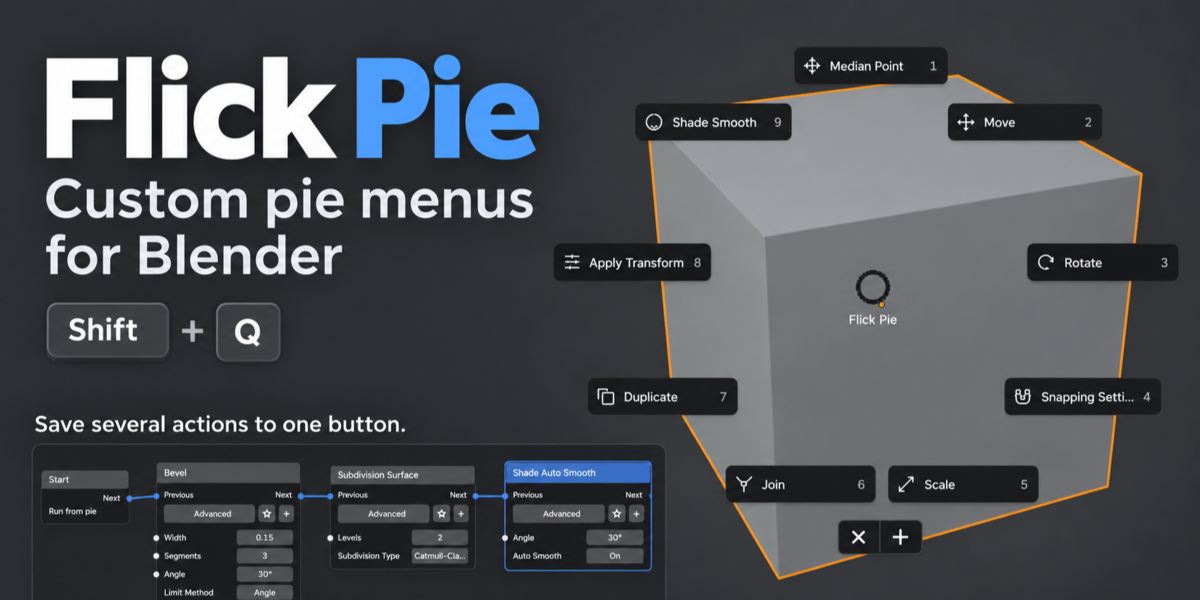
Add your frequently used tools to a circular menu, save settings, and combine repeated steps into a single button.
Start here: install the ZIP → press Shift + Q → click + to add your first command.
01 / INSTALL
Install and open Flick Pie
Flick Pie requires Blender 4.5 or newer. Version 0.17.0 has been tested in Blender 4.5.5 and 5.2.2 on Windows. It works in the 3D Viewport and does not require a particular render engine.
- Download flick_pie-0.17.0-install.zip. Keep the file zipped.
- Open Edit → Preferences → Add-ons. Open the menu in the upper-right corner and choose Install from Disk.
- Select the ZIP and install it. Find Flick Pie in Add-ons and enable it if necessary.
- Return to the 3D Viewport. Put your pointer over it and press Shift + Q.
For another way to open the menu, press N in the 3D Viewport, open the Flick tab, and choose Open Flick Pie. The same tab contains Quick Start, Edit Wheel, Create Workflow, Import and Export.
Updating an existing installation? Export your layouts first, install the new ZIP, then restart Blender.
02 / BASICS
Choose a tool
Hold and release: hold Shift + Q, move toward a tool, then release Q to choose it. Tap and click: tap the shortcut quickly without moving away from the center, then click a tool.
1–9, then 0
Choose a visible command by its displayed number.
Esc / right-click
Close the normal pie. In removal mode, leave that mode first.
H
Show or hide labels for the current opening.
S over a tool
Edit its saved settings, or reopen a saved workflow.
E
Open the wheel layout editor.
Ctrl + Z in the pie
Undo the last wheel layout edit.
Object, Edit and Sculpt modes have separate layouts. Each layout holds up to 10 commands. Empty slots are hidden in the normal pie. Adding or removing tools changes their positions and number shortcuts.
03 / CUSTOMIZE
Add, remove and rearrange tools
Add a command
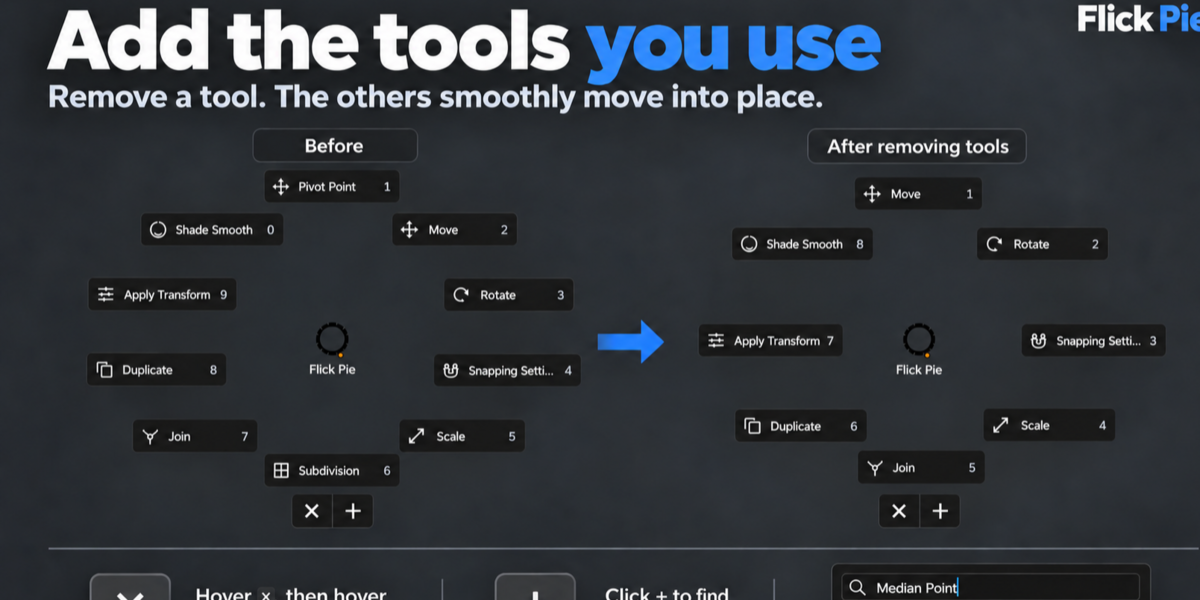
- Open the pie and click +. Search using the tool’s Blender name, such as Bevel Modifier, Median Point, or Clay Strips Brush.
- Choose the result. If a settings form opens, adjust the name, symbol and settings, then select Add to Pie. Some commands are added directly.
- The tool fills an available slot and the circle rearranges. If the pie is full, choose an existing tool to replace. Press Esc to cancel replacement.
Adding a tool saves an entry; it does not run that tool. You can also right-click a supported Blender command button and choose Add to Flick when that option is available.
Remove a command
- Hover over × to enter removal mode.
- Move onto the tool you want to remove and pause briefly. The tool disappears while the pie stays open.
- Move away from the buttons before removing another tool. Press Ctrl + Z to undo a removal.
- Press Esc to leave removal mode. Press it again to close the pie.
Rearrange the layout
Press E while the pie is open. In Edit Wheel, drag one entry onto another to swap them, click a slot to replace its command, or hover a slot and press Delete to clear it. Right-click an entry to edit it. Use the mode tabs to choose a layout, and press Enter or Esc when finished. Layout edits are applied as you make them; Esc closes the editor without undoing them.
Edit Wheel shows all ten storage slots. The normal pie shows only the commands you have added.
04 / SETTINGS
Save a tool’s settings
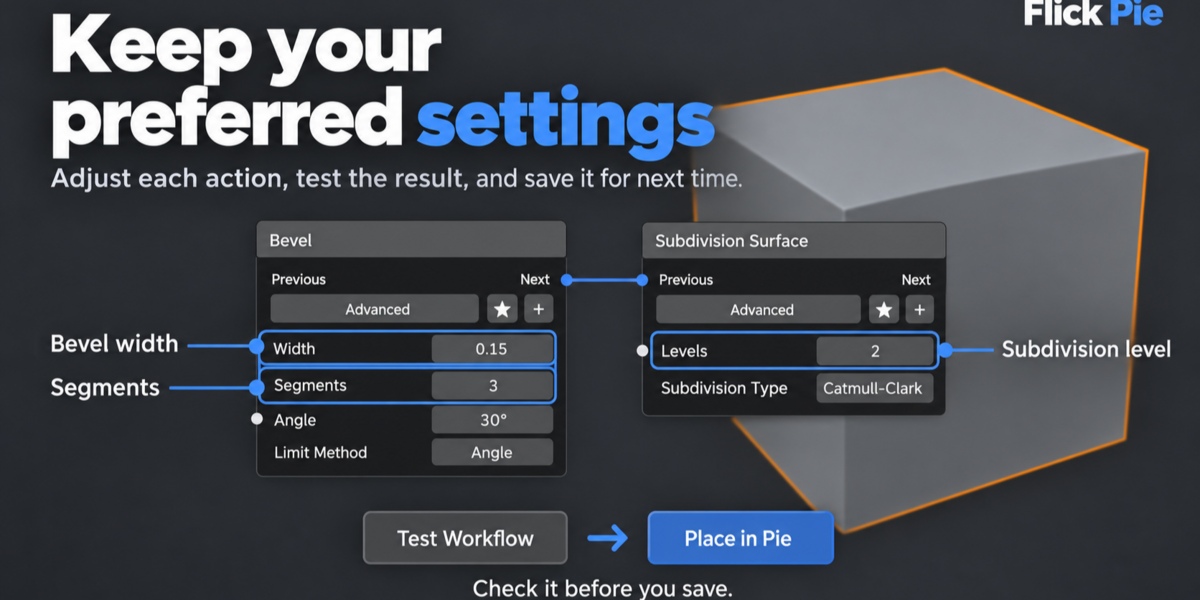
Hover over a tool in the pie and press S. For supported commands, you can change its name, symbol and saved settings. Choose Save Entry to keep your changes.
Common settings appear first. Use Advanced settings, the search field, or the page control when available to find more. Complex properties may require Blender’s own tool panel.
Saved values are applied the next time you run the entry. Changing a saved value does not update the selected object immediately.
For supported individual operator entries, Adjust interactively after choosing starts Blender’s interactive tool when you select the entry. The controls after that point belong to that tool.
05 / WORKFLOWS
Create your first workflow
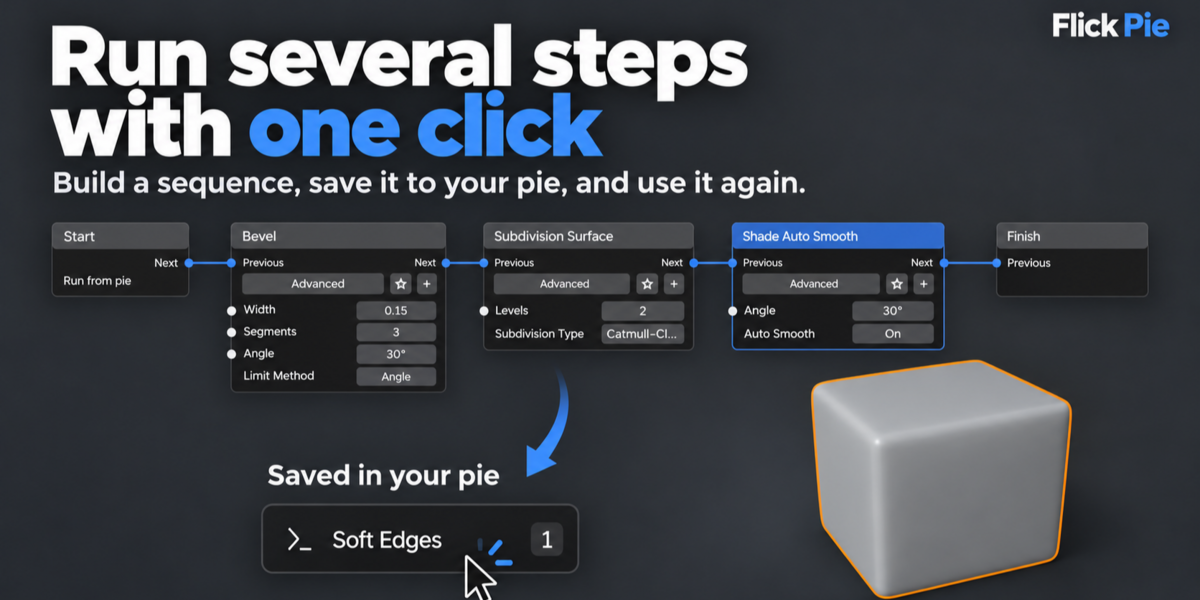
A workflow runs several actions from one pie button. Start with a selected mesh in Object Mode and try this example:
- Open Shift + Q → + → Create Workflow, or choose Create Workflow in the Flick sidebar.
- Click the name at the top of the canvas. Name the workflow Soft Edges and choose a symbol.
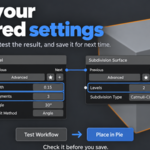
- Choose + Action, search for Bevel Modifier, and add it. Set Width to 0.15 and Segments to 3.
- Add Subdivision Surface and set Levels to 2.
- Add Shade Auto Smooth. Keep a continuous execution path from Start through the three actions to Finish.
- Choose Test Workflow to check the result on your selected mesh.
- Choose Place in Pie. If the menu is full, choose an entry to replace.
- Open the pie and select Soft Edges to apply the saved sequence.
The values above are a starting point. The visible result depends on your model’s size, scale and geometry. Bevel Modifier and Bevel Mesh Edges are different actions; choose the modifier for this example.
New actions connect after the selected action. Drag the execution sockets to change the order. A workflow occupies one pie entry even when it contains several actions.
06 / WORKFLOW EDITOR
Edit and navigate a workflow
Drag a node header
Move the node.
Drag between sockets
Connect actions or numeric values.
Click a number
Enter an exact value.
Drag a number / Shift
Adjust a value; hold Shift for finer changes.
Advanced
Open the action’s full settings form.
Star on an action
Add or remove the action from Favorites in search.
Small + on an action
Expose another supported numeric input.
+ Value
Create a number that can feed multiple numeric inputs.
Right-click an input
Disconnect its link.
Delete / Backspace
Remove the selected Action or Value node.
Ctrl + Z / Ctrl + Y
Undo or redo graph edits.
Mouse wheel / middle-drag
Zoom / pan the canvas.
Fit, F, or Home
Fit the graph into view.
S with a node selected
Open that node’s settings.
Full Editor
Continue in Blender’s node editor; use Viewport in its header to return.
Keep Start and Finish connected through the actions you want to run. Value nodes supply numbers; they do not run as steps. To reuse one number, add a Value node and connect its output to the relevant numeric inputs.
To edit a saved workflow, open the pie, hover its button and press S. Choose Save Entry to update the existing entry. Cancel or Esc leaves without saving the draft.
07 / TESTING
Test a workflow safely
Test Workflow runs the draft on the current selection. Completed actions receive a green outline and check mark. If an action fails, it is marked red, later actions are skipped, and the message at the bottom explains the failure.
-
Undo Test restores the model while keeping your graph edits.
- Testing again first restores the previous test, so test modifiers do not accumulate.
- Saving, cancelling, or switching to Full Editor also restores the temporary test. Run the saved entry from the pie to keep its result.
-
Global Undo must be enabled in Blender’s preferences for workflow testing.
- Ctrl + Z inside the canvas edits the graph. Use Undo Test to restore the model.
Actions still need the correct object, selection and mode. A command appearing in search does not guarantee it can run in every context. Workflows support ordered actions and shared numeric values; branches, loops and nested workflows are not supported. File, interface and history commands are excluded.
08 / SCULPTING
Use sculpt brushes and saved brush setups
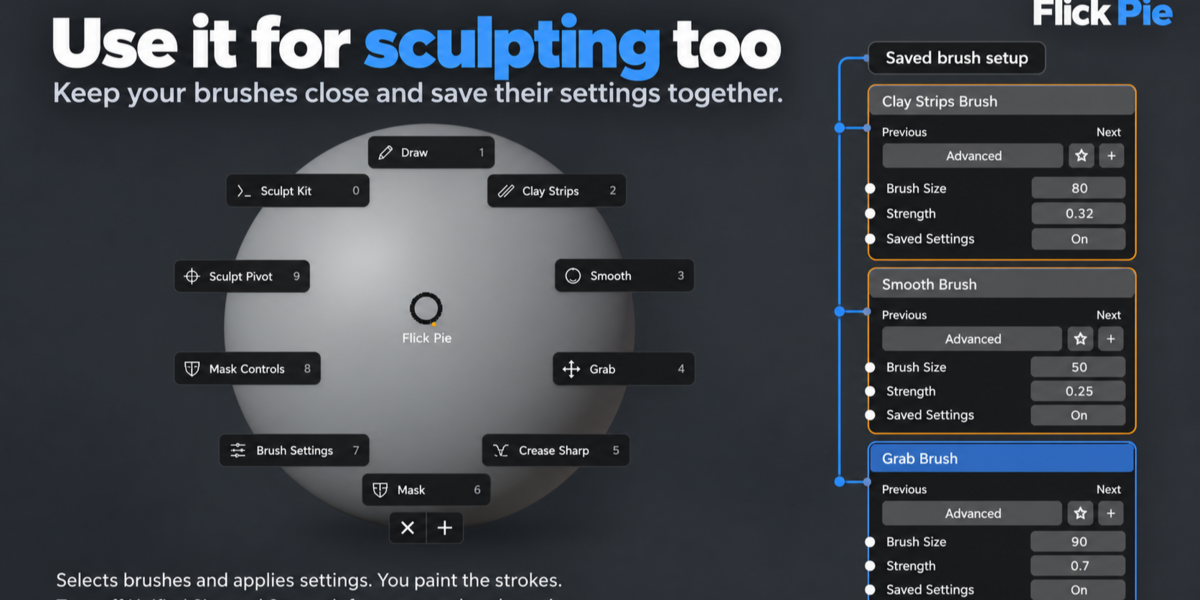
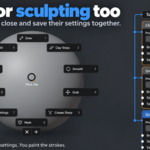
Select a local, editable mesh and switch to Sculpt Mode. Open Flick Pie to use the Sculpt layout. Use + to find brushes such as Draw, Clay Strips, Smooth, Grab, Crease Sharp, Mask, Inflate/Deflate, Flatten/Contrast, Draw Sharp and Pinch/Magnify. These require Blender’s Essentials sculpt brushes.
Example: save a three-brush setup
- In Blender’s brush settings, turn off Unified Size and Unified Strength if you want each brush to keep individual values.
- Create a workflow named Sculpt Kit. Add Clay Strips Brush, Smooth Brush and Grab Brush.
- Enable Saved Settings on each brush action. Set Clay Strips to 80 px / 0.32, Smooth to 50 px / 0.25, and Grab to 90 px / 0.70.
- Choose Place in Pie. Run Sculpt Kit from the Sculpt pie to apply the saved setup.
- Select the individual brushes from your pie as you sculpt.
Brush actions select and configure brushes; they do not paint strokes or blend brushes together. The last brush in the sequence stays active. With Unified Size or Strength enabled, values are shared instead of remaining separate for each brush.
Saved brush size is applied in screen pixels. Other sculpt entries include Brush Settings, Mask Controls, Invert Mask, Clear Mask, Face Sets, Sculpt Pivot and Sculpt Options.
09 / MODELING
Pivots and live modeling tools
Use + to add Pivot Point, a specific pivot such as Median Point or Individual Origins, Transform Orientation, Snapping Settings, Toggle Snapping, or Cursor and Selection. Use Sculpt Pivot when sculpting.
Flick’s live Bevel, Extrude, Inset and Solidify tools let you move the pointer to adjust the result. Hold Shift for precision, type a number for an exact amount, and click or press Enter to confirm. Esc cancels and restores the preview. For live Bevel, use the mouse wheel to change the segment count.
The live Edit Mode previews support one editable mesh at a time, without shape keys, and up to 100,000 vertices. Select vertices or edges for Bevel, and faces for Extrude, Inset or Solidify. Amounts use local mesh units. These limits apply to Flick’s live previews, not every Blender command you can add to the pie.
10 / PREFERENCES
Appearance, backups and persistence
Open Edit → Preferences → Add-ons → Flick Pie to adjust Wheel size, Adjustment speed, Show tool names and Smooth menu motion. The interface follows Blender’s theme. Turn off Smooth menu motion if you prefer immediate transitions.
Change the shortcut in the add-on’s Shortcut section, or open Blender’s Keymap preferences and search for Flick Pie.
-
Save between sessions: Flick Pie follows Blender’s Auto-Save Preferences setting. If it is off, use Save Preferences after making changes.
-
Export: in the Flick sidebar, choose Export to save Object, Edit and Sculpt layouts, including their saved workflows, as a JSON file.
-
Import: choose Import and select a Flick Pie JSON preset. Import replaces all mode layouts, so export your current setup first.
-
Undo Edit: restores the previous wheel edit for the current mode. After an import, modes must be restored separately.
-
Reset Current Mode: restores that mode’s default layout. Export first if you want to keep the current setup.
11 / HELP
Troubleshooting
The ZIP says it is packaged incorrectly
Install flick_pie-0.17.0-install.zip as downloaded. Inside it, the Python files must be within a folder named flick_pie. Do not install an older ZIP with __init__.py at the top level, and do not unzip the package before choosing Install from Disk.
Shift + Q does nothing
Check that Flick Pie is enabled and your pointer is over the 3D Viewport. Try N → Flick → Open Flick Pie. If that works, inspect the Flick Pie shortcut in Keymap preferences for a disabled entry or conflict.
A tool is missing, disabled, or fails to run
Check the current mode and select a suitable editable object or mesh elements. Tools from other add-ons require those add-ons to be installed and enabled. Read the message shown by the command or at the bottom of the workflow canvas.
The workflow overlay stays on screen or stops responding
Dismiss any open search or settings popup first, return the pointer to the 3D Viewport, then use Cancel or Esc. If it remains stuck, press F3, search for Close Flick Workflow, and run it. Unsaved draft changes are discarded. If Blender is not accepting input, restart it after saving your work when possible.
Brush settings do not stay separate
Enable Saved Settings on the brush nodes and disable Unified Size and Unified Strength in Blender. Run the saved setup again. If a brush cannot be found, check that your Blender installation includes its Essentials sculpt brushes.
The test result disappears after saving
That is expected: tests are temporary. Open the pie and run the saved workflow to apply the result to your model.
My layout disappears after restarting Blender
Enable Auto-Save Preferences or use Save Preferences manually. Use Export to keep a separate backup of your layouts and saved workflows.
Need help with a reproducible issue?
Send your Blender version, Flick Pie version, operating system, active mode, steps to reproduce the issue, and the full error text or a screenshot. For workflow issues, include the exported preset if you can share it.
 TopoPen