 auron3d



===============================================================================
GanzoFX - Procedural rig builder for any bone chain
Version 1.0.0 | Auron3D | GPL-3.0-or-later
===============================================================================
-------------------------------------------------------------------------------
1. REQUIREMENTS
-------------------------------------------------------------------------------
Blender 4.2 LTS, 5.0, 5.1 or 5.2 LTS
Dependencies None. No internet access, no telemetry, no online licensing.
License GPL-3.0-or-later. Full text ships as LICENSE in the package.
-------------------------------------------------------------------------------
2. INSTALLATION
-------------------------------------------------------------------------------
1. Edit > Preferences > Get Extensions
2. Arrow at the top right > Install from Disk...
3. Pick ganzofx-1.0.0.zip
4. The add-on enables itself on install.
5. The panel lives in the 3D viewport N-panel, under the GanzoFX tab.
-------------------------------------------------------------------------------
3. QUICK START
-------------------------------------------------------------------------------
1. Enter Pose Mode on your armature.
2. Select the chain you want to rig, in order, from base to tip.
3. Open the N-panel > GanzoFX tab.
4. Set a Name. Everything the rig creates is prefixed with it.
5. Press Create Rig.
6. Select GZ-root and animate the Depth slider in the Animation Controls
panel. That is the whole workflow.
Press Remove Rig at any time. The original chain comes back untouched.
-------------------------------------------------------------------------------
4. THE PANEL
-------------------------------------------------------------------------------
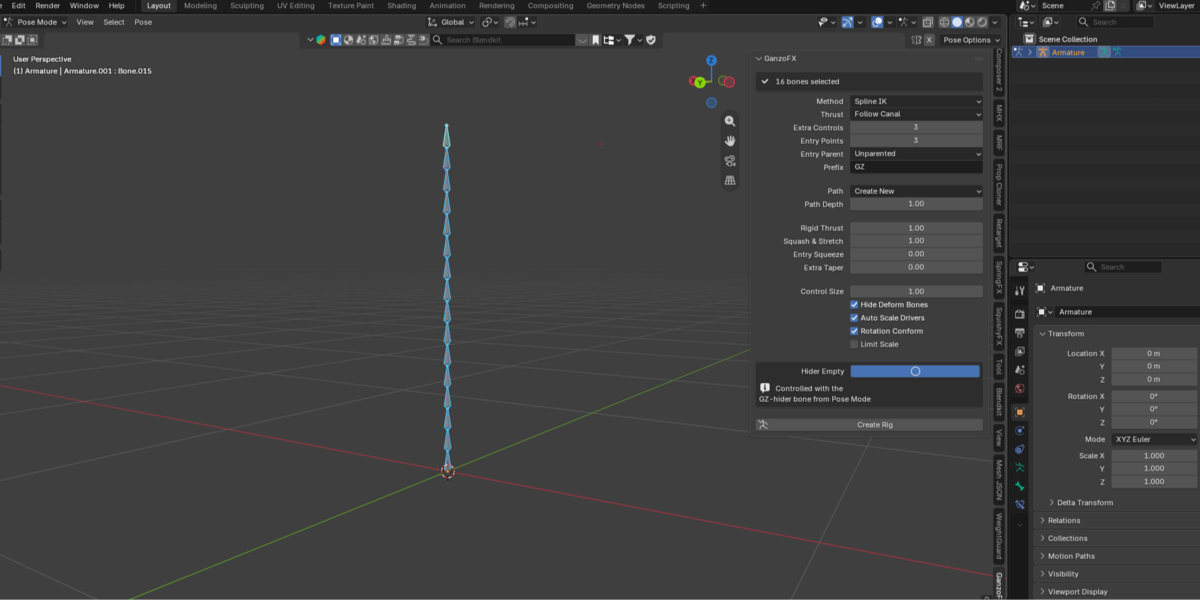
GanzoFX Build settings and the Create / Remove buttons.
Animation Controls Appears once a rig exists. The sliders you keyframe.
Four operators:
Create Rig Builds the rig on the selected bones.
Remove Rig Removes the rig, leaves the original chain intact.
Edit Path Selects the channel curve and enters Edit Mode.
Toggle Mechanism Bones Shows or hides the mechanical bones, for debugging.
-------------------------------------------------------------------------------
5. BUILD SETTINGS
-------------------------------------------------------------------------------
These are read when you press Create Rig. Changing them afterwards does
nothing until you rebuild.
5.1 NAMING
Name Unique name for this rig. Used in every created datablock.
Prefix Prefix for every bone and object created. Default GZ.
5.2 STRUCTURE
Method How the existing bones follow the control system.
- Spline IK : the bones follow a NURBS curve. Smoother
bending, and squash & stretch with volume
preservation comes for free. Default.
- Stretch To : a Stretch To chain between trackers. More
predictable and faster.
Extra Controls Intermediate controls between base and tip. Default 3,
range 1 to 12. More controls means finer shaping and a
busier viewport.
Control Size Multiplies the size of every control widget. Use this
rather than scaling the control bones by hand.
5.3 THE CHANNEL
Path - Create New : builds a straight editable path starting
at the current tip. Default.
- Use Existing : uses a curve you already have, for example
the channel of another rig, so two rigs
can share one path.
Curve The existing curve, when Path is Use Existing.
Path Points Control points of the generated channel. Default 4, range
3 to 12. Edit them afterwards with Edit Path to bend the
channel by hand.
Path Depth Channel length as a multiple of the chain length.
Default 1.0, range 0.1 to 2.0.
5.4 ENTRY POINTS
Entry Points With 1, the channel is a straight editable curve parented
to the entry bone. With 2 or more, the entry bones BECOME
the control points of the channel, so you shape the path
by posing bones instead of editing a curve.
Default 1, range 1 to 8.
Entry Parent What the entry bones hang from.
- Unparented : placed by hand in world space. Classic
behaviour, and the default.
- Master control : they hang from GZ-root and follow the
character.
- Specific bone : they hang from a bone you pick on this
armature, so they follow a partner's
pelvis, a prop, or anything else.
Parent Bone The bone to hang from. It cannot be one of the bones in
the selected chain: that would be a circular dependency,
and GanzoFX refuses rather than building a broken rig.
5.5 MOTION
Thrust How the chain behaves as it travels.
- Follow Canal : the part already inside follows the curve
of the channel, so the chain always stays
on the path. Default.
- Stay Straight : the chain ignores the channel shape and
goes in perfectly straight, like a rigid
body.
This only sets the STARTING value of the Follow Canal
slider. Stay Straight sets it to 0. The part that has not
entered yet is ALWAYS straight, whichever you pick.
Rigid Thrust 1 = the base follows the tip and the chain does not
stretch. This is the realistic behaviour and the default.
0 = the base stays put and the chain stretches to reach
the depth.
Rotation Conform Orients the chain to the channel curvature as it enters.
On by default. Turn it off if you see odd twisting.
5.6 SHAPE
Squash & Stretch Starting value of the rig's Squash slider. Default 1.0.
Entry Squeeze Narrowing of the chain while it crosses the entry.
Defaults to 0. Raise it only if you want that effect.
Extra Taper ADDITIONAL taper on top of the shape the mesh already has.
0 means nothing changes at rest, which is what you want
unless you are deliberately reshaping.
Auto Scale Drivers Adds the thickness and volume drivers the sliders use.
Leave it on unless you are driving scale yourself.
Limit Scale Adds Limit Scale constraints to the controls. OFF by
default, because it stops you shrinking controls freely in
the viewport. Use Control Size instead.
5.7 VIEWPORT
Hider Empty Optional. Creates a ring-shaped empty. Chain geometry that
crosses the ring is hidden, so the chain disappears as it
goes in rather than poking through the surface. On by
default. It needs a mesh weighted to the chain; if there
is none, GanzoFX says so and skips it.
Hide Deform Bones Hides the selected chain on build so only the controls are
left in the viewport. It reappears when the rig is
removed. On by default.
-------------------------------------------------------------------------------
6. ANIMATION CONTROLS
-------------------------------------------------------------------------------
Every slider lives as a custom property on GZ-root and is keyframed like any
other property. This is what you animate.
Depth The travel. 0 = fully out, 1 = fully in. At 0 the tip rests
exactly on the first entry point; at 1 it reaches the far
end of the channel.
Squash Squash and stretch intensity along the chain.
Thickness Overall thickness.
Length Overall length.
Bend Up Bends the chain up and down.
Bend Side Bends the chain left and right.
Aim Entry Blends how strongly the chain aims at the entry point.
Follow Canal 0 = the chain ignores the channel shape and stays straight.
1 = the part inside hugs the channel exactly.
Rigid Thrust Live version of the build setting: 1 keeps the length, 0
lets the chain stretch.
Entry Squeeze Live narrowing as the chain crosses the entry.
-------------------------------------------------------------------------------
7. WHAT GETS CREATED
-------------------------------------------------------------------------------
Bones, all prefixed with your Prefix and Name:
GZ-root Master control. Holds every animation slider.
GZ-ctrl-NN The controls you shape the chain with.
GZ-entry-NN The entry points. Move these to place the channel.
GZ-thrust Drives the base as the chain travels.
GZ-mech-NN Mechanism. Hidden by default; Toggle Mechanism Bones shows
them if you need to see what the rig is doing.
GZ-trk-NN Trackers, used by the Stretch To method.
GZ-aim Aim target for the entry.
GZ-hider Drives the hider empty.
Collections:
WGT_GanzoFX Control widgets. Hidden.
GanzoFX_Internal Riders and internal objects. Hidden.
GanzoFX_Hider The hider empty. Always visible, because you need to see
and place it.
The rig writes a manifest into a custom property named ganzofx_data on the
armature. Remove Rig reads it to undo exactly what it did. Do not delete it by
hand: without it, the rig cannot be removed cleanly.
-------------------------------------------------------------------------------
8. SHAPING THE CHANNEL
-------------------------------------------------------------------------------
With a single entry point, press Edit Path. GanzoFX selects the channel curve
and drops you into Edit Mode. Move the control points to bend the channel any
way you like, then go back to Pose Mode. The rig follows the new shape
immediately; there is nothing to rebuild.
With two or more entry points, skip the curve entirely: the entry bones ARE
the control points. Pose them and the channel follows. This is the better
choice when the path has to move with something, because bones can be
constrained and curve points cannot.
-------------------------------------------------------------------------------
9. NOTES AND LIMITATIONS
-------------------------------------------------------------------------------
* Order matters. Select the chain from base to tip. GanzoFX builds along the
parent relationship, so a broken or branching chain will not work.
* Reach. The tip sweeps the full length of the channel whatever the distance
between the base and the first entry: at Depth 0 it rests on the entry
bone, at Depth 1 it reaches the far end. Moving the entry nearer to or
further from the base changes WHERE the motion happens, not how much range
the Depth slider has.
* Armature scale. Rigs built on figures imported at a scale other than 1.0
behave identically to rigs at scale 1.0. Nothing needs applying first.
* Do not place an entry point behind the base, with the channel pointing
back through the body. The geometry is degenerate and the chain will
collapse at mid-travel. Entry points belong in front of the chain.
* The Parent Bone for entries cannot be part of the rigged chain. GanzoFX
refuses that combination rather than producing a circular dependency.
* The hider empty needs a mesh weighted to the chain. Without one it is
skipped and reported, not silently ignored.
* Build settings are read once, at build time. To change Method, Extra
Controls, Entry Points or the channel structure, remove the rig and build
again. Everything in section 6 is live and needs no rebuild.
-------------------------------------------------------------------------------
10. CHANGELOG
-------------------------------------------------------------------------------
1.0.0
* First public release.
-------------------------------------------------------------------------------
11. SUPPORT
-------------------------------------------------------------------------------
Author Auron3D
Store https://superhivemarket.com/creators/auron3d
License GPL-3.0-or-later. The full text ships as LICENSE inside the
add-on package.
Include your Blender version and, where possible, a small .blend that shows
the problem.
===============================================================================
 Included
Includes 12 months of
- Support from auron3d
- Product updates
Extend this product’s Support Period +12 months: 50% of product price
Have questions before purchasing?
Login to message
| Blender Extension Compatible | Yes |
| Published | 8 days ago |
| Blender Version | 4.2 - 5.2 |
| Extension Type | Add-on |
| Render Engine Used | Cycles, Eevee |
| License | GPL |
Discover more products like this
bone chain spline ik tentacle rig procedural rig control-rig Character rigging rigging tail rig