Maskwright
 FurryMisty3D
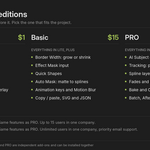
Maskwright 1.0.0 – Documentation
Maskwright is a compositor node for Bézier spline masks. This page is the written guide for all three editions (Lite, Basic, PRO). A longer PDF manual with pictures is included in your download. Works on Blender 4.2 LTS up to 5.2 LTS.
1. Installation
- In Blender open Edit → Preferences → Get Extensions (or Add-ons) and choose Install from Disk… from the drop-down menu.
- Select the
.zipfile (the extension package) and enable the add-on. The classic single.pyfile also works: pick it instead in the same dialog. - Open the Compositor. In Blender 4.2 to 4.5 enable Use Nodes; in Blender 5.0 and newer press New.
- Add the node with Shift+A → Mask → Maskwright Lite / Basic / PRO.
Lite, Basic and PRO are independent add-ons and can be installed together. A Lite, a Basic and a PRO node are not interchangeable: choose one edition per node. When you update from an earlier build, restart Blender after installing.
Important: a .blend that contains a Maskwright node needs the add-on on every computer that opens or renders it, render farms included. Without it the node shows as "Undefined" (in some Blender versions the render comes out black or Blender closes). In PRO, Convert to Node Group removes this need.
2. Quick start
- Add the node and connect your image to the Image input (optional but recommended: it sets the canvas size).
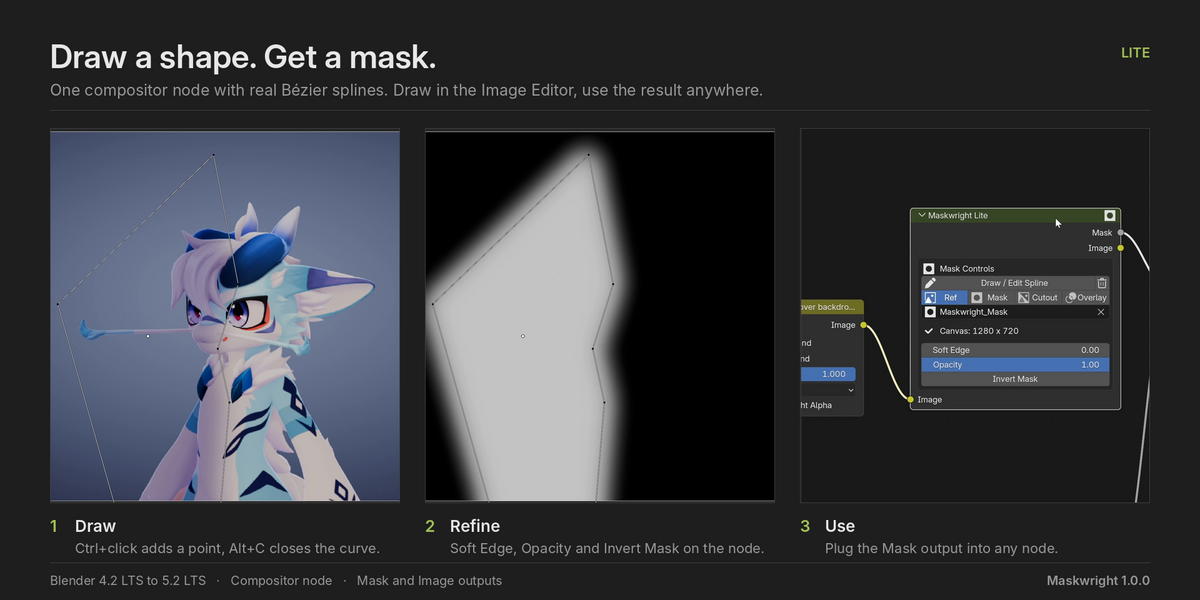
- Press Draw / Edit Spline. The node prepares the Viewer, matches the canvas size and opens an Image Editor in Mask mode.
- Draw with Blender's own mask tools: Ctrl+click adds a point, Alt+C closes the curve.
- Adjust Soft Edge, Opacity (and Border Width in Basic and PRO).
- Connect the Mask output (or the Image output, which is your image cut out by the mask) to whatever needs it.
3. Sockets
| Socket | Type | Use |
|---|---|---|
| Image (input) | Color | Reference image. Sets the automatic canvas size and feeds the Image output. |
| Effect Mask (input, Basic and PRO) | Float | External mask combined with the drawn one (Cryptomatte, ID Mask, a keyer, another mask). |
| Mask (output) | Float | The resulting mask. |
| Image (output) | Color | The input image cut out with the mask (alpha). |
4. Basic controls
| Control | What it does |
|---|---|
| Draw / Edit Spline | Prepares the Viewer and activates drawing in the Image Editor. |
| Trash button | Deletes the curves of the active layer so you can start over. |
| Viewer Output | What the Viewer shows while editing: Ref (reference image), Mask, Cutout (image cut out by the mask) or Overlay (the mask as translucent red over the image). It never changes the Mask and Image outputs. |
| Soft Edge | Blurs the mask contour, in pixels (0 to 500). |
| Opacity | Overall opacity of the mask (0 to 1). |
| Invert Mask | Inverts the mask. |
| Border Width (Basic, PRO) | Grows (positive) or shrinks (negative) the mask, in pixels (−500 to 500). The clock icon switches between a fast stepped algorithm (much quicker at 4K) and the exact Euclidean one. |
| Custom Size (Basic, PRO) | Off: the canvas follows the input image or the render size. On: your own width and height. |
| Effect Mask → Combine (Basic, PRO) | How the Effect Mask input is combined: Multiply (intersect), Add (union) or Subtract (cut out). |
| Border / Soft Edge After Combine (Basic, PRO) | Off: Border Width and Soft Edge act on the drawn mask. On: they act on the result of the combination. This lets you grow, shrink and soften any mask through the node: connect it to Effect Mask, set Combine to Add and draw nothing. |
Processing order: mask → Border Width → Soft Edge → Invert → Effect Mask → Opacity.
5. Quick Shapes (Basic, PRO)
Puts a ready-made shape in the centre of the canvas, half the canvas wide and tall. Basic: Ellipse and Rectangle. PRO: also Rounded (with Corner) and Polygon (with Sides), and New Layer to put the shape in a new spline layer. Then move, scale or rotate its points like any spline.
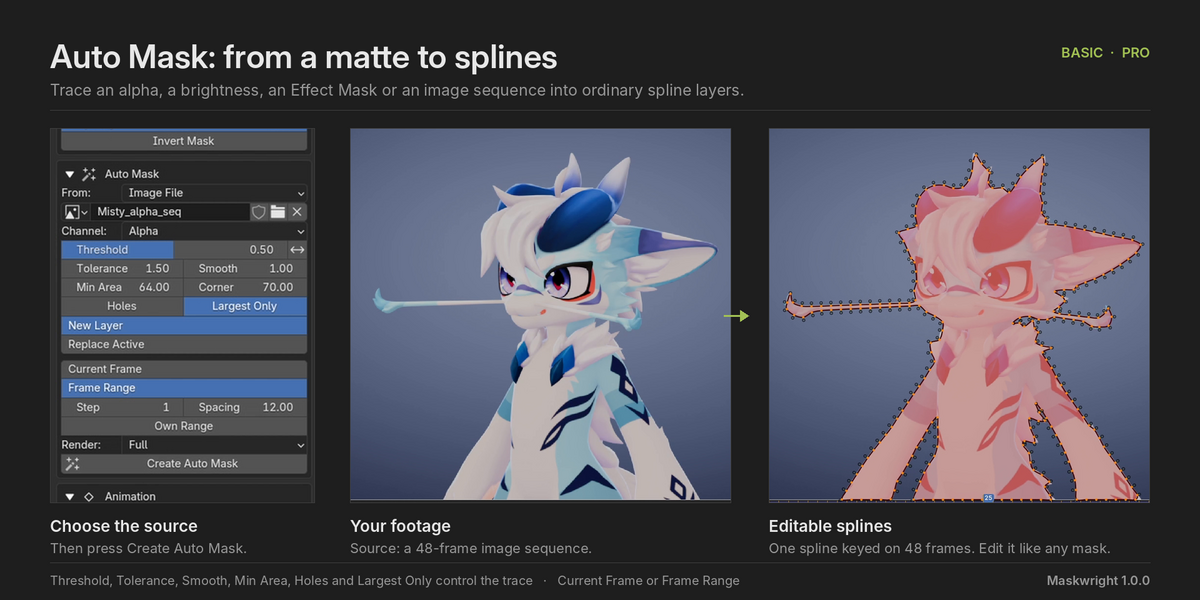
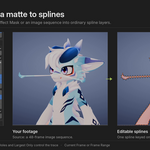
6. Auto Mask: from a matte to splines (Basic, PRO)
Auto Mask traces a matte and writes it as ordinary spline layers: you can edit the points, feather them, animate them and, in PRO, track them.
- Choose the source in From: Effect Mask (Cryptomatte, ID Mask, a keyer…), Image Alpha, Image Brightness, or Image File (an image, sequence or movie, reading Alpha, Brightness or Red).
- Set Threshold (where the contour runs; 0.5 is halfway) and, if needed, Tolerance (lower = more points, tighter fit), Smooth, Min Area (ignores dust), Corner, Holes and Largest Only.
- Choose Current Frame for one still shape, or Frame Range to key the shape over time (Step = a key every N frames; Spacing = distance between points; Own Range).
- Press Create Auto Mask.
When the matte comes from Render Layers, the scene is rendered at Fast (default), Draft (quickest) or Full quality, and the renders are kept, so changing Threshold, Tolerance or Holes and pressing the button again only re-traces. Auto Mask also runs from the command line.
7. Animation (Basic, PRO)
- Draw the shape and go to the first frame. Press Insert Key.
- Go to another frame, move or reshape the points and press Insert Key again (on a key frame the button reads Update Key).
- Use the arrows beside the key button to jump to the previous or next key. The X button removes the key of the current frame.
Motion Blur (Samples 1–64, Shutter 0–1) blurs the mask along its movement and costs one mask evaluation per sample. PRO adds Easing between two keys (Linear, Ease In, Ease Out, Ease In-Out, Hold) and the tools described below.
8. AI Subject (PRO, optional free AI Pack)
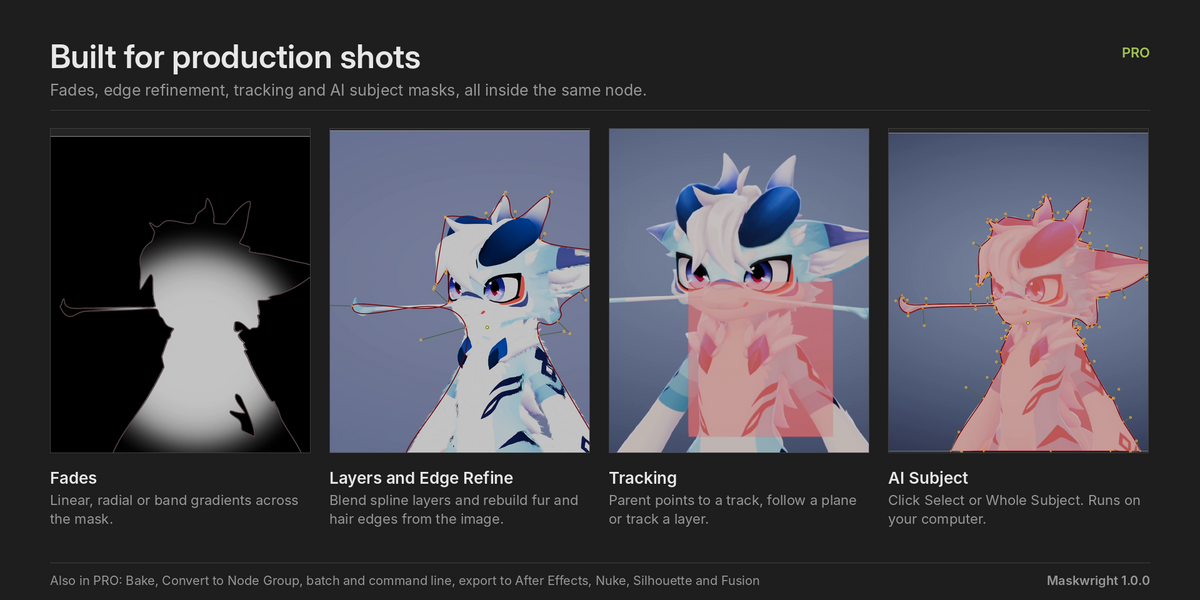
AI Subject finds the subject of the image and gives it to you as spline layers with the same tracing as Auto Mask. The AI runs on your own computer: no account, no internet connection while you work, no fee.
- Click Select (SAM 2.1): press Pick Points, then left-click = part of the subject, Shift+click = not part of it, drag = a box, Backspace = remove the last point, Enter = done, Esc = cancel. Choose the model size: Large (best edges), Base+, Small or Tiny (fastest).
- Whole Subject (BiRefNet): no clicks, it finds the main subject of the frame.
Press Make AI Mask. On a frame range, Click Select carries your clicks from frame to frame; check the keys and fix any frame that drifts, or use a smaller Step.
Installing the AI Pack. The AI Pack is not inside the add-on because it is large and made by other people: the library onnxruntime (Microsoft, MIT, about 15 MB) and the models (SAM 2.1 by Meta, Apache-2.0; BiRefNet, MIT; 110–800 MB each). Nothing is downloaded by itself. One click: turn on Allow Online Access (Edit → Preferences → System → Network), then press Install AI Pack… in the add-on preferences (Edit → Preferences → Add-ons → Maskwright PRO) or in the node's AI Subject panel. By hand: follow Maskwright_AI_Pack_Guide.txt. The files go into a "Maskwright AI Pack" folder in your home folder; delete it to remove the pack. Check AI Pack tells you whether everything is found and whether the AI runs on the graphics card (any DirectX 12 card on Windows) or on the CPU.
9. Edge Refine: hair, fur, fine detail (PRO)
A spline cannot follow every hair. Edge Refine (inside the Advanced part) rebuilds the edge from the image inside a band around the mask: the inner core stays solid, the outside stays empty, and the image decides in between. Plug the image into the Image input. Modes: Edge Snap (any background; Radius, Edge Sensitivity), Color Key (hair against a sky, a screen or a plain wall; pick the Background Color, then Tolerance and Falloff) and Brightness (Low / High). Outside / Inside set how far the band reaches; Strength blends between the plain mask (0) and the refined one (1). Tip: draw the spline a little inside the hair line and let Outside cover the strands. It also refines an Effect Mask such as a Cryptomatte.
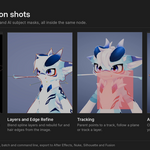
10. Tracking (PRO)
- Parent Points: track a point in Blender's Movie Clip Editor, choose the clip and track in the Animation panel, select the points (none = all of the active layer) and press Parent Points.
- Follow Plane: choose a plane track of the clip and press Follow Plane; the shape follows with perspective.
- Track Layer: draw the shape once on the surface and press Track Layer. Maskwright finds trackable detail, tracks it forwards and backwards, leaves out details that slide, jump or get covered, and makes the layer follow it. Motion sets how the surface may move (Auto, Perspective, Affine, Position, Turn, Scale, Position Only). The panel reports how many frames are weak and the arrow button jumps to the next one.
- Bake Tracking to Keys: writes the tracked movement as ordinary mask keys and releases the tracking, so the mask no longer needs the clip.
- Follow a 3D object or bone (Blender 4.4 or newer): pick an object (and a bone for an armature), optionally switch on Follow Size (Perspective), draw the mask over the object on the current frame and press Follow. It needs a scene camera and follows position (and scale), not rotation.
11. Advanced / Studio Tools (PRO)
The Advanced / Studio Tools switch is off by default; off, the node gives exactly the same result as Basic. On, it unlocks: spline layers with nine blend modes (Merge Add, Merge Subtract, Multiply…) and per-layer opacity, soft edge, border and falloff; Separate X/Y Softness and Edge Gamma; Fades (Directional, Circular / Radial or Band, drawn in the Image Editor with Draw Fade Line, plus Fit Fade to Spline); Transform Mask (offset, rotate, scale without touching the curves); layer tools (Move / Turn / Scale This Layer, Extract Layer to New Node); layer lifetime (a layer counts only on a frame range) and nested layer groups.
12. Bake and Convert to Node Group (PRO)
Baking renders the finished mask once and the node plays the image back, so a heavy mask (many layers, large blurs, fades, motion blur) costs almost nothing to render. Save the .blend first, then press Bake Mask. Bake As: Auto, Still or Frames; Own Frame Range; Bake All / Edit All for every PRO node of the tree. Edit Source brings the live mask back. Animated bakes keep their frames in a maskwright_bakes folder next to the .blend: move it with the project. On Blender 5.2 a still mask is already quick live, so baking it gains little; masks with Motion Blur still gain about six times.
Convert to Node Group turns the node (or every PRO node) into an ordinary node group that renders the same without Maskwright installed: use it for render farms.
13. Copy, Import and Export
- Copy Layer / Copy All / Paste (Basic, PRO): between nodes, files, Blender sessions and editions.
- Import SVG / JSON and Export SVG / Maskwright JSON (Basic, PRO).
- PRO export to After Effects (.jsx: File → Scripts → Run Script File), Nuke (.py: builds a keyed Roto node), Silhouette (.fxs) and Fusion / DaVinci Resolve (.setting: paste the text into the Node Editor). Choose Current, Keys or Every Frame; use Every Frame for the exact movement.
- Blender Mask datablocks in and out (PRO).
14. Batch and command line (PRO)
The Batch panel runs one job on every PRO node of the file: Bake All, Edit All Sources, Convert All to Node Groups, Export All, Auto Mask All, AI Mask All and Report. The same jobs run from the command line, for example:
blender -b shot.blend --python-expr "import bpy; bpy.ops.node.maskwrightpro_batch(action='BAKE', save=True)"
Options: action (BAKE, UNBAKE, TO_GROUPS, EXPORT, AUTO_MASK, AI_MASK, REPORT), scene_name, folder, export_format (AE, NUKE, FXS, FUSION, SVG, JSON), export_frames (RANGE, KEYS, CURRENT) and save. The add-on must be enabled in the Blender profile that runs the job.
15. Node groups and video strips
The node works inside node groups (press Tab to edit the group). From Blender 5.0 it also works inside the Compositor modifier of video-sequencer strips.
16. Quick recipes
| I want… | Do this |
|---|---|
| A cutout with a soft border | Draw the shape, raise Soft Edge, connect Mask to Alpha Over, Set Alpha or Mix. |
| Limit the mask with another mask | Connect it to Effect Mask and choose Multiply. |
| A hole inside the mask (PRO) | Add a layer, draw the hole, set its Layer Blend to Merge Subtract. |
| A top-to-bottom gradient (PRO) | Fade → Directional, Draw Fade Line, drag it in the Image Editor. |
| A shape that changes over time | Open Animation, Insert Key on the first frame, change the points on a later frame, Insert Key again. |
| A mask that sticks to a surface (PRO) | Draw it once and press Track Layer. |
| Render a heavy mask fast (PRO) | Save the .blend and press Bake Mask. Edit Source to change it again. |
17. Limits and troubleshooting
- Tested on Blender 4.2.23, 4.3.2, 4.4.3, 4.5.15, 5.0.1, 5.1.2 and 5.2.3, on Windows. A .blend saved with an older Blender opens in a newer one and the node upgrades itself.
- I can't see a change: check that the Viewer is set to Mask, Cutout or Overlay and that the Image Editor shows the node's mask.
- Node settings cannot be keyframed with Blender's own keyframes (Soft Edge, Opacity, Fade Angle…). Animate the mask itself: Insert Key (with easing), Move / Turn / Scale This Layer with a key, Follow a 3D object or bone, or Follow a tracked point.
- Fade cut short on a tall canvas: a Blender limit on 4.2, 4.3 and 4.4 (mask boxes are capped at two canvas widths). Use Circular or another angle; on 4.5 and newer the limit is gone.
- A baked node does not react to my changes: it is locked on purpose. Press Edit Source, change the mask and bake again.
-
Baked frames are missing after moving the project: copy the
maskwright_bakesfolder together with the .blend. - Auto Mask finds nothing or too much: check From and move Threshold; raise Min Area to drop specks or turn on Largest Only; use the arrows button when the subject is the dark part of the matte.
- Track Layer tracks too few details or reports many weak frames: lower Threshold, draw the shape over a part with texture, start on a sharp frame, or choose a simpler Motion. Very blurred or bending surfaces are better tracked by hand in the Movie Clip Editor, then followed with Follow Plane. Track Layer runs only in Blender's interface.
- Track Layer says Blender is still updating the compositor: wait until it finishes and press it again.
- Exported shapes move differently in the other program: export with Every Frame.
- A mask is left after deleting the node: if it contains a drawing it is kept on purpose. Remove it from the Outliner (Blender File → Masks).
- Blender 4.2 and 4.3 can close when you switch the add-on off while a Maskwright node is still in the file. Delete the nodes, or save and restart Blender, before switching it off.
18. Licence and support
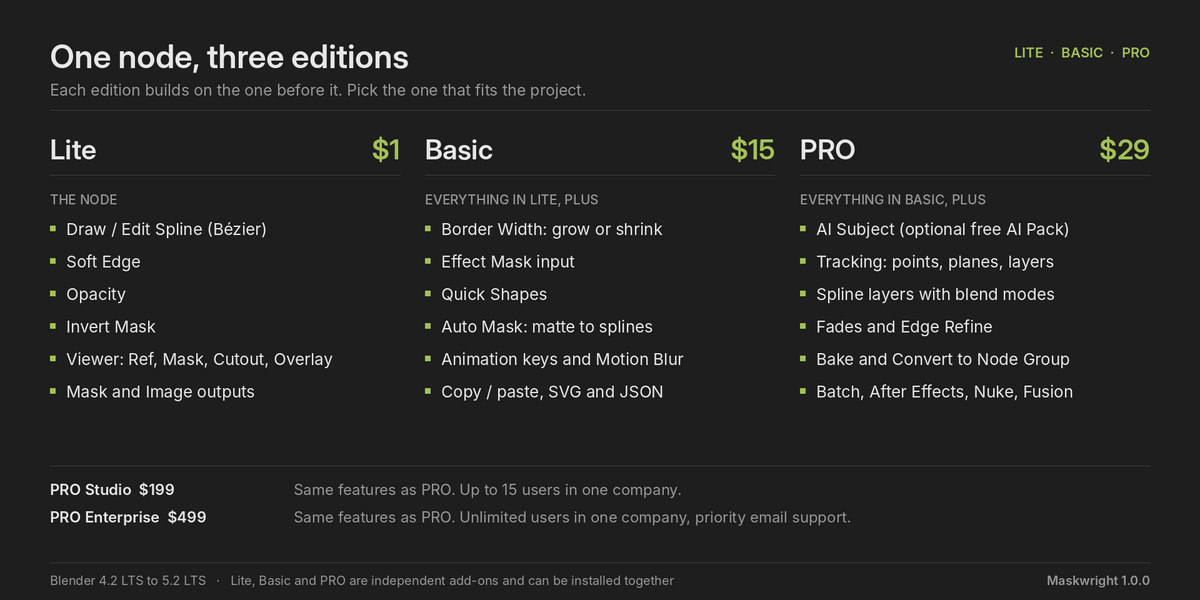
GPL-3.0-or-later. Copyright © 2026 FurryMisty. The variant you buy sets how many people the purchase covers: Basic and PRO, one user; PRO Studio, up to 15 users in one company; PRO Enterprise, unlimited users in one company, plus priority email support. For questions, use the Messages option on this product page.
Have questions about this product?
Login to message
| Blender Extension Compatible | Yes |
| Published | 1 day ago |
| Blender Version | 4.2 - 5.2 |
| Extension Type | Add-on |
| Render Engine Used | Cycles, Eevee |
| License | GPL |
Discover more products like this
bezier cryptomatte rotoscoping planar tracking mask VFX Node compositor matte Compositing Motion Tracking spline