 Skava
Skava



MoCap AI — Documentation
Version 1.1.0 · Blender 4.2 through 5.1 · Windows / macOS / Linux
1. Install the add-on
- Download the MoCap AI add-on ZIP (do not unpack it).
- Open Edit, then Preferences, then Add-ons, then Install from Disk. Pick the ZIP and enable MoCap AI.
- Press the N key in the 3D Viewport to reveal the MoCap AI tab.
2. Dependencies (required)
MoCap AI runs a 100% local pipeline built on two free Python packages that must be installed into Blender's own bundled Python. They are not part of Blender:
- mediapipe — the on-device body, face and hand estimator (the add-on uses the modern MediaPipe Tasks interface).
- opencv-python (imported as cv2) — reads the extracted video frames.
Both run entirely on-device. Nothing is uploaded anywhere. The pose, face and hand landmark models are already bundled inside the add-on, so there is no separate model download and nothing to fetch at run time. Installing these two packages is the only setup step.
How to install them (per OS)
The idea is the same on every platform: find Blender's own Python and use its built-in pip to install the two packages by name. The bundled Python lives inside the Blender install folder, in a python then bin subfolder next to the Blender program.
- Windows: open PowerShell, then run Blender's bundled Python with its pip module and ask it to install mediapipe and opencv-python. The bundled Python sits under the Blender Foundation program folder, in the version folder, then python, then bin.
- macOS: open Terminal and run Blender's bundled Python (inside the Blender application bundle, under Contents then Resources then the version folder then python then bin) with its pip module to install mediapipe and opencv-python.
- Linux: open a terminal and run Blender's bundled Python (under the Blender install folder, in the version folder then python then bin) with its pip module to install mediapipe and opencv-python.
Tip: the README included with the add-on lists ready-to-paste commands for each OS, and the Blender Scripting tab can print the exact path to the bundled Python for you.
After installing, restart Blender. The MoCap AI panel and the add-on Preferences both show a green confirmation when MediaPipe and OpenCV are detected. If either is missing, the panel names exactly what to install and the capture buttons show a clear plain-English message instead of failing.
3. Quick start
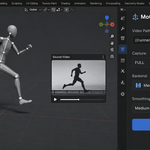
- Pick a video file (Video Source).
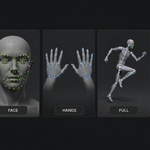
- Pick a Capture Type: Body, Body plus Face, Body plus Hands, or Full.
- Optionally set the frame range, step and smoothing.
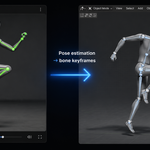
- Click Process Video. A new armature appears with the captured action.
- For retargeting: enable Auto Retarget in the Retargeting panel and pick the target rig.
4. Capture settings and timing
Start Frame and Frame Step select which source frames are read, and the resulting keyframes land on the same output timeline. For example, Start Frame 10 with Frame Step 2 places keys on frames 10, 12, 14 and so on. The scene frame range is set to match.
5. Model accuracy and detection confidence
In the add-on Preferences, Model Accuracy controls how strictly a landmark must be present before it is accepted: Fast is the loosest and keeps more frames, Balanced is in between, and Accurate is the strictest for cleaner tracking. Detection Confidence is the minimum confidence for a pose to be accepted; lower it if a valid subject is being missed. Both settings drive the MediaPipe Tasks options directly.
6. Batch processing
Add several videos to the Batch list at the bottom of the sidebar. Each video becomes its own action named after the file, or a per-item override. The batch runs sequentially with the same settings.
7. Smoothing
A Gaussian filter on bone curves: None, Low, Medium, High. Higher is smoother but adds a little lag on fast movements.
8. Retargeting
Maps the captured pose skeleton onto Rigify, Auto-Rig Pro, Mixamo or custom humanoid rigs. Bone-name remapping is built in for the common rigs; Custom uses automatic name matching between the source and target.
9. Foot-sliding fix
Detects ground-contact frames and locks the feet to a ground height during those frames. Set a sensible Ground Height in the cleanup panel.
10. Face shape keys
When Capture Type is Body plus Face or Full, the add-on writes shape-key keyframes (MouthOpen, SmileLeft and similar) on the target mesh. The mesh should have a Basis shape key before processing.
11. Frame cache
Extracted frames are written to a per-capture folder inside the cache directory set in Preferences. The cache is cleared before every capture, so an older video's frames can never be re-used, and a Clear Frame Cache button in the cleanup panel removes them on demand.
12. Troubleshooting
MediaPipe or OpenCV not installed — install both into Blender's own Python (see Dependencies above). The panel tells you which is missing.
Action is empty — the video has too few detectable poses (low light, distant subject). Lower Detection Confidence in Preferences or try a different video.
Retargeted rig is in rest pose, not animated — bone names do not match the chosen retarget mapping. Switch to Custom for automatic name matching, or rename the target rig's bones to a standard convention.
Could not initialise shape keys — the mesh has broken modifiers or comes from linked library data. Unlink it first, or add a Basis shape key manually.
13. Compatibility and limitations
- Blender 4.2 LTS through 5.1 (tested on 5.1), including the new action system in 4.4 and later.
- Pose estimation runs on the main thread; long videos block the UI.
- Retargeting works best on humanoid rigs with proportions similar to the source.
14. Changelog — version 1.1.0
- Migrated capture to the modern MediaPipe Tasks interface, so it runs on the current MediaPipe releases that install on today's Blender (the older interface it previously used has been removed upstream).
- Bundled the official pose, hand and face landmark models inside the add-on, so capture is fully offline: the models load from the add-on's own folder with no separate download.
- Removed the OpenPose backend and the remote upload path entirely; the pipeline is now 100% local with no network calls.
- Added per-OS dependency install guidance and in-app detection with clear messages.
- Fixed frame extraction so the pipeline reads back exactly the frames it wrote.
- Fresh per-capture frame cache plus a Clear Frame Cache button; stale frames can no longer be re-used.
- Keyframes now honour Start Frame and Frame Step.
- No unanimated bones: neck, head and feet are driven from MediaPipe landmarks.
- Replaced the non-functional Model Path and Enable GPU settings with real MediaPipe options (Model Accuracy and Detection Confidence).
- Corrected the stated Blender compatibility to 4.2 through 5.1.
15. Support and License
Through marketplace messaging. GPL-3.0.
Changelog
1.1.1 — The add-on panel draws again on Blender 5.x. It asked for an icon named STACKED, which no longer exists, and a bad icon name aborts the whole draw — the MoCap AI tab came up empty, with nothing in it to click. Every icon name in the add-on is now checked against Blender's own list.
Have questions about this product?
Login to message
| Sales | 10+ |
| Published | about 2 months ago |
| Blender Version | 4.2 - 5.1 |
| Extension Type | N/A |
| Render Engine Used | Arnold, Blender-Internal, Blender-Game-Engine, Cycles, Eevee, Freestyle, Luxrender, Mental-Ray, Octane, Vray, Yafaray |
| License | GPL |
Discover more products like this
indie animation mediapipe body tracking rigify skeletal-animation pose-estimation facial-capture hand tracking video-mocap animation retargeting motion capture