 dotblend









🚀 MoStack: The Ultimate Layer-Based MoGraph System for Blender
MoStack is a powerful, non-destructive, layer-based Motion Graphics (MoGraph) and procedural modeling system for Blender (4.x & 5.x).
📦 Installation
Download the MoStack .zip file.
Open Blender and go to Edit > Preferences > Add-ons.
Click Install... and select the downloaded .zip file.
Check the box next to Object: MoStack to enable it.
(Important: Do not extract the zip manually. The add-on requires mostack_core.blend to remain in the same directory as the Python script, which Blender handles automatically when installing from zip).
🎯 Getting Started (The MoStack Workflow)
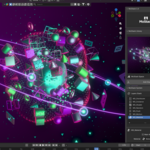
MoStack operates in the Sidebar (N-Panel) under the MoStack tab.
1. Create a MoStack Object
Select any mesh in your scene (or just have an empty scene) and click the ✚ Create MoStack button. This initializes the object, applying the base MS_Distributer and MS_Instance modifiers.
2. Add Effectors
Effectors manipulate your geometry (move, scale, rotate, extrude, etc.). Click the Force Icon to add effectors like Transform, Random, Target, or Delay.
3. Mask with Fields (Data Groups)
Want to restrict an effector to a specific area? Add a Field (Gradient, Shader, Step, or Mixer). MoStack will automatically link the new field to your active effector. No manual attribute typing required!
4. Add Materials
Click the Material Icon to add an MS_Material modifier. You can easily apply your Fields (Masks) directly into the Shader Editor to drive colors, roughness, or emission!
🧩 System Components
MoStack is divided into distinct modular components that stack logically.
1. Generators
The foundation of your setup.
Distributer: Generates the base points (Grid, Line, Circle, Spline, Volume, or from an Object).
Instance: Places geometry on those points (Cube, Sphere, Custom Collection, etc.).
2. Fields / Data
Used to create masks, weights, and falloffs.
Gradient: Linear, Spherical, Cylindrical, Radial, or Object-based falloffs.
Shader: Procedural textures (Noise, Voronoi, Wave, Brick, Image) used as 3D fields.
Step: Creates stepped/quantized data and time-based animations.
Mixer: A powerful layer system to combine multiple Fields together (Add, Multiply, Overlay, etc.) into a single master mask.
3. Effectors
The engines of motion.
Transform / Random / Push: Move, scale, and rotate instances.
Target: Make instances look at a specific object or magnetic point.
Delay / Motion: Add springy physics, trailing animation, or continuous looping motion.
Killer: Deletes geometry based on a field mask.
Extrude / Split / Curve: Deform and manipulate actual mesh geometry.
4. Terminals
Used at the end of the stack to finalize geometry.
Realize: Converts instances into real editable mesh data.
Wires / Tracer: Generates wireframes or trailing splines behind moving instances.
🌟 Key Features
🔗 Smart Attribute Linking
Forget about typing ms_mask_8A2F. When you add a Field, MoStack automatically generates a unique ID, applies it to the Field, and assigns it to your selected Effector.
To change a source, simply click the Dropdown Menu on the effector and pick any existing Field in your stack.
🎨 Dynamic Material Engine
MoStack bridges Geometry Nodes and the Shader Editor seamlessly.
Add an MS_Material modifier and assign a material.
In the Shader Editor, select the Principled BSDF node.
In the MoStack N-Panel, click Add Material Layer.
Choose any Field from your stack. MoStack automatically builds a Multiply Chain or Direct Color setup in the Shader Editor, allowing you to colorize your clones using your 3D falloffs!
🎛️ Standard Blender Modifiers Integration
You are not limited to Geometry Nodes! Click the Modifier Icon in the MoStack panel to inject standard Blender modifiers (Subdivision, Bevel, Boolean, Solidify, etc.) seamlessly into your layer stack. Includes a built-in blazing-fast search menu.
💾 Stack Library (Asset Manager)
Save your complex MoGraph setups and reuse them in any project!
Save Stack As: Saves the entire modifier stack, materials, and linked objects to a library folder.
Capture Thumbnail: Automatically takes an OpenGL render of your viewport to use as an icon.
Add Stack: Browse your visual gallery and click to import a fully functioning setup instantly.
Copy/Paste Settings: Copy the exact slider values from one stack and paste them to another.
💡 Tips & Tricks
The Mixer Node: If you want an effector to be influenced by both a Noise Shader and a Spherical Gradient, add an MS_Mixer. Then, inside the Mixer's properties, add your Gradient and Shader as layers (just like Photoshop). Finally, assign the Mixer as the source for your Effector.
Reordering: Use the Up/Down arrows in the panel to reorder modifiers. Rule of thumb: Generators at the top, Terminals at the bottom.
Jump to Modifier: Click the small Gear/Preferences icon next to an attribute dropdown to instantly scroll to and open the properties of that specific Field.
Update Assets: If you download a new version of MoStack, click Stack Options > Update Asset Nodes to upgrade your current scene's modifiers without losing your slider values or animations.
⚠️ Troubleshooting & FAQ
Q: My Effector isn't doing anything!
A: Check if the effector has a Field assigned to it in the "Source" dropdown. If it does, ensure the Field's location/scale actually overlaps with your geometry. (You can move the empty controller in the viewport).
Q: I get a "mostack_core.blend not found" error.
A: Ensure you installed the Add-on via the .zip file through Blender's preferences. The .py file and the .blend file must sit next to each other in Blender's add-on directory.
Q: Can I use custom objects as instances?
A: Yes! In the MS_Instance properties, set the Instances Menu to Object or Collection, and pick your custom mesh.
-
$69
Full MoStack System · Full Library · All Fields & Effectors · Advanced Features · Single-seat Professional License
-
$49
Core MoStack Features · Essential Library · Essential Fields (2/4) & Effectors (7/13)· Single-seat License
-
$129
Everything in Professional · Studio/Team License · Production Pipeline
Have questions about this product?
Login to message
Discover more products like this
animation Object animation motion graphics product animation mograph typography motion Motion design effectors Procedural Animation Motion System