Parametric Slicer
 3dartbox
in Modeling
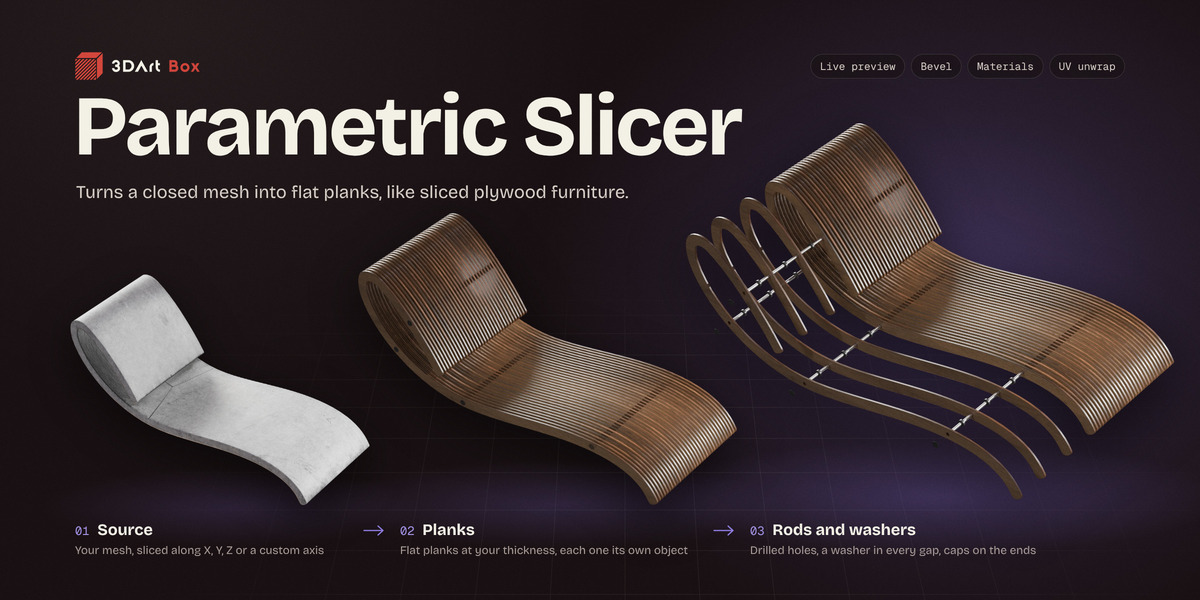

Installing
- Download AB_Parametric_Slicer.zip. Don't unzip it: Blender installs the zip itself.
- In Blender, go to Edit > Preferences > Add-ons, click the small arrow menu at the top right, choose Install from Disk... and pick the zip. It installs as an extension and is switched on straight away.
- In the 3D Viewport, press N to open the sidebar and click the tab called AB Parametric Slicer.
Updating from an older copy. Remove the old one first, restart Blender, then install the new zip. To remove it, open its entry in the add-on list and click Uninstall. Blender happily keeps an old copy next to the new one, and both load, so the old one gets in the way.
Quick start
- Select the model you want to slice and click Use <name> under Source. A live preview of the planks appears right away.
- X is on to start with. Switch on other directions under Directions if you want them.
- Set Thickness and Gap under Layout and watch the preview follow.
- When it looks right, press the Slice button at the bottom of the card. The planks go into a new collection named after the model.
The card
The add-on draws its own card in the viewport rather than a stack of Blender panels. Down its left edge is a strip of buttons: the two at the top are what the add-on makes, and the four below them are settings and side jobs.
- Planks: the slicing itself, and the Slice button
- Hardware: rods, washers and end pieces
- Detail: the outline, the shading, the bevel and the materials
- UV: flattening every part onto the sheet
- Output: where results go, the live preview, and past results
- Settings: the card itself and Reset
The number under Planks is how many planks the settings make right now; the one under Hardware is how many guides mark a rod.
Each numbered step folds away when you click its head, and the value on the right of the head says what is set without opening it. Resting the pointer on any control brings up what it does, most of them with a small animation of that very setting.
Lengths and angles read on the card exactly as they do in Blender's own fields: in the units set in the scene's Units panel (1.8 cm, 18 mm, 0.71"), and angles in degrees unless the scene's rotation is set to radians. Clicking one opens Blender's own field for it, which takes a number the same way: 18mm, 0.7in, or a plain number in the unit on show.
The card hears the mouse through four entries in Blender's keymap, in Edit > Preferences > Keymap under Screen > Screen Editing, each called "AB Parametric Slicer card". They act only while the pointer is over the card and hand everything else straight on to Blender. Leave them switched on: without them the card is drawn but can't be clicked. Nothing of the card keeps running in the background, so Blender's autosave works exactly as it does without the add-on.
The classic panel
If you'd rather have Blender's own panels, go to Settings and, under Interface, choose Classic panel. The classic panels offer the same settings and the same buttons, and a button at the top of the first one brings the card back. The add-on's preferences (Edit > Preferences > Add-ons > AB Parametric Slicer) hold the same switch, the card's Accent color, and Card Width in pixels if the card is too narrow or too wide for your screen.
Planks
Step 1, Source
The Source field lists every object in the file and narrows the list as you type, so part of a name is enough. When something else is selected in the viewport, a Use <name> button appears under it. Once a source is set, Hide Source and Show Source tuck the original away while you look at the planks. Hide Source stays with the source: pick another object while it's on, and the old one comes back into view while the new one is hidden in its place. If you brought the old one back yourself in the meantime, the new one is left alone. Apply Modifiers slices the mesh as it looks with its modifiers, instead of the base mesh.
Step 2, Directions
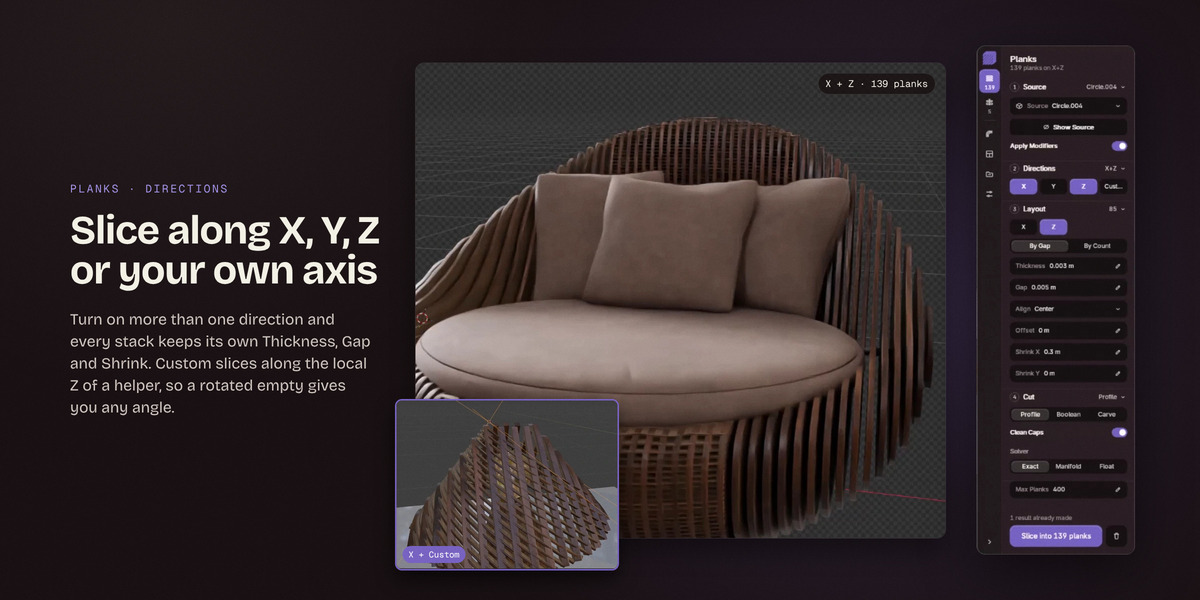
X, Y, Z and Custom choose the directions to slice along, and you can switch on more than one. Custom slices along the local Z axis of a Helper object; an empty works best. Rotate the helper and the planks follow.
Step 3, Layout
With more than one direction on, a row of chips picks whose settings these are; the figure on the step's head is how many planks that direction makes.
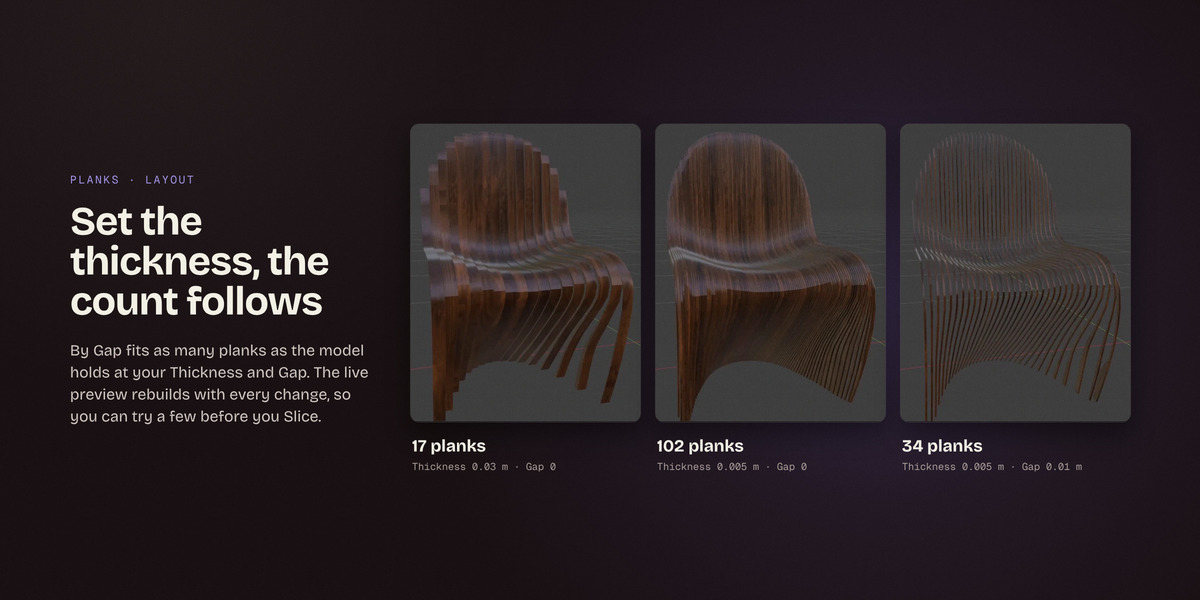
- By Gap: you set Thickness and Gap, and the count follows: as many planks as fit the model at that spacing.
- By Count: you set Thickness and the count, and the gap follows, stretched to spread them over the model. Ask for more than fit and it says the planks overlap at this count.
Align (Center, Start or End) decides where the stack sits when it doesn't fill the model exactly, and Offset slides the whole stack along its direction. The two Shrink fields, Shrink Y and Shrink Z on an X stack, take the same amount off both edges of the plank in that direction. This is how stacks from different directions are kept out of each other's way: each one is pulled in by its own amount, rather than every plank being notched against every plank it crosses.
Step 4, Cut
- Profile: the default and usually the best choice. It reads the outline of the model at each plank and builds the plank fresh from that outline, so every plank comes out clean, with flat caps and a tidy side. It is also the only method with the Bevel and Outline options.
- Boolean: cuts each plank out of the model with Blender's boolean. It keeps the model's own topology on the sides, but it needs a properly closed mesh.
- Carve: slices the mesh with a plane on each side of the plank and fills the cut. Clean Caps merges the cap triangles into flat faces.
Solver picks the boolean solver. It applies to all three ways of cutting, because Profile drills its holes and trims its stacks with a boolean too; the list shows whatever your Blender has, and in Blender 5 the old Fast solver is called Float. Max Planks is a safety limit for Slice.
Slice
The big button at the bottom builds the real result, and says how many planks it will make.
A slice of a heavy model is minutes of work, so it isn't done in one go: the parts are built a few at a time and Blender is handed back in between. While it runs, a bar above the button shows how far along it is and how many parts are done, the viewport still turns and pans under your hand, and Esc stops it and keeps nothing. The live preview holds off until the slice has finished.
Results pile up rather than replace each other. The bin button beside Slice opens Delete results, which asks whether to remove the last result or every one, and does nothing until you press its button. Undo brings them back.
Hardware
Rods and washers, the switch at the top of the tab, builds the hardware together with the planks. With it off the planks come out plain, with nothing drilled through them.
Step 1, Guides
Every object in the guide collection marks one rod position. Guides in picks that collection from the file, and Add a guide at the cursor drops a new empty where the 3D cursor is. Under each guide are X, Y, Z and Custom chips for which directions that guide puts hardware on. They start off, so switch on the ones you need.
On X, Y and Z a rod always runs square to the planks. On Custom its direction comes from the guide's own rotation: an unrotated empty gives a square rod, and rotating the empty tilts that one rod.
Step 2, Rods
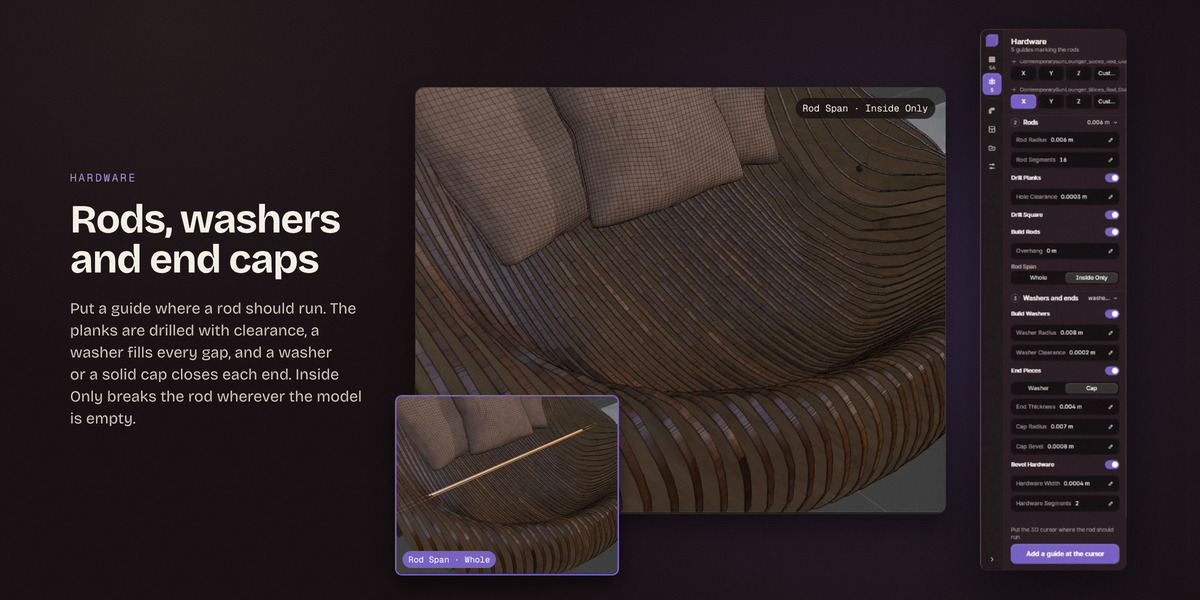
Rod Radius and Rod Segments shape the rod. Drill Planks cuts the holes: Hole Clearance is added to the radius so the rod slides through, and Drill Square bores straight through the plank instead of following a tilted rod, which would leave a stretched hole, deeper on one side. Build Rods adds the rods themselves, and Overhang is how far they run past the outer planks.
Rod Span decides what a rod does where it crosses empty space inside the model, like a slot running through it. Whole runs one rod straight across, from the first plank it reaches to the last. Inside Only stops the rod where it leaves the model and starts it again where it comes back in, so nothing of it hangs in the open: every piece gets its own overhang and its own end pieces, and the pieces are numbered along the rod, Rod_01_1, Rod_01_2 and so on. Rod Span shows while Build Rods or End Pieces is on, since both follow it.
Step 3, Washers and ends
Build Washers puts a washer in every gap between planks, sized by Washer Radius and Washer Clearance. End Pieces adds something outside the first and last plank a rod reaches, either a Washer the same size as the ones between the planks or a solid Cap with its own Cap Radius and Cap Bevel; End Thickness sets how thick it is. Bevel Hardware bevels rods, washers and end pieces, with Hardware Width and Hardware Segments of its own.
The button at the bottom of this tab is Add a guide at the cursor, the same as the one in step 1.
Detail
Step 1, Outline
Profile only. With both switches off, the outline comes straight from the model.
Segment Count respaces every ring, the outline and every hole, to about that many Segments. Segment Step keeps every segment no longer than Step. Either way, a turn sharper than Corner Above counts as a corner and is never moved, and a ring is never allowed to fold over itself or cut into its neighbor on a thin wall; where it would, it simply gets more segments. Thin Out Straight Runs drops the points along stretches where the outline turns less than Keep Above.
Step 2, Shading
Smooth Shading turns smoothing on, and the row under it decides which edges stay sharp: by Angle, Keep Rims for the edges where caps meet sides, or None. Weighted Normals lets the bigger faces decide the shading, which cleans up the pinching a bevel leaves behind, and Keep Sharp respects the sharp edges while it does that.
Step 3, Bevel
Profile only, and the plank bevel only ever happens there. Width and Segments set the bevel. The row under them chooses Cap Edges, the rim where each cap meets the side, or By Angle, any edge sharper than the Angle you give it.
Fit Width holds the width at 45 percent of the thinnest plank, one value for the whole run, so a thin stack never gets a bevel wider than its planks. Fit Outline merges outline points that sit closer together than the bevel needs; it removes the short edges that force clamping, but it also thins out the outline, so leave it off unless clamping is a problem. Clamp Overlap shrinks the bevel wherever a plank is too narrow for the full width. Left off, the width is identical on every plank, which is usually what you want.
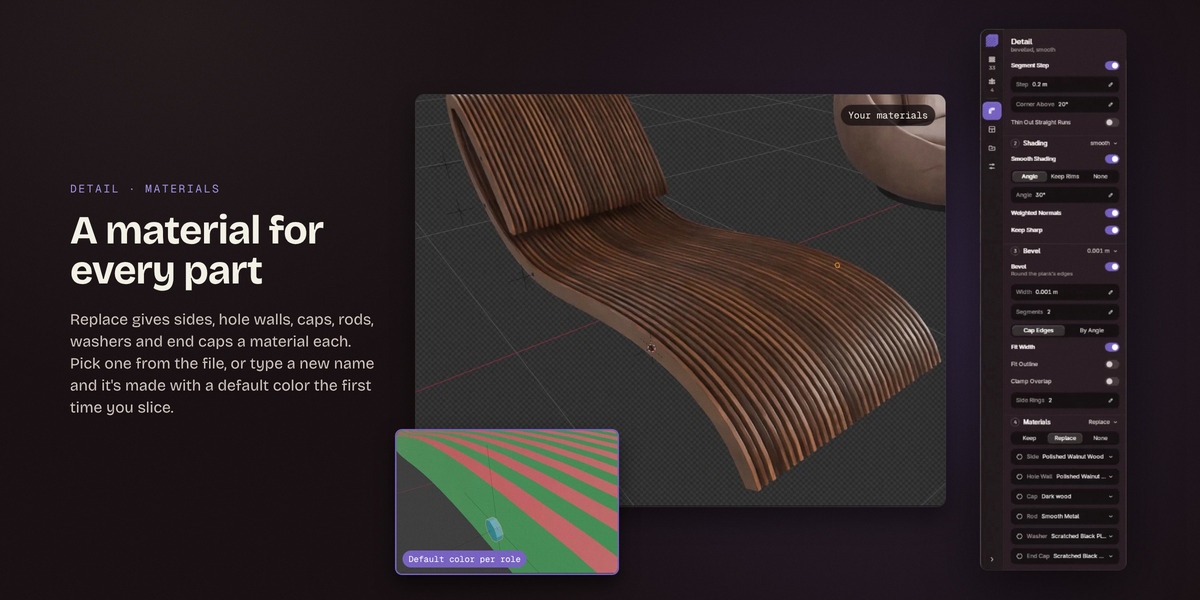
Step 4, Materials
Keep leaves the model's own materials on the planks. None gives the parts no materials. Replace gives every part a material by its role, with a field each for Side, Hole Wall, Cap, Rod, Washer and End Cap. Each field lists the materials already in the file and narrows the list as you type; a name that doesn't exist yet is created the first time you slice, with a default color, and nothing is created before it's needed.
With Profile, a bevel and Replace, Side Rings decides how far the side material reaches across the bevel. At 0 only the flat middle band takes the side material; at the segment count the whole bevel does.
UV
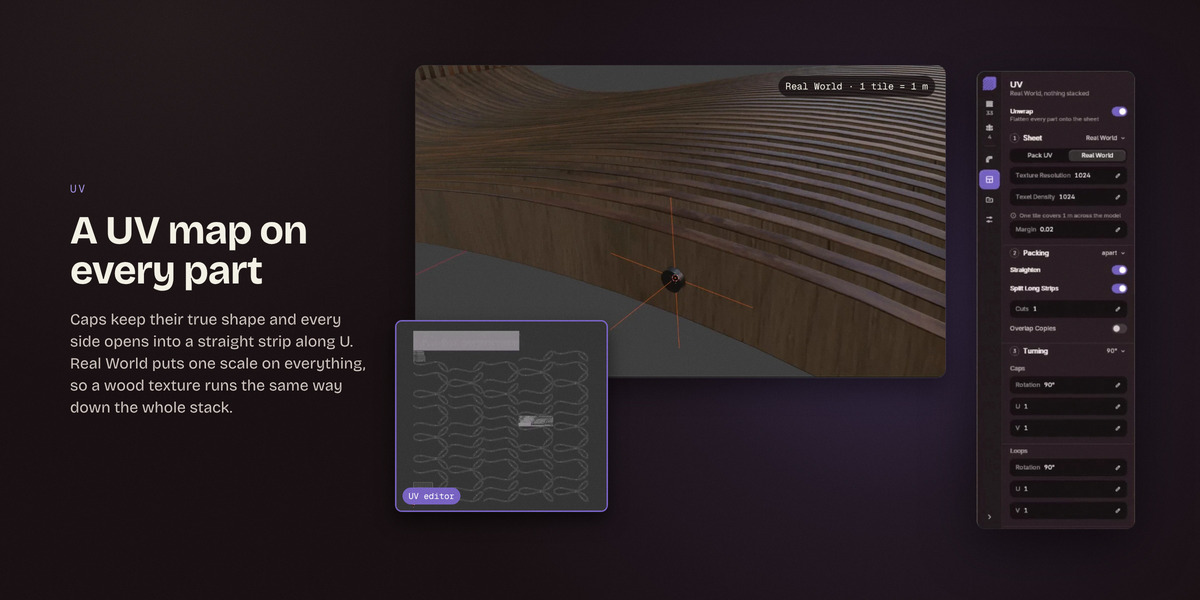
With Unwrap on, every part gets a UV map, in the preview and in the result.
Seams follow the materials. With Replace, the Cap, Side and Hole Wall slots decide every cut on their own; with the other material modes, caps are cut from the sides.
Caps keep their natural shape. They're laid flat at their true size, in the plane they actually lie in, so a slanted end comes out round rather than squashed. Bevel rings that carry the cap material stay attached and open out around the cap at their true width.
Loops, meaning the sides, the hole walls and the bevel rings of the side material, come out as straight strips: every rim a straight line, one strip per material, no seam inside it. Every closed ring opens along a single cut, placed on its sharpest corner when it has one. A cap that is only a narrow ring, like the end of a tube, is cut and straightened like a loop too. A cap with just a rod hole in it isn't, and keeps its shape.
Rods, washers and end pieces open by their angle round the rod, so their strips stay straight at any tilt and all their cuts line up on one line. When they're bevelled, the seam runs along the middle of the bevel. With an odd segment count there's no middle edge, so the edge on the cap side of the middle is used and the extra ring goes to the strip. Planks without Replace follow the same middle-of-the-bevel rule.
Every strip lies along U, so all the loops read in one direction.
Step 1, Sheet
- Pack UV: the planks share one UV tile and the rods, washers and end pieces share the next, joined or not, so the two kinds can take two texture sets and each is easy to pick out. Inside a tile every island has its own place. Blender draws one square unless it is told otherwise, so the open UV editors are asked for the two tiles that were used. Even Texel Density brings both tiles to one density, set by whichever of them needs the most room.
- Real World: one scale on every part, so a tiling texture reads the same across the whole stack, in a single tile. Texel Density sets that scale and the line underneath shows how long one repeat of the texture is. At true size a big run simply runs past the square, and that is the point of the mode.
Texture Resolution is the pixel size of the texture you're going to use. Margin is the space between islands, as a share of one UV unit.
Step 2, Packing
Straighten squares every strip up: each rim becomes one level line and every edge across the strip stands straight. Columns in a strip of triangles are left alone so nothing folds over.
Split Long Strips cuts a strip too long for the sheet across into pieces, which pack into far less room than one long run did; Cuts is how many times it may be cut. A strip is cut along edges it already has, and a rod whose strip has no ring to cut along is given one. Copies of a strip are cut the same way, so they still stack with Overlap Copies on.
Overlap Copies lays islands that are copies of one another on the same spot, so a run of identical parts spends the texture once. A copy is recognized two ways: by how the part was built, which is exact and lands the copy on its leader corner for corner, and failing that by the outline it came out with.
Step 3, Turning
Caps and Loops each have Rotation, U and V. Rotation turns every island of that kind; U and V stretch them in that direction, and 1 leaves them as they are. A quarter turn on Loops stands every strip up along V. On a plank's end caps this is where you put the 45 degrees that lines them up with the rest.
Output
Where it goes. Collection names the collection results go into; leave it blank and it becomes the object's name plus _Slices. Every Slice makes a new numbered collection, and the line underneath shows the name the next one will get.
Join Parts merges every plank, rod and washer of a result into one object. The materials are gathered into one list and every face keeps its own; UVs, smoothing, sharp edges and seams all come across.
Triangulate Ngons splits every face with more than four corners into triangles, in the preview and in the result. Quads stay quads. Turn it on when the parts are headed to another program, since ngons are the thing every program fills in its own way.
Live preview rebuilds a temporary preview whenever a setting changes, and it comes two ways:
- Draft: the default. The finishing work is left undone (no bevel, no UVs, no triangles, no weighted normals) and the rings round rods, washers and holes are cut back to a handful of segments. Everything that decides the shape of the run is still read, so the planks land exactly where they will.
- Full: everything, exactly as Slice will build it.
Because a draft never reads the finishing settings, they aren't shown while one is on screen: the Bevel step, the whole UV tab, Weighted Normals, Triangulate Ngons, Cap Bevel and Bevel Hardware all come back when you switch to Full. A line beside the switch says so. With Live preview off there is no draft, and everything shows.
Changing a setting doesn't always cost a whole rebuild. One only the packing reads (Margin, Overlap Copies, Texture Resolution, Texel Density) lays the run out again with nothing rebuilt. One only the rods, washers and end pieces can see has those built again and the planks left where they are, which is most of the cost. Everything else is a full rebuild, and so is anything at all while Join Parts is on, since a joined object has no separate parts left to redo.
Preview Limit keeps the preview from trying above that many planks; past the limit it just says so and waits for you to Slice.
Results. The line here is what the last Slice or delete did. Delete results opens the same dialog as the bin button on the Planks tab.
Settings
Interface switches between the card and Blender's own panels, and Accent sets the color the card is drawn in. The add-on's preferences hold the same two, plus Card Width.
Start again holds Reset every setting, which puts every setting back the way it started. Its dialog asks whether the results should go too. A source Hide Source has hidden comes back into view either way.
Notes
- A long, thin rod unrolls into a long, thin strip. That's its real shape; zoom in if it looks like a line.
- Only thin washers get their flat faces straightened. A thick one keeps its round face, because straightening it would stretch it too much.
- The preview is rebuilt as you work. On a heavy model, leave it on Draft, lower Preview Limit, or switch Live preview off and just Slice.
Troubleshooting
- "cannot import name ... from AB_Parametric_Slicer" right after installing an update: Blender still holds pieces of the previous version. Restart Blender.
- "the boolean handed back the whole mesh every time, the source is probably not closed, try Profile": the Boolean method needs a closed mesh. Switch to Profile, or close the mesh.
- "the source has N open edges": the model has gaps in its surface. Profile usually copes; Boolean usually doesn't.
- "N planks are too narrow for a X bevel, clamping left them square": the bevel was wider than those planks allow. Lower the width, or turn on Fit Width.
- "no guide has a direction switched on": the guides are there, but none of their X, Y, Z or Custom chips is on for that direction.
- "no rod guide lands inside the model": for that direction every guide sits outside the model. Move a guide inside.
- "planks overlap at this count": By Count asked for more planks than fit at that thickness. Lower the count or the thickness.
- "N planks, over the preview limit of M": the preview skipped it. Raise Preview Limit, or just press Slice.
- The Bevel step or the UV tab is missing: a draft preview is on screen. Switch Output to Full.
- Nothing happens when you click the card: a Blender dialog is open somewhere over it. Close the dialog.
Have questions about this product?
Login to message
| Blender Extension Compatible | Yes |
| Published | about 15 hours ago |
| Blender Version | 4.2 - 5.2 |
| Extension Type | Add-on |
| License | GPL |
3dartbox
Discover more products like this
sliced parametric parametric-furniture slicing automatic uv unwrap 3D parametric rods furniture planks bevel slicer plywood