Quick Detail It
 EdenWeby 3D



Documentation & Setup
Welcome to the Quick Detail-IT user manual. This documentation outlines how the layering stack functions, parameter references for procedural and image modes, custom asset pipelines, and troubleshooting advice.
1. Installation
Keep the downloaded file in its `.zip` format. Do not unzip it.
Go to Edit → Preferences → Get Extensions (or Add-ons in Blender 4.0/4.1).
Click the dropdown menu arrow or Install button in the top right, select the `.zip` file from your disk, and ensure the checkbox next to Quick Detail-IT is enabled.
2. Addon Location & Panels
Quick Detail-IT integrates seamlessly into three main areas of Blender's layout interface:
Material Properties
Located directly inside the Material Properties tab. This is the primary workspace panel containing every config option.
Shader Editor Sidebar
Press N in the Shader Node Editor to open the right sidebar and click the Quick Detail-IT tab. Handy for working directly alongside your material nodes.
3D Viewport N-Panel
Press N in the 3D Viewport. Perfect for adjusting detail layers, seed values, and intensity sliders dynamically while observing the shader update live in rendered view.
3. Stack Mechanics & Under the Hood
Quick Detail-IT operates on a non-destructive stacking pipeline. Instead of altering your base material nodes or baking files directly, it builds node networks dynamically.
The Node Frame Stacker
Every time you click Apply Detail, the addon creates a dedicated, color-coded node frame inside the Shader Editor. The frame is tagged as QDIT_DETAIL. This tag allows the addon to count active layers and strip them out or stack them sequentially without touching any custom nodes you set up manually.
Displacement Setup
If the Affect Displacement toggle is active, the addon hooks a displacement node group directly to your material's output. It automatically switches the material's displacement method inside Blender from 'Bump Only' to 'Displacement and Bump' (BOTH), allowing for real mesh deformations out of the box in Cycles.
4. Parameter Reference
Determines the overall visibility of the detail layer (0.0 to 1.0). Controls the factor input on color mix nodes and math multiplier nodes.
Controls feature density. A higher scale results in smaller, more densely repeated detail shapes.
Provides variation for procedural noise coordinates. Click the refresh button to generate a new seed manually, or toggle Auto Randomize to get a unique pattern variations automatically each time you hit apply.
Allows post-process corrections directly on color and albedo maps without opening image editors.
Applies X and Y translations to tile coordinates, moving maps dynamically across mesh surfaces.
5. Procedural Detail Presets
Quick Detail-IT generates details procedurally by combining multiple noise networks. To make the interface accessible, details are separated into 10 key categories.
Metals
Fine hairlines (Scratches), surface dents, oxidation rust patches, weathered paint chips, brushed grain, weld seams, heat discoloration, etc.
Wood
Directional fiber wood grain, natural knots/burls, aging checks, weather-bleached surface wood, charred surfaces, termite bores, etc.
Stone
Marble-style mineral veining, crevice moss/lichen growth, chip marks, tile grout overlays, sandblasted pits, water streak marks, quarry tool marks, etc.
Fabric
Canvas weave crosshatching, fiber pilling, seam stitching lines, frayed edges, compression wrinkles, color-bleeding stains, mesh open-holes, etc.
Plastic
Oily fingerprint smudges, mold parting lines, UV-yellowing gradients, crazing micro-cracks, label adhesive residue ghosts, thermal warping ripples, etc.
Concrete
Formwork wood grains, entrapped air pockets, rebar rust bleed, efflorescence crystal bloom deposits, vehicle oil drips, graffiti marks, etc.
Leather
Hide pore texture details, abrasion scuffs, stress creases, dry cracks, hot-stamped embossing patterns, perspiration salt stains, mold spots, etc.
Glass
Grease smudges, edge chips, spiderweb cracks, water spots, frosted patches, devitrification hazing, paint overspray, scratch networks, etc.
Organic
Skin pores, scales, bark texture, fungal growth patches, subsurface veins, decay rot zones, feather barbs, bone osteon patterns, etc.
Paint & Coatings
Brush strokes, orange peel spray texture, runs/drips, flaking paint, craquelure cracking, overspray edge, roller stippling, primer showing, etc.
6. Image Textures & Custom Imports
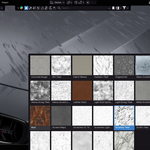
For realistic PBR materials, switch to the Image Texture tab. The addon detects and displays thumbnail previews for all folders loaded inside the `textures/` directory.
Built-in Library
Quick Detail-IT ships with 10 high-quality tileable PBR texture sets ready to go: Rust, Metal Scratches, Wood Grain, Stone Veining, Fabric Weave, Plastic Scuffs, Concrete Rough, Leather Grain, Paint Flakes, Organic Scales.
Custom Import Pipeline
Use the Import Custom Texture operator to expand your library. The import dialog requires:
- Texture Name: Folder key (use underscores instead of spaces).
- Color Map (Required): Main color/diffuse texture path.
- Roughness Map (Optional): Fallback maps automatically to your color map.
- Normal Map (Optional): Omitted normal paths auto-generate a flat 2x2 tangent space Normal map (RGB 128, 128, 255).
All custom files are copied directly into the addon's directory under `textures/custom/[name_clean]/`, ensuring your Blender library is portable.
7. Troubleshooting FAQ
Error: "No active material"
Occurs when your selected object has no material assigned in the slot menu. Click the Create Material button provided directly inside the alert banner to quickly assign a clean node tree.
Error: "Material needs a Principled BSDF"
Quick Detail-IT hooks detail nodes directly to the inputs of a Principled BSDF node. If your material uses simple custom shaders (e.g. Emission/Glass nodes directly connected to Surface Output), check Use Nodes or add a Principled BSDF node first.
Custom textures do not load after manual deletion
If you delete custom directories directly on your disk, please restart Blender or hit F3 → search 'Reload Scripts' to trigger a refresh of the custom texture preview dictionary.
Need Support?
Got questions, bugs, or feature suggestions? Join the YouTube or Discord server:
Have questions about this product?
Login to message
| Blender Extension Compatible | Yes |
| Sales | 10+ |
| Dev Fund Contributor | |
| Published | 4 months ago |
| Blender Version | 4.4 - 5.2 |
| Extension Type | Add-on |
| Render Engine Used | Cycles, Eevee |
| License | GPL |

Discover more products like this
detailer Material texture maps procedural adding surface imperfections surface imperfection rougness textures smurg detail