Shader Shaper
 3d illusions



Shader Shaper Documentation
Installation
Install the addon from the Blender preference’s Add-ons panel (this is not an extension). Follow the below step by step guide to install the modules and models. Any issues, please refer to the troubleshooting at the bottom of the page, and if you can't find an answer, drop me a message using the contact creator button on the product page 👍
Preferences
Once installed, open the Shader Shaper addon preferences and set:
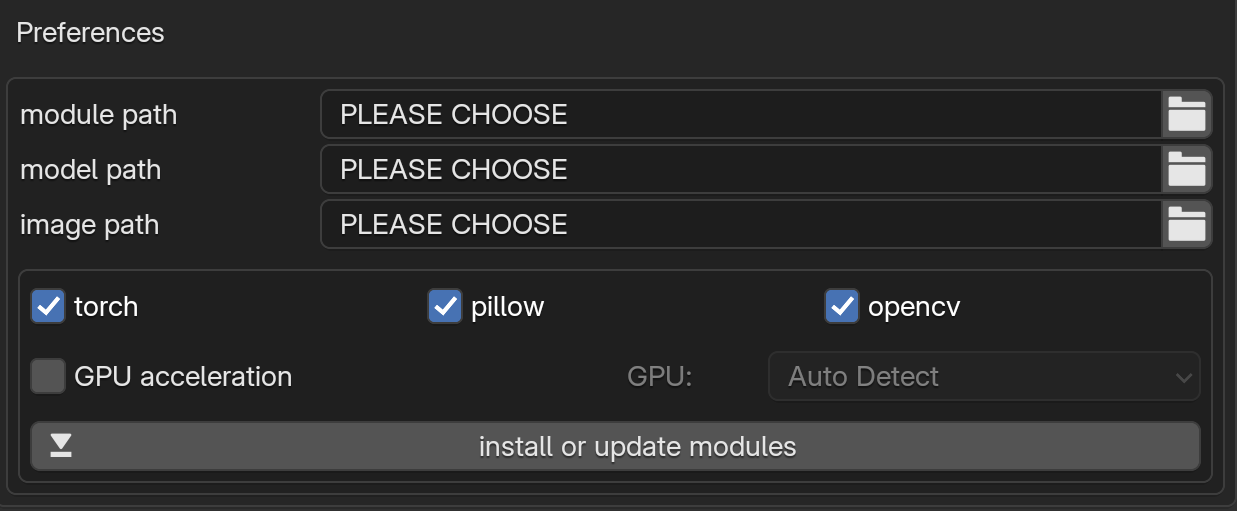
- module path – This is the path where the addon will place necessary python modules when you click 'install or update modules'. Make sure the folder has read/write permissions
- model path - The path to the AI models you've downloaded
- Image path – The path to the folder you would like the addon to save generated depth, normal, and bump maps to.
Important - When setting the above paths, avoid using paths that contain brackets, this seems to cause issues with the external modules used by the addon.
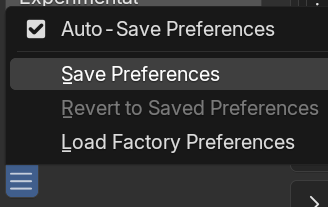
After setting the preferences, make sure you click the 3 bars at the bottom left of the preferences window, and choose ‘save preferences’.
Module Installation

This addon uses the Pillow, Torch, and CV2 python modules and their dependencies. If you already have them on your computer, then you can try specifying the folder where they already reside, just bear in mind that your existing ones may not be GPU accelerated, and if they were installed in another version of Blender, they may be incompatible.
If you have my PixelModeller addon, and you plan to install the GPU accelerated modules using Shader Shaper, then you should disable PixelModeller, save the preferences, and then restart Blender before attempting to install the Shader Shaper modules. After installing the Shader Shaper modules as instructed below, you can then set PixelModeller to use the same module folder. If you don't intend to install the GPU accelerated versions, then you can just set Shader Shaper to use the PixelModeller module folder (they use the same modules).
If during addon usage you get a message saying the modules you have are incompatible, then you can either:
A) update the current ones using the 'install or update AI modules' button
B) choose a different folder just for this addon (just in case another addon or a previous version of Blender requires the older versions).
If you go with option B, before clicking the ‘install or update modules’ button, disable any other addons that use PIL, Torch, and CV2, save the preferences again, and restart Blender to ensure there are no conflicting modules that will prevent successful installation or correct operation of the addon. Consider using application templates when using conflicting addons: Application Templates - Blender 4.3 Manual
To download or update the modules, follow the steps below.
- tick the checkboxes for torch, pillow and opencv (they're all needed, but you can untick the ones that are already in the specified modules folder providing they were installed with a version of Blender that uses the same python version as your current version)
- If your GPU supports it, optionally enable GPU acceleration. Highly recommended, as it's massively faster, and will be necessary to avoid prolonged waiting times when using the enhance option.
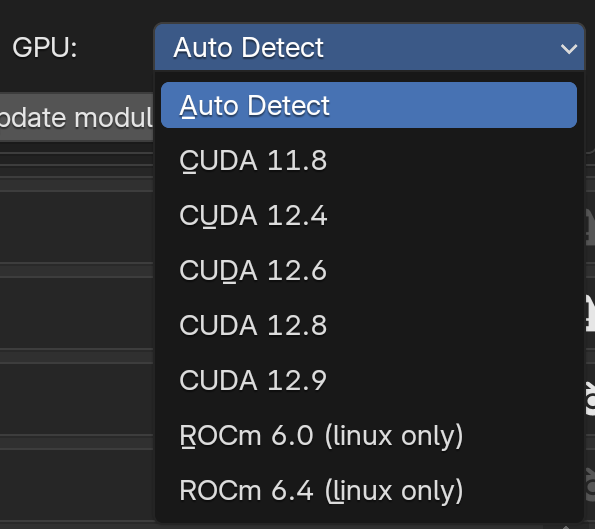
- choose the GPU option. Auto Detect will usually work, but if it's unable to find the necessary information, you can manually specify from the dropdown (choose the option closest to your gpus's cuda version). Please note ROCm is for AMD GPU's only, is only supported on Linux, and requires that ROCM is installed: AMD ROCm documentation — ROCm Documentation
- Open Blender's Terminal from the window menu
- click the ‘install or update modules’ button.
- once complete, open the modules folder and make sure pillow (PIL), torch and cv2 folders are present:
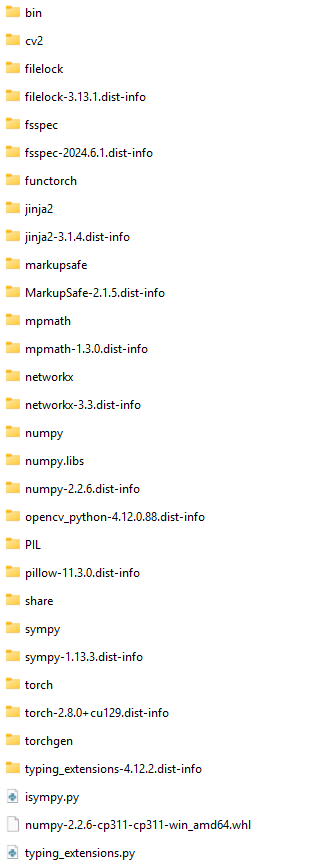
- If a module fails to install, then you'll get a popup telling you why, see the troubleshooting at the bottom of this page. Unless it's a folder permissions issue, or loss of internet, it's usually only torch that may fail to install, so the troubleshooting section also shows you how to download and install torch manually if necessary.
WARNING - The GPU version of torch is approximately 3.5GB to download, and unpacks to 7.5GB, so ensure you have enough disk space, and expect Blender to become unresponsive for a prolonged period of time during download/unpacking. The CPU version is much smaller, around 300mb download size, and 1.1GB unpacked, but is MUCH slower. You can view the progress in the Blender console. If there are any issues with installation, you will get a pop up box with detailed instructions on how to resolve.
Download an AI model
Download any (or all) of the below AI models, and place them in the ‘models’ folder (not the ‘modules’ folder).
- DepthAnything v2 Large 1.34GB (non-commercial use only, requires attribution CC-BY-NC-4.0).
- DepthAnything V2 Small 99.2MB (commercial use allowed - Apache 2.0 licence)
- Midas3.1 dpt_beit_Large_ 512 (1.47GB) (commercial use allowed - MIT licence)
- Midas3.1 dpt_swin2_Large_384 (827MB) (commercial use allowed - MIT licence)
- Depth Anything V1 Large (licence unknown (check with LiheYoung))
Please note that it's your responsibility to check that the licences are still as stated above. You can check using the below links:
-
Depth anything V2 models: link to licence text for v2 models
- Midas 3.1 dpt_beit_Large_512: Intel/dpt-beit-large-512 · Hugging Face
- Midas 3.1 dpt_swin2_Large_384 : Intel/dpt-swinv2-large-384 · Hugging Face
-
Depth anything v1 model: Unable to locate licence information, you can ask Lihe Young (the creator), here: Issues · LiheYoung/Depth-Anything
For the midas models pages linked above, the licence is shown on the right, as shown below:
Using the addon
Using the addon is very easy:
- Select an object
- IMPORTANT If using Blender 4.2 or later, it is strongly recommended to switch to the 3d viewport's material preview mode rather than Cycles viewport rendering. Cycles doesn't always refresh correctly during interactive tweaking, and can display incorrect, or downright peculiar results. Once you click finish or cancel, you can switch to Cycles without issue. If you do use Cycles whilst interactively tweaking Shader Shaper's sliders (for example if you're using an old version of Blender that didn't support displacement in EEVEE), and notice your change hasn't taken effect, or the result is odd, you can force cycles to update by switching to solid view and back to rendered view.
- Open the shader editor and make sure the material you want to modify is shown.
- Make sure the material has a principled bsdf connected to an output node, and that it has an image texture node
- Select the image texture node
- Choose the shader shaper settings you want to use
- Click 'Generate'
- The addon will then generate the images and add the relevant nodes and wires to your material!
- Use the interactive sliders to get the result you want.
- Click Finish to finalise the material and save the maps to disk, or click Cancel to revert the material back to how it was before you clicked 'generate'.
Important - Until you click finish or cancel, the addon will limit Blender functionality. You will be able to use all Shader Editor functionality, the 3d viewport and image editors will be limited to navigation, and all other areas of Blender will be locked. This is to ensure the addon isn't left running by accident, which would reduce Blender general performance.
Addon Options
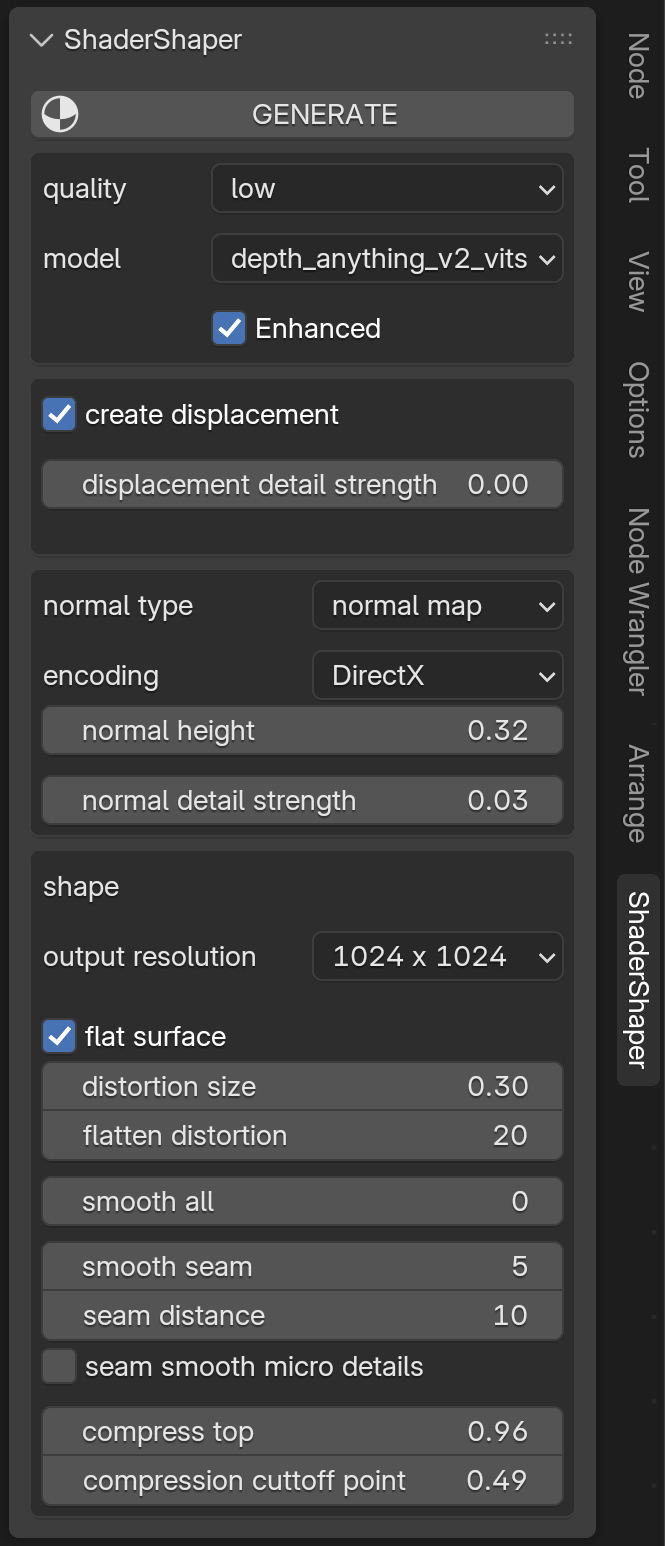
Generation options
Quality: Choose from low, medium and high. Depth anything models prefer medium or high (use small or medium when enhanced is ticked)
Model: The Model you would like to use. Depth Anything v2 Large is considered the best in the world right now, but can only be used for non-commercial projects (providing you give attribution CC-BY-NC-4.0): For that reason the addon has an 'enhance' option which makes the depth anything V2 Small 99.2MB model output a similar or better quality, and can be used for commercial projects (providing they don't change the licence).
Enhanced: Does some witchcraft to make the small model generate results that match the large model. IMPORTANT: Only recommended to use with the depth anything v2 SMALL model, with quality set to medium or low, which takes around 10 seconds on GPU (4080 super). Other models will take a very long time, even with GPU acceleration. If you didn't install the GPU accelerated python modules in the addon's preferences, it will take much longer even with the small model, and the other models should definitely be avoided unless you want to go and take a bath while it calculates. When you use this option, the 'flat surface' option will also become available in the shape options (described further down).
Displacement options
Create displacement: When ticked, the addon will generate a displacement map and wire it up.
Displacement detail strength (interactive): adds micro details to the generated displacement map.
Normal options
Normal Type (interactive): Choose from: normal map, bump map, none. I find normal map in combination with displacement produces the best results.
Encoding (interactive): Direct X (Unity) Green channel is bottom to top (brighter green at the top), OpenGL (Blender, Unreal, and any other 3d software that requires the green channel to be flipped top to bottom (brighter green at the bottom)
Normal Height (interactive): Increases the visible height of the normal map. If you notice white artefacts around the sides of displaced geometry, then lower this value. Higher resolution outputs require higher values. Generally between 0.2 and 1.5 is a good range. The value also depends on if you're using the normal map on it's own, or if you're using it in combination with a displacement map. Lower values with displacement, and higher values for a normal on it's own.
Normal Detail Strength (interactive): Adds micro details to the normal map. I find it best to have micro details on the normal/bump map, and have no micro details on the displacement map. This allows for a flat clearcoat to be used over the micro details if wanted.
Shape options
Output Resolution (interactive): Choose a suitable output resolution. The square options are suitable for both Blender and Game engines. Keep it low for faster tweaking, then increase when ready to output (you may need to re-modify the normal height and smoothing values at different resolutions)
Flat Surface: This needs to be set before you click generate, it should only be used on flat surfaces such as bricks, tiles, flooring, etc. It can also be used on non flat surfaces, providing the details are not large. For example a field of petit pois may be ok, but a field of basketballs may cause the basketballs to be squashed inwards.
Distortion Size (interactive): Used by the below flatten distortion slider (which is an interactive version of flat surface). Set it low for most images (0.37), or high if you have large curvature (same as the petit pois basketball example).
Flatten Distortion (interactive): It's used to remove unwanted waviness or distortions in the result, and uses the above distortion size to decide what size distortions it should flatten. Use the lowest possible value to avoid excessive calculation time (particularly if the distortion size is greater than 0.5)
Smooth All (interactive): Smooths the entire output, useful if there are any jagged sides or stretched faces on the displaced mesh.
Smooth Seam (interactive): Adds smoothing between the boundaries of repeating images if there are any visible discontinuities. Can generally be left off or very low (1-3). Can also be pumped up high for artistic use, or where the original image was not tile-able.
Seam Distance (interactive): How far Smooth Seam should smooth from the edge inwards.
Seam Smooth Micro Details (interactive): When enabled the Smooth Seam option will also affect the micro details on the displacement and normal map. The micro details are the details introduced by the 'Detail Strength' sliders.
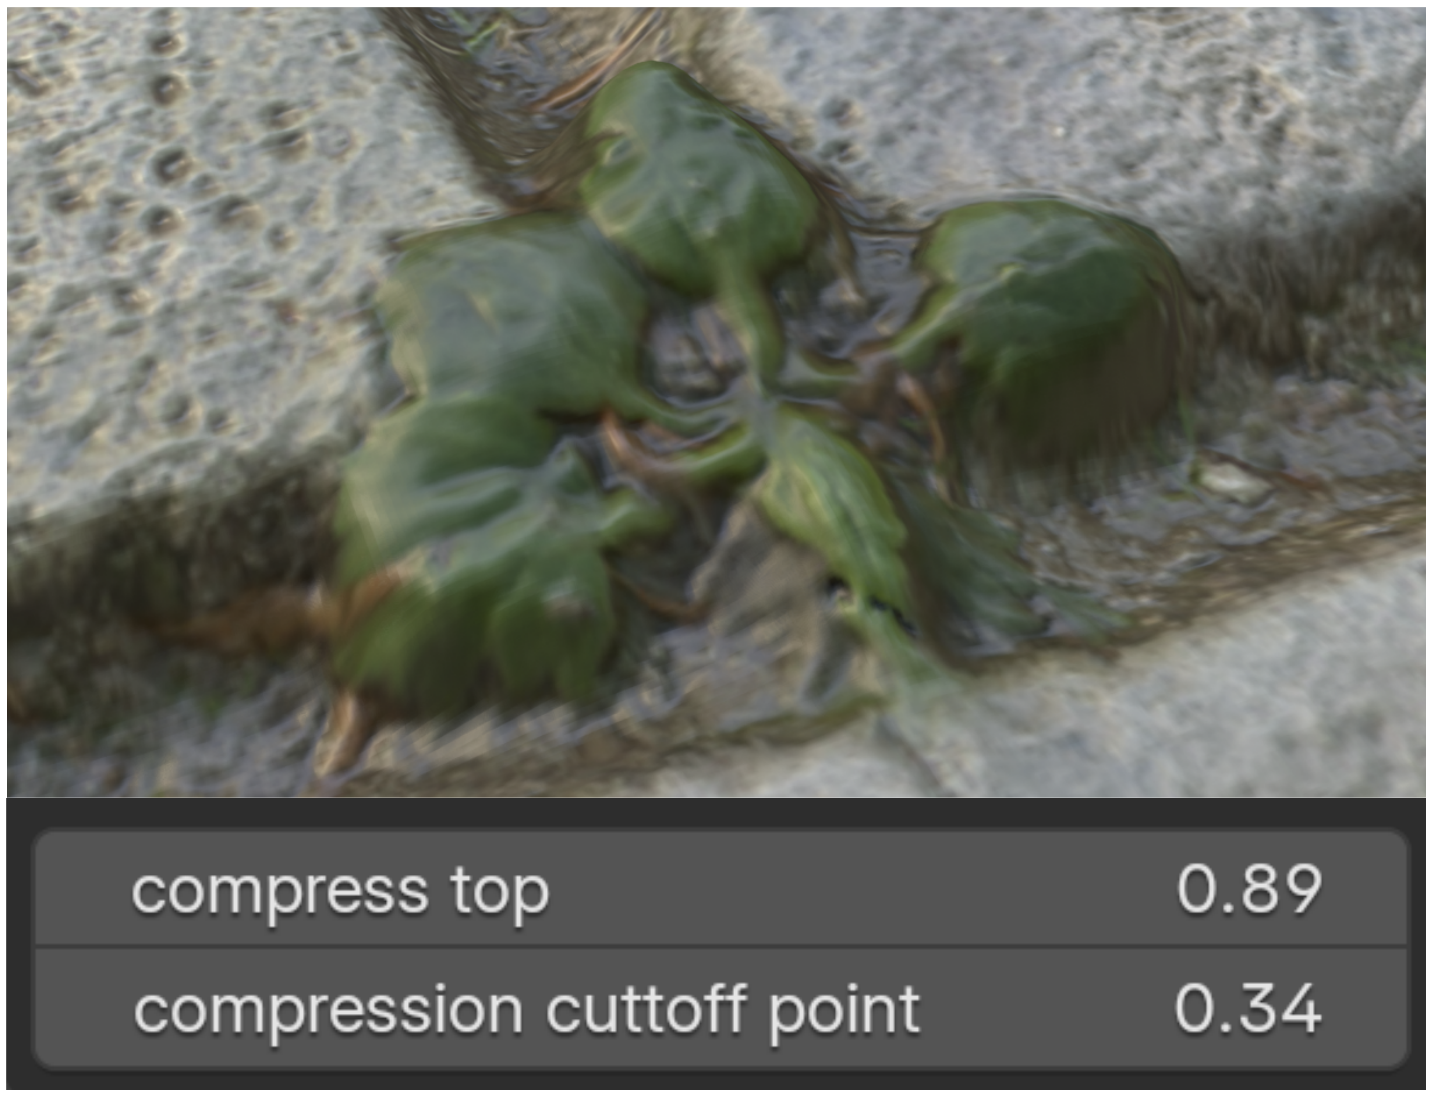
Compress Top (interactive): You can use this to flatten the highest points in the output depth/normal/bump maps. Imagine if you want to turn some pebbles into round paving slabs. Also handy if you get small spikes in the depth either because there was something in the image that made it difficult for the AI to get the correct height of an element, or it did get the correct height, but you'd prefer it to be less pronounced. For example if there are plants on a brick path, you can squash the plants down to match the height of the bricks or the height you want. When set to 1 it will completely flatten above the compression cuttoff point. Setting it below 1 will allow a bit of the shape above the compression cuttoff point to remain.
Compression Cut-off Point (interactive): The point to compress down to when 'compress top' is in use. The lowest point of the displacement is 0, and the highest point is 1, so if you have a brick path with large plants that you want to get more level with the path, and the bricks reach about a quarter way up the total height, you can set this to 0.25 and then use the compress top option above to control how squashed down to the path those plants become.
Enjoy!
Michael
3d-ilusions
Troubleshooting
My GPU doesn't use a CUDA version that the addon supports (11.8 to 12.9)
During installation, the addon will download the latest compatible version of torch. For example if you're GPU driver has CUDA 13, the addon will automatically use the latest compatible version, which is 12.9. If however you're GPU is quite old and there isn't a driver for it that supports Cuda 11.8 (or 11.3 if you're using Blender 3.1 to 3.6), you will need to disable the 'gpu acceleration' option prior to installation. This will install the CPU version of Torch which is compatible with all hardware.
I can't see Shader Shaper in the N panel
Shader Shaper is in the shader editor's N panel, not the 3d viewport's N panel.
There are unexpected spikes/high points in the displacement
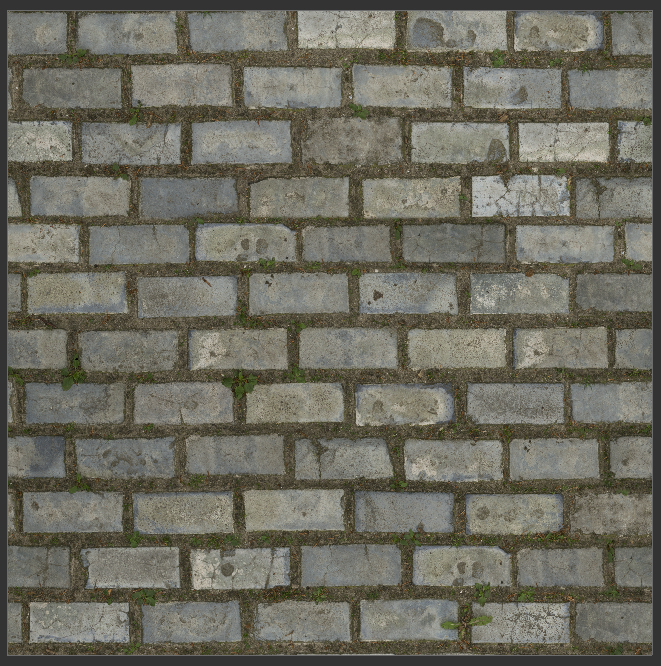
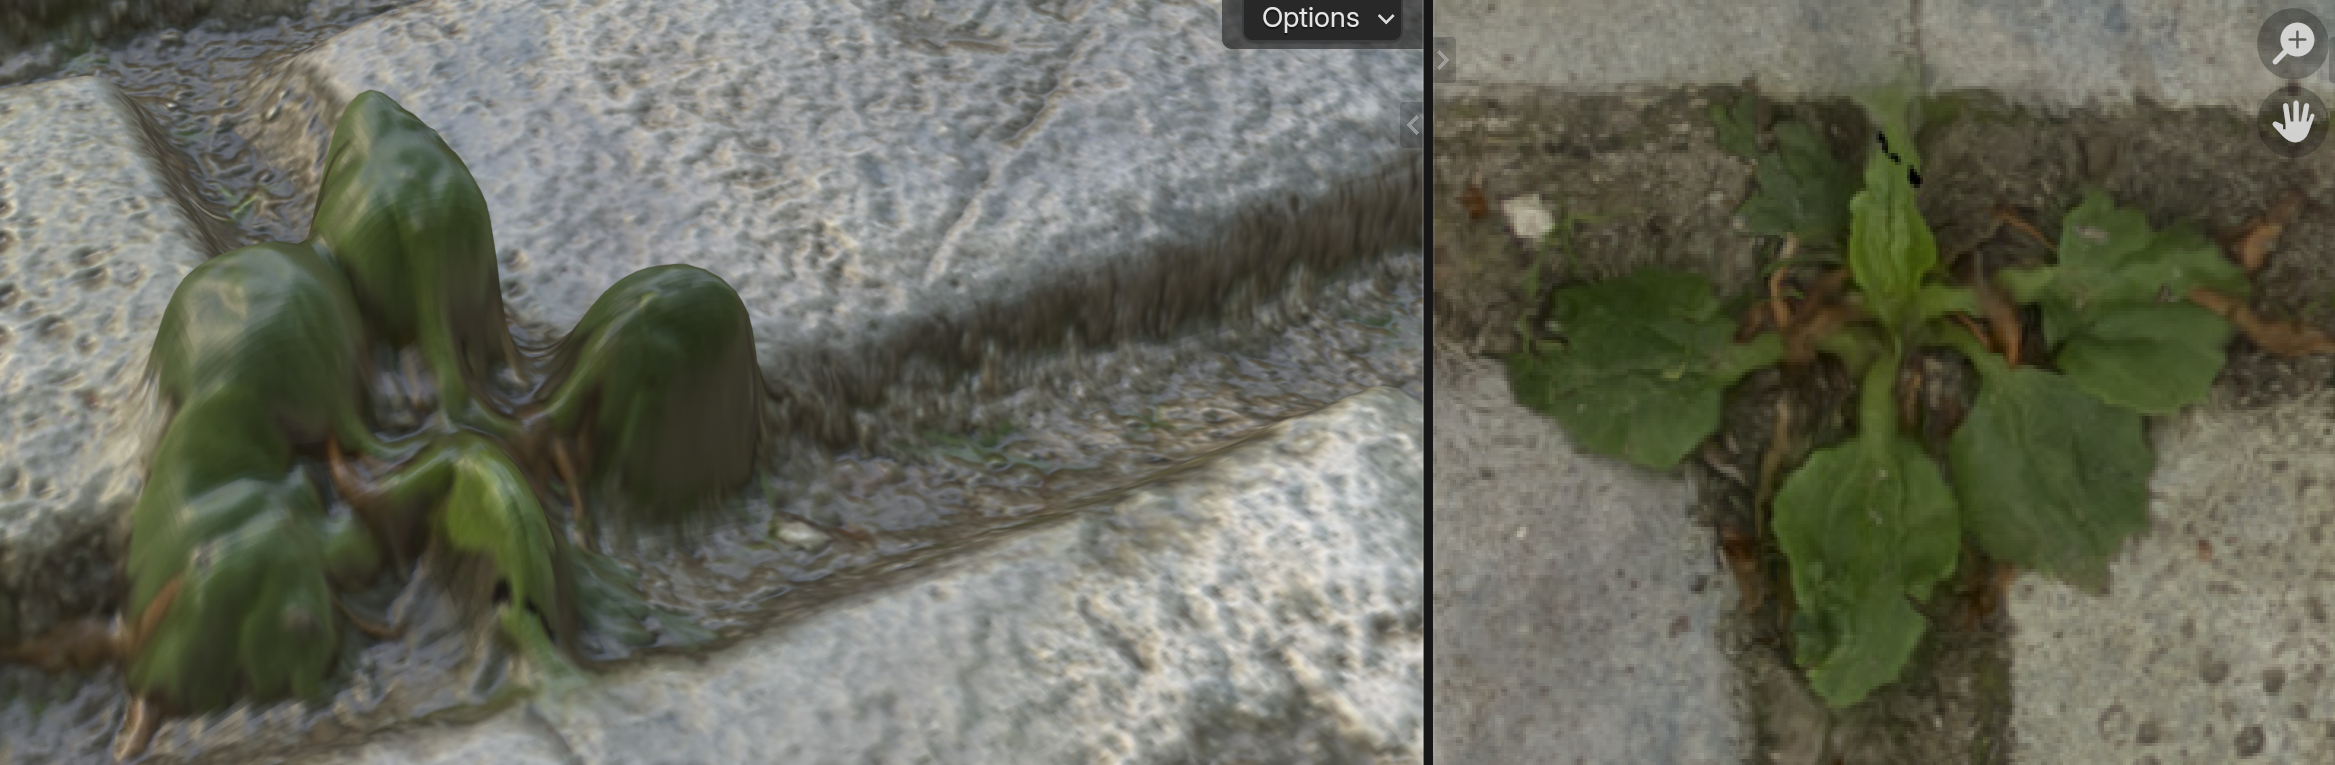
a) AI may have mis-identified the height of an element, or correctly identified the height of something that wasn't obviously high to the human eye (such as the height of plants on a brick path when viewed from above).
input image:
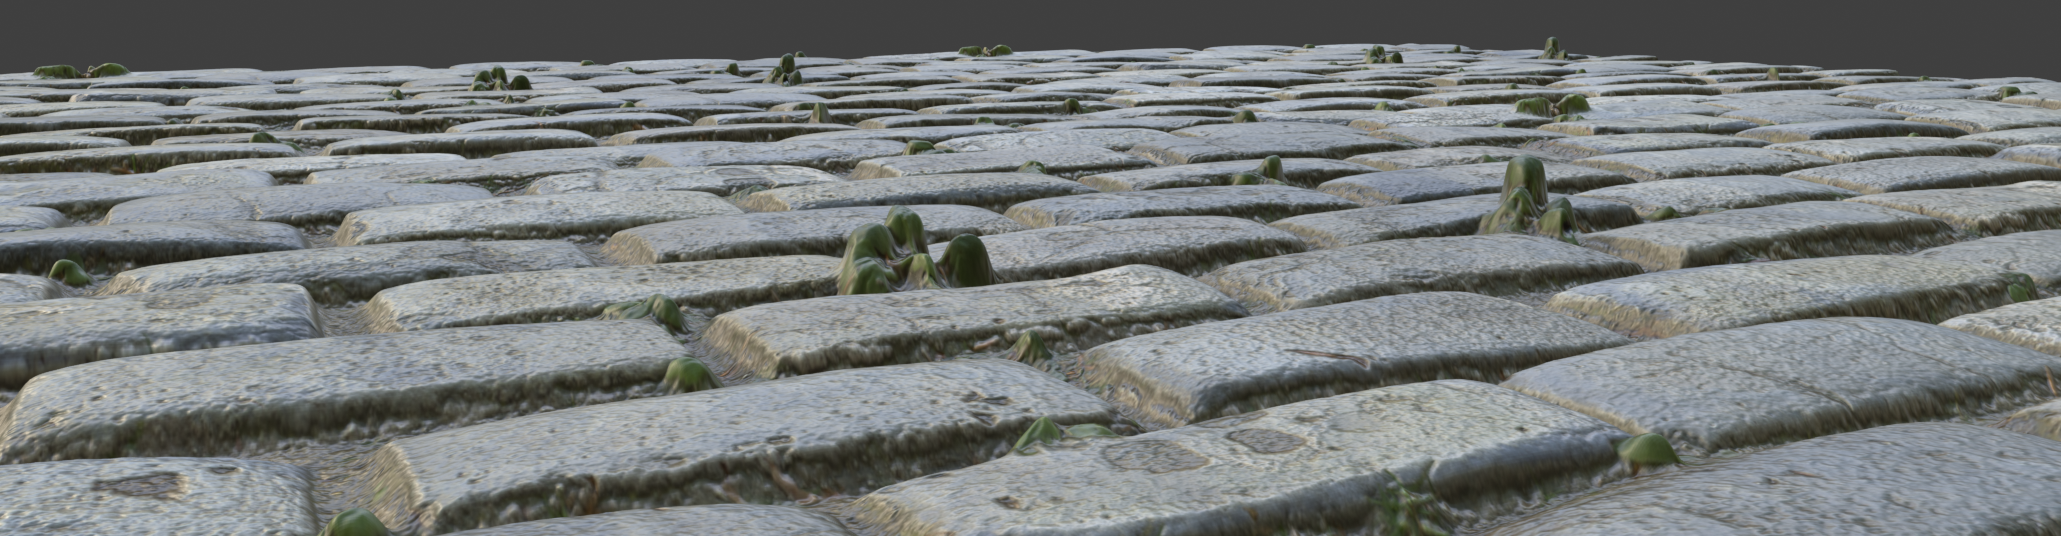
You can squash the unwanted spikes/high points down to the preferred height using the compress top and compress cuttoff point sliders (see above for an explanation of how to use them)
Left plant appears unexpectedly high when displaced. Right the plant on the input image could be interpreted as the same height as the bricks, but on closer inspection we can see based on the shadows and the several layers of leaves, that it's probably higher than it first appears, and AI has correctly identified that:
Using the compress top and compression cuttoff point sliders, we can push the plant down as close to the brick path as we like. The brick height is around 0.34 of the total displacement height, so we can set the compression cut-off point to 0.34 and then squash the higher plants as close to it as we want:
it's actually insane how much detail we were able to get in the depth and normal map, when you consider this was about 0.5% of the full input texture's pixel area. We're getting depth and normal data for even the tiny stalks!
b) Make sure you're using the material preview, cycles viewport rendering can sometimes not update or output incorrect or odd spikey results during tweaking. Switch to material preview, or if you're in an old version of blender where EEVEE didn't support displacement, switch to solid view and back to cycles viewport rendering.
If I use Cycles viewport rendering whilst tweaking the Shader Shaper sliders, sometimes my changes don't take effect in the 3d viewport, or the result is odd/incorrect or an explosion of spikes
If using Blender 4.2 or later, switching to material preview mode will resolve. You can switch back to Cycles viewport after you finalise your material by clicking 'finish' or 'cancel' at the bottom of the Shader Shaper panel. Alternatively you can continue using Cycles viewport, and if you notice it doesn't update correctly, you can force it to update by switching to solid view and back to rendered view. This seems to be an intermittent bug/limitation of Cycles viewport rendering.
The addon is telling me there's a problem with the selected texture node's filepath
If the addon gives you a message saying it can't locate the input image's filepath, then update to Shader Shaper version 1.4.8. In version 1.4.7 only input images with absolute filepaths were allowed. 1.4.8 allows both relative and absolute paths.
Also ensure the input image is not linked, it needs to be local.
I get a message saying one or more of the modules can't be found, even though I've installed them, or I get a popup message saying a module has failed to install after clicking 'install or update modules'
The most likely causes:
-
After clicking install or update modules, the terminal shows that torch has failed to install with a TimeoutError:
Downloading https://download.pytorch.org/whl/cu129/torch-2.8.0%2Bcu129-cp311-cp311-win_amd64.whl (3571.8 MB)
━━━╸━━━━━━━━━━━━━━━━━━━━━━━━━━━━━━━━━━━━ 0.3/3.6 GB 569.8 kB/s eta 1:34:35
ERROR: Exception:
Traceback (most recent call last): File "C:\Blender\blender 5.0.1\5.0\python\Lib\site-packages\pip\_vendor\urllib3\response.py",
line 438, in _error_catcher yield File "C:\Blender\blender 5.0.1\5.0\python\Lib\site-packages\pip\_vendor\urllib3\response.py",
line 561, in read data = self._fp_read(amt) if not fp_closed else b"" ^^^^^^^^^^^^^^^^^^
File "C:\Blender\blender 5.0.1\5.0\python\Lib\site-packages\pip\_vendor\urllib3\response.py",
line 527, in _fp_read return self._fp.read(amt) if amt is not None else self._fp.read() ^^^^^^^^^^^^^^^^^^
File "C:\Blender\blender 5.0.1\5.0\python\Lib\http\client.py", line 473, in read s = self.fp.read(amt) ^^^^^^^^^^^^^^^^^
File "C:\Blender\blender 5.0.1\5.0\python\Lib\socket.py", line 718, in readinto return self._sock.recv_into(b) ^^^^^^^^^^^^^^^^^^^^^^^
File "C:\Blender\blender 5.0.1\5.0\python\Lib\ssl.py", line 1314, in recv_into return self.read(nbytes, buffer) ^^^^^^^^^^^^^^^^^^^^^^^^^
File "C:\Blender\blender 5.0.1\5.0\python\Lib\ssl.py", line 1166, in read return self._sslobj.read(len, buffer) ^^^^^^^^^^^^^^^^^^^^^^^^^^^^^^
TimeoutError: The read operation timed out
During handling of the above exception, another exception occurred:
'TimeoutError' indicates that your internet connection dropped, or is exceptionally slow (less than 1.5 MB/s). If you have a fast internet connection, then check you're still connected to the internet and retry. If you have a very slow internet connection, then you'll need to download the torch wheel manually, and then install using blenders text editor in the scripting workspace. To ensure you download the correct version, copy the download link from your blender terminal (it will be similar to the green highlighted text above and usually around 3.5GB for the GPU version of Torch), and will only be shown if you've clicked 'install or update modules' during the current blender session. Once you've downloaded the wheel, you can go to blender's scripting workspace, and paste the below code into the text editor, and press the text editor's run script button (looks like a play button). You need to change the wheel_path to the folder you downloaded the wheel to, and the target_path to match the module path you have set in the addon preferences. Only modify the text between the double quotes.
import subprocess
import sys
import bpy
# -------------------------------------------------------------------
# USER SETTINGS — you need to change the wheel_path and target_path
# -------------------------------------------------------------------
# only change the text between the quotes
#file name is example only, use the one you downloaded
wheel_path = bpy.path.abspath(r"Z:\shader shaper\downloaded torch wheel\torch-2.8.0+cu129-cp311-cp311-win_amd64.whl")
#the target path should match the modules path you set in the addon preferences
target_path = bpy.path.abspath(r"Z:\shader shaper\pipped from local wheel")
# ---------------------------------------------------
# Install the torch wheel you previously downloaded
# ---------------------------------------------------
subprocess.run([
    sys.executable,
    "-m", "pip", "install",
    "--force-reinstall",
    "--no-cache-dir",
    "--upgrade",
    wheel_path,
    "--target", target_path
])
- outdated gpu driver - try updating it. You may also need to re-install the torch module.
- insufficient disk space. Torch for GPU is around 3.5GB to download, and uncompresses to around 7.5GB. If you can't free up sufficient space, try downloading the CPU version instead, by unchecking 'gpu acceleration' before clicking 'install or update modules', this is only a few hundred MB.
- A permission error, set a module folder that definitely has read/write permissions. For example create an empty folder in my documents, and choose that as the module folder prior to installing the modules. You may also need to start Blender as administrator before doing the module installation.
- old version of blender with unsupported python version for available torch - try a newer blender version such as 4.5 or above.
- conflicting addon -try starting blender in factory mode to ensure there are no conflicting addons enabled, re-install the modules to an empty folder, restart blender in factory mode again, and try to use the addon. If it still doesn't work, another addon may have naughtily installed the conflicting modules to blender's own site-packages folder, in which case refer to the next bullet point.
- incompatible or outdated versions of the modules have been installed to blender's site-packages folder by another addon:
a) The easiest solution is to download the next minor version of Blender, for example if you have 5.0.1 you could get 5.1.0 (the middle number is the minor version) You can get these from blender's daily builds page on their website. When you first launch it, say NO when it asks if you want to import your settings from the previous blender version, this will ensure you have a completely clean slate.
b) If you want to stick with the same blender version, locate the site packages folder and remove torch, functorch, pil (pillow), and cv2 folders. You can find the folder by putting the blue text below into the blender python console (it's in the scripting workspace) and pressing enter, and then looking at the output in the Blender terminal (which you can open from Blender's window menu):import site
print(site.getsitepackages())Be careful to only remove the torch, functorch, cv2, and pillow (PIL) folders. Don't for example remove numpy folders etc (as blender needs those)
After that, reinstall the modules and retry. - Problem with communication between your driver and torch version - try installing an earlier version of torch from the gpu dropdown (or the latest version if you manually selected an earlier version previously). It needs to be the same or below your nvidia driver's current CUDA version, which you can find by opening the command prompt and typing nvidia-smi and look for the line that says CUDA Version, then manually select the nearest available version from the GPU dropdown in the addon preferences and retry module installation. You can also find the cuda version in the nvidia control panel -> help -> system information -> components
As an alternative to trying to track down conflicting addons and removing modules from site packages. You can just try a version of Blender that you haven't used before, and don't choose to 'import preferences from previous blender version' the first time you run it, this will ensure a clean slate, because there'll be no addons installed, and also the site-packages folder that lives in the blender folder won't have had any modules downloaded into it by other addons.
If all else fails, it could be any number of system related issues, in which case I'd just disable the 'gpu acceleration option' and re-install the torch module. This will install the CPU version, which works on all hardware.
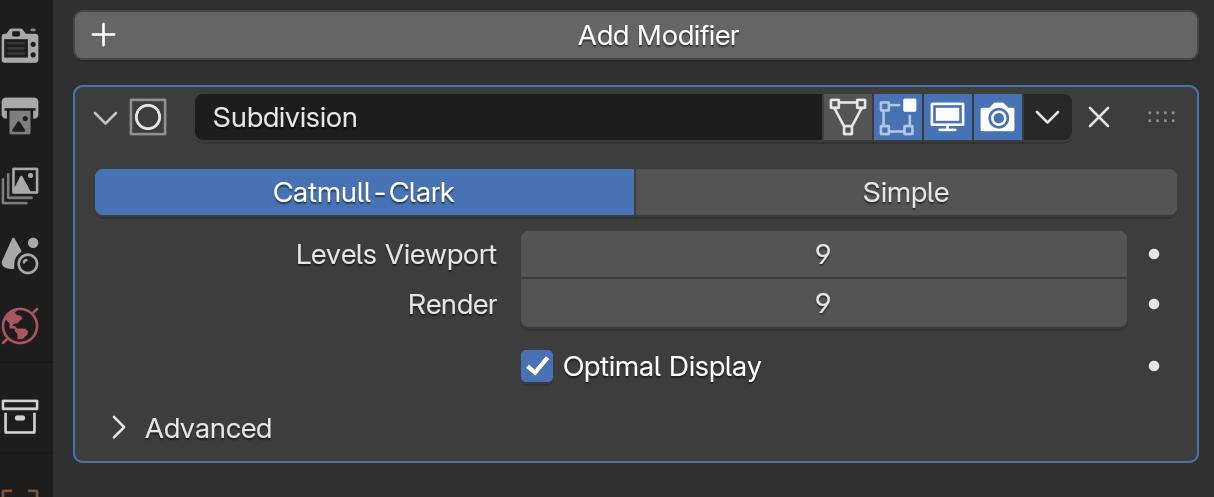
I don't see any effect from the displacement
You need to subdivide the mesh when using displacement, otherwise there's no geometry for cycles to displace. You can either use a set number of subdivision levels on your plane:
Or if you're using cycles you can set it to experimental in the render settings:
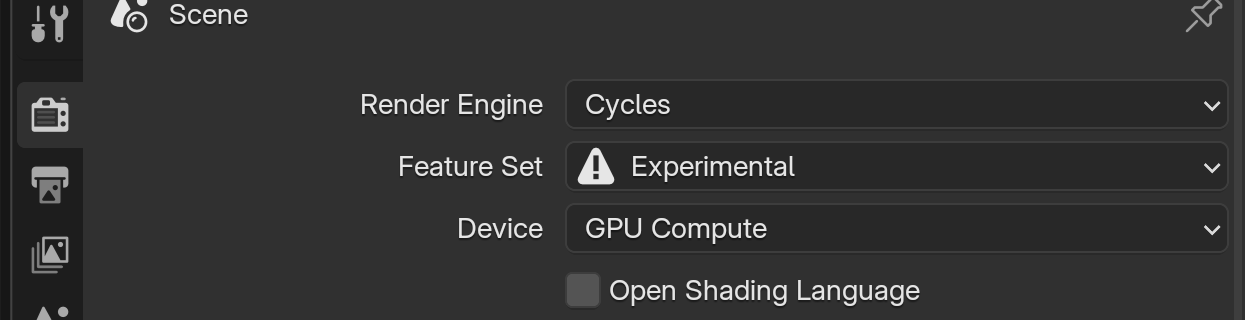
and then use adaptive subdivision instead of set number of levels:
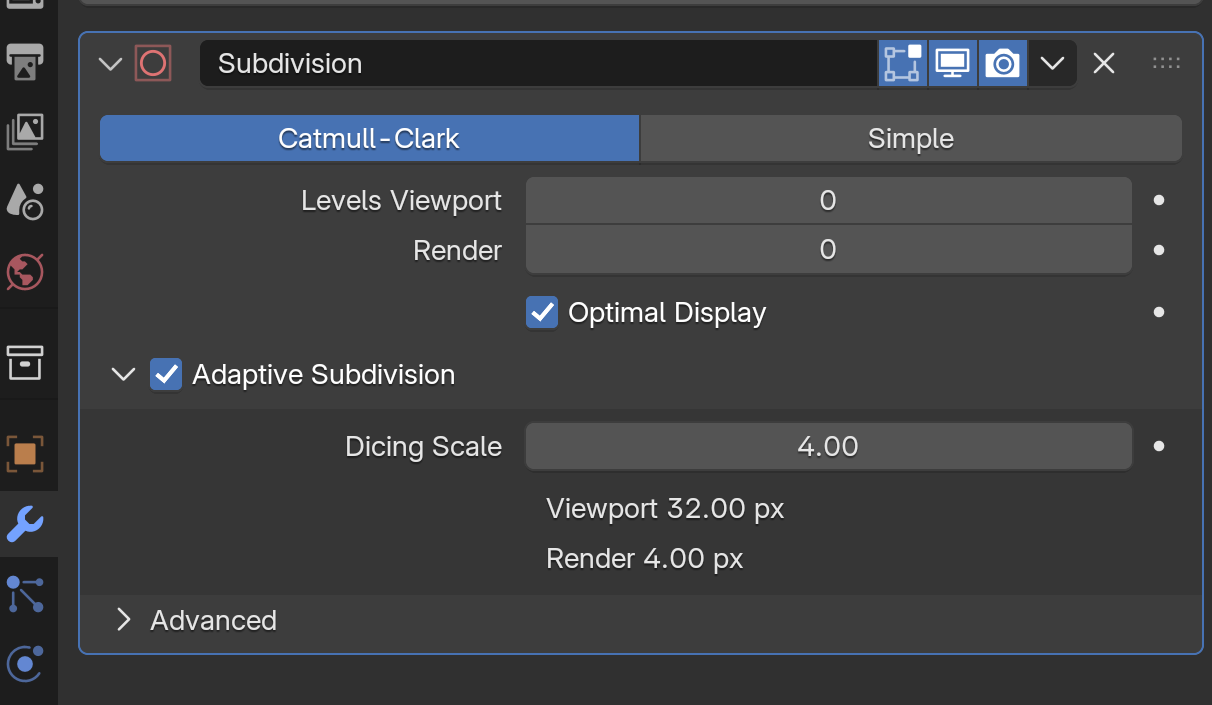
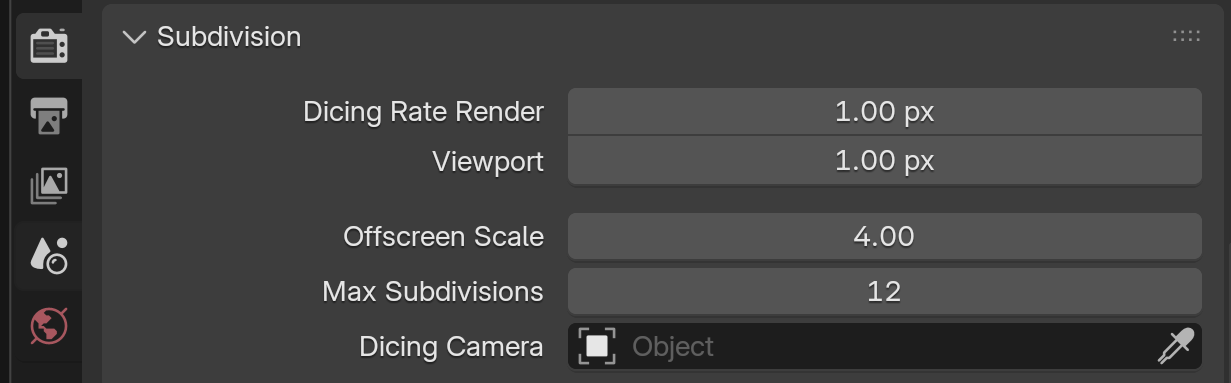
Be careful with the dicing scale. A small value will use a lot of ram and take a lot of time to calculate prior to rendering. I recommend setting it so that the viewport and final render are the same values, usually between 4 and 6 are adequate. You can make viewport and render dicing scale the same in the cycles render settings under subdivision. I'd set both multipliers to 1, then control the actual number used in the modifier as shown above:
I get a popup saying the modules are found but can't be imported
This indicates there is a conflicting addon. The easiest thing to do is get a version of Blender you haven't used before (portable versions don't need installing by the way), and then when you first launch Blender, don't don't select the option to import settings from the previous blender version. This will ensure the site packages folder is clean, and also that there are no conflicting addons.
Alternatively, disable other addons, save the preferences, restart Blender and then it should work. To avoid conflicts when you re-enable your other addons, you may also need to remove the conflicting torch, pillow(PIL) and CV2 module folders from your site packages folder. Then you can re-enable your other addons. The other addons will then use the new versions installed by Shader Shaper (providing Shader Shaper remains enabled in the Blender preferences).
Shader Shaper notification pops up saying 'AI could not process the image', followed by a short error message along the lines of 'ValueError: not enough values to unpack (expected 3, got 2)'
Most likely cause is your hardware has very low available VRAM/system ram. Alternatively it could be that the input image is corrupt, or too high in resolution for the python modules or your available system/gpu memory to process. 16k HDRI images for example could potentially be massive when uncompressed. Also multilayer images, packed images, linked images are not supported. If however it happens with low res images, this indicates that the Torch module did not function correctly or potentially your GPU driver could do with updating. Try updating you GPU driver in the first instance (I'm using 576.02 without any issues), and if it doesn't resolve, try re-downloading Torch in case of corruption. If it still continues, try manually specifying an earlier cuda version in the addon preference's gpu dropdown and re-install torch. For more detailed information, following the message, check Blenders system console (opens from Blender's window menu). If the problem persists, it's likely just hardware limitations, in which case try using the CPU version of torch instead, particularly if you're on a low VRAM laptop gpu for example. To do that, untick the 'gpu acceleration' option in the addon preferences, then re-install torch. If you struggle send me the error message from the system console, together with the image you're selecting, and I'll give you a hand.
The tops of my displacement are sometimes squished inwards
If you're using the enhance option, make sure you don't have the 'flat surface' option enabled unless the texture is of a flat surface. If you aren't using enhance, or you are but don't have 'flat surface' enabled, then your using the 'flatten distortion' slider in combination with a 'distortion size' value that's too small. Increase the 'distortion size', or turn off 'flatten distortion' by setting it to zero.
-
$19.99
Shader Shaper, take the realism of your shaders to the next level! Currently 50% OFF at $9.99!
Have questions about this product?
Login to message
| Sales | 1500+ |
| Rating | 18 ratings |
| Dev Fund Contributor | |
| Published | about 1 year ago |
| Blender Version | 3.1 - 5.2 |
| Extension Type | N/A |
| Render Engine Used | Arnold, Blender-Internal, Blender-Game-Engine, Cycles, Eevee, Freestyle, Luxrender, Mental-Ray, Octane, Vray, Yafaray |
| License | GPL |
Discover more products like this
depth depth map normal maps unity bump map generator Shader unreal materials bump Normal Map Generator ai