Smart Addon Manager | Documentation
Version: 1.0 | Compatibility: Blender 4.2 to 5.2
1. Installation & Setup
Installing Smart Addon Manager follows the standard Blender installation process:
- Download the .zip file provided upon purchase.
- Open Blender and navigate to Edit > Preferences > Add-ons (or Extensions in Blender 4.2+).
- Click the Install button located at the top right of the Preferences window, or simply drag and drop the extension file into the Blender window (if using 4.2+).
- Locate the downloaded .zip file on your computer and select it.
- Check the box next to Smart Addon Manager to enable it.
Customizing the Tab Name: Right after enabling the addon, expand its details in the Preferences window. Here you will find the N-Panel Tab Name text field. By default, it is set to "SAM". You can change this to anything you like to position the manager exactly where you want it in your workspace.
2. Interface Location
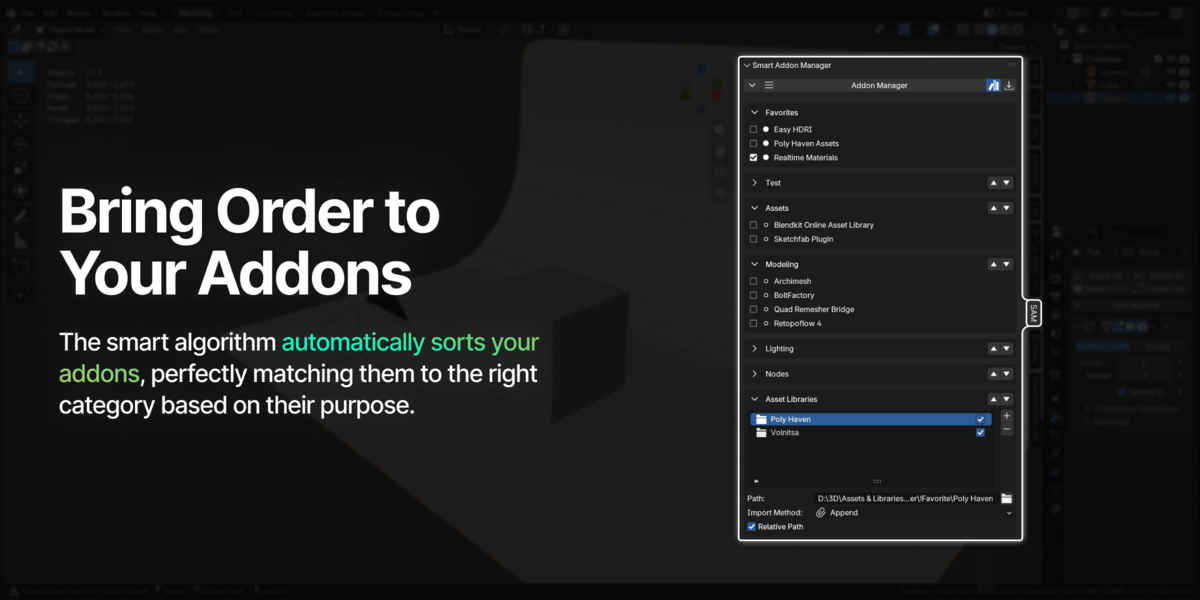
By default, the tool is located in the N-Panel of the 3D Viewport. Press the N key on your keyboard to open the panel, and look for the tab named SAM (or your custom name).
The interface is divided into two main sections: the Main Dashboard (for daily work) and the Settings Screen (for configuration).
3. Main Dashboard
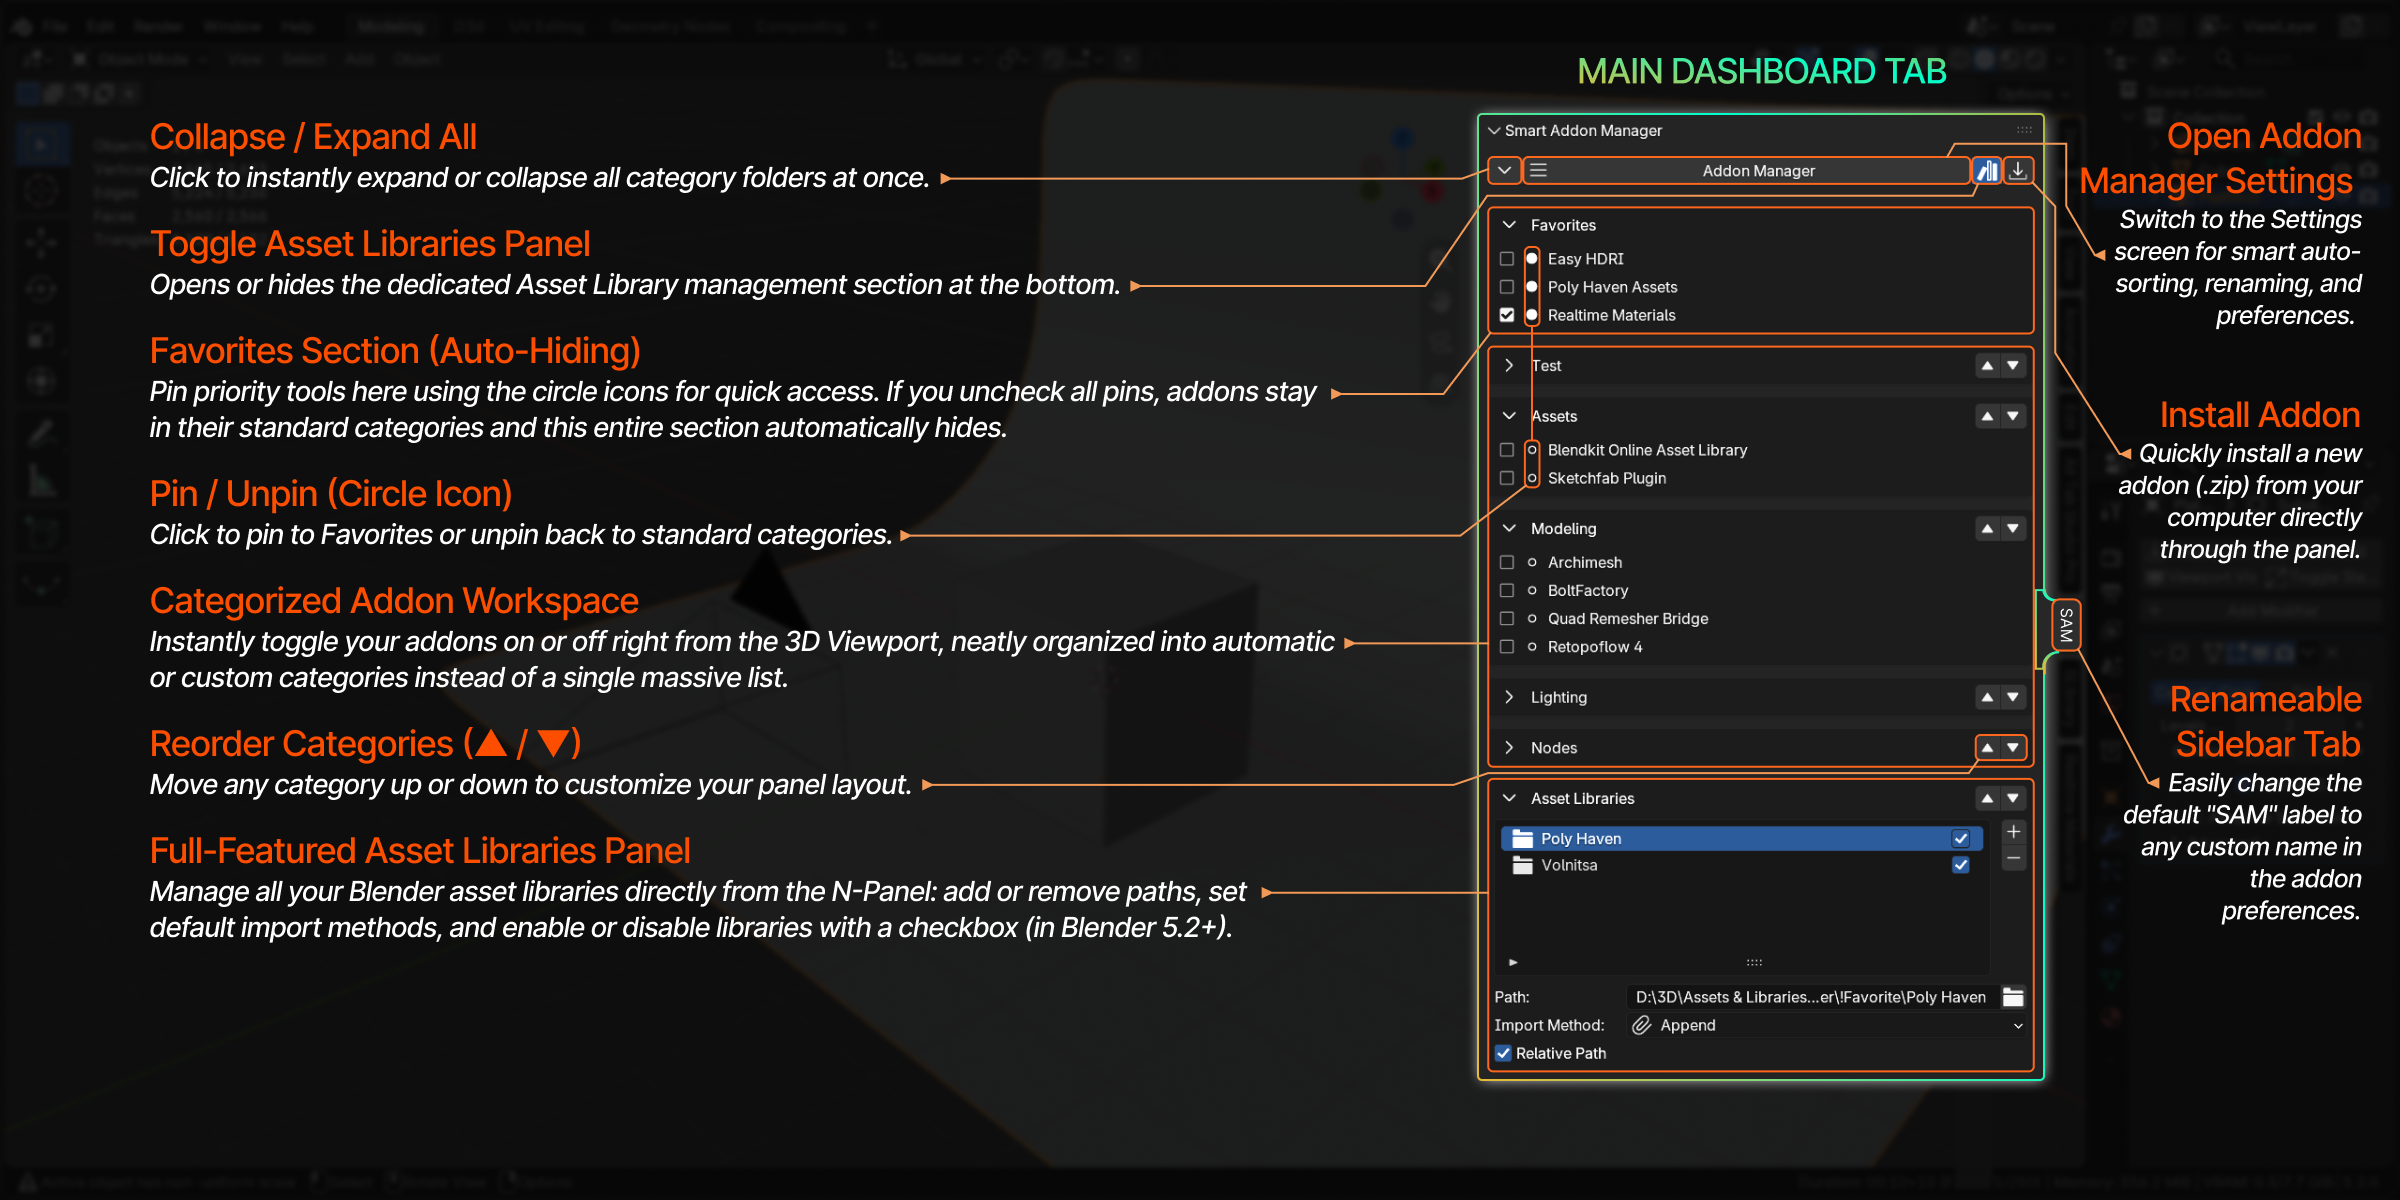
The Main Dashboard is your primary workspace where all your active tools are organized.
Categories: Addons are automatically grouped into logical categories (e.g., Modeling, Lighting, Assets). Note that these categories are fully customizable — you can manually rename or rearrange them on the Settings screen, and those changes will be reflected here.
Toggle Addons (Checkbox): Click the checkbox next to any addon to instantly turn it on or off without opening Blender's native preferences window.
Collapse/Expand All: A button in the top header allows you to quickly collapse or expand all category folders simultaneously.
Reorder Categories (Up/Down Arrows): Use the arrows on the right side of each category header to move the category up or down, customizing the layout to fit your personal workflow.
Favorites (Circle Icon): Click the small circle icon next to any addon to pin it to a dedicated Favorites folder at the very top of the panel. This is ideal for frequently toggled tools like heavy asset libraries. If no addons are favorited, the folder automatically hides itself.
Asset Library Button: Located in the top header. Clicking this opens a dedicated section at the bottom for managing your Blender Asset Libraries. You can add new paths, remove libraries, change import methods, and (in Blender 5.2+) enable or disable them using checkboxes directly from the N-Panel.
4. Settings Screen
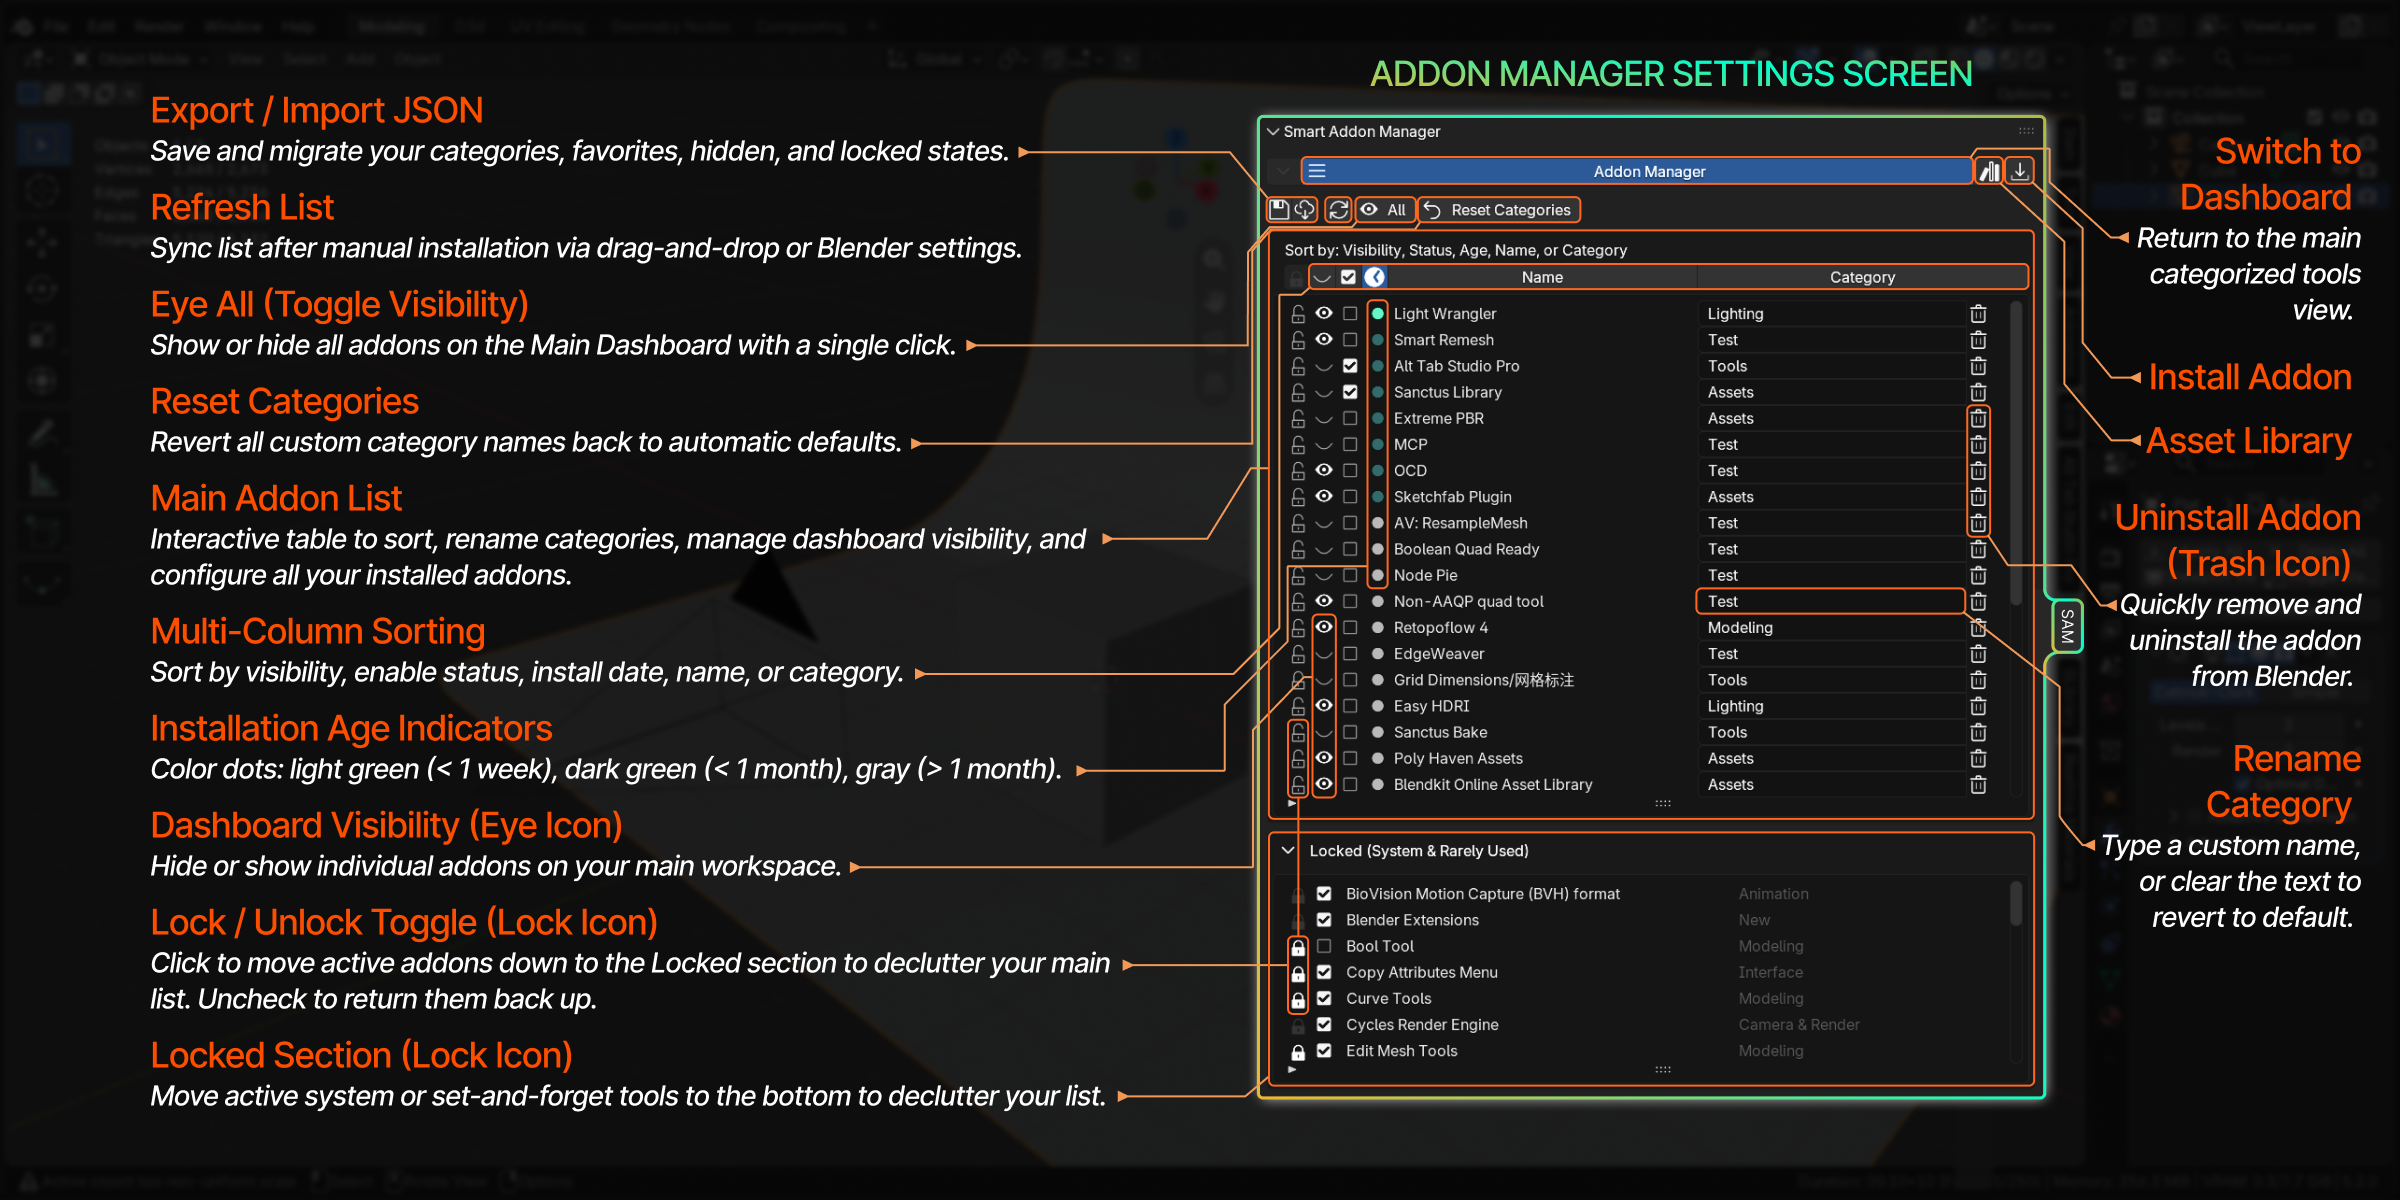
To access the Settings Screen, click the Addon Manager button located in the top header. This screen gives you full control over how your addons are sorted, named, and displayed.
Install Addon Button: Click the install icon in the top right to install a new addon directly from your local drive through the manager interface.
Smart Sorting: When you install a new addon, the system uses a database to automatically assign it to one of 19 categories. If the algorithm cannot determine the category, it tags the addon as New.
Rename Categories: Click on the category text field next to any addon to type a custom category name. If you delete the text and leave it blank, the addon will automatically revert to its default category.
Uninstall Addon (Trash Icon): Located on the far right of each addon row, next to the category name. Click the trash can icon to quickly remove and uninstall the addon from Blender.
Reset Categories Button: Located at the top. Click this to revert all custom category names back to their standard defaults.
Installation Age (Color Indicators): A colored dot next to each addon shows how recently it was installed:
-
Bright Green: Installed within the last week.
-
Dark Green: Installed within the last month.
-
Gray: Older than one month.
Time Sorting (Clock Icon): Click the clock icon in the header to sort the entire list by installation date. Your newest downloads will instantly jump to the top, making it easy to find freshly installed tools.
Visibility Control (Eye Icon): Click the Eye icon next to an addon to hide it from the Main Dashboard. This allows you to create a clean workspace showing only the tools you need. Click the Eye All button at the top to toggle the visibility state for all addons at once.
Locked Section (Lock Icon): Located at the bottom of the Settings list. Clicking the Lock icon next to an addon moves it to this hidden section. This is perfect for "set and forget" tools (like Node Wrangler) or built-in system addons that you want to keep active but out of your way. Uncheck the lock to return the addon to the main list.
Refresh Button: If you install an addon manually via standard Blender preferences, click this button to immediately update and populate the list in Smart Addon Manager.
5. Configuration Export & Import (JSON)
If you move to a new version of Blender or switch computers, you can easily migrate your custom setup.
Export (Floppy Disk Icon): Click this icon to save your entire configuration to a JSON file. This saves your custom category names, Favorites, hidden (Eye) states, and Locked states.
Import: Click the import button next to the export icon to load a previously saved JSON configuration file.
Note on Safety: The JSON file does not save which addons are currently enabled or disabled. This is an intentional safety feature designed to prevent Blender from freezing by attempting to load dozens of heavy addons simultaneously upon import.
 Nodextree




 Included