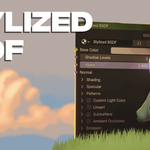
Stylized BSDF for Blender 5.1.0
Requirements: Blender 5.1 or later
Installation
Download the Stylized_BSDF.blend file
In your project, go to File > Append or File > Link
Navigate to the downloaded .blend file > NodeTree
Select Stylized_BSDF
In Shader Editor, press Shift + A > Group > Stylized_BSDF
Inputs
Base Color |
Connect your main color/albedo texture here. |
Shadow Levels |
Sets the number of shadow bands. |
Alpha |
Transparency control. |
Normal |
Connect a normal map here to add simulated detail. |
Controls Reference
SHADING
Shadow Lift |
Brighten shadows for softer toon shading |
0.0 to 1.0 |
Shadow Saturation |
Saturate shadows to account for the brightning |
0.0 to 100.0 |
SPECULAR
Highlight Threshold |
Controls where the highlight (brightest area) begins. |
0.0 to 1.0 |
Roughness |
Controls the sharpness or spread of the specular highlights only. Lower values = tighter, sharper highlights. Higher values = broader, softer highlights. Does not affect diffuse shading. |
0.0 to 1.0 |
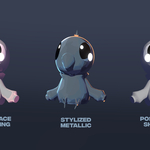
Metallic |
A stylized metallic control that enables a stylized reflective surface with fake, artist-controlled reflections. At 0.0, the surface behaves as a non-metal with standard toon shading. At 1.0, the surface becomes metallic with stylized, non-realistic reflections. |
0.0 to 1.0 |
Reflection Smoothness |
Controls the shape of the stylized reflections. Does not blur or soften the reflections. Instead, higher values make the reflections appear rounder and more compact. |
0.0 to 1.0 |
Reflection Detail |
Determines the scale of the stylized fake reflections. Lower values = larger, broader reflection patterns. Higher values = smaller, tighter reflection patterns. |
0.0 to 1000.0 |
PATTERNS (Diffuse Pattern)
Pattern Type (Dropdown) |
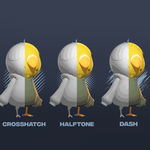
Selects the stylized texture applied to the diffuse shading. Options: Clean (no pattern), Crosshatch, Halftone, Dash, Paint |
N/A |
Aspect Ratio (Menu) |
Corrects the scale of the pattern to match your render's screen space resolution. Prevents patterns from appearing stretched or squashed. Options: 16:9 (widescreen/landscape), 9:16 (portrait), 1:1 (square), 4:3 (standard), Custom (use custom dimensions). |
N/A |
Pattern Scale |
Controls the size of the selected pattern. Higher values = smaller, more repeated pattern elements. Lower values = larger, more spread out pattern elements. |
0.0 to 1000.0 |
Pattern Intensity |
Controls how strongly the pattern affects the underlying diffuse shading. Higher values = more visible pattern. |
0.0 to 1.0 |
HIGHLIGHT PATTERN
Pattern Type (Dropdown) |
Selects the stylized texture applied specifically to the highlight areas. Options: Clean (no pattern), Crosshatch, Halftone, Dash, Paint |
N/A |
Pattern Scale |
Controls the size of the selected pattern. Higher values = smaller, more repeated pattern elements. Lower values = larger, more spread out pattern elements. |
0.0 to 1000.0+ |
Pattern Intensity |
Controls how strongly the pattern affects the highlights. Higher values = more visible pattern in bright areas. |
0.0 to 1.0 |
CUSTOM LIGHT COLOR
Highlight Color |
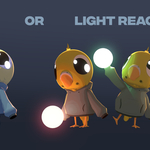
Tints the brightest areas of the material independently from the scene lighting. |
RGB Color Picker |
Shadow Color |
Tints the shadow bands independently from scene lighting. |
RGB Color Picker |
Tint Color |
A global color wash applied over the entire material. Works like a color overlay. |
RGB Color Picker |
Tint Intensity |
Controls the strength of the global Tint Color overlay. |
0.0 to 1.0 |
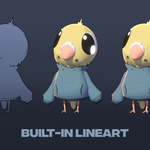
LINEART
Thickness |
Controls the width of the lineart strokes. Larger values = thicker, more prominent lines. |
0.0 to 1.0 |
Threshold |
Determines which edges receive lineart based on normals. Lower values = more lines. Higher values = fewer lines. |
0.0 to 1.0 |
Opacity |
Controls the transparency of the lineart. At 1.0, lines are fully opaque. At 0.0, lines are invisible. |
0.0 to 1.0 |
Color |
The color of the lineart strokes. Common choices include black, dark brown, or colored lines for stylized looks. |
RGB Color Picker |
Multiply Self |
When enabled, the lineart no longer uses a solid Color. Instead, it samples the base shading of the material and multiplies it over itself. This creates lineart that dynamically adapts to the underlying brightness and color of the surface. |
N/A |
SUBSURFACE
Distance |
Controls how far light scatters beneath the surface. Higher values = light penetrates deeper, creating a softer, more translucent effect. Essential for skin, wax, or leaf materials. |
0.0 to 50.0 |
Weight |
Controls the intensity of the subsurface scattering effect. Higher values = more pronounced SSS. |
0.0 to 10.0 |
Tint |
The color of the scattered light beneath the surface. For skin, this is often reddish/orange. For leaves, green. |
RGB Color Picker |
Tint Factor |
Controls how strongly the Tint color influences the SSS effect. Higher values = more tinted scattering. |
0.0 to 1.0 |
AMBIENT OCCLUSION
AO Opacity |
Controls the darkness strength of the ambient occlusion in crevices and contact areas. Higher values = darker, more pronounced AO. |
0.0 to 1.0 |
AO Threshold |
Controls how close surfaces must be for AO to appear. Lower values = AO affects wider, more subtle areas. Higher values = AO only appears in the tightest crevices. |
0.0 to 1.0 |
EMISSION
Color |
The color of the emitted light. |
RGB Color Picker |
Strength |
The brightness of the emission. |
0.0 to 100.0+ |
IOR (Index of Refraction) |
Uses Fresnel to create the effect that emission is brighter at the center of the object and dimmer toward the edges. |
0.0 to 1.0 |
SHADOW MASK
Shadow Mask (Input Socket) |
Connect a custom mask (e.g. vertex color, texture) to selectively control where shadows appear on the material. Black areas = shadows fully active. White areas = shadows disabled. |
Ignore Shading (Toggle) |
When enabled, the material ignores all scene lighting and instead uses only the Shadow Mask input to determine where shadows appear. |
Shader AOVs (Arbitrary Output Variables)
AOVs allow you to render specific shader components as separate output passes for greater control in compositing. This is useful for adjusting shadows, highlights, or emission independently in post-production.
How to use AOVs:
In Render Properties, go to the AOVs panel
Add a new AOV and name it exactly as listed below
In the Compositor, the AOV will appear as an output from the Render Layers node
Available AOVs:
AOV Name |
Description |
Base Color |
Outputs the raw base color of the material without any lighting or shading applied |
Patterns |
Outputs the diffuse pattern texture in isolation |
Highlight Pattern |
Outputs the highlight pattern texture in isolation |
Specular |
Outputs the stylized specular reflection component in isolation |
Metallic |
Outputs the stylized metallic reflection component in isolation |
Subsurface |
Outputs the subsurface scattering component in isolation |
Lineart |
Outputs the lineart strokes in isolation |
Shading |
Outputs the complete shading (diffuse lighting and shadows) without base color or other components |
Shadow Mask |
Outputs the connected Shadow Mask input for compositing use |
Happy shading!
– Pojo
-
 Pojo
Pojo