Variant Manager
 Techqon core


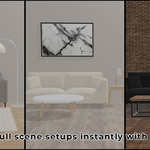
Variant Manager – User Manual
Version: 1.0.0
Author: OakenPixel
Blender Version: 4.0.0+
Overview
Variant Manager is a Blender add-on designed to simplify the process of switching between design alternatives, organizing visual options, and managing variant sets — all within an intuitive interface. Whether you're a product designer, 3D artist, game developer, or architect, Variant Manager helps you present and compare ideas with clarity and control.
Key Features
-
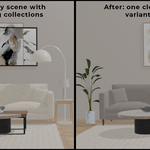
One-Click Variant Switching: Turn collections into variants, show one variant and automatically hide the rest.
-
Group Variants: Combine multiple object variants into a single, unified group.
-
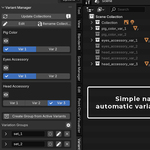
Naming-Based Detection: Automatically recognizes collections using a simple naming format.
-
Multi-Level Variation Support: Organize collections by Section, Group, and Variant Number.
-
Visual Feedback: Active variants and groups are clearly marked.
-
Flexible Organization: Add, edit, and remove variants or groups at any time.
-
Presentation-Ready: Ideal for showing clients multiple options quickly and professionally.
Installation
-
Download the Addon
Get the ZIP file from Superhive. -
Install the Addon
Open Blender and go toEdit → Preferences → Add-ons.
Click Install…, select the ZIP file, and install. -
Enable the Add-on
In the Add-ons list, check the box next to Variant Manager. -
Save Preferences
Click Save Preferences to keep it enabled permanently.
Collection Naming Convention
Variant Manager recognizes variant collections based on this format:
SectionName_var_VariantName
Example:
Lights_var_1
-
Lights → Section/group
-
1→ Variant identifier
✅ Any collection containing
_var_is automatically detected as a variant.
Basic Usage
-
Collections named with
_var_are automatically detected. -
Click on variant buttons in the UI to toggle visibility.
-
Only one variant per group is shown at a time.
-
Active variants are marked with ✔️ checkmarks.
-
Multiple variants can be shown by combining them into groups.
Creating Variant Groups
Method 1: From Active Variants (Recommended)
-
Activate the variants you want to use together.
-
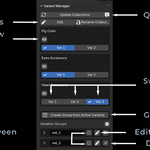
Click “Create Group from Active Variants”.
-
Enter a name for your group.
-
The group is saved and listed in the panel.
Managing Variant Groups
-
Activate: Click the radio button (🔘) next to the group name.
-
Edit: Click the ✏️ icon to modify the group.
-
Delete: Click the ❌ icon to remove the group.
-
Visual Cue: Active groups are highlighted for clarity.
Batch Rendering
Automatically render multiple variants with multiple cameras — in one go.
Batch Rendering lets you queue selected variants and cameras, then export every combination with a single click.
How it works
✅ Only collections added to the render queue are managed
✅ All other scene content stays untouched
✅ Simple queue-based rendering system — no manual toggling required
Step-by-Step Workflow
Step 1: Enable Render Queue Mode
-
Click ‘Add Renders’ in the Render section of the UI
-
Click on the variants you want to include
-
Click ‘Exit Add Renders’ when done
Step 2: (Optional) Add Group Sets
-
While in Add Renders mode, click the render icon (📷) next to a group set
-
All variants in the group will be added at once
Step 3: Add Cameras
-
Click ‘Add All’ to include every camera
-
Or manually select cameras from the list
-
Use checkboxes to enable/disable individual cameras
Step 4: Configure Output
-
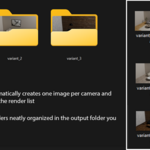
Choose your export folder
-
Enable Variant Folders to organize images per variant
-
Enable Camera Suffix to include the camera name in each filename
-
Example output:
VariantName_CameraName.png
Step 5: Render!
-
Click ‘Render X Images’
-
Each selected variant is rendered with each enabled camera
-
Rendering progress is shown in real-time
-
Press
ESCto cancel at any timeUse Case Highlights
-
Present multiple lighting setups from different angles
-
Showcase product materials and styles side by side
-
Prepare clean, organized outputs for clients or portfolio presentations
-
Example Use Cases
-
Product Designers: Instantly switch between different materials, styles, or colors.
-
Architects: Present alternate furniture layouts, lighting setups, or finishes.
-
Game Developers: Compare versions of props, enemies, or environmental setups.
-
3D Artists: Swap entire outfit sets, accessories, or lighting styles for characters.
-
Presentations: Seamlessly show your client design options live in the viewport.
Tips & Best Practices
-
Keep your naming clean and consistent.
-
Use sections and groups to separate large scenes logically.
-
Group variants by function (e.g.
Lighting,Furniture,Walls, etc.). -
Combine with camera bookmarks to present different layouts or designs interactively.
Accessing the Tutorial
Click the “Tutorial” button in the Variant Manager UI to access the interactive help system.
Available modules:
-
Create a Variant
-
Create Group from Variants
-
Edit Variant Group
-
Switch Variants
-
Manage Visibility
Have questions about this product?
Login to message
| Blender Extension Compatible | Yes |
| Published | over 1 year ago |
| Blender Version | 4.2 - 4.5 |
| Extension Type | Add-on |
| Render Engine Used | Cycles, Eevee |
| License | GPL |
Discover more products like this
presentation 3d architecture 3D workflow Comparison object visibility product Design blender addon scene organization variant manager switching variants Toggle Visibility