A bevel whose corners never collapse. Blender's own bevel builds the topology; then every corner the bevel runs around becomes a handle you can shape — its depth, spread and vertex count, with the profile live — all before you confirm.
It appears in Blender's add-on list as Tachyon Advanced Bevel, so it groups with the other Tachyon Studio tools there.
Advanced Bevel doesn't replace Blender's Bevel.
It's for the shapes where you want more control: rounded corners that keep their shape, and every corner adjustable on its own. Building corners like that is complex, so it can't handle every mesh, and on some tricky shapes it won't give you the result you want. When that happens, or when a plain bevel is all you need, use Blender's own Bevel. It's on the same menu (
Shift + Alt + Y), right next to the advanced one, and still on
Ctrl + B.
Version: 1.1.1
Blender: 3.3 – 5.2, one package for all of them — a modern extension on 4.2+, a classic add-on on 3.3 – 4.1
Platform: Windows, macOS or Linux. No native code, nothing platform-specific
Network use: None
Licence: GPL-3.0-or-later
Getting started
1. Install it
Edit ▸ Preferences ▸ Add-ons ▸ Install from Disk, pick the zip, and enable Tachyon Advanced Bevel. A welcome dialog appears once per install and points you at the first few steps. The panel is in the 3D Viewport sidebar — press N, then the Unreal Tools tab, shared with the other Tachyon Studio add-ons when they are installed.
2. Bevel something
Select edges and press Shift + Alt + B, use Edit Mode ▸ Edge menu ▸ Bevel (Editable), or pick Bevel (Editable) from the toolbar — right after Blender's Bevel tool — and click-drag on the selection. The width follows the mouse, like Blender's own bevel.
3. Click once

The tool stops following the mouse and becomes an editor (from the toolbar, releasing the mouse does the same). Every corner the bevel runs around is now a handle, and the profile's segments, shape and measurement are live. Nothing is committed until you confirm, and Esc puts the mesh back exactly as it was.
4. Confirm
Enter, Space or a right-click commits the whole thing as one undo step.
The problem it solves

Blender's bevel draws the bevel's inner edge on each face as a parallel offset of that face's outline. On a straight edge that is exactly right. Around a rounded corner every offset direction points at the arc's centre, so a bevel run around the corner tightens as the width grows — it collapses to a single point when the width reaches the corner's radius, and past it the vertices cross over and the corner turns inside out.
How it works
Blender's bevel first
The topology is always Blender's own bevel, run with the segments, profile and measurement you ask for. An edge with no corner bevels exactly as Blender's bevel does, vertex for vertex: where a run of new vertices is two long — a plain edge — there is no curve to describe, and Blender's result stands.
Which faces the editor lays out
The editor lays out a face that is bevelled all the way round, such as the top of a slab whose whole outline is in the selection. It also lays out the ring of faces around the foot of an extrusion, which it reads as one outline (see The foot of an extrusion). On a face bevelled along only part of its outline, the straights and sharp corners keep Blender's answer. A round corner there is laid out in Keep Shape from the start, so it doesn't shrink as the width grows. The width drives every vertex either way.
Finding a corner is not the same as taking it over
Each run is read for its own corners: a vertex that turns sharply is a corner, and so is a long straight, which ends whatever corner ran into it. That only decides where the handles are. A corner stays exactly where Blender put it until you shape it — give it a spread, or a vertex count it did not already have — and only then does the corner solver place it. So the default is Blender's answer, and the editor is opt-in, one corner at a time.
Two modes per corner
| Mode |
What the corner does |
| Keep Shape |
Keeps a rounded corner's spacing whatever the width — the fix this tool exists for |
| Classic |
The parallel offset Blender's own bevel would have made, held just short of collapsing by Clamp Overlap |
T swaps the selection between them.
Using the editor
| Do |
Result |
| Click a corner |
Select it. Shift adds to the selection |
| Drag from empty space |
Box-select corners |
| Click or drag a side's small dot |
Select that side, or set its depth by hand |
| Shift + Wheel |
Step the width |
| I |
Open the Width dialog: a number field with the selection's current value, and an Adjust by field that adds or subtracts an amount. Both update the mesh live; Enter keeps it, Esc puts it back |
| Z |

Reset the selection to its reset point: where each corner was when the tool started, or where you last set it. With nothing selected, every corner |
| Shift + Z |
Make the selection's current shape its reset point (also the Set Reset Point chip) |
|
Ctrl + C / Ctrl + V
|
Copy the selection's settings, and paste them onto another selection — through a tick list |
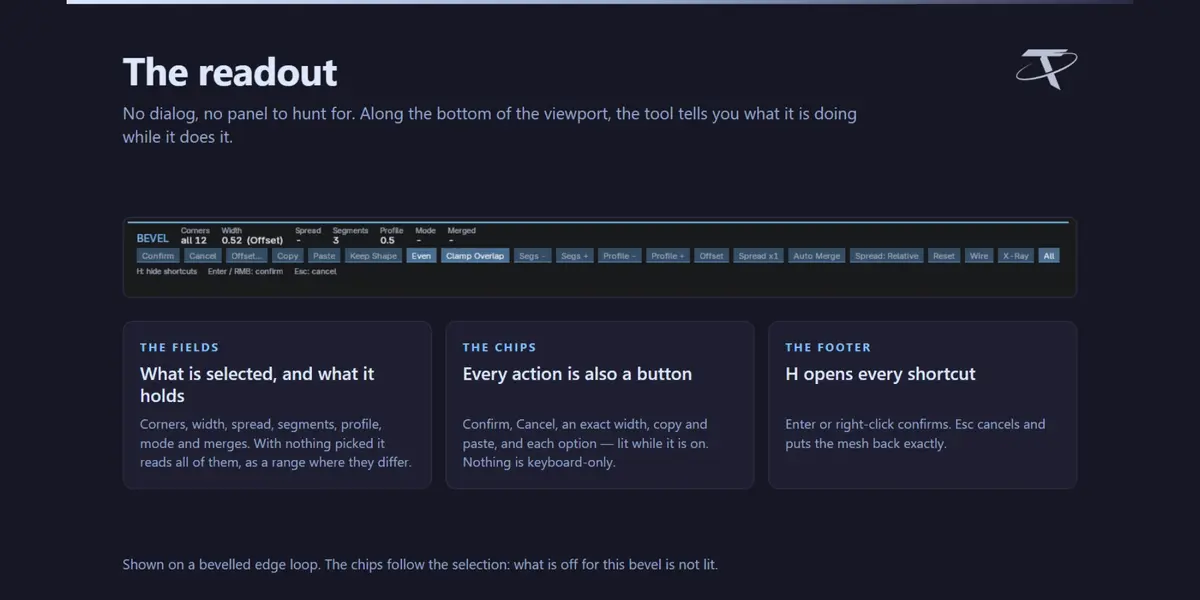
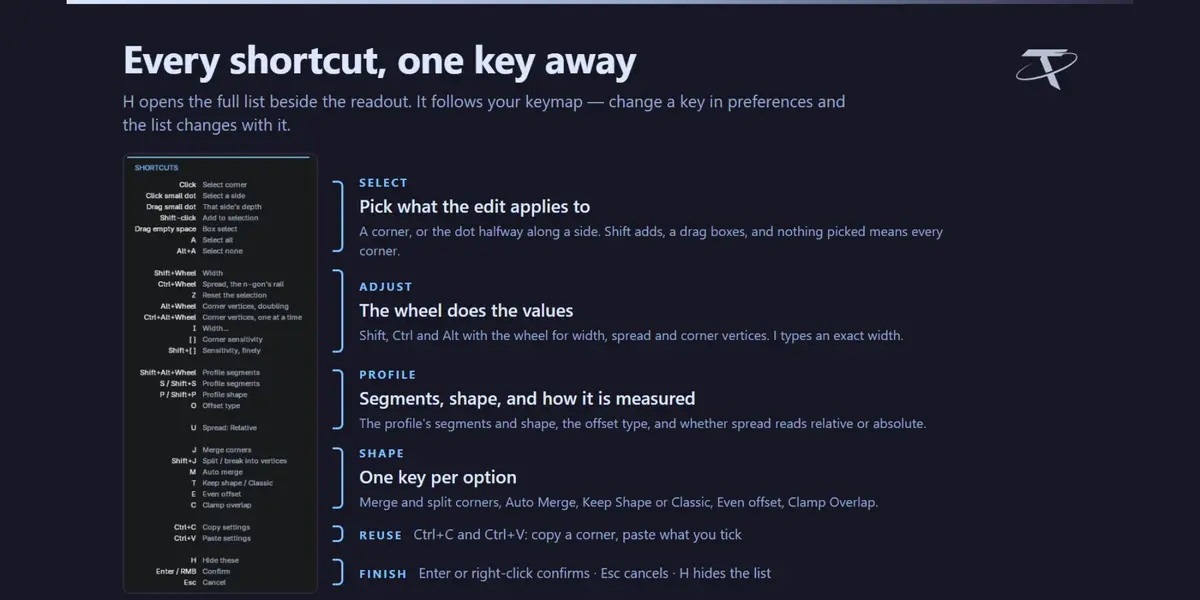
With nothing selected, every edit applies to all corners at once. The panel at the bottom of the viewport carries the same actions as clickable chips, and H shows or hides the full list of shortcuts. The bare mouse wheel stays Blender's zoom.
The profile
| Key |
What it does |
|

S / Shift + S, or Shift + Alt + Wheel
|
The profile's segment count — 1 is a chamfer |
|
P / Shift + P
|
The profile's shape — 0.5 is a circular arc, lower is flatter, higher is squarer |
| O |
Cycles how the amount is measured — Offset along the faces, Width of the bevel face, or Depth from the original edge, the same three ways Blender's own bevel offers |
Every vertex across the bevel — not just the rail on either face — is laid out afresh along the profile between the two rails, evenly spaced, so a corner pushed deeper or wider keeps a clean profile rather than bunching its rows.
Spread


Ctrl + Wheel widens or tightens the selected corner along the n-gon's own rail — the face the bevel runs around. The radius changes about the point where its two straight edges would meet if the corner were sharp, so the tangent points slide along those edges and stay on them. U switches between giving every selected corner the same length or the same multiple of its own size.
Select All picks the n-gon's own rail, not the rails on the far side of the strip: those are the neighbouring faces' boundaries, and spreading them would pull apart geometry that has nothing to do with the bevel.
Corner vertices

Alt + Wheel doubles or halves a rounded corner's vertex count, and Ctrl + Alt + Wheel changes it one vertex at a time. The new vertices land on the fitted circle, so the corner gets rounder rather than denser.
A bevel can densify an arc it already has, but not round a single-vertex corner into one: its rails carry profile columns that would have to be rebuilt with it. Rounding a sharp corner is Edit Corners (Shift + Alt + C), which is in the Bevel too as of 1.1.0.
Structural edges

A selection where three or more bevelled edges meet at one vertex (the corner of a box, or a whole rounded strip selected at once) bevels like any other. Blender builds a patch of new geometry where the edges meet, and that patch is exactly Blender's own at any width, along with everything that touches it. Every corner around it is still a handle you can widen, spread and give vertices.

Clamp Overlap stops a bevel that runs into existing geometry (an edge whose end meets a bevel already there, say) at the vertex it runs into. With Auto Merge on, it lands on that vertex and welds to it when you confirm.
The foot of an extrusion

Bevel the ring of edges around the base of an extruded shape, and the faces around it on the surface below come up as one outline with its own corners. Before 1.1.0 each of those faces was a separate corner of one vertex.
-
A round corner grows around its own centre. Every vertex goes straight out from the round, and its first and last vertices go out square to the straight sides beside them, so the straights stay parallel to the extrusion.
-
Spread widens or tightens that round with its ends sliding along the straights. With Clamp Overlap on, it stops before the round runs off the face or into the extrusion.
-
The extrusion's wall carries the other side of the bevel. Its round is one corner too, left exactly where Blender's bevel puts it, since its vertices can only move up the wall. Spreading it slides the round along the wall at the same height. With Clamp Overlap on it can widen but not tighten past the wall's own round, which would cut across the extrusion.
-
Clamp Overlap holds the ring at the far edge of the faces it crosses.
Structure: which vertices are one corner

A round made of many small faces (the side of a rounded corner, say) is read as one corner across all of them, not a corner per face.
[ and ] move the turn a vertex has to make to count as a corner (Shift for fine steps). Because finding a corner is not the same as taking it over, the geometry is Blender's at every setting.
Shift + J takes a run apart into a corner per vertex — handles without any change of shape, since each one is still exactly where Blender put it. J puts any of them back together. Neither moves anything: both are structure. From there each corner has its own depth, and giving one a spread hands that corner to the solver while its neighbours stay as they were.
Auto Merge

M lets corners fuse as they meet instead of being held back. Whenever two vertices meet they become one, which carries on along the bisector of the two edges left either side of it, and confirming welds them.
Auto Merge starts on whenever Clamp Overlap is on, which is the default. A bevel that runs into the structure beside it then joins it instead of stopping dead against it. M turns it off for the session.
Clamp Overlap

C toggles the caps. A corner is held by whichever is tightest: its own vertices meeting, a corner across a real straight, the far side of the shape, or the geometry the bevel runs into at the end of its edge. The corners cut out of one smooth run are one curve, so neither cap applies between them: widening one never stops it against its neighbour or breaks the shape.
Turning Clamp Overlap on also turns Auto Merge on (see Auto Merge).
Copy and paste

Ctrl + C opens a list of what the selection carries (distance, spread, vertex count, mode, the options, and the profile's segments, shape and offset type as one row), each with its current value beside a tick box. Ctrl + V shows the same list holding what was copied, onto whatever is selected now. The clipboard outlives the editor, so settings carry from one bevel to the next.
-
Spread is copied as a length, so the same number is the same size on any corner: 0.3 copied off a round corner is 0.3 on a sharp one.
-
The vertex count reads N vertices, and pastes onto any round corner, including one that is still a single vertex.
The menu
Shift + Alt + Y opens the tools as a pie or a dropdown — whichever the preferences say. It carries:
-
Bevel (Editable) — this add-on's bevel.
-
Blender Bevel — Blender's own, unchanged, for when a plain bevel is exactly what you want.
Each entry can be switched off in Preferences ▸ Menu.
Every control
| Key |
What it does |
| Wheel |
Zooms, as everywhere else in Blender — the tool does not take it |
| Shift + Wheel |
Step the width |
| Ctrl + Wheel |
Spread on the n-gon's rail |
| Alt + Wheel |
Corner vertices, doubling or halving |
| Ctrl + Alt + Wheel |
Corner vertices, one at a time |
| Shift + Alt + Wheel |
Profile segments |
|
S / Shift + S
|
Profile segments up / down |
|
P / Shift + P
|
Profile shape |
| O |
Offset / Width / Depth |
| I |
Width dialog — set exactly, or adjust by an amount, live |
| U |
Spread: Absolute / Relative |
| Z |
Reset the selection to its reset point |
| Shift + Z |
Set the reset point |
| M |
Auto Merge on or off |
| T |
Keep Shape ↔ Classic for the selection |
|
J / Shift + J
|
Merge corners / split, or break a run into a corner per vertex |
|
E / C
|
Toggle Offset Even / Clamp Overlap |
|
A / Alt + A
|
Select all corners / none |
[ / ]
|
Corner sensitivity (Shift for fine steps) |
|
Ctrl + C / Ctrl + V
|
Copy / paste the selection's settings, through a tick list |
| H |
Show or hide the shortcut panel |
|
Enter / Space / right-click |
Confirm |
| Esc |
Cancel, restoring the mesh exactly |
Every key above except confirm and cancel can be changed in the add-on preferences, and any of them can take Ctrl, Shift or Alt (on a Mac, also Cmd, with Alt shown as Option). The ones that go up and down (the wheel rows, S, P and [ ]) can each be the wheel with any modifiers, or a pair of keys: one for up, one for down.
Preferences
| Setting |
Default |
What it controls |
| Corners |
Keep Shape |
What a rounded corner does when the tool starts |
| Starting Distance |
0.1 |
The width the bevel opens at |
| Bevel Profile Segments |
3 |
How many segments across the profile a new bevel starts with |
| Menu |
Pie |
Whether Shift + Alt + Y opens a pie or a dropdown |
| Menu Entries |
both shown |
Which of the two entries appear on that menu |
| First drag |
Away from the centre deepens |
Which way the first drag runs, before the editor opens |
| Shortcuts panel |
Left |
Which side of the viewport the shortcut panel (H) sits on |
|
Wire / X-Ray
|
Off / Off |
Draw the original outline and spokes, and draw the handles through the mesh |
| Keys in the editor |
as listed above |
Every shortcut the editor answers to: a key with any of Ctrl, Shift and Alt, set by clicking the round button and pressing it. Up-and-down controls take the wheel or a pair of keys. A clash is flagged, and Restore Default Editor Keys puts them all back |
| Shortcuts |
Shift+Alt+B / Y |
Both, in Blender's own keymap editor, with a Restore button |
Limits worth knowing
-
Where three or more bevelled edges meet, the patch Blender builds is Blender's own. It follows the width but has no handles of its own.
-
A single-vertex corner cannot take a vertex count on the bevel — see Corner vertices.
-
Corner vertex counts and Auto Merge are declined on Blender 3.3. Both change topology, and that build's bmesh is intermittently fatal at the Python teardown which follows such operator sequences — nothing in Python can prevent it. 3.4 and later are fine; everything else works on 3.3.
-
The profile between the rails is evenly spaced, which differs slightly from Blender's own parameterisation. It is what lets the profile controls work live without rebuilding the bevel.
-
Auto Merge on a partly bevelled run is built to fuse corners meeting across a straight; within one smooth run there is no straight to meet across, so leave it off there.
-
There is no redo panel. It would re-run the bevel on geometry that is already bevelled and discard every per-corner edit, so the operator does not offer one. Ctrl + Z undoes the whole bevel in a single step, and
bpy.ops.tbv.bevel(thickness=...) still works from a script.
Troubleshooting
The bevel refuses to start
Either no edges are selected, or an edge in the selection is missing a face on one side. Every bevelled edge needs a face on both sides.
Nothing changes when I push a corner
A straight or sharp corner only leaves Blender's placement once it is shaped. Give it a spread with Ctrl + Wheel, or switch it between Keep Shape and Classic with T. A round corner is laid out from the start.
Two corners are being read as one
A long straight ends a corner, and [ / ] move how sharp a turn has to be. Shift + J breaks a run into a corner per vertex, and J merges any of them back.
Alt+Wheel and M do nothing
You are on Blender 3.3, where both are declined — see Limits worth knowing — or the corner is a single vertex, which a bevel cannot round.
Where is the inset?
The editable inset is its own add-on, Advanced Inset, sold separately. Edit Corners is in both. The two install side by side and neither needs the other; with both installed, Blender's menus list Edit Corners once.
The panel is not there
Press N in the 3D Viewport and look for the Unreal Tools tab. The tool is also on the toolbar, in the Edge menu, and on Shift + Alt + Y.
Network use and files written
None, and almost none. The add-on opens no sockets, sends no telemetry and checks no licence. The Documentation and Discord buttons hand a URL to your default browser and nothing more.
| Path |
What, and when |
| Blender's own preferences |
The add-on preferences, saved by Blender |
<Blender config>/tachyon/welcomed_tachyon_bevel.txt |
One line recording which version last showed its welcome, so a reinstall greets you again |
Release history
| Version |
Released |
What changed |
| 1.1.1 |
24 September 2026 |
Every shortcut in the editor can be changed, with any of Ctrl, Shift and Alt. Anything that goes up and down can use the wheel with any modifiers, or a pair of keys. Defaults and your earlier choices carry over. |
| 1.1.0 |
24 September 2026 |
Structural edges (three or more bevelled edges meeting) are bevelled instead of declined. The foot of an extrusion is one outline with square-ended rounds. Clamp Overlap stops a bevel running into other geometry, and brings Auto Merge with it. Merged corners and very wide rounds keep their shape. A reset point for corners (Shift + Z). Edit Corners is in the Bevel. Spread pastes as a length, and a vertex count pastes onto any corner. The shortcut panel sits on the left. |
| 1.0.1 |
21 September 2026 |
Corner handles are visible again on Blender's Vulkan backend (Preferences ▸ System). They are drawn as GPU points, and Vulkan ignores the requested point size for the shader the add-on used, so every handle came out one pixel wide and read as missing; they now use Blender's dedicated point shader, which honours the size on both backends. Nothing changes on OpenGL. |
| 1.0.0 |
— |
First release. A bevel whose rounded corners hold their shape as the width grows, with every corner a handle you edit before you confirm. |
Support
Questions, bug reports and feature requests — join the Discord. The same invite is in the add-on preferences, next to a link back to this documentation.
GPL-3.0-or-later. Copyright 2026 Tachyon Studio.
 Tachyon Studio


 Included