Procedural Anime Eye Shader Pack For Blender: 20 Customizable & Animated Presets
 Rasheed's Edit






Procedural Anime Eye Shader Pack — User Guide
Twenty procedural eye materials and the UV-mapped eye mesh they are authored against. Blender 4.5 to 5.2, Cycles and EEVEE. There is not a single image texture in the pack.
Read this first — the shaders are UV-driven
The eye is drawn into a specific place in UV space. That has three consequences, and they explain almost every support question:
- On the included Anime Eye Ball mesh the iris lands correctly.
- On a mesh with no UV map the shader will not appear at all — you get a blank sphere.
- On a differently unwrapped eye the iris sits off-centre.
So either use the mesh included in the pack, or unwrap your own eye the same way. This is why the mesh ships with the shaders.
Two ways to get the shaders in
A — Blender’s Asset Browser (recommended)
- On Blender 5.2: add Superhive as a Remote Asset Repository and your purchase appears in Blender itself — every material with a rendered preview, filed and tagged.
- On Blender 4.5 and above: download the library, then point Preferences → File Paths → Asset Libraries at the extracted folder.
- Open the Asset Browser, pick an eye, and drag it onto your object. No unzipping, no Append, no hunting for a material name.
B — Append from the .blend
- File → Append → choose Anime Eye Shader V1.blend or Anime Eye Shader Part2.blend (the twenty are split across the two).
- Open the Material folder and pick one by name.
- Select your eye object and assign the appended material.
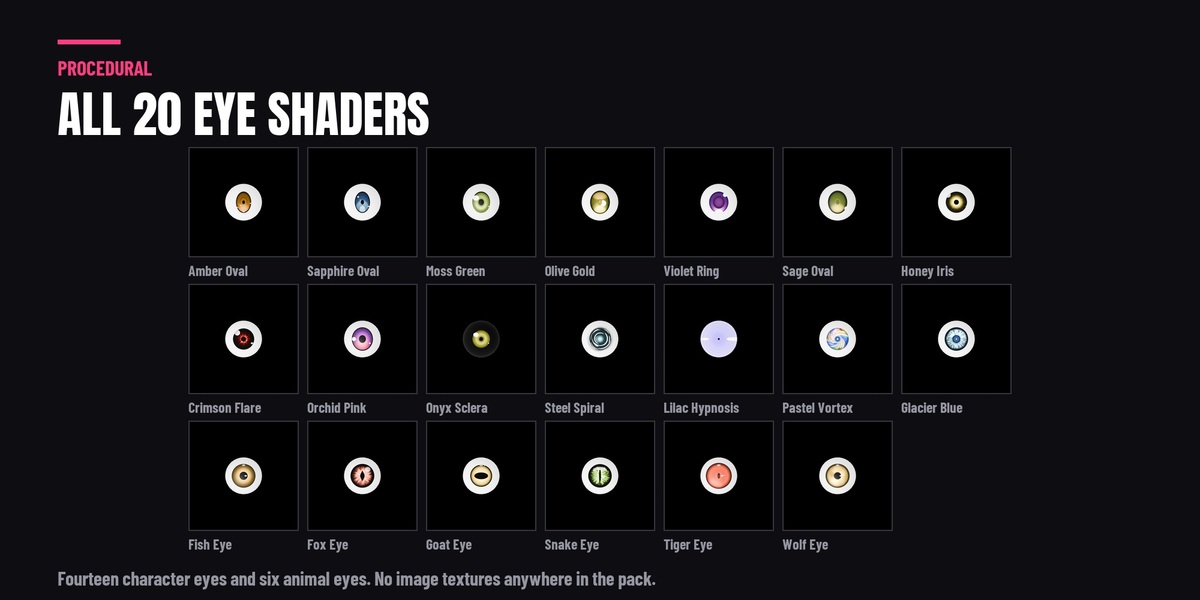
The twenty shaders
Character eyes (14): Amber Oval, Crimson Flare, Glacier Blue, Honey Iris, Lilac Hypnosis, Moss Green, Olive Gold, Onyx Sclera, Orchid Pink, Pastel Vortex, Sage Oval, Sapphire Oval, Steel Spiral, Violet Ring.
Animal eyes (6): Fish Eye, Fox Eye, Goat Eye, Snake Eye, Tiger Eye, Wolf Eye.
Eight animate on their own — Crimson Flare, Steel Spiral, Lilac Hypnosis, Pastel Vortex, Glacier Blue, Fox Eye, Snake Eye and Wolf Eye. Press play; they are seamless loops and there are no keyframes for you to set.
The controls
Eye colour
- Gradient Colour 1 / 2 — the base gradient of the iris. Contrasting hues read as depth.
- Overall Scale — this control is inverse: a lower number gives a bigger iris, and it means something different in every material. For reference, to make the iris half the width of the eyeball (real anatomy is a 24 mm eyeball with a 12 mm iris) Crimson Flare needs about 1.4, Snake Eye 1.8, Wolf Eye 2.2, Pastel Vortex 3.7, Onyx Sclera 4.0 and Glacier Blue 4.0. Anime styling usually wants a larger iris than that. Start from the preset value and adjust by eye.
- Overall Vector Scale — stretches the detail. Changes of ±0.1 noticeably alter the pattern flow.
- Border Scale — thickness of the iris rim.
- Primary Mask Scale / Colour Gradient Scale — how the gradient and masks blend.
Pupil
- Pupil Colour / Border Colour — pupil and rim tint.
- Pupil Vector Scale — stretches the pupil; this is how you get a vertical cat pupil.
- Pupil Scale — pupil size. A real pupil is roughly a third of the iris width.
Reflections
- Reflection Intensity — brightness of the highlights.
- Reflection 1 / 2 Scale — size of the main and secondary highlights.
- Reflection Position X/Y/Z — moves the highlights across the iris.
- Reflection Vector Scale — skews them to suggest the curve of the eye.
Arc and special effects (on the eyes that have them) — Arc Scale, Arc Coverage and Arc Tint. Coverage under 0.2 reads as a subtle sparkle; higher values give a dramatic halo.
Animating the parameters
Every input is keyframable and takes drivers. Right-click a slider or colour → Insert Keyframe, or Add Driver to link it to an object, a bone or an f-curve modifier. Useful for expressive blinks, eye tracking and magic effects — and remember eight of the eyes already animate without any of this.
Applying to several characters at once
Set the material up on one object, select the targets, select the object that has the material last, then Ctrl + L → Materials. Or simply drag the asset from the Asset Browser onto each one.
Render notes
EEVEE — enable screen-space reflections and soft shadows; keep reflection intensity moderate or the speculars blow out. Cycles — 128 to 512 samples depending on the scene; HDRI lighting gives the most believable highlights.
Using these in a game engine
These are Blender node materials, so they cannot be exported to Unity, Unreal or a VRChat/VRoid avatar directly. What does work is baking: set the look up, make sure the iris mesh is unwrapped, then Render → Bake to an image and use that texture in your engine.
Troubleshooting
- The eye renders blank or the shader does not appear. The mesh almost certainly has no UV map. Unwrap it, or use the included Anime Eye Ball mesh.
- The iris is off-centre. Your eye is unwrapped differently from the mesh the shader was authored against. Use the included mesh, or match its layout.
- The iris is too small or too large. Overall Scale is inverse — lower it to enlarge the iris. See the reference figures above.
- The material is black. Check the material is assigned and Use Nodes is on, and recalculate normals (Shift + N).
- Highlights are missing. Add lights or an HDRI; in EEVEE, check reflections are enabled.
- Banding in the gradients. Increase render samples, or add a little dither.
What is included
- 20 procedural eye materials, listed by name above.
- The UV-mapped Anime Eye Ball mesh the shaders are authored against.
- Asset-library builds with a rendered preview and catalog for every asset, delivered into Blender’s Asset Browser.
- The .blend downloads: Trial Version (Only one Shader).blend, Anime Eye Shader V1.blend and Anime Eye Shader Part2.blend.
What you get depends on the variant you bought: the Trial has one shader, Original 10 Eyes has ten, and the Full Version has all twenty. Everything in a smaller tier is also in the Full Version.
-
$3
One eye shader plus the UV-mapped eye mesh, so you can check the workflow and the render quality on your own character before buying the pack.
-
$15
The ten original character eyes, from natural to dramatic, plus the UV-mapped eye mesh they are authored against. One of the ten animates on its own with no keyframes to set. Everything here is also in the Full Version.
-
$25
All 20 eye shaders: fourteen character eyes and six animal eyes - snake, fox, wolf, tiger, goat and fish - plus the UV-mapped eye mesh. Eight of the twenty animate on their own with no keyframes to set.
Have questions about this product?
Login to message
Includes an Asset Library with select variants
34 drag-and-drop assets for Blender’s Asset Browser.
Browse included assets| Published | 5 months ago |
| Blender Version | 4.5 - 5.2 |
| Render Engine Used | Cycles, Eevee |
| Misc Data | Uvs-Unwrapped, Animated |
| License | GPL |
Discover more products like this
Eye procedural shader anime toon-eye asset library animated eye-shader Anime Eye Shader eyes procedural eye anime eye eye material