Auto Quad Filler Pro – One-Click Quad Topology Transitions Between Uneven Edge Loops
 blenderustad


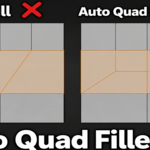
Auto Quad Filler Pro — How to Use
This guide covers installation, the exact selection rules the add-on requires, the full workflow, what each result means, and how to fix the errors you'll actually see.
1. Installation
- In Blender, go to Edit > Preferences > Add-ons > Install.
- Select
Auto_Quad_Filler_Pro.zip(do not unzip it first). - Enable the Auto Quad Filler Pro checkbox in the add-ons list.
No restart is required. The tool is now active in every Mesh Edit Mode session.
2. Where to Find It
- N-panel: open the side panel in the 3D Viewport (press N) and click the Quad Filler tab.
- Keyboard shortcut: Shift+F, while in Mesh Edit Mode.
- Right-click context menu: in Edit Mode, right-click in the viewport and choose Quad Filler near the bottom of the menu.
All three trigger the same operation. The tool only works on mesh objects in Edit Mode — it does nothing in Object Mode.
3. Quick Start
- Select your mesh and enter Edit Mode.
- Switch to Edge select mode.
- Select the boundary edges on one side of the gap you want to close (for example, a 4-edge loop).
- Hold Shift and also select the boundary edges on the other side of the gap (for example, the opposite 1-edge or 2-edge loop). You now have two separate chains selected, not one continuous loop.
- Open the Quad Filler tab in the N-panel. It should read "Ready: 4 → 1" (or whatever your ratio is).
- Press Shift+F, or click Fill.
The gap is filled with quad topology and the newly created faces are selected, ready for further editing.
4. Selection Rules — Read This Before You Start
The add-on is strict about what it accepts, on purpose, so it never guesses wrong. It needs exactly two separate, open, non-branching boundary edge chains:
- "Boundary edge" means an edge with a face on at most one side — a hole edge, or a loose/wire edge. An interior edge with faces on both sides will not be picked up even if selected.
- "Two separate chains" means two disconnected pieces. If your selection is actually one continuous loop, it will be rejected.
- "Open" means each chain has two distinct endpoints. A fully closed loop (a ring with no start or end) is not supported — split it or select two open sides instead.
- "Non-branching" means every vertex in your selection touches at most two selected edges. A T-junction or extra branch in the selection will be rejected.
- No stray selected vertices that aren't part of a selected boundary edge.
You do not need to select the interior faces or any side-connecting edges — just the two boundary chains you want connected. The add-on figures out the side connections and internal topology on its own.
5. Reading the Panel
The Quad Filler tab always shows your current selection status at the top:
| Message | Meaning |
|---|---|
| Select a mesh object | No mesh is active. |
| Enter Edit Mode | You're on a mesh, but not in Edit Mode. |
| Select two open boundary chains | You're in Edit Mode, but the current selection doesn't qualify (see Section 4). |
| Ready: X → Y (green check) | Your selection is valid. X is the denser side's edge count, Y is the sparser side's. The Fill button is now active and shows "Fill X → Y". |
The Fill button is greyed out until your selection is valid — if you can't click it, the status line above tells you why.
If Shift+F shows as unavailable in the panel (a red warning box instead of the shortcut row), another add-on or a custom keymap is already using that shortcut in the Mesh keymap. The Fill button and right-click menu still work regardless.
6. What Happens When You Click Fill
- The add-on reads your two selected chains and tries both possible pairing directions (in case the loops run opposite ways), scoring each candidate.
- It builds the topology transition on a temporary working copy of your mesh — your real mesh is not touched yet.
- It checks the result: the exact face count and shape must match what that ratio is supposed to produce (see the table in Section 7). If anything doesn't check out, the whole attempt is discarded.
- Only if validation passes does it write the result into your actual mesh, select the new faces, and report the outcome in the status bar (bottom left), e.g.: "Quad Filler: 4 quads, 0 triangles, 0 n-gons; template TEMPLATE_3_TO_1; validation PASS"
If it fails at any point, your mesh is left exactly as it was, and you'll see a red error message instead — nothing partial or broken is ever left behind. The whole thing is also a normal undo-able operation (Ctrl+Z).
Your two originally selected boundary chains are never moved, split, or merged by this operation, whether the fill succeeds or not.
7. Understanding the Result
Each dense-to-sparse ratio has a known, fixed face outcome:
| Ratio | Result |
|---|---|
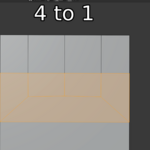
| 4 → 1 | 4 quads + 1 five-sided face |
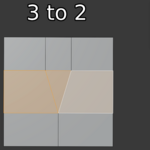
| 3 → 2 | 2 quads + 1 triangle |
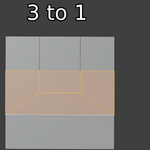
| 3 → 1 | 4 quads (no triangles or n-gons) |
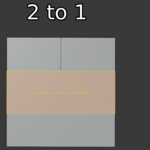
| 2 → 1 | 3 quads + 1 triangle |
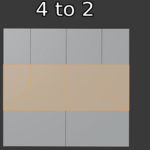
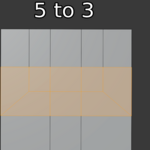
| Other ratios (5→3, 6→2, 4→2, etc.) | Built from the same strip-reduction logic, using one two-strip reduction point for every 2 edges of difference. Larger gaps may use more than one reduction point along the loop. |
If the two chains differ by an odd number of edges (like 5 → 2), the add-on automatically adds one extra supporting vertex on whichever side scores best — you don't need to do anything differently; it's handled as part of the same Fill operation.
8. Optional Behavior (set once, not exposed as buttons yet)
Three behaviors are built in and run with sensible defaults every time you use Fill:
| Behavior | Default | What it does |
|---|---|---|
| Preserve Symmetry | On | Favors placing the transition symmetrically when your selection sits on a mirrored part of the mesh. |
| Relax Internal Vertices | On | Smooths the shape of newly created interior points without moving your original selected boundary. |
| Debug Mode | Off | Highlights the generated transition faces with a dedicated debug material and writes a full scoring breakdown to a text block named QuadFiller_Debug in the Text Editor. |
These currently don't have their own checkboxes in the N-panel — the defaults above are what every Fill uses. If you want to change one for a specific project (for example, turning Debug Mode on to inspect why a layout was chosen), you can do it from Blender's Python Console:
bpy.context.scene.quad_filler_debug = True


bpy.context.scene.quad_filler_preserve_symmetry = False


bpy.context.scene.quad_filler_relax_internal = False
Or press F3 and search for "Debug Mode", "Preserve Symmetry", or "Relax Internal Vertices" to toggle them without the console.
9. Troubleshooting
| Error you see | What it means | Fix |
|---|---|---|
| Select two open boundary chains | Nothing usable is selected yet, or only one side is selected. | Select the boundary edges on both sides of the gap, holding Shift for the second chain. |
| Closed loops are not supported | Your selection is one continuous closed ring, not two open chains. | Deselect and instead select two separate open sides of the area you want filled. |
| Selection branches — use simple open chains | A vertex in your selection touches more than two selected edges (a T-junction). | Simplify the selection so it forms two clean, unbranched lines. |
| Remove isolated selected vertices | A vertex is selected without its connecting boundary edge also selected. | Switch to Edge select mode and reselect just the boundary edges. |
| Select exactly two separate open chains | You selected one merged chain, or three or more separate pieces. | Adjust the selection down to exactly two separate open chains. |
| Quad Filler: selected candidate failed final validation | An internal safety check rejected the best candidate before committing anything to your mesh. | Your mesh is untouched. Try adjusting the selection slightly (a cleaner, more planar boundary tends to resolve this), or enable Debug Mode to see the scoring detail. |
10. Known Limitations
- Closed-loop selections are not supported in this version — only two separate open chains.
- Only works in Mesh Edit Mode; no Object Mode / multi-object batch operation.
- Works on the exact two chains you select — it does not scan the rest of the mesh or auto-detect multiple gaps at once. Run it again for each gap.
Support
- Website:
- Email:
- YouTube tutorials:
- More add-ons:
Have questions about this product?
Login to message
| Blender Extension Compatible | Yes |
| Sales | 10+ |
| Published | 2 months ago |
| Blender Version | 3.0 - 5.2 |
| Extension Type | Add-on |
| Render Engine Used | Cycles, Eevee |
| License | GPL |

Discover more products like this
Poly Modeling mesh cleanup subdivision-surface modeling topology retopology quad-topology hard surface edge-loops