Baga Cam OSL
BagaCam – OSL Camera Presets for Blender
Browse, apply and customize Open Shading Language camera shaders directly inside Blender.
What is BagaCam?
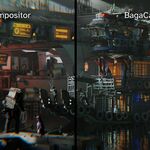
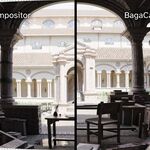
BagaCam uses OSL camera shaders. Instead of stacking a simple post-effect on top of your render, the camera itself becomes a shader that controls how rays are shot into the scene: distortion, chromatic aberration, vignetting, depth of field, bokeh shapes, glow and more. Because this happens inside Cycles, the effect reacts correctly to motion blur, transparencies, volumes, reflections and resolution. Like a real lens, not just a filter.
Installation
- Install the addon via
Edit > Preferences > Add-ons > Install… - Enable BagaCam. A new panel appears in the 3D Viewport and in Camera properties.
- Select any preset in the gallery and click Apply Preset on the active camera.
Optional: import any .osl into the Presets list using the Add Preset button.
Preset Browser
The preset browser displays every OSL camera shader found in the module’s presets folder.
- Preset Thumbnails: Each preset card shows its preview.
- Category: Filter presets by category using the top dropdown.
- Tag: Type a keyword to show presets containing that tag.
- Search: Filter presets by name.
- Favorites Only: Show only presets marked as favorite.
- Quick Navigation: Use the left/right arrows to move through visible presets (looping at start/end).
- Refresh Presets: Reload the list after adding, renaming, or deleting presets.
Add & Apply Presets
Select a camera, pick a preset in the browser, then click Apply Preset. BagaCam sets up the custom camera shader and its controls on that camera.
BagaCam works in Cycles only. If another engine is active, the Switch to Cycles button will appear so you can swap in one click.
You can assign a different preset to each camera in your scene.
If you tweak the parameters of a preset, then switch to another preset and come back, the values are restored to that preset’s default settings.
Camera Panel
When a camera uses a BagaCam preset, two sections appear:
- Parameters: User-friendly grouped controls (distortion, chromatic aberration, vignetting, DOF, bokeh, glow, etc.).
- Preset Parameters: Shows every raw shader input for advanced tweaking.
If Cycles is not active, a Switch to Cycles button appears automatically.
Tools & Interface
| Button | Description |
|---|---|
| Apply Preset | Attach the selected camera preset to the active camera and show its controls. |
| Previous / Next | Jump to the previous or next visible preset, keeping your current filters. |
| Switch to Cycles | Switch the scene render engine to Cycles (required for OSL cameras). |
| Add Preset | Import an external OSL file (and optional metadata) into the preset library. |
| Refresh Presets | Reload the preset list after adding, renaming or deleting files. |
| Save as New Preset | Duplicate the active preset with a new name, description, tags and default values read from the current preset on camera. |
| Rename Preset | Rename the preset and all associated files (OSL, compiled shader, preview, metadata) safely. |
| Favorite | Toggle the ⭐ to mark a preset as favorite; favorites stay pinned at the top of the list. |
| Set Preview | Assign a custom thumbnail (PNG or JPG) for the selected preset. |
| Edit Preset Metadata | Edit the preset’s description, category and tags through a small form. |
| Generate Previews | Automatically render missing thumbnails using the included Classroom scene. |
OSL Shader
Simple Distortion
Amount: Applies basic geometric distortion to the image. Negative values bend lines outward (barrel effect), while positive values bend them inward (pincushion effect).
Advanced Distortion
K1: Principal coefficient influencing general curvature from center to edges for a realistic vintage lens look.
K2: Secondary coefficient adjusting curvature in intermediate image areas.
K3: Tertiary coefficient influencing distortion at the extreme edges.
Noise Swirl
Scale: Defines the size of the wavy distortion pattern. Small scale creates tight turbulence; large scale creates wide, gentle ripples (heat haze type).
Amplitude: Controls the overall intensity of the wavy effect. Increase to make the distortion more visible.
Evolution (W): Evolves the random noise pattern over time. Ideal for animating the distortion or finding a different static variation.
Depth of Field & Bokeh
Use Depth of Field: Enables realistic depth of field blur calculation. If disabled, the image will be perfectly sharp everywhere (pinhole camera).
Focus Object: (Optional) Select an object in the scene for automatic camera focusing.
Focus Distance: Manually sets the distance where the image is perfectly sharp (used if no Focus Object is selected).
F-Stop: The lens aperture. A lower value (e.g., f/1.4) lets in more light and reduces depth of field, increasing background blur.
Blades: The number of diaphragm blades. Defines the geometric shape of blurry light points (e.g., 6 for hexagon). Set to 0 for a perfect circle.
Rotation: Rotates the geometric bokeh shape defined by the blades.
Ratio: Stretches or compresses the overall bokeh shape to change its aspect ratio.
Split Diopter (Simulates an additional lens element covering part of the lens, creating a second simultaneous focus plane.)
Distance: The specific focus distance for the area covered by the split diopter element.
Angle: The angle of the separation line between the two focus zones.
Split Position: The position of the separation line across the screen (0.5 places the line in the center).
Feather: The softness of the transition along the separation line. Increase to blend the two focus zones more subtly.
Bokeh Shapes :
Swirl Strength: Creates a "swirling bokeh" effect (Petzval look), where blurry shapes on the edges are stretched circularly around the center.
Cat’s Eye:
Strength: Simulates mechanical optical vignetting. Bokeh shapes at the edges are truncated by the lens barrel, taking on a cat's eye shape.
Falloff: Controls how quickly the cat's eye effect appears as you move away from the image center.
Anamorphic:
Squeeze: Strongly stretches bokeh points to mimic the look of anamorphic cinema lenses (try values like 1.33 or 2.0).
Rotation: Rotates the axis of the anamorphic stretch.
Doughnut:
Strength: Transforms blurry light points into rings (doughnut shape), characteristic of mirror lenses (catadioptric).
Chromatic Aberration
Strength: Simulates lens imperfection by separating color channels (Red/Blue) at the image edges.
Seed: Modifies the random pattern used for color dispersion. Change this value if you perceive unwanted fixed artifacts in the grain.
Vignette
Strength: Darkens the image corners to draw attention to the center.
Falloff: Controls the softness of the gradient. A low value spreads darkening toward the center; a high value concentrates it in the corners.
Focal Length (mm): Defines the lens field of view and magnification in millimeters. Low values (e.g., 24mm) create a wide angle, while high values (e.g., 85mm, 135mm) compress perspective like a telephoto lens.
Metadata Editing
Preset metadata (category, tags, description, favorite status, preview path, default values, etc.) is stored with each preset. All management tools update this metadata safely without breaking existing cameras or scenes.
Metadata are stored in the .osl file itself as such :
// Category: Main
// Favorite: true
// Tags: Basic
// Base BagaCam Preset
Good to know !
- Custom OSL cameras work in Cycles only.
- Switching presets resets parameters to each preset’s default values.
- Favorites always stay at the top of the preset list for quick access.
- Render : effects are baked into the render and cannot be adjusted after the image/animation has been rendered.
FAQ
How do I add my own presets?
Drop your OSL file in the presets folder or use the Add Preset button, then click Refresh Presets.
Why does BagaCam require Cycles?
OSL camera shaders are supported only in Cycles, not in Eevee. Use the Switch to Cycles button to enable them.
Can I safely rename a preset?
Yes ! Rename Preset updates the OSL file, compiled shader, preview and metadata so existing cameras keep working.
What happens if a preset has no preview?
Use Generate Previews to automatically render thumbnails for all presets that are missing an image.
Changelog
v1.0.0 First public release: full preset browser, OSL camera, metadata system, thumbnails, and management tools.
Discover more products like this
lens distortion depth of field swirl bokeh vintage lens lens preset camera effects cinematic cinematography viewport Cycles optics realtime bokeh anamorphic in-camera film look OSL camera realism Shader rendering split diopter chromatic aberration vignette per-camera non-destructive photography