One click takes your Blender render into DaVinci Resolve: versioned bins, a timeline at the right frame rate and resolution, and a color pipeline that shows exactly the picture you lit. Not close. Pixel exact.
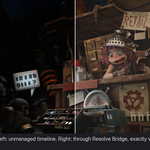
Without the bridge. The Junk Shop splash scene as a raw EXR on a Resolve timeline.
Through Resolve Bridge. The same frame, showing exactly what Blender showed you.

Rendering is the easy half. Getting frames into Resolve with the right frame rate, timecode, version handling, and above all the right color is where evenings disappear. Resolve Bridge makes the whole handoff one button.
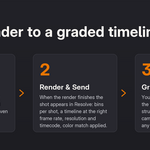
1
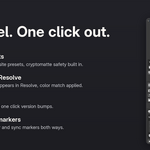
Set up the shot
Project, shot name, delivery folder. The Edit & Grade and Composite presets write proven EXR settings, with cryptomatte safety built in.
2
Render & Send
When the render finishes, the shot appears in Resolve: bins per shot, a timeline at the scene's frame rate, resolution and start timecode, color match applied.
3
Grade
Your grade lives in log under the view transform, the same structure colorists use with camera footage. Switch looks any time; grades survive.

Wiring Blender into Resolve by hand is convoluted. You need to know what scene linear means, which OCIO config matches your Blender version, how to build the right color space transform chain, and why a LUT that expects video quietly breaks on float EXRs. Get one assumption wrong and every shot is off. The bridge encodes that whole discipline, so the pipeline stops being your problem.
The manual way
Learn scene referred versus display referred. Hand build a shaper and transform chain per clip. Keep it in sync when Blender's color management changes. Repeat for every shot, every version, every look you want to try.
With the bridge
Press Render & Send. The correct chain is built on every clip, verified against Blender's own output to a fraction of a pixel value. You spend the evening on the art, not the plumbing.

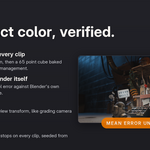
Blender EXRs are scene linear light; Resolve LUTs expect display video. Feed one to the other and you get the broken picture every Blender artist knows. The bridge builds the correct chain on every clip: a float log shaper in the clip's Fusion comp, then a 65 point cube baked from Blender's own color management on the clip node.
Under 0.2/255
mean pixel error against Blender's own render, verified per release
Grade in log
your corrections sit under the view transform, like grading camera log with a show LUT
True exposure
a linear light Exposure slider in stops on every clip, seeded from Blender's own setting

Here is why so many renders look the same, and often a little fake: most artists treat the Blender render as the finished picture. The artists whose frames stop the scroll treat it as raw material, because the look is made in the grade. And that kind of post is simply not possible on a PNG or an MP4. Delivery formats are for delivering: 8 bits deep, highlights clipped, one look welded in forever. An EXR is not a picture of your render; it is the render itself, every value of light your renderer computed, still open to any decision you have not made yet.
The Resolve Bridge panel in Blender's sidebar. One panel, and the EXR settings are always right.
Unclamped highlights
A sunset at forty times display white is still all there. The rolloff is yours to shape.
Grade light, not pixels
Exposure in true stops. White balance that behaves like relighting.
Change your mind later
View transform, look and contrast stay open on the timeline, not welded in at render time.
Passes, cryptomatte, HDR
Light mixing, clean mattes and true HDR masters, all from the same frames.
Prefer another format anyway? PNG, JPEG, TIFF, DPX, Targa, WebP and BMP all port through the bridge with the right frame rate, resolution and timecode, and it knows not to transform their baked pixels twice. And if file size is the worry: the Edit & Grade preset writes half float DWAB EXRs, which stay surprisingly close to high quality PNG sizes.

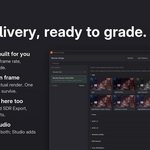
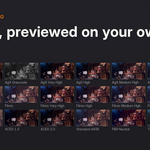
The full AgX and Filmic families, ACES 1.3 and 2.0, Standard, Khronos PBR Neutral, and Tony McMapface, each baked from its own authoritative source. Every delivery ships preview thumbnails rendered from your actual frame, so you pick looks by eye in Resolve and apply them with one click. Grades survive the switch.
The Blender Bridge panel inside Resolve: deliveries on the left, look cards rendered from your own frame on the right.
AgX 10 looks
Filmic 8 looks
ACES 2 looks
Other transforms 3 looks
Every preview above was generated by the bridge itself from the Blender 3.0 splash scene. Your deliveries get the same set, rendered from your own frame.

Serious VFX and finishing work runs on passes: every light, every shading component, every matte under your own control. Setting that up by hand is where most artists quietly give up. On the Blender side it is a maze of view layer checkboxes, light group naming and cryptomatte codec rules; on the Resolve side, a multilayer EXR it may not even read. The bridge collapses all of it to one click on each side. Render once with the Composite preset, then press Break Out Passes in Resolve: the bridge reads what is actually inside your EXR and builds a mixer for exactly that, in the clip's Fusion comp, in scene linear, before the view transform. At neutral the picture is your render, untouched and exact. Total control, zero setup.
Passes set up in one click
The Passes box handles it all: passes, light groups from your lights, cryptomatte safety, and the one EXR flavor Resolve fully reads.
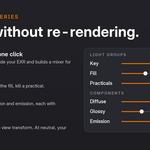
Light group mixer
Gain and color controls for every light group. Turn the key down, warm the fill, kill a practical, all without re-rendering.
Component mixer
Diffuse, glossy, transmission and emission, each with its own controls. Tame the speculars, lift the bounce, push the emission.
Light groups and exact component math are Cycles features. Depth loads into the Fusion Z channel automatically for depth blur and fog.

Anyone who has tried HDR by hand knows the ritual: flip the project's color science, choose the right transfer curve, set mastering luminance, tag the export so platforms actually treat it as HDR, then discover your SDR timelines now render wrong, and your grade did not come along anyway. It is an evening of back and forth per attempt. Your EXRs deserve better: they already hold unclamped linear light, SDR just clips it. HDR Export does the entire dance in one click.
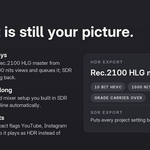
One click, both ways
HDR Export builds the Rec.2100 HLG master from Blender's own HDR 1000 nits views and queues it; SDR Export puts every setting back when you are done
Your grade rides along
the grade, exposure and mixer setup you built in SDR carry onto the HDR timeline automatically; no regrading from scratch
Tagged so it counts
10 bit HEVC with the exact flags YouTube, Instagram and HDR TVs look for, so it plays as HDR instead of washed out grey

Send Shot2 and it opens exactly as the colorist left Shot1: the grade, a switched look, and every mixer adjustment carry onto the new version automatically. The old timeline stays untouched. Overwrite protection warns before you render over delivered frames, and the shot name bumps with one click when you want to keep both.

One click installer. A single button in the addon preferences places the Resolve scripts, the color cubes, and the Studio panel exactly where they belong.
Every delivery, one library. The Resolve panel lists every shot you have sent, filterable by project, with per look preview thumbnails and cleanup tools.
Two way markers. Blender markers appear on the Resolve timeline; Resolve markers and notes sync back into Blender. Works on free Resolve through the delivery folder.
Frame stepped renders. Stepped previews import as one clip with an optional Optical Flow retime preset, ready for Resolve to invent the in betweens.
Manual imports. Any frame sequence or media file comes in through the same door, with the same look tools.
Fusion viewer, final picture. The Fusion page viewers preview through your look automatically instead of washed out log.
Multilayer done right. Composite deliveries are written single part so Resolve can address every pass, and every import is pinned to the real picture, never a stray AO layer.
Fps, resolution, timecode. Image sequences in Resolve default to the wrong frame rate; the bridge stamps the right one every time, plus timeline resolution and start timecode.

One purchase covers both. The color pipeline, looks, mixers, markers, and HDR setup are identical on free Resolve; Studio adds hands off automation.
| Feature | Free Resolve | Studio |
| Pixel exact color match, look catalog, previews | Yes | Yes |
| Break Out Passes, light group and component mixers | Yes | Yes |
| Grade relink across versions, markers, HDR and SDR export setup | Yes | Yes |
| How imports run | Blender Bridge browser in the Scripts menu | one click push straight from Blender |
| Blender Bridge panel in Workflow Integrations | No | Yes |
| Speed Warp quality preset on stepped renders | Optical Flow only | Yes |

| Requirements |
Windows 10 or 11, Blender 4.2 or newer (developed and tested on 5.2), DaVinci Resolve 19 (free or Studio) |
| Studio auto push |
Needs a system Python 3.11 or 3.12 install for Resolve's scripting; the free tier needs none |
| What ships |
The Blender addon, the Resolve Blender Bridge panel (Studio) and browser (free), 26 baked color cubes, and a one click installer that places everything for you |
| Formats |
EXR single layer and multilayer with full codec and depth control, plus PNG, JPEG, TIFF, DPX, Targa, WebP, BMP for display referred work |
| License |
GPL 3, like Blender itself |
| Purchase |
One time purchase with 12 months of updates and support; renew the support period later if you want to keep updates coming |
Page imagery is rendered from Blender splash screen scenes: The Junk Shop by Alex Treviño and the Blender 3.0 splash by Blender Studio (studio.blender.org), CC BY. Tony McMapface display transform by Tomasz Stachowiak, MIT or Apache 2.0, baked from the author's own OCIO configuration. Blender is a trademark of the Blender Foundation. DaVinci Resolve is a trademark of Blackmagic Design. Resolve Bridge is an independent product and is not affiliated with either.
 Limitless Creative