Emission Pro — For Blender® 5.2+ and Cycles
 Danilo Caliro


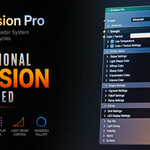
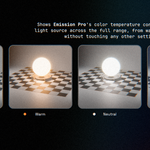
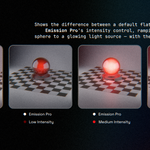
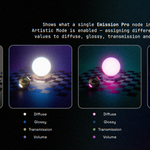
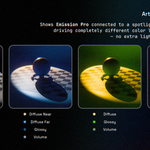
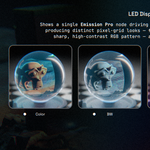
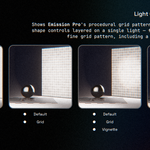
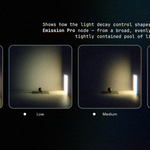
Emission Pro is an advanced shader system designed to extend the capabilities of Blender®'s native Emission material to its maximum potential.
It can be applied to any mesh, including Geometry Nodes generated geometry, and used together with physical lights as additional lighting support.
In addition to working as a standalone light source, Emission Pro is fully compatible with Blender®'s native Point, Spot, and Area lights, and can be combined with them freely.
Through a single compact interface, it is possible to create and simulate any type of emissive surface, from simple light panels to RGB LED displays, neon lights, signage, softboxes, LED diodes, abstract organic surfaces, and volumetric emission effects.
The system uses intelligent presets that automatically modify the interface by displaying only the tools actually required (inside collapsible sections), maintaining a clean, fast, and non-destructive workflow.
Emission Pro is built primarily for Cycles, and full ray-type control (independent Diffuse, Glossy, Transmission, and Volume tinting and exposure) requires Cycles.
All other features — color and texture input, materials, visibility, and alpha masking — also work in Eevee, making Emission Pro useful for layout and animation preview even outside Cycles. In Eevee, emission resolves to a single color rather than the full per-ray tint/intensity chain.
Sun lights are not supported.
Environment lighting offers more limited compatibility but still works well, particularly in combination with the Ray Mix section.
When used with Blender®'s native Point, Spot, and Area lights, the Volume parameters of Ray Mix do not work, due to internal behavior of Cycles.
Using Emission Pro together with real lights is mainly useful when a specific light property is needed — such as a Spot light's cone angle or a light's Radius — or when working with existing scenes and older projects that already rely on physical lights and should now benefit from Emission Pro.
Installation
- Blender® 5.2 or newer
- Cycles render engine (GPU or CPU)
- No additional add-ons, plugins, or external dependencies required
Emission Pro is distributed as a Blender® add-on, packaged as a single .zip file. It installs directly through Blender®'s built-in Preferences panel — no external dependencies, Python scripts, or additional software required.
How to install:
- Download the .zip file from your purchase (do not unzip it).
- In Blender®, open Edit → Preferences → Add-ons.
- Click Install..., select the downloaded .zip file, and confirm.
- Enable Emission Pro by ticking the checkbox next to its name in the add-ons list.
- The Emission Pro node group becomes available directly from the Shader Editor.
- Add it to any material with Shift + A inside the Shader Editor, or from the dedicated Emission Promenu — this menu, which also gives access to this documentation, becomes visible only after the add-on has been installed.
Emission Pro relies only on Blender®'s native Python API and node system — it does not require additional render engines, external libraries, or an internet connection to function.
If the add-on doesn't appear after installation, make sure you selected the downloaded .zip file directly (not an extracted folder), and that your Blender® version meets the minimum requirement (5.2+).
License
Emission Pro is a commercial digital product made of two distinct parts, each covered by a different license.
Add-on code (the installer, menus, and Blender integration) is released under the GNU GPL v3, as required by Blender's own add-on policy. This only covers the small amount of Python code that installs and registers Emission Pro inside Blender.
The Emission Pro node group itself — its shader network, workflow, and internal structure — along with this documentation, its branding, and assets, is not covered by the GPL. It remains the proprietary intellectual property of Danilo Caliro, all rights reserved, and its use is governed by the commercial terms below.
You may:
- Use Emission Pro on all of your own personal devices, without limit.
- Use it in personal, freelance, and commercial projects, including work delivered to clients.
- Modify the node setup freely to fit your own projects.
- Deliver renders, animations, and final output created with Emission Pro to clients with no restriction and no attribution required.
You may not:
- Share your license, download, or the add-on file with any other person.
- Resell, redistribute, or share the Emission Pro node group, in original or modified form, as a standalone product or as part of another shader/asset pack.
- Hand over the Emission Pro node group itself to a client, even as part of a delivered project file.
- Claim authorship of the original shader system.
Each Personal License covers a single individual, who may install and use Emission Pro on any number of their own devices. Studios or teams where more than one person will use Emission Pro require a Studio License, covering multiple users under the same purchase.
If you're unsure which license fits your situation, ask yourself: "will more than one person at my company be using this?" — if yes, a Studio License is the right choice; if no, Personal License covers you.
Presets
Emission Pro includes several presets designed for different rendering scenarios.
Each preset automatically configures the material and modifies the interface by adding, muting or removing specific tools.
Parameter values (only for compatible parameters and according to their specific function) can be modified beyond the default minimum and maximum limits, allowing manual input of values below or above the defined ranges.
Any numeric parameter can be instantly restored to its default value by hovering the mouse cursor over the slider and pressing Backspace or Delete on your keyboard. Alternatively, right-click the parameter and choose Reset to Default Value.
Currently available:
- Simple
- Advanced
- RGB LED
- LED Display
Simple
Simple is the base preset of Emission Pro and represents the starting point for creating most physically plausible emissive materials.
The interface exposes only the fundamental controls, keeping the workflow simple and compact.
- Simple displays
- Light cards
- Illuminated signs and panels
- Simple neon lights
- Self-illuminated meshes
- Organic materials
Advanced
Advanced fully extends the Simple preset by adding the Artistic Mode system, which introduces separate controls for the Cycles ray contributions.
This mode allows the user to manipulate the physical behavior of emission in a creative way while maintaining the same workflow simplicity.
- Look Development
- Cinematic Rendering
- Stylized Rendering
- Direct color grading inside the shader
- Sci-fi scenes
- VFX productions
RGB LED
Preset designed to simulate RGB Light Emitting Diodes (LEDs).
Compared to the Simple preset, it automatically introduces an internally calibrated Fresnel-based falloff that enhances the diode appearance depending on the viewing angle.
The effect has been optimized to achieve a realistic result without requiring additional adjustments.
The diode and Fresnel effect works best on rounded or curved surfaces.
- Single diodes
- Light indicators
- Buttons
- Dashboards
- Electronic components
LED Display
Preset dedicated to RGB LED display simulation.
In addition to the functions available in the Simple preset, it adds specific controls to recreate the typical RGB pattern used in LED matrix displays.
- LED screens
- Large displays
- Billboards
- Moiré effects
- Projector / gobo effects
Attributes
The Attributes section contains the primary controls that define how the emissive material generates light.
This is the starting point of the entire Emission Pro workflow, where the emission intensity, color source, and physical color temperature are configured before any additional processing such as color correction, Artistic Mode, Ray Mix, or Visibility controls.
In most production scenarios, the majority of an emissive material can be created using only the controls available in this section, while the remaining tabs provide optional tools for artistic direction and advanced rendering workflows.
This hybrid workflow allows artists to achieve fast results while preserving the flexibility to integrate any Blender® node network whenever more advanced control is required.
Emission Pro is fully compatible with Blender®'s physically based rendering workflow.
The emitted energy follows Cycles' light transport system while providing additional artistic control over individual ray contributions.
In visual effects and animation, emissive materials are often used as practical light sources rather than relying exclusively on physical lights.
Examples include:
- LED displays
- Television and monitor screens
- Smartphone displays
- Dashboard indicators
- Neon signs
- Holograms
- Light panels
- Sci-fi interfaces
- Light cards
- Architectural fixtures
Although emissive materials generate physically accurate illumination, extremely high emission values or large emissive surfaces may increase render noise, particularly in scenes with multiple indirect light bounces or volumetric effects.
For production rendering, balancing emission intensity together with sampling settings usually provides better results than simply increasing emission strength.
The Ray Mix section of Emission Pro offers additional control over how the emitted energy is distributed among individual ray types, making it possible to optimize lighting without rebuilding the shader.
For photorealistic rendering, it is generally recommended to use emissive materials for surfaces that are physically expected to emit light (such as LEDs, displays, neon tubes, and illuminated panels), while relying on physical lights whenever precise illumination control or lower render noise is required.
Depending on the scene, emissive materials may be used either as the primary lighting source or combined with Area Lights to achieve cleaner renders, improved artistic control, or reduced render noise.
Combining emissive materials with Area Lights is a common production technique used in VFX to preserve realistic reflections and visible light sources while improving render efficiency and maintaining predictable lighting behavior.
Strength
SLIDERControls the overall intensity of the light emission produced by the material.
Strength represents the main energy control of the shader and determines both the perceived brightness of the surface and the amount of indirect illumination generated in Cycles.
Strength modifies only the amount of emitted energy and does not alter the material color.
Very high values may increase scene noise.
To increase brightness while keeping the color unchanged, it is always preferable to adjust Strengthrather than increasing the RGB value of the Color / Texture input itself.
Color / Texture
TEXTUREDefines the main emission color and determines the source used by the shader, representing the entry point of the entire shader color pipeline.
It can receive a uniform color, such as a constant value or a manually selected color using the integrated color picker, or any color output generated by Blender® nodes, including bitmap textures and procedural textures such as Noise, Color Ramp, and Gradient.
When an external texture is connected, the uniform color is automatically replaced by the texture content.
Texture colors are processed later by the Texture Settings section.
Using textures in the correct color space is recommended to achieve maximum color control.
Use Temperature
TOGGLEEnables physically based color temperature simulation using the Blackbody model.
When this option is enabled, the input color or texture is ignored and automatically replaced by the color generated through the Kelvin value.
Ideal for simulating real-world light sources, tungsten lamps, daylight, or physically plausible illumination.
Temperature
SLIDERDetermines the light color temperature expressed in Kelvin ("K").
Lower values generate warmer tones, while higher values produce progressively cooler colors.
Available only when Use Temperature is enabled.
5600 K represents an excellent starting point for most neutral light sources.
Typical values (from warm to cool):
- Candle - 1700 K
- Household lamp - 2700 K
- Tungsten - 3200 K
- Daylight - 5600 K
- Neutral white - 6500 K
- Overcast sky - 10000 K
Texture Settings
This section contains all the tools dedicated to processing the color signal before it is sent to the emissive shader.
The parameters in this section are evaluated in sequence, allowing multiple color adjustments to be combined before reaching the final emission output.
Combine multiple controls such as Filter, Brightness, Contrast, and Hue to create complex emissive variations without rebuilding the material.
Color / Texture Settings
TOGGLEEnables the color processing tools below — Filter, Brightness, Contrast, Hue, Saturation, and Inverted Color — applied to the color or texture before it reaches the emissive output.
Disabling this toggle bypasses all controls below it, passing the Color / Texture input straight to the emissive output.
Useful for quickly comparing the original color or texture against the corrected result, by toggling this control on and off.
Filter Weight
SLIDERControls the intensity with which the color filter is applied to the original signal.
Can be animated to create dynamic color variations.
Intermediate values allow a natural blend between the original texture and the color filter.
Filter
COLORApplies a color filter directly over the input texture or color.
The behavior is similar to theatrical and cinematic lighting gels, allowing quick color modifications without altering the original texture.
The filter is applied before emissive processing.
Very useful for quickly creating different color variations of the same texture.
Brightness
SLIDERAdjusts the brightness of the color or texture before emissive processing.
It does not replace the Strength parameter but can increase the shader's light output.
Use Brightness to correct textures that are too dark or too bright.
Contrast
SLIDERIncreases or decreases the difference between bright and dark areas of the texture.
High values create more pronounced textures, while low values produce a softer result.
Does not affect saturation.
Can be used to enhance emissive patterns.
Hue
SLIDERRotates the color hue, allowing quick creation of color variations.
Original saturation and brightness remain unchanged.
Ideal for creating multiple versions of the same material without duplicating textures.
Saturation
SLIDERControls the color intensity of the texture.
A value of 0 produces a completely grayscale image, while values above 1 increase color saturation.
Does not affect brightness.
Can be used to enhance signs and displays.
Inverted Color
TOGGLECompletely inverts all colors of the input signal.
Works with both uniform colors and textures.
Useful for graphic effects, debugging, or quickly creating alternative versions.
Artistic Mode
Artistic Mode transforms Emission Pro from a simple emissive material into an advanced system for creative and stylized light control.
When enabled, it unlocks a collection of non-physical adjustments that can be used to stylize the emission while preserving full control over the final result.
This allows independent color assignment for direct light, indirect illumination, transmission, and volumetric contributions without modifying the original material.
Artistic Mode has been designed for look development, cinematic lighting, and artistic direction, providing a level of control normally achievable only through significantly more complex shader networks and light rigs.
It enables the following sections:
- Light Shape Color
- Diffuse Color
- Glossy Color
- Transmission Color
- Volume Color
Artistic Mode is entirely optional and non-destructive.
When enabled, the emission color is no longer treated as a single uniform value, but can be separated into the different light contributions used by Cycles during rendering.
When Artistic Mode is disabled, the shader uses a single emissive color shared by all Ray Types.
Enable Artistic Mode only when advanced creative control is required.
Develop the base emission first, then enable Artistic Mode to refine the final look.
Using the global Weight control makes it easy to compare the original and stylized versions or animate the transition between them.
For standard physically accurate emissive materials, the Simple preset is recommended.
ON
TOGGLEEnables or disables all Artistic Mode features.
When enabled, all artistic controls become available and can influence the emission according to their individual settings.
When disabled, the shader bypasses every artistic modification and outputs the original emission.
This toggle acts as a global switch for the entire Artistic Mode section without affecting the underlying emission parameters.
Use this control to quickly compare the original shader with its stylized version during look development.
Global Weight
SLIDERControls the overall influence of every Artistic Mode adjustment.
This master parameter blends all artistic modifications—including Light Shape, Diffuse, Glossy, Transmission, and Volume adjustments—between the original emission and the fully processed result.
Lower values preserve more of the original appearance, while higher values progressively apply the complete artistic effect.
Global Weight acts as a global blend factor for the entire Artistic Mode system.
Individual parameter values remain unchanged and are simply interpolated according to the Global Weight value.
Use Global Weight as a non-destructive "before/after" control to fine-tune the intensity of the overall artistic look or to animate smooth transitions between realistic and stylized lighting.
Light Shape Color
Light Shape Color tints the emissive surface itself — including how it appears in reflections and when viewed through transparent or refractive materials — without influencing the overall lighting behavior contributed to the rest of the scene.
This is a purely artistic, non-physically-plausible control: it changes only the visible appearance of the emissive shape, not the light it casts onto surrounding surfaces.
Useful for giving the emissive surface a distinct look — including its reflections and refracted appearance — while keeping the actual illumination it contributes to the scene physically accurate.
Filter Weight
SLIDERControls the intensity with which the Filter color is blended into the visible emissive shape.
A value of 0.0 keeps the original emissive appearance, while 1.0 fully replaces it with the selected Filtercolor.
Useful for quickly comparing the original and tinted appearance of the emissive shape.
Filter
COLORDefines the color used to tint the emissive shape as it appears directly, in reflections, and through transparent materials.
Affects only the visible appearance of the shape — reflections and refractions included — not the light it casts on the rest of the scene.
Can be combined with Hue, Saturation and Value for further refinement.
Hue
SLIDERRotates the hue of the emissive shape's color.
Does not affect the light contributed to the rest of the scene.
Can be used together with Filter for fine-tuning.
Saturation
SLIDERControls the saturation of the emissive shape's color.
Lower values produce a more neutral tint, while higher values increase color intensity.
Can be used together with Filter for fine-tuning.
Value
SLIDERAdjusts the brightness of the emissive shape's color.
Affects only the brightness of the visible tint, not the emission Strength.
Can be used together with Filter for fine-tuning.
Diffuse Color
Applies independent color correction to the Diffuse Ray contribution only, allowing the visible diffuse emission to be adjusted without affecting the remaining Ray Types.
Weight
SLIDERControls the overall influence of the Diffuse Color adjustments below.
Acts as a local blend factor for this category only, independent from the global Global Weight of Artistic Mode.
Lower this value to preserve more of the original diffuse appearance while still previewing the stylized result.
Near
COLORDefines the color applied to the diffuse contribution at close range.
Blends toward Far as the distance increases, over the range set by Length.
Useful for simulating a warmer or more saturated tone close to the camera or viewer.
Far
COLORDefines the color applied to the diffuse contribution at maximum distance, set by Length.
Beyond the distance set by Length, the diffuse contribution is fully tinted with this color.
Useful for simulating atmospheric falloff or a cooler tone at greater distances.
Length (Meters)
SLIDERSets the distance, in meters, over which the diffuse color transitions from Near to Far.
Lower values produce a sharper transition, while higher values spread it over a larger area.
Match this value to the scale of your scene for a natural-looking transition.
Filter Weight
SLIDERControls the intensity with which the Filter color is blended into the diffuse contribution.
A value of 0.0 keeps the original color, while 1.0 completely replaces it with the selected Filter color.
Does not modify Global Illumination or volumetric effects.
Can be used to create a visually neutral emission while producing colored diffuse illumination.
Filter
COLORDefines the color blended into the diffuse contribution, according to Filter Weight.
Has no effect while Filter Weight is at 0.0.
Can be combined with Hue, Saturation and Value for further refinement.
Hue
SLIDERRotates the hue of the color assigned to the diffuse contribution.
Allows quick modification of the diffuse light color.
Does not affect other Ray Types.
Can be used together with the diffuse Filter for fine-tuning.
Saturation
SLIDERAdjusts the saturation of the diffuse color.
Lower values produce more neutral colors, while higher values increase color intensity.
Does not modify brightness.
Can be used together with the diffuse Filter for fine-tuning.
Value
SLIDERControls the brightness of the color used by the diffuse contribution.
Affects only the Diffuse contribution.
Can be used together with the diffuse Filter for fine-tuning.
Glossy Color
Applies independent color correction to the Glossy Ray contribution, providing artistic control over the color of glossy reflections generated by the emissive material.
Filter Weight
SLIDERControls the intensity with which the Filter color is blended into the glossy contribution.
Changes the color of the glossy reflection contribution without affecting the direct emission, transmission and volumetric contributions.
Useful for controlling reflection tinting independently from the visible light source.
Filter
COLORDefines the color blended into the glossy reflections, according to Filter Weight.
Has no effect while Filter Weight is at 0.0.
Can be combined with Hue, Saturation and Value for further refinement.
Hue
SLIDERRotates the hue of the Glossy contribution.
Allows quick modification of the glossy reflection color.
Does not affect other Ray Types.
Can be used together with the glossy Filter for fine-tuning.
Saturation
SLIDERControls the saturation of the color used by the Glossy contribution.
Lower values produce more neutral colors, while higher values increase color intensity.
Does not modify brightness.
Can be used together with the glossy Filter for fine-tuning.
Value
SLIDERAdjusts the brightness of the Glossy contribution.
Affects only the Glossy contribution.
Can be used together with the glossy Filter for fine-tuning.
Transmission Color
Applies independent color correction to the Transmission Ray contribution, allowing light passing through transparent or transmissive materials to be adjusted separately.
Filter Weight
SLIDERControls the intensity with which the Filter color is blended into the transmission contribution.
A value of 0.0 uses the shader's main color, while 1.0 completely uses the selected Filter color.
Affects only transmission rays.
Useful when working with glass, liquids or translucent materials where transmitted light requires a different artistic appearance.
Filter
COLORDefines the color blended into the transmission contribution, according to Filter Weight.
Has no effect while Filter Weight is at 0.0.
Can be combined with Hue, Saturation and Value for further refinement.
Hue
SLIDERRotates the hue of the Transmission contribution.
Allows quick modification of refracted light color.
Does not affect other Ray Types.
Can be used together with the transmission Filter for fine-tuning.
Saturation
SLIDERAdjusts the saturation of transmitted color.
Lower values produce more neutral colors, while higher values increase color intensity.
Does not modify brightness.
Can be used together with the transmission Filter for fine-tuning.
Value
SLIDERDetermines the brightness of transmitted light.
Affects only the Transmission contribution.
Can be used together with the transmission Filter for fine-tuning.
Volume Color
Applies independent color correction to the Volume Ray contribution, enabling separate control over light interacting with volumetric effects such as fog, smoke and participating media.
Filter Weight
SLIDERControls the intensity with which the Filter color is blended into the volume contribution.
Only affects Volume Rays.
Ideal for adding atmospheric color variations without changing the visible color of the emissive object.
Filter
COLORDefines the color blended into the volumetric contribution, according to Filter Weight.
Has no effect while Filter Weight is at 0.0.
Can be combined with Hue, Saturation and Value for further refinement.
Hue
SLIDERRotates the hue of volumetric light.
Allows quick modification of volumetric light color.
Does not affect other Ray Types.
Can be used together with the volume Filter for fine-tuning.
Saturation
SLIDERControls the saturation of the Volume contribution.
Lower values produce more neutral colors, while higher values increase color intensity.
Does not modify brightness.
Can be used together with the volume Filter for fine-tuning.
Value
SLIDERAdjusts the brightness of volumetric light.
Affects only the Volume contribution.
Can be used together with the volume Filter for fine-tuning.
Shape Settings
The Shape Settings tab contains a collection of controls designed to modify the spatial distribution and visual behavior of the emission across the surface.
Rather than changing the emitted color itself, these parameters shape how the emission is distributed, attenuated, and remapped, providing greater artistic control over the final appearance.
The tab includes Vignette, Falloff, and Ramp Settings, which can be combined to create smooth gradients, edge attenuation, custom intensity transitions, and more stylized emissive effects.
Shape Settings affect the distribution of the emission independently of its color and intensity.
These controls are fully procedural and can be combined to achieve a wide range of visual results without modifying the underlying mesh or textures.
For the most predictable workflow, adjust the base emission first, then use the Shape Settings controls to refine its distribution and create the desired visual balance.
Vignette Settings
Vignette Settings apply an artistic color vignette based on UV coordinates to the emissive output, allowing additional creative control over the final appearance of the material.
The vignette is generated procedurally within the shader and can be independently adjusted in intensity and color, making it suitable for emphasizing the center of the emission or introducing subtle edge color variations without requiring external textures.
This effect is intended for artistic use and can modify the physical behavior of the emitted light.
Low values are recommended for subtle edge shading, while higher values can be used for stylized or cinematic lighting effects.
Weight
SLIDERControls the intensity with which the vignette is applied to the original signal.
The vignette filter is applied before emissive processing.
Useful for quickly creating color variations of the same texture by combining UV Falloff, Circular Ramp, and Fresnel into a single mask.
Filter
COLORDefines the color used by the vignette effect, applied over the emission according to the Weight value.
This allows the vignette to use a color independent from the base emission, rather than one derived only through Hue, Saturation and Value adjustments.
A value of 0.0 in Weight keeps the original emission color, while 1.0 fully replaces it with the selected Filter color.
Works together with Hue, Saturation and Value to further refine the final vignette color.
Useful for tinting the emission edges or center with a specific color — such as a colored rim light or a stylized glow — independently from the material's main color.
Hue
SLIDERAdjusts the hue of the vignette independently from the base emission color.
Rotates the vignette color around the color wheel while preserving its luminance.
Does not modify the original emission color.
Useful for introducing complementary edge colors or creating stylized color transitions.
Saturation
SLIDERControls the color saturation of the vignette.
Lower values produce a more neutral vignette while higher values increase color intensity.
Only the vignette color is affected.
Reducing saturation creates a softer and more natural result, while higher values emphasize the artistic effect.
Value
SLIDERControls the brightness of the vignette.
Adjusts the luminance of the vignette independently from the base emission.
Does not affect the overall emission Strength.
Can be used to create either subtle dark edge shading or brighter colored edge highlights depending on the selected vignette color.
Falloff Settings
This section allows the creation of fades, edge falloffs on meshes, and circular gradients directly inside the shader, eliminating the need for dedicated textures.
Fresnel Falloff Weight
SLIDERIntroduces a falloff based on the viewing angle of the surface.
Areas observed at grazing angles and areas viewed frontally receive different intensity values.
This is an artistic effect independent from the physical Fresnel behavior of the material.
Can be used together with Vignette Settings for fine-tuning.
UV Falloff Overlay Weight
SLIDERGenerates a radial mask overlay using the mesh UV space.
Higher values increase the intensity of the falloff.
The behavior depends on the UV layout of the mesh.
Can be used together with Vignette Settings for fine-tuning.
Ramp Settings
The Ramp Settings section allows radial gradients to be generated procedurally inside the shader or driven externally through custom texture or Blender® node networks.
Depending on the selected workflow, the internal procedural ramp can be used directly or replaced by an external input connected through the shader interface.
Use Texture
TOGGLEEnables the use of an external ramp connected to the Ramp Input socket.
When enabled, the internally generated procedural ramp is bypassed and the shader evaluates the incoming color signal instead.
This allows any Blender® node network to drive the emissive falloff while preserving the remaining functionality of Emission Pro.
The external input accepts any grayscale or color signal.
Grayscale inputs are automatically evaluated as a luminance mask.
Useful when using Color Ramps, procedural textures, image textures, Geometry Nodes attributes, Noise, Musgrave, Voronoi, gradients, or any custom masking workflow.
Texture
TEXTUREDedicated input socket for connecting an external ramp or grayscale mask.
The Color slot follows the same workflow used by other Emission Pro color inputs, such as Filter.
When no external texture is connected, the Color slot defines the main color applied to the ramp.
When a texture is connected through the external texture input, the Color slot automatically becomes a color overlay, allowing additional color tinting and artistic adjustments without modifying the original texture data.
Supports both procedural and bitmap textures.
The connected signal is evaluated before the emissive output is generated.
Use the texture input when the ramp pattern needs to be driven by external data, and use the Color slot as an overlay to quickly create color variations, lighting effects, or stylized emissive looks while keeping the original texture unchanged.
Combining this input with Blender®'s procedural textures makes it possible to create complex animated emission patterns without modifying the shader itself.
UV Ramp Weight
SLIDERControls the intensity of the internally generated radial gradient.
The gradient is evaluated in UV space and produces a perfectly centered circular falloff.
The final appearance depends on the UV layout of the mesh.
The internally generated ramp is intended for quick setup and requires no additional nodes.
Ideal for LED buttons, flashlights, circular displays, indicator lights, and procedural glow effects.
UV Ramp Hue
SLIDERAdjusts the hue of the ramp-generated color independently from the original emission color.
The parameter rotates the gradient colors around the color wheel while preserving the relative brightness distribution of the ramp.
Only the color generated by the ramp is affected.
The original emission color and texture input remain unchanged.
Useful for quickly creating different lighting variations from the same ramp setup without modifying the source texture or procedural mask.
UV Ramp Saturation
SLIDERControls the color saturation of the ramp contribution.
Lower values produce more neutral colors, while higher values increase the intensity of the generated color variation.
Only the ramp color information is affected.
The brightness distribution and falloff shape remain unchanged.
Higher values are useful for graphic effects, neon materials, and stylized rendering.
Extras
Extras collects additional tools mainly dedicated to the creation of graphic effects.
These tools are primarily intended for artistic control and stylized rendering rather than physically accurate light simulation.
Useful for creating additional visual details, graphic patterns, and stylized emissive effects while keeping the shader workflow fully procedural.
Grid Settings
The Grid section provides controls for generating and adjusting a procedural UV grid overlay.
It is primarily intended for creating structured pixel-based patterns and evenly distributed grid layouts without requiring an external texture.
The section includes UV Grid Weight and UV Grid Scale, allowing the procedural grid to be blended with the emission and resized to achieve the desired visual density.
The grid is generated procedurally using the object's UV coordinates, ensuring consistent and resolution-independent results across the surface.
Start by adjusting UV Grid Scale to define the desired cell size, then use UV Grid Weight to control how prominently the grid appears within the final emission.
UV Grid Weight
SLIDERControls the visibility of a UV-based fake grid overlay.
The grid is applied directly over the input color of the emissive material.
For physically accurate shadow patterns and light diffusion, a modeled grid geometry remains the preferred solution for replicating the structure of real photographic grids used on softboxes and studio light modifiers.
Very useful during look development to simulate reflections from light sources using grids typically found in photography studios and professional photo shoots.
For cinematic or physically accurate lighting scenarios, a modeled grid mesh is the preferred solution when the goal is to reproduce realistic shadow patterns and light diffusion behavior.
UV Grid Scale
SLIDERDetermines the size of the UV grid.
Lower values produce larger cells, while higher values increase grid density.
The final appearance depends on the UV layout and scale of the mesh.
The parameter affects only the grid pattern and does not modify the original tiling of the input texture.
Useful for simulating LED matrices, digital displays, patterned light sources, softboxes and technical visualization effects.
Combining UV Grid Scale with UV Grid Weight allows precise control over the visibility and density of the fake grid effect.
LED Display Settings
The LED Display section provides advanced controls to simulate the appearance of real RGB LED panels and digital displays.
The system processes the emission signal through a procedural LED structure, creating a fake pixel matrix that reproduces the characteristic appearance of individual RGB diodes.
This section allows control over the visibility, shape, and density of the simulated LED elements, providing artistic control over the final display appearance without requiring external textures.
The same pixel matrix can also be routed into a Blender® Spot light's color input, turning the light's cone into a projected pixel grid — useful for simulating projectors, gobos, and other artistic or magical projected-light effects.
The LED Display effect is a procedural visual simulation designed to reproduce the appearance of RGB LED technology.
It does not create physically separate light sources, but modifies the emission appearance through shader-based pattern processing.
Adjust the RGB LED Tiling first to define the desired pixel density, then refine the diode appearance using RGB LED Roundness and control the overall influence with RGB LED Weight. Ideal for RGB LED panels, video walls, digital signage, and — when driven into a Spot light — projector beams and stylized pixelated projections.
RGB LED Weight
SLIDERControls the overall influence of the simulated RGB LED pattern over the emission.
Lower values preserve a smoother emissive surface, while increasing the value progressively reveals the RGB LED matrix structure, blending between the original emission and the fully processed LED display effect.
RGB LED Weight acts as the main intensity control for the LED Display effect, allowing a smooth transition between a standard emissive material and a fully simulated RGB LED panel.
Use intermediate values to maintain the original light quality while adding subtle LED characteristics, or increase to maximum values for a stronger digital display appearance.
RGB LED Roundness
SLIDERControls the shape transformation of the simulated RGB LED elements.
This parameter modifies the aspect ratio of each LED cell, transitioning from an elongated anamorphic shape with a 2:1 ratio (similar to an elongated rice-grain shaped LED) to a perfectly circular 1:1 ratio.
RGB LED Roundness affects the visual geometry of the simulated LED points without changing the actual mesh.
It allows the creation of different LED styles, from elongated diode displays to modern circular RGB pixel structures.
Lower values are useful for recreating traditional LED panels with elongated diode elements, while higher values produce a cleaner and more uniform pixel appearance.
RGB LED Tiling
SLIDERControls the density and repetition of the simulated RGB LED matrix across the surface.
Higher values increase the number of LED elements, creating a finer and higher-resolution display effect.
Lower values produce larger individual LED cells, similar to low-resolution panels or large-format LED walls.
RGB LED Tiling defines the visual resolution of the procedural LED structure and works together with RGB LED Roundness to determine the final appearance of the simulated pixels.
Use RGB LED Tiling together with the object scale and camera distance in mind.
Distance Fading
SLIDERControls the progressive reduction of the RGB LED pixel effect based on the distance between the camera and the emissive surface.
As the object moves farther away from the camera, the simulated LED structure gradually fades out according to the distance value defined by the slider, allowing the material to transition from a detailed LED display appearance to a smoother emission at greater viewing distances.
Distance Fading is designed to prevent unwanted pixel patterns from becoming visually distracting when the object is viewed from far away.
Use Distance Fading to maintain realistic readability of LED displays across different shot scales, keeping detailed pixel structures visible in close-ups while avoiding excessive pattern visibility or Moiré effects in wider shots.
Use External RGB Matrix Texture
TOGGLEEnables the use of a custom external texture to drive the RGB LED matrix pattern, replacing the internally generated procedural one.
When enabled, RGB LED Tiling and RGB LED Roundness no longer affect the pattern, which is instead driven entirely by the connected Texture.
Useful for reproducing a specific real-world pixel layout or a custom logo pattern instead of a uniform procedural grid.
Texture
TEXTUREDedicated input socket for connecting the external texture used to drive the RGB LED matrix pattern.
Only evaluated when Use External RGB Matrix Texture is enabled.
Supports both procedural and bitmap textures, evaluated before the emissive output is generated.
Ray Mix
Ray Mix is the core system of Emission Pro and allows independent control of the emission contribution for each ray type used by Cycles.
Unlike Blender®'s standard Emission shader, which does not expose independent user controls for each ray contribution, Emission Pro allows the contribution of Diffuse, Glossy, Transmission and Volume Rays to be adjusted independently.
The Exposure parameter acts as a global master control for the entire Ray Mix system, while the remaining controls allow fine-tuning of each individual ray type.
This level of control makes it possible to optimize rendering performance, compensate for specific lighting behaviors, or achieve artistic effects that would otherwise require complex shader setups.
When volumetric shaders are present in the scene, Cycles may exhibit a different ray distribution compared to scenes without volumetrics.
With no active volumetric shader, Is Diffuse Ray behaves as expected while Is Volume Ray remains at zero.
Once a volumetric shader is introduced, Is Volume Ray begins returning valid values and its contribution can influence the behavior of the other ray types, effectively redistributing part of the emitted light energy.
This behavior is related to Cycles' internal light transport and energy conservation system.
Although this is normal, it can produce different visual results compared to scenes rendered without volumetrics.
Ray Mix is primarily intended for artistic control rather than physically accurate lighting.
Small adjustments are often enough to achieve the desired visual result while preserving a natural lighting balance.
When troubleshooting lighting behavior, isolate individual Ray Types by temporarily reducing the others.
This makes it easier to understand how each contribution affects the final render.
Exposure
SLIDERControls the overall contribution of the emissive material across all Ray Types simultaneously.
This parameter acts as a global multiplier for the Ray Mix system, allowing the entire ray contribution to be increased or reduced with a single control before applying individual adjustments to each ray type.
- 0.0 disables the contribution of all Ray Types.
- 1.0 preserves the original ray behavior.
- Intermediate values proportionally reduce the contribution of every ray type.
- Higher values increase the overall contribution while maintaining the relative balance between individual ray controls.
This parameter affects Diffuse, Glossy, Transmission and Volume rays simultaneously.
Use Exposure as a master control to quickly balance the overall ray contribution before fine-tuning the individual Ray Types.
Diffuse
SLIDERControls how much the emitted light affects diffuse surfaces, combining both direct illumination and indirect diffuse light bounces.
Higher values preserve the full diffuse lighting contribution, while lower values reduce it without affecting the other Ray Types.
Does not modify the contribution of Glossy, Transmission or Volume rays.
Reducing this value can be useful to create extremely bright surfaces with a lower impact on the diffuse lighting of the scene.
Glossy
SLIDERControls the contribution of emission visible in glossy reflections, combining both direct and indirect reflective contributions.
Higher values increase the visibility of the emissive source in reflections on glossy and reflective surfaces.
Does not modify the contribution of Diffuse, Transmission or Volume rays.
Useful for controlling the visibility of emissive panels, LEDs, and light sources reflected on polished surfaces, or for reducing excessive reflections in complex scenes.
Transmission
SLIDERControls the emission contribution through transparent materials.
It affects the behavior of rays passing through glass, liquids, and transmissive materials.
Particularly useful for architectural materials and scenes involving transparent surfaces.
Fine-tuning the Transmission contribution can help balance emissive materials viewed through transparent surfaces without affecting their direct illumination.
Volume
SLIDERControls the interaction between emission and volumetric shaders.
It affects how emissive light contributes when interacting with fog, smoke, and participating media.
Useful when controlling the atmospheric impact of emissive surfaces.
Due to an internal behavior of volumetric rendering in Cycles, this slider acts primarily as an intensity control rather than a strict on/off switch — even with a value of 0.0, some contamination may still appear in the scene as a result of energy conservation.
To fully exclude the emissive object from volumetric interactions, disable Volume Scatter visibility for the mesh in Blender®'s native Object Properties → Visibility panel.
Reducing this value can help prevent excessive brightness or color contamination inside volumetric environments.
Light Decay
Light Decay introduces a distance-based light attenuation system calculated in meters.
It can be used to simulate visually controlled light attenuation without modifying the overall material intensity.
Useful when working with thin surfaces, display panels, cards, or emissive objects that require custom visibility and shadow behavior.
ON
TOGGLEEnables or disables the entire Light Decay system.
When disabled, the emission ignores distance entirely and no attenuation is applied, regardless of the values set below.
Toggle this on and off to quickly compare the emission with and without distance-based attenuation.
Near Decay Start (Meters)
SLIDERDetermines the distance from which the first attenuation begins.
The effect starts only after the defined distance value.
Useful for keeping the area close to the emissive object brighter while controlling the falloff further away.
Near Decay Contrast
SLIDERControls the softness of the first attenuation.
Higher values produce a sharper transition.
Lower values create smoother light fading.
Useful for matching different types of real-world or artistic light behavior.
Far Decay End (Meters)
SLIDERDetermines the maximum distance beyond which the light contribution is completely attenuated.
Controls the final limit of the emission influence.
Useful for simulating localized light sources or optimizing lighting behavior in large scenes.
Far Decay Contrast
SLIDERControls the softness of the final fade.
Higher values create a more abrupt transition, while lower values produce smoother attenuation.
Higher values create sharper light fading.
Useful for matching different types of real-world or artistic light attenuation.
Visibility
This section controls how the emissive component is displayed and filtered in the final render, allowing independent control over visible emission without affecting the shader structure.
These settings affect the visible appearance of the emissive material.
Useful for balancing the relationship between visible light sources, reflections, and the final rendered image.
Double Side
TOGGLEAllows emission to be visible on both sides of the geometry.
Disabled by default, only the front-facing side of the mesh produces emission.
Useful for thin geometry such as planes, cards, and display surfaces.
Disable when a one-sided emission behavior is required.
Light Visibility
TOGGLEEnables or disables the visible emissive component.
The object can continue contributing as an emissive source while reducing or completely removing the visible appearance of the emission.
Additional control is available through Blender®'s native Visibility and Ray Visibility settings in Object Properties, which can be combined with Emission Pro settings for more precise control over the mesh and light behavior.
For maximum flexibility use both systems together to separately manage shader visibility and object-level visibility, reflections, shadows, and ray interactions.
Value
SLIDERControls the intensity of the visible light component.
Affects only the visible emission and does not directly control the energy contribution handled by Ray Mix.
Useful for fine-tuning when the object should appear luminous without physically blocking light.
Color Filter Weight
SLIDERDetermines the intensity with which the Color Filter is applied to the visible emission component.
A value of 0 keeps the original visible color, while higher values increase the influence of the Color Filter.
Useful for creating quick artistic variations without modifying the original texture.
Color Filter
COLORApplies a final color filter exclusively to the visible emission component.
Unlike the Filter located in the Texture Settings section, this filter operates during the final stage of the shader, allowing the original texture color to be modified without affecting the emitted light energy or previous processing stages.
It is designed to simulate theatrical gels, photographic filters, and color corrections applied directly to the visible light source.
Has no effect while Color Filter Weight is at 0.
Useful for quickly matching the visible light color to a specific art direction without touching the underlying emission setup.
Alpha
This section provides mask-based transparency controls for creating partial visibility effects on emissive materials.
Alpha controls affect material visibility without modifying the original emission color.
Useful for creating controlled transparency variations and dynamic emission masks directly inside the material.
Input Mask
TEXTUREAllows a grayscale mask (non-color data) to be connected to control the material transparency.
White areas are fully visible, while black areas become completely transparent.
The mask affects the visibility of the material and can be used with both procedural and bitmap textures.
Useful for creating animated displays, damaged screens, light patterns, and controlled emission cutouts.
Brightness
SLIDERControls the brightness level of the connected Alpha mask.
Increasing the value makes the mask progressively brighter, increasing visible areas.
Lower values reduce mask influence.
Does not modify the original texture or emission color.
Useful for adjusting the visibility threshold of masks without editing external textures.
Contrast
SLIDERControls the contrast between visible and transparent areas of the Alpha mask.
Higher values create a sharper transition between black and white areas.
Lower values produce smoother transparency gradients.
Only affects the mask interpretation.
Useful for refining soft transitions, glow patterns, and procedural masks.
Invert Mask
TOGGLEInverts the behavior of the Alpha mask.
White areas become transparent and black areas become visible.
Useful for quickly creating alternative mask variations without editing the original texture.
Surface
Surface allows the integration of a physically based surface component (Principled BSDF shader) directly inside Emission Pro.
This allows the object to maintain complete PBR properties together with advanced emissive behavior, avoiding the need to manually build complex mixed shader networks.
When routing an external material through Shader Input, the dedicated Emission Mask input additionally lets a single material contain both self-illuminated and non-emissive zones — a control not available on Blender®'s native Principled BSDF.
Since these controls behave identically to Blender®'s native Principled BSDF shader, this documentation provides only a brief overview of each parameter.
The following section is included for convenience, while for a complete explanation of their behavior, recommended values and physical principles, please refer to the official Blender®documentation.
The Base Color input does not directly control the emitted light, but it affects the surface response of the material, influencing reflections, diffuse appearance, metallic behavior, and transmission.
As a result, changing the base color can significantly alter the final look of an emissive object, especially when the emission intensity is balanced with the surrounding lighting environment.
A realistic emissive object is often achieved by combining moderate emission with correct surface properties rather than relying only on extreme brightness values.
Use Internal BSDF
TOGGLEEnables the integrated Principled BSDF controls (Base Color, Roughness, and the rest of the Surface parameters) as the surface foundation.
When disabled, the shader uses only the Emission output as its base, without any surface information — the object no longer responds to reflections, shading, or other surface properties, and is affected only by direct light contribution.
Mutually exclusive with Use Shader Input: enable this to use the integrated BSDF, or use Use Shader Input to route an external shader instead.
Disable this when a purely emissive result is needed, without any physically based surface response.
Use Shader Input
TOGGLEWhen enabled, Emission Pro uses an external shader connected to the Shader Input socket, disabling the integrated BSDF shader controls.
This allows all emissive features of the system to be applied on top of any existing Blender® or third-party material without modifying the original workflow.
The external shader becomes the surface foundation, while Emission Pro continues managing all emission-related controls; pair it with Emission Mask to blend between the emissive result and the connected shader.
Useful when adding advanced emissive behavior to existing production materials, assets, or complex shader networks.
Shader Input
SHADERDedicated input socket for connecting an external shader.
The connected shader is processed as the surface component while preserving all Emission Profeatures.
Only evaluated when Use Shader Input is enabled.
Useful for reusing an existing production material or shader network as the surface foundation, without rebuilding it from scratch.
Emission Mask
TEXTUREDedicated non-color mask input that lets a single material contain self-illuminated and non-emissive areas at the same time.
White areas of the mask reveal Emission Pro's emissive output; black areas reveal the surface connected to Shader Input instead, with no emission at all.
This is different from adjusting Color / Texture or Strength / Exposure: those define the color and intensity of the emission itself, while Emission Mask decides where emission is allowed to appear, without constraining or replacing them — a control Blender®'s native Principled BSDF doesn't offer, since its Emission Color and Emission Strength always apply everywhere on the surface.
Works together with both Use Shader Input and Use Internal BSDF, blending between the emissive result and whichever surface is active. If Emission Pro is used without any surface at all, black areas of the mask behave like a holdout: at its core, Emission Pro is built on an Emission shader, and an Emissionshader at zero strength has no material information of its own.
Useful when the emissive color texture is a full, uninterrupted texture with no black areas of its own — for example a bright logo or panel texture. If your emissive texture already has black areas where nothing should glow, you can skip this input and connect that texture directly to Color / Texture instead: the result is the same.
Base Color
COLORDefines the main color of the surface material.
Metallic
SLIDERControls the metallic behavior of the material.
Roughness
SLIDERDetermines the surface roughness and therefore the diffusion of reflections.
IOR
SLIDERDefines the Index of Refraction of the material.
Thin Wall
TOGGLEAllows the material to be treated as an infinitely thin surface (Blender® 5.2+), useful for glass, films, and materials without physical thickness.
Normal
NORMAL / BUMPDedicated input for Normal Maps or any node modifying the orientation of surface normals.
Diffuse Roughness
SLIDERDetermines the roughness of the microstructure of the diffuse surface.
SSS
SLIDERControls the Subsurface Scattering properties of the material.
Transmission
SLIDERControls light transmission through the material.
Coat
SLIDERAdds an independent transparent surface layer.
Sheen
SLIDERControls the Sheen contribution.
Thin Film
SLIDERSimulates optical interference phenomena typical of iridescent materials.
Answers to a few common questions about Emission Pro.
Q1Some colors or parameters don't seem to have any effect — what's wrong?
Before assuming something is broken, check whether a nearby Weight slider or enabling toggle is set to 0 or disabled. Many sections in Emission Pro — such as the color Filter controls in Artistic Mode or Use Internal BSDF in Surface — are gated behind a master Weight or toggle, and the parameters below them stay invisible in their effect until that control is turned on or raised above 0.
Q2Why doesn't the Volume parameter work when using a Spot light instead of the emissive mesh?
There is no direct fix for this — it's a limitation of Cycles itself, which does not allow the volume contribution of a light object to be modified independently.
A practical workaround is to duplicate the Spot light: on one copy, disable Volumetric visibility and use it only for surface lighting, taking advantage of properties like Radius and the spot cone angle; on the other copy, keep only the volume contribution active with its own color. This gives full independent control over surface lighting and volumetric contribution, using two lights instead of one.
Q3I'm seeing strange artifacts or excessive contrast — how do I fix it?
Keep parameters within their default range whenever possible. Most sliders can be pushed manually beyond their indicated limits, but doing so — especially with color and contrast-related controls — can introduce unexpected visual artifacts. Use extreme values with parsimony, and treat them as a controlled exception rather than a starting point.
Q4My scene has a lot of noise — is this caused by Emission Pro?
Not specifically. Excessive noise is usually caused by pushing Volume contributions or Ray Depthtoo far, which is a common characteristic of Cycles as an unbiased renderer, regardless of whether Emission Pro is involved. Avoid excessive volumetric intensity and keep ray depth reasonable for the scene.
Have questions about this product?
Login to message
| Blender Extension Compatible | Yes |
| Sales | 10+ |
| Dev Fund Contributor | |
| Published | about 2 months ago |
| Blender Version | 5.2 |
| Extension Type | Add-on |
| Render Engine Used | Cycles |
| License | GPL |
Discover more products like this
shading Advanced exposure volumetric light-decay lookdev raymix Lighting emissionpro diffuse glossy transmission