Fog Pro: Volumetric Fog, Mist, Haze & God Rays
 Darksteady. Studio
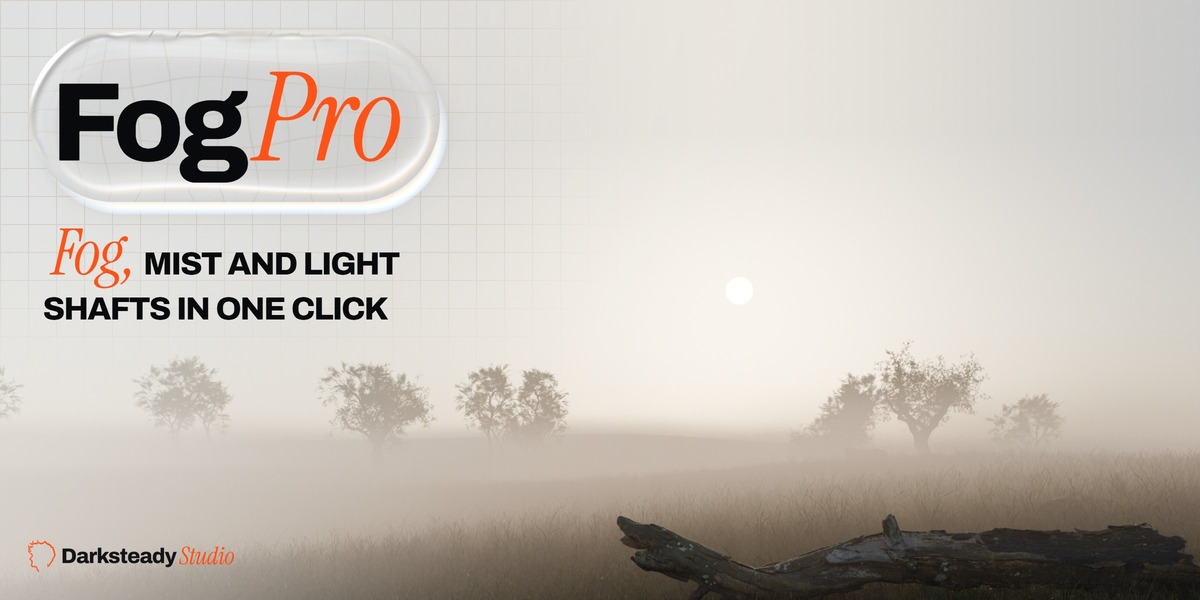
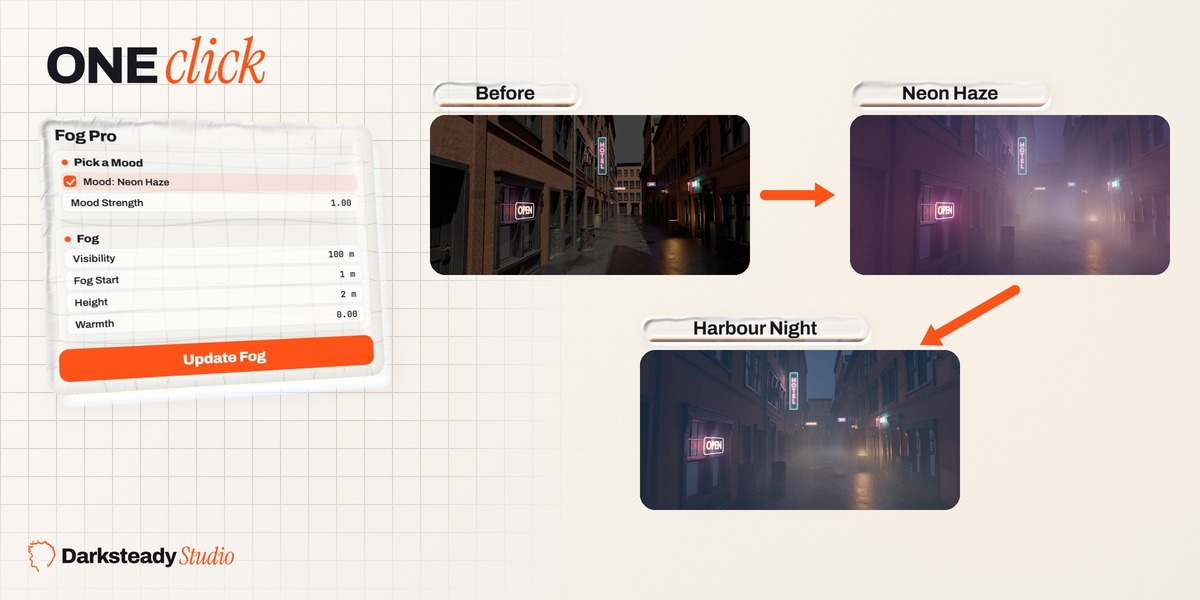
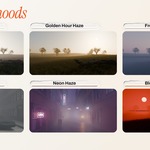
Fog Pro adds volumetric fog, mist, haze and light shafts (god rays) to a Blender scene in one click, for EEVEE and Cycles. Fog Pro sets whole moods (fog, sun, sky and colour grade) in one click, and four fog types shape the fog: everywhere, creeping on the ground, torn, or in local patches. Emissive Glow lets neon signs, lit windows and screens light the fog, in EEVEE too. Fog Pro Studio adds 28 more moods and 24 more looks, My Moods, Mood Morph and camera moods, light patterns, masks and a clarity window, two more fog types (Smoke Room and Drifting Banks) and unlimited fog patches.
Install
- In Blender open Edit > Preferences > Get Extensions.
- Open the menu in the top right corner and choose Install from Disk.
- Pick the Fog Pro zip. It is enabled right away.
Supported: Blender 4.2 LTS, 4.5 LTS and 5.1, tested on Windows. On Blender 4.2 we recommend Cycles; for EEVEE use Blender 4.5 or newer (see Known limits). Upgrading from Fog Pro to Fog Pro Studio: install the Studio zip over the Standard one; your scenes keep working.
Quick start
- In the 3D View press N and open the Fog Pro tab. Pick a mood from the tiles at the top of the panel: the fog, the sun, the sky and the colour grade change together. Fog Pro fits the fog to your camera and your scene and sets the volume options of EEVEE and Cycles. (The Fog Only button under the tiles adds just the fog, with a look that suits the scene, and leaves your light and sky as they are.)
- Adjust Mood Strength, Visibility, Fog Start, Height, Color and Warmth. Under Fog Type, pick fog that creeps along the ground, torn banks or pockets of mist you place.
- Render. If something looks wrong, open Fog Doctor and click Check Scene.
Remove Fog puts the scene back exactly as it was: every setting Fog Pro changed is restored and everything it made is deleted. A setting you changed yourself after adding fog keeps your value.
Main controls
| Control | What it does |
|---|---|
| Visibility | How far you can see through the fog. Smaller is thicker. At this distance contrast falls to 5 percent, the meteorological definition. |
| Fog Start | The fog is clear in front of the camera up to this distance, so the foreground stays crisp. |
| Height | How high the fog rises above the ground. |
| Color | The colour of the light the fog scatters. |
| Warmth | A quick cool to warm tint on top of Color. |
Update Fog refits the fog after you move the camera; the panel tells you when the camera changed since the fit. Fog Pro never adds a second fog.
Moods
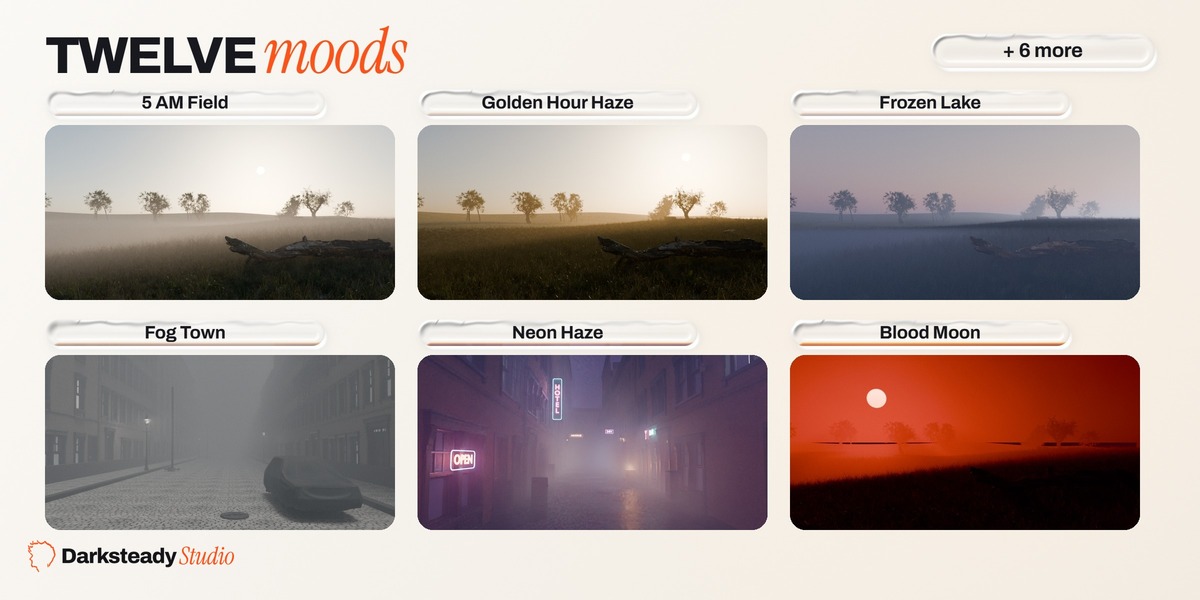
A mood changes the whole scene in one click: the fog, the sun, the sky and the colour grade together. The mood tiles sit at the top of the Fog Pro panel; Show picks a group. If the scene has no fog yet, the mood adds it.
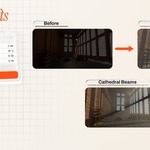
Fog Pro has 12 moods in four groups. Dawn and Day: 5 AM Field, Golden Hour Haze, Frozen Lake. Weather: Moor Valley, Desert Heat, Fog Town, Swamp. Night: Blood Moon, Harbour Night, Neon Haze. Interior: Cathedral Beams, Cold Corridor. Fog Pro Studio adds 28 more in five packs: Horror, Sci-fi, Fantasy, Noir and Archviz.
- Mood Strength blends from your own scene (0) to the full mood (100 percent): numbers and colours evenly, Visibility so the fog thins evenly, the sun by rotation, the sky as a mix with your own world.
- The sun follows your camera. A mood places the sun relative to the camera's view, so a low dawn sun sits in your frame the same way in every scene. A scene without a sun lamp gets one; Remove Mood takes it away again.
- The sky. Day moods use Blender's physical sky, night moods a dark sky colour, Fog Town the fog's own colour so fog and sky meet without a line. Sun and moon discs are drawn in both EEVEE and Cycles.
- The grade. Exposure is added to your own, the AgX look changes (at half strength), highlights and shadows get a slight tint, and a few moods lower the saturation through one compositor node.
- Respect my sky. Change sky and sun and Change grade (Mood panel) keep your own sky or colour settings. When your scene already has an HDRI or another sky, or a sun driven by something else, both start off and the panel says why. Turn them on if you want the mood's sky anyway.
Remove Mood puts your sun, sky and colour settings back and keeps the fog. Remove Fog puts everything back exactly as it was.
Fog types
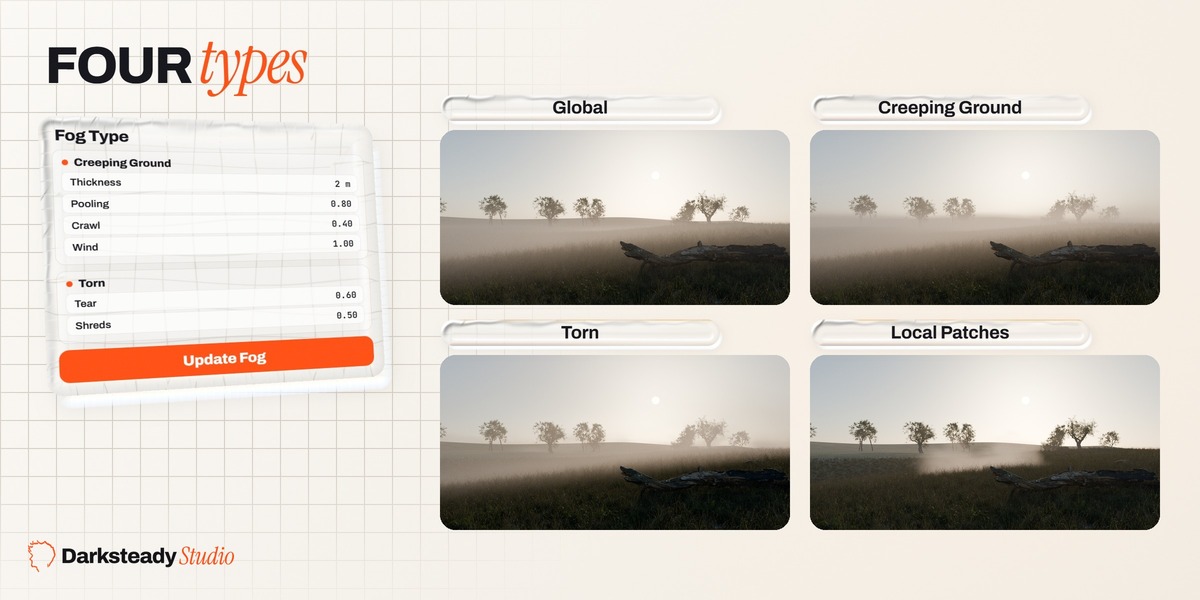
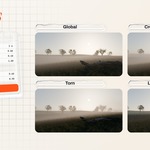
Fog Type, right under the moods, sets the shape of the fog. Every type works in EEVEE and Cycles and renders without the add-on.
| Type | What it does |
|---|---|
| Global | The layered fog over the whole scene: ground fog, a mid layer and distance haze. The default. |
| Creeping Ground | Low fog lying on the real ground: it follows hills and slopes, fills hollows and ditches, and its ragged top crawls. Thickness sets how high it lies, Pooling how much it fills the dips, Crawl how fast its top changes shape, Wind how it drifts. |
| Torn | The fog is torn by the wind into banks a few metres tall, lying on the ground, with clear air between them: through the gaps you see the ground and the trees behind. Tear sets how much of it is torn away, Shreds adds thin strands drifting with the wind in the gaps. |
| Local Patches | No fog anywhere except pockets of mist you place. Each lies in the grass, thickest at the ground and thinning upwards, with an uneven outline and wispy edges that keep changing in the wind. Add Fog Patch puts one on the ground under the selected object or under the 3D cursor; each has its own Size, Strength and Softness (how ragged its edge is), and no box edge ever shows. |
| Smoke Room, Drifting Banks | Studio: the fog plus small rolling puffs that fill the space, or a few large soft banks moving with the wind. |
Creeping Ground and Torn read the shape of the ground once, from above, in about a second, and keep it in the .blend file. Ground picks the object the fog lies on; left empty, Fog Pro finds the ground itself and leaves thin things such as posts and trees out, so the fog flows around them. After you change the terrain, click Re-bake Ground.
Local patches also add to the other types, for an extra pocket of mist in one place. Fog Pro keeps up to 3 patches, Fog Pro Studio any number.
Emissive Glow
Neon signs, lit windows, screens and bulbs light the fog around them. Cycles does this by itself; EEVEE does not: an emissive surface leaves the air around it dark. Emissive Glow, in its own panel under Fog Type, gives every emissive object lights that light only the fog (they do not light surfaces and the camera does not see them), so the glow shows in EEVEE too, and the same lights make it in Cycles, so both engines match.
- Found and lit. Fog Pro finds every object whose material emits light (an Emission shader, or a Principled BSDF with emission, through mix and add shaders and node groups). A long sign or a row of windows gets up to four lights along its length, 24 lights in the scene at most, the brightest first. The panel shows how many objects light the fog.
- Strength sets how strongly they light the fog; 1 is as bright as Cycles lights it from the emitters themselves. The night moods (Harbour Night, Neon Haze, and Neon Noir and Hologram Blue in Studio) turn Emissive Glow on (Neon Haze and Neon Noir with a stronger glow), and take it away again with the mood.
- Refresh Glow looks for emissive objects again after you add, move or change signs and windows. A light follows its object when the object moves, and an animated emission strength (a flickering sign) makes its glow flicker too.
- Studio: a list of the emissive objects with Strength, an own colour and Exclude for each.
Emitters stop lighting the fog themselves while Emissive Glow is on (in Cycles that would light it twice), and Remove Fog, or turning Emissive Glow off, puts them back exactly. A huge emissive backdrop or sky dome is not treated as a sign. Fog Doctor tells you when a scene in EEVEE has emissive objects and Emissive Glow is off.
Looks
A look changes the fog only. Fog Pro has 16 looks in four groups: Outdoor Day, Nature, Interior, Night and City. Fog Pro Studio adds 24 looks in five packs: Horror, Sci-fi, Fantasy, Noir and Archviz. Click a tile and the fog changes at once; nothing new is added to the scene. Looks scale with your scene, so they work on a desk scene and on a mountain range alike. Tick Keep my Visibility and Height to try looks without losing your own density and height.
Layers
Three layers, each with its own Visibility:
- Ground: low fog lying on the ground, with Softness for its top.
- Mid: the main fog, thinning with height (Falloff).
- Distance Haze: haze that builds up only in the distance, with its own Color, Start and Height. Height lets the haze thin out above the ground, so the sky stays graded.
Shape: Clump Size, Breakup (0 is perfectly even fog) and Glow Toward Lights (how strongly fog shines when you look toward a light).
Drift
Speed and Direction move the fog's clumps like wind. Loop makes the motion repeat seamlessly over the scene's frame range (or Loop Frames), without pulsing. Speed 0 keeps the fog still.
Light shafts
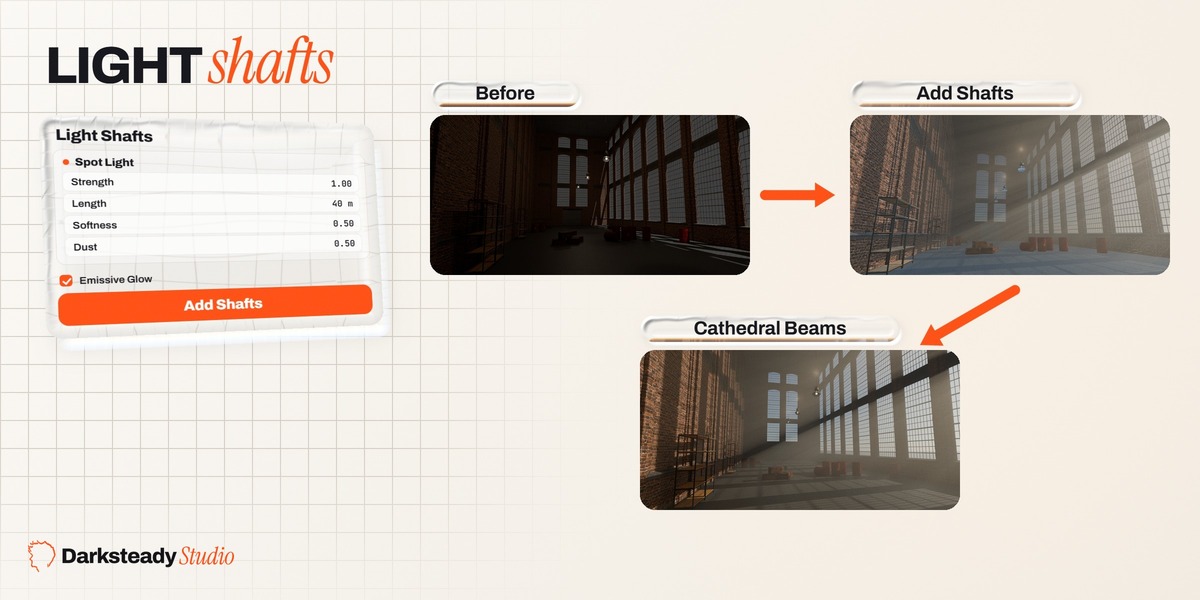
Select one or more spot, area, point or sun lights and click Add Shafts. A spot gives a cone, an area light a column, a point light a glow around the lamp and a sun lights the air of the whole scene. The shafts carry the shadows of everything in their way, in EEVEE and Cycles, and follow the light when you move it or change its size or angle.
Per light: Strength, Length (set automatically from how far the light reaches), Softness, Tint, Dust and Keep Clear (pick an object and the beam's air thins around it, so the beam frames it instead of fogging it). Add Shafts never changes the light's power, colour, size, angle or shadows.
LumiRig Pro: select any light of a LumiRig rig or its target and click Shafts for This Rig. Key and rim lights get subtle, soft shafts and the subject is kept clear. Fill lights are skipped unless you tick Include Fill Lights.
Quality
Preview, Balanced (default) and Best set the volume options of both engines. Measured on our reference scenes (1280 x 720, 128 samples, RTX 4070 SUPER), EEVEE renders with fog take 1.2 to 1.35 times as long as without fog at Preview, 1.75 to 2.5 times at Balanced and 4.4 to 9.3 times at Best. Best gives the sharpest shafts. In Cycles on the CPU, fog roughly triples the render time at the same samples. Self Shadowing lets thick fog shade itself.
Fog Doctor
Check Scene looks for anything that stops the fog from rendering well and explains it in plain words; most findings have a Fix button, and Fix All fixes everything fixable at once. Examples: Workbench render engine, EEVEE volume range cutting the fog, too few EEVEE samples (fine stripes below 128 samples), lights without shadows, glass that blocks the shafts, light linking that leaves shafts dark, an old world fog (Convert Old World Fog moves it into Fog Pro). Every fix is undone by Remove Fog.
Fog Pro Studio
Light patterns
Select a spot, area or sun light, pick a pattern in Light Patterns and click Add Pattern. The light shines through the pattern into the fog and onto the scene, like a gobo in front of a lamp. Patterns: Venetian Blinds, Window 2 x 2, Tall Window 3 x 4, Gothic Arch, Foliage, Branches, Lattice, Stained Glass, Skylight Grid, Fence Slats, Grate, Dappled Clouds, and Custom Image (white lets light through, black blocks it). Size, Rotation and Softness shape the pattern.
How it works: a card in front of the light casts the pattern's shadow; the camera, reflections and refractions never see it. In our beam test the blinds raised the stripe contrast across the beam about seven times in Cycles and about five times in EEVEE at Quality Best.
Good to know:
- A pattern needs a sharp light. Add Pattern sets a spot light's Radius to 2 mm (a larger radius blurs the pattern); Remove Pattern and Remove Fog put your radius back.
- Area lights are big, so their patterns are soft by nature, like a real softbox grid.
- Stained Glass makes coloured light in Cycles. EEVEE shadows are not coloured, so the light stays white in EEVEE.
Masks and clarity window
Masks: select objects and click Mask: Clear Inside to clear the fog in a box around them (an interior under outdoor fog), or Mask: Fog Only Inside to keep fog only in that box. Up to four masks; move and scale the box like any object; Soft Edge fades the fog at its sides.
Clarity window: select your hero and click Clarity Window on Active. The fog thins in a soft window around the hero that reaches toward the camera, so the hero stays crisp while the rest of the scene keeps its fog. Strength and Soft Edge set how much and how softly. The window follows the hero and the camera.
Smoke Room and Drifting Banks
Two more fog types (Fog Type): Smoke Room adds small rolling puffs that fill the space, Drifting Banks a few large soft banks moving with the wind. They are made with geometry nodes, stay where the camera looks, take the fog's colour and drift, and keep their shape in light fog too. Strength, Size and Variation (Wisps panel) adjust them.
My Moods
Click the plus button in My Moods to save the scene's current fog, sun, sky and grade as your own mood. It shows in the mood tiles under My Moods and works in any scene like the built in ones (the fog scales to the scene, the sun is stored relative to the camera). Export Moods writes your saved moods into a text block called Fog Pro Moods.json: append that text block into another file, or paste its text, and click Import Moods there.
Mood Morph
A slow change from the current mood to another over a frame range, for example a 5 AM Field whose fog burns off into Golden Hour Haze. Pick the mood to end in, set Start and End, and click Make Morph. The fog thins evenly, the sun moves along its path and the two skies crossfade; Ease In and Out starts and ends gently. The morph is plain keyframes, so it renders without the add-on and on render farms. Picking another mood for the whole scene, Clear Mood Keys, Remove Mood and Remove Fog take the keys away.
Camera moods
Give each camera its own mood: add a row in Camera Moods, pick the camera, the mood and how strong it is. Bind your cameras to timeline markers (Blender's Bind Camera to Markers) and click Bake to Markers: each shot renders with its own fog, sun, sky and grade, and the sun sits right for each camera. Cameras without a mood keep the current mood. The bake writes constant keyframes, so it renders the same without the add-on. Clear Mood Keys removes them.
Render farms and sharing
Everything the render needs is saved in the .blend file as normal Blender data: nodes, simple drivers and keyframes. A render farm or a colleague without Fog Pro gets the same image. Our tests render every scene with and without the add-on installed and compare.
Known limits
- EEVEE shows fog to camera rays only: fog in reflections and through glass is approximate in EEVEE; Cycles renders it exactly.
- In EEVEE, the sharpness of fog and shafts follows the volume resolution (Quality Best is the sharpest).
- EEVEE fog can show fine stripes below 128 render samples; Fog Doctor tells you.
- Cycles beams show grain at low samples: in our window test, 128 to 512 samples halved it.
- Blender 4.2.0 has an EEVEE bug that can make fog render far too dark or not at all in some sessions. Use the latest Blender 4.2 LTS release; Cycles is not affected.
- Night moods (Harbour Night, Neon Haze and the night moods of the Studio packs) light the scene with a dim sky or moon only. They come alive with your own lamps, signs and lit windows; in a scene without lights they stay dark.
- A mood changes your sun and world only while Change sky and sun is on, and your colour settings only while Change grade is on. With an HDRI in the scene both start off, so moods, a Mood Morph and camera moods change the fog only until you turn them on.
- On Blender 4.2 and 4.5 a mood lowers the saturation only when the scene already uses the compositor: Blender 4 cannot remove a compositor setup completely, and Remove Fog must put your scene back exactly. There, Mood Morph and camera moods keep full colour. Blender 5 has no such limit.
- EEVEE does not light fog with the sky. Fog Pro adds the sky's light to the fog itself, scaled by how much sky the fog can see (less in a street, almost none in a closed hall), and matched to Cycles on our test scenes. It is a close match, not an exact one: thick fog under a plain coloured sky on open land comes out brighter in EEVEE than in Cycles.
- Emissive Glow in EEVEE is an approximation: EEVEE lights fog from the centre of each light, so the glow right at a small, very bright bulb is softer than in Cycles, and around a big flat sign a little stronger (EEVEE against Cycles from the same lights: 0.55 to 1.9 on our test signs). In Cycles, turn Emissive Glow off to get Cycles' own glow from the exact shape of every emitter.
- Emissive Glow's lights cast no shadows (with 24 shadowed lights EEVEE runs out of shadow memory): a sign's glow passes walls in both engines, so a sign behind a wall can light the fog on its other side.
- Emissive Glow finds real objects with emissive materials; emitters inside collection instances or made by geometry nodes are not found (add a light, or make them real).
- A dense, low blanket of Creeping Ground (Moor Valley's ground fog) is thinner near the camera in EEVEE than in Cycles, so the far top of the blanket can show as a brighter line along a hollow, where Cycles stays softer; the moods' own fog is matched. A Local Patch reads softer in EEVEE than in Cycles: EEVEE's volume cells are coarse for a low pocket of mist seen from a distance.
- Moods with a dense blanket on the ground (Moor Valley, Frozen Lake, Cold Corridor) lay it on the lowest ground in view. In a scene without a floor, such as Blender's start scene with its lone cube, the cube is that ground and the blanket veils it. Put a ground plane under the cube: the blanket then lies on the floor and the cube shows through it.
- The viewport preview and very large production scenes are not part of our automatic tests.
Support
Ask your question on the product page where you bought Fog Pro. We answer within 72 hours.
Made by Darksteady Studio.
 Included
Includes 12 months of
- Support from Darksteady. Studio
- Product updates
Extend this product’s Support Period +12 months: 25% of product price
Have questions before purchasing?
Login to message
| Blender Extension Compatible | Yes |
| Published | 6 days ago |
| Blender Version | 4.2 - 5.1 |
| Extension Type | Add-on |
| Render Engine Used | Cycles, Eevee |
| License | GPL |
Discover more products like this
volumetric lighting fog god rays mist ground fog Lighting haze light shafts atmosphere cinematic volumetric fog fog eevee