Frameformer
 eye-candy.xyz


FrameFormer Documentation
Welcome to FrameFormer! This addon is designed to bridge the gap between dynamic, animated geometry (like Alembic or USD caches) and Blender's powerful sculpting tools. Normally, you can't directly sculpt on a mesh sequence cache because the mesh data is re-evaluated on every frame. FrameFormer provides a non-destructive workflow to solve this problem by converting a selected frame range of a mesh cache into a series of shape keys. This allows you to sculpt corrections or creative additions on a per-frame basis, create "Overall" shape keys for edits that affect the entire animation, and even sculpt on multiple objects simultaneously.
Overall Workflow
The typical process for using FrameFormer is straightforward:
- Import & Select: Import your Alembic (or other mesh cache) file into Blender. Select the object(s) you wish to edit.
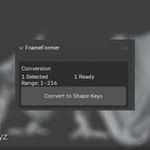
- Convert: In the FrameFormer panel (in the 3D View's N-Panel), click Convert to Shape Keys. You can choose to convert the entire scene's frame range or specify a custom range.
- Sculpt Frame-by-Frame: Scrub the timeline. The addon automatically manages the shape keys, so the object animates as before. Stop on any frame and enter Sculpt Mode to make your edits. Your changes are automatically saved for that specific frame.
- Global Edits: If you need to make a change that affects all frames (e.g., fixing a persistent artifact), use the Shape Keys section to add an "Overall" shape key. Sculpt on this key to apply global modifications.
- Multi-Object Editing: If you've converted multiple objects, you can select them all and use the Multi-Object Controls to enable Multi-Edit mode. This allows you to sculpt on one object and have the changes mirrored to all other selected objects in real-time.
- Review and Revert: At any time, you can use the Show Original button to toggle between your sculpted version and the pristine Alembic cache. If you're unhappy with the results, the Back to Cache button will safely remove all shape keys and restore the original object.
UI and Operators Explained
FrameFormer's UI is context-aware, meaning it will change depending on what you have selected.
Conversion
This is the starting point of the workflow. It appears when you select an object that has a Mesh Sequence Cache modifier but hasn't been converted yet.
-
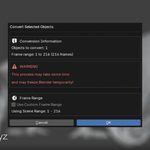
Convert to Shape Keys: This is the main operator. Clicking it brings up a dialog where you can confirm the conversion.
- Use Custom Frame Range: Allows you to specify a start and end frame for the conversion, which is useful for large files or when you only need to edit a small section of the animation.
Once an object is converted, this section changes to show the following options:
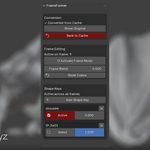
- Show Modified / Show Original: This toggle lets you quickly A/B test your sculpted changes against the original, untouched Alembic cache.
- Back to Cache: This is a destructive operation that will remove all shape keys and modifications, restoring the object to its original state. Use this if you want to start over or discard your work.
Frame Editing
This section appears when you have a single converted object selected. It's the primary area for per-frame sculpting control.
- Frame Mode / Activate Frame Mode: This indicates whether you are in per-frame editing mode (● Frame Mode) or if an "Overall" shape key is selected for editing (○ Activate Frame Mode). You can click this to ensure you are editing the current frame.
- Frame Blend: This slider controls the intensity of your sculpted modifications on the current frame. A value of 1.0 is full intensity, while 0.0 shows the base frame without your sculpt.
- Reset Frame: This button will discard any sculpting you've done on the current frame only, resetting it to its base state.
Shape Keys (Overall Keys)
This section allows you to manage global shape keys that affect all frames simultaneously.
- Add Shape Key: Creates a new, empty shape key that is active across the entire timeline. You'll be prompted to give it a name.
-
Shape Key List: Any overall keys you create will be listed here.
- Select / Active Button: Click this to make an overall key the active one for sculpting. When an overall key is active, your sculpting strokes will modify it instead of the per-frame key.
- Intensity Slider: Controls the global influence of this overall shape key.
- X Button: Deletes the overall shape key.
Multi-Object Controls
This powerful set of tools appears only when you have more than one converted object selected.
- Enable Multi-Edit: Toggles the multi-object sculpting mode. When active, any sculpting on the active object will be mirrored to the corresponding shape key on all other selected objects. This is incredibly useful for applying the same correction to multiple assets.
-
Batch Shape Key Operations:
- Add to All: Adds a new overall shape key to every selected object.
- Show All Modified / Original: Toggles the view for all selected objects at once.
- All Back to Cache: Discards changes and reverts to the original cache for all selected objects.
-
Common Shape Keys: The addon detects which overall shape keys are shared among all selected objects and lists them here.
- Sync Button: Instantly syncs the intensity value of that shape key across all selected objects, using the active object's value as the source.
- X Button: Deletes that overall shape key from all selected objects.
Have questions about this product?
Login to message
| Blender Extension Compatible | Yes |
| Published | about 1 year ago |
| Blender Version | 4.4 - 4.5 |
| Extension Type | Add-on |
| License | GPL |
Discover more products like this
3DEditing finalize cleanup shapekey animation blendshape Sculpt alembic modify-geometry change