Layerify
 Peakz
Peakz
LAYERIFY 1.0 · USER GUIDE
Using Layerify
Everything Layerify does, in the order you'll meet it. In Blender, press ? (or F1) while editing for the searchable list of every shortcut and gesture.
Contents
1 · Install & update 2 · Getting started 3 · The screen 4 · Layers & masks 5 · Tools 6 · Brushes 7 · Selections & transform 8 · Adjustments, filters & styles 9 · Text & shapes 10 · Saving & applying 11 · Texture tools 12 · Channel Packer 13 · Make it yours 14 · Shortcuts 15 · Troubleshooting & support
1
Install & update
-
Pick the zip for your system:
windows_x64,linux_x64,macos_arm64(Apple Silicon) ormacos_x64(Intel Mac). - Install: Edit > Preferences > Get Extensions, the menu at the top right > Install from Disk…, choose the zip. No internet connection or admin rights needed.
- Update: uninstall the old version, restart Blender, install the new zip. Your layers and settings are kept.
2
Getting started



1. Open an image in the Image Editor: a texture of your model, any image file, a generated or packed image, a UDIM set.
2. Open the Sidebar (N) and its Layerify tab.
3. Click Edit with Layerify. To start from a PSD on disk instead, click Open PSD…

Put a 3D View beside the Image Editor in Material Preview: your model updates as you work.
The first time, a welcome card shows three tips and asks what Ctrl+S should do over the canvas:
- Save the layers, as in Photoshop (Blender's Ctrl+S still saves the .blend everywhere else), or
- Save the .blend, as in Blender: the layers then save with Alt+S.
You can change it later in the add-on's Preferences, under Saving.

- A PSD with the image's name is beside it: Edit the PSD's layers (Save writes them back into it), or Edit this image only. Asked once per image.
- The image changed outside Layerify since its layers were saved: Keep both (the outside edit added as a new layer on top), use your layers, or start from the image and set the old layers aside in a backup.
- Unsaved work survived a crash: Restore it, or discard it.
3
The screen



1 Options bar: the active tool and its settings (size, hardness, opacity...).
2 Tool bar: hover a tool for its shortcut and how it works; the corner mark means more tools in a flyout.
3 Colors: the foreground and background colors (X swaps them).
4 Info pill: the layered file's name (a dot while it has unsaved changes), the size, the bit depth, the zoom; click it for the Image menu.
5 Image menu, Before / after, help (?): hold Before / after (or \) to see the image as it was.
6 Live: on, the image in Blender (and your model) follows every edit; off, the model waits for Apply.
7 Apply (and where it writes, the arrow) and Close (×).
8 Layers panel, with the channel buttons RGB · R · G · B · A at its top.
4
Layers & masks

1 Blend mode and opacity of the selected layer.
2 Eye: show / hide. A group's arrow opens it (Alt+click: all groups).
3 Adjustment layer, with its mask (white shows, black hides).
4 Smart object and its smart filter: click the filter to change it, its eye to hide it.
5 Fill layer, with a mask made from a selection.
6 Footer: new layer, group, adjustment / fill, mask, duplicate, filter, layer style (fx), delete.

Right-click a layer: the layer menu
Layers
- Kinds: pixel, adjustment, fill (color, gradient, pattern), text, shape, smart object, group
- 27 blend modes, opacity and fill, clipping masks (Ctrl+Alt+G)
- Click, Ctrl+click, Shift+click to select; drag a row to reorder (onto a group: into it)
- Double-click to rename; right-click for the layer menu (merge, rasterize, clip...)
- Ctrl+G group, Ctrl+E merge down, Ctrl+J layer via copy
- Drop image files on the canvas, or Alt+O, to place them as layers
Masks
- With a selection, a new mask (or a new adjustment / fill) takes its shape
- Click the mask thumbnail to paint on it: black hides, white shows
- Alt+click: see the mask itself · Shift+click: turn it off / on
- Ctrl+click: load it as a selection
- Drag a mask to another layer (Alt: copy it)
- Right-click the canvas: grow, shrink, feather the mask's selection
5
Tools
The tool bar's tools, with Photoshop's keys. Pressing a key again picks the next tool of its group.
| Key | Tool | What it does |
|---|---|---|
| V | Move | Drag the layer, or the selected pixels. Arrows nudge 1 px (Shift: 10). |
| B | Brush · Pencil | Paint (Pencil: hard-edged). Alt+click picks a color. |
| E | Eraser | Erase to transparency. |
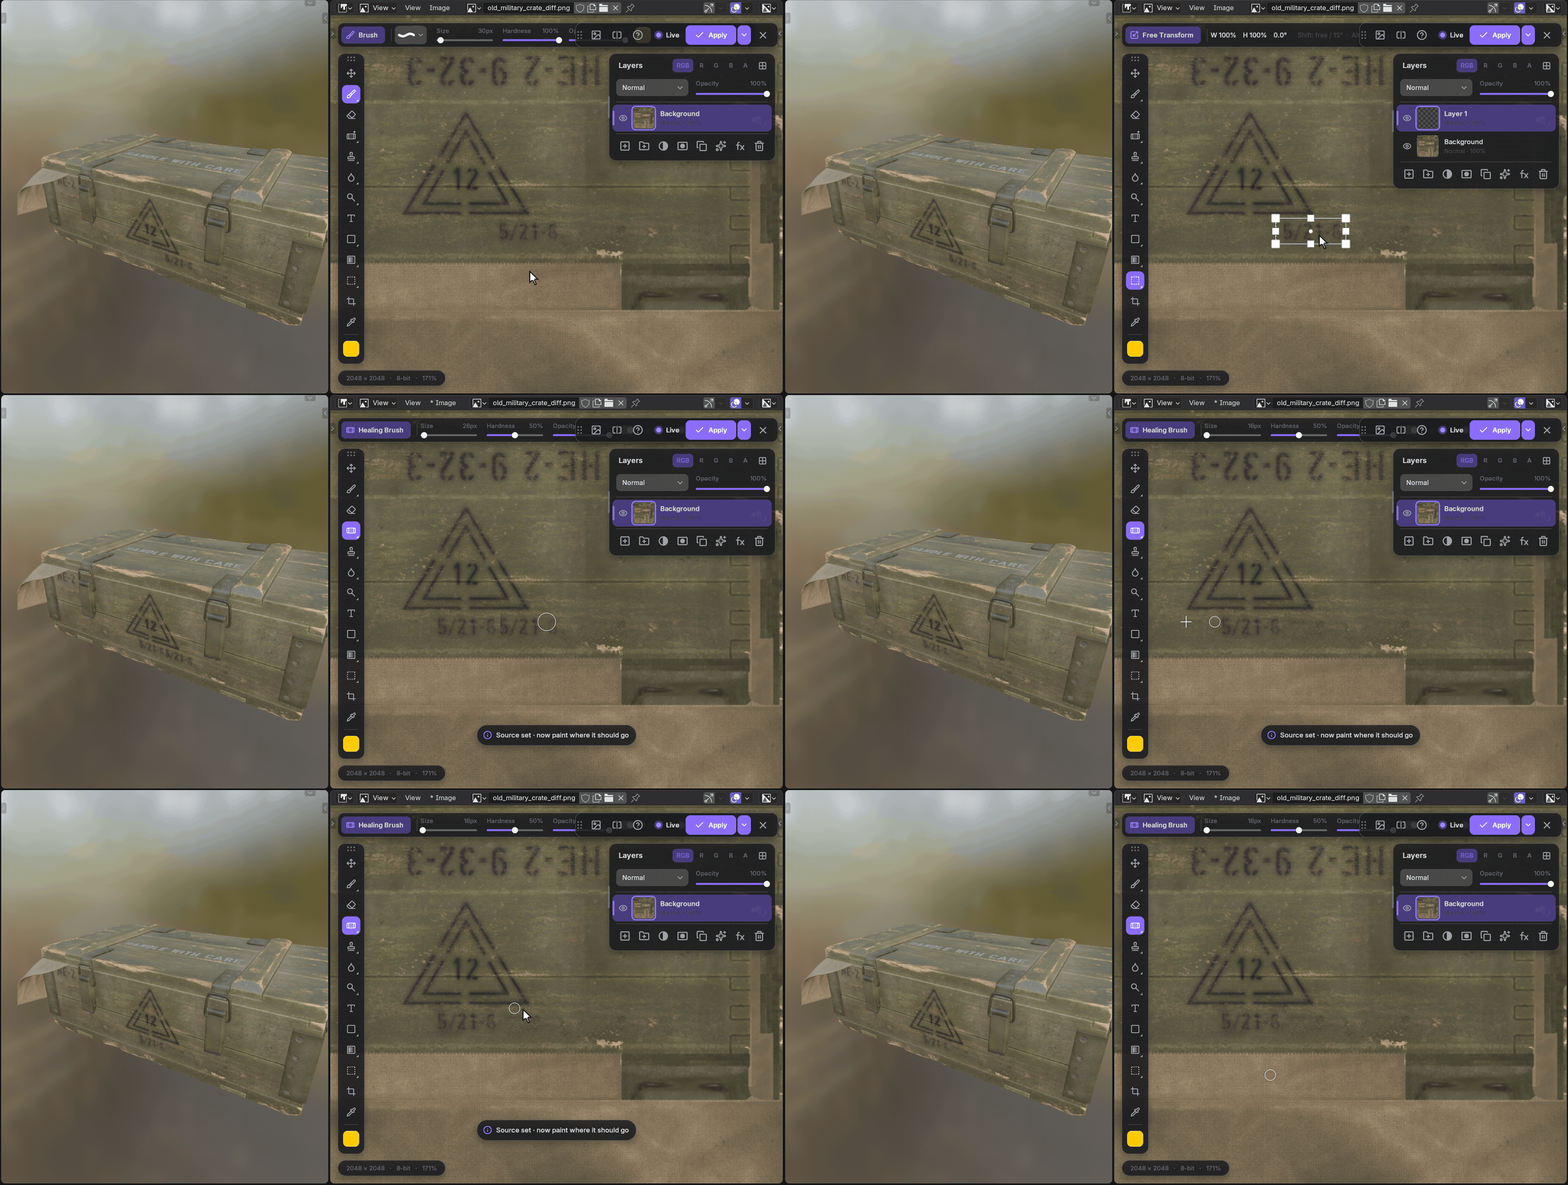
| J | Spot Healing · Healing Brush | Paint a flaw away with what's around it. Healing Brush: Alt+click where to copy from. |
| S | Clone Stamp | Alt+click a source, then paint a copy of it. |
| Y | History Brush | Paint back the image as it was when you opened it. |
| R | Blur · Sharpen · Smudge | Soften, crisp up or push paint where you brush. |
| O | Dodge · Burn · Sponge | Lighten, darken, or (de)saturate where you brush. |
| G | Gradient · Paint Bucket | Drag a gradient (Shift: 45° steps); fill similar colors with a click. |
| M | Rectangle · Ellipse Select | Select an area (see section 7). |
| L · W | Lasso · Magic Wand | Draw a selection freehand; select similar colors with a click. |
| C | Crop | Drag the box's edges, Enter crops, Esc resets. |
| I | Eyedropper | Pick a color from the image. |
| T | Type | Click to type, drag for a text box (see section 9). |
| U | Rectangle · Ellipse · Polygon · Line · Custom Shape | Draw a shape layer (see section 9). |
6
Brushes

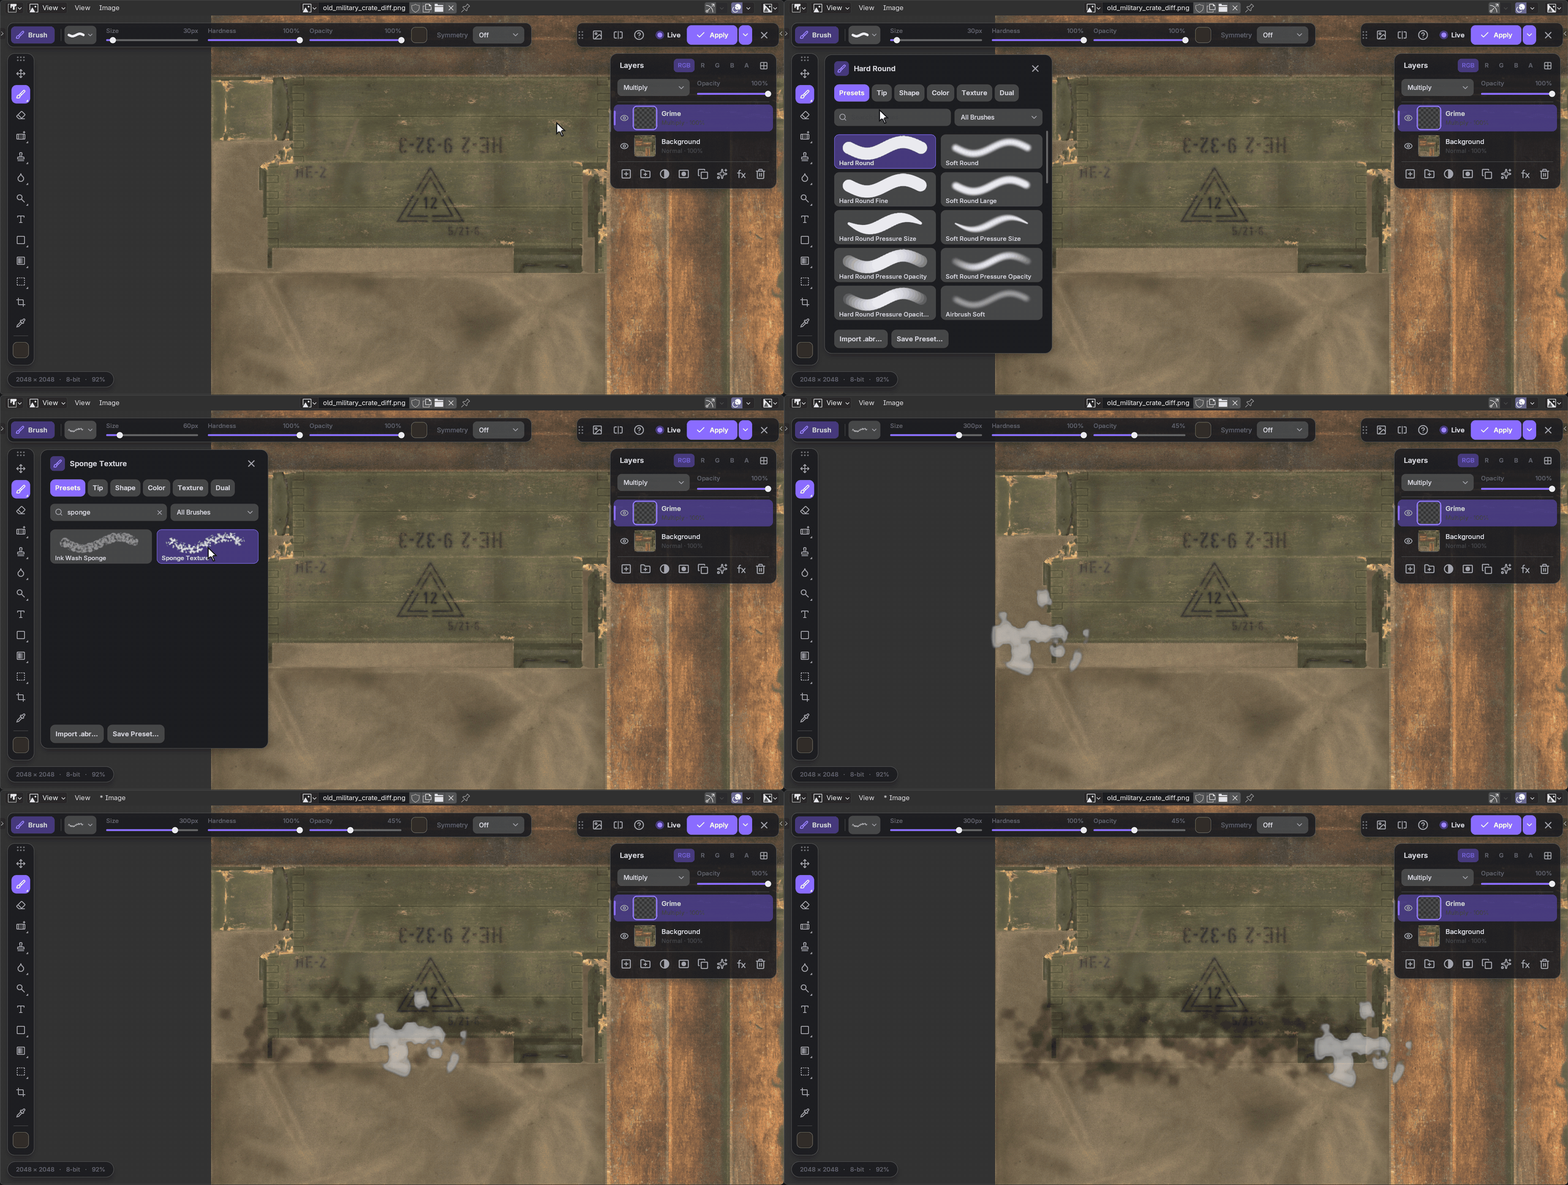
The Brush button (left of Size in the options bar) opens the Brush panel: presets with a preview of their stroke, a search field, and the tip, shape and color settings.
- Import .abr: Photoshop brush files join a library you can use in every project.
- [ ] size; Alt+right-drag: size left / right, hardness up / down.
- Pen pressure for size, opacity and flow; Symmetry in the options bar.
- Shape and color dynamics, texture and dual brushes, as in Photoshop.
7
Selections & transform
Selecting
- Shift+drag adds, Alt+drag subtracts, Shift+Alt keeps the overlap
- Ctrl+A all, Ctrl+D none, Ctrl+Shift+I inverse
- Right-click: grow, shrink, feather, smooth, border
- Ctrl+click a thumbnail: select that layer's pixels; Ctrl+click R, G, B or A: by a channel
- Delete clears the selected pixels; Ctrl+J copies them to a new layer
- Ctrl+C / X / V, images copied in other programs too
Free Transform (Ctrl+T)
- The layer, the selection, or the selected layers
- Drag a corner to scale (Shift: freely, Alt: from the centre), outside to rotate
- Ctrl+drag a corner: distort, for perspective
- Enter or double-click applies, Esc cancels
- Edges and centres snap to the image's and other layers' (Ctrl: freely)
8
Adjustments, filters & layer styles

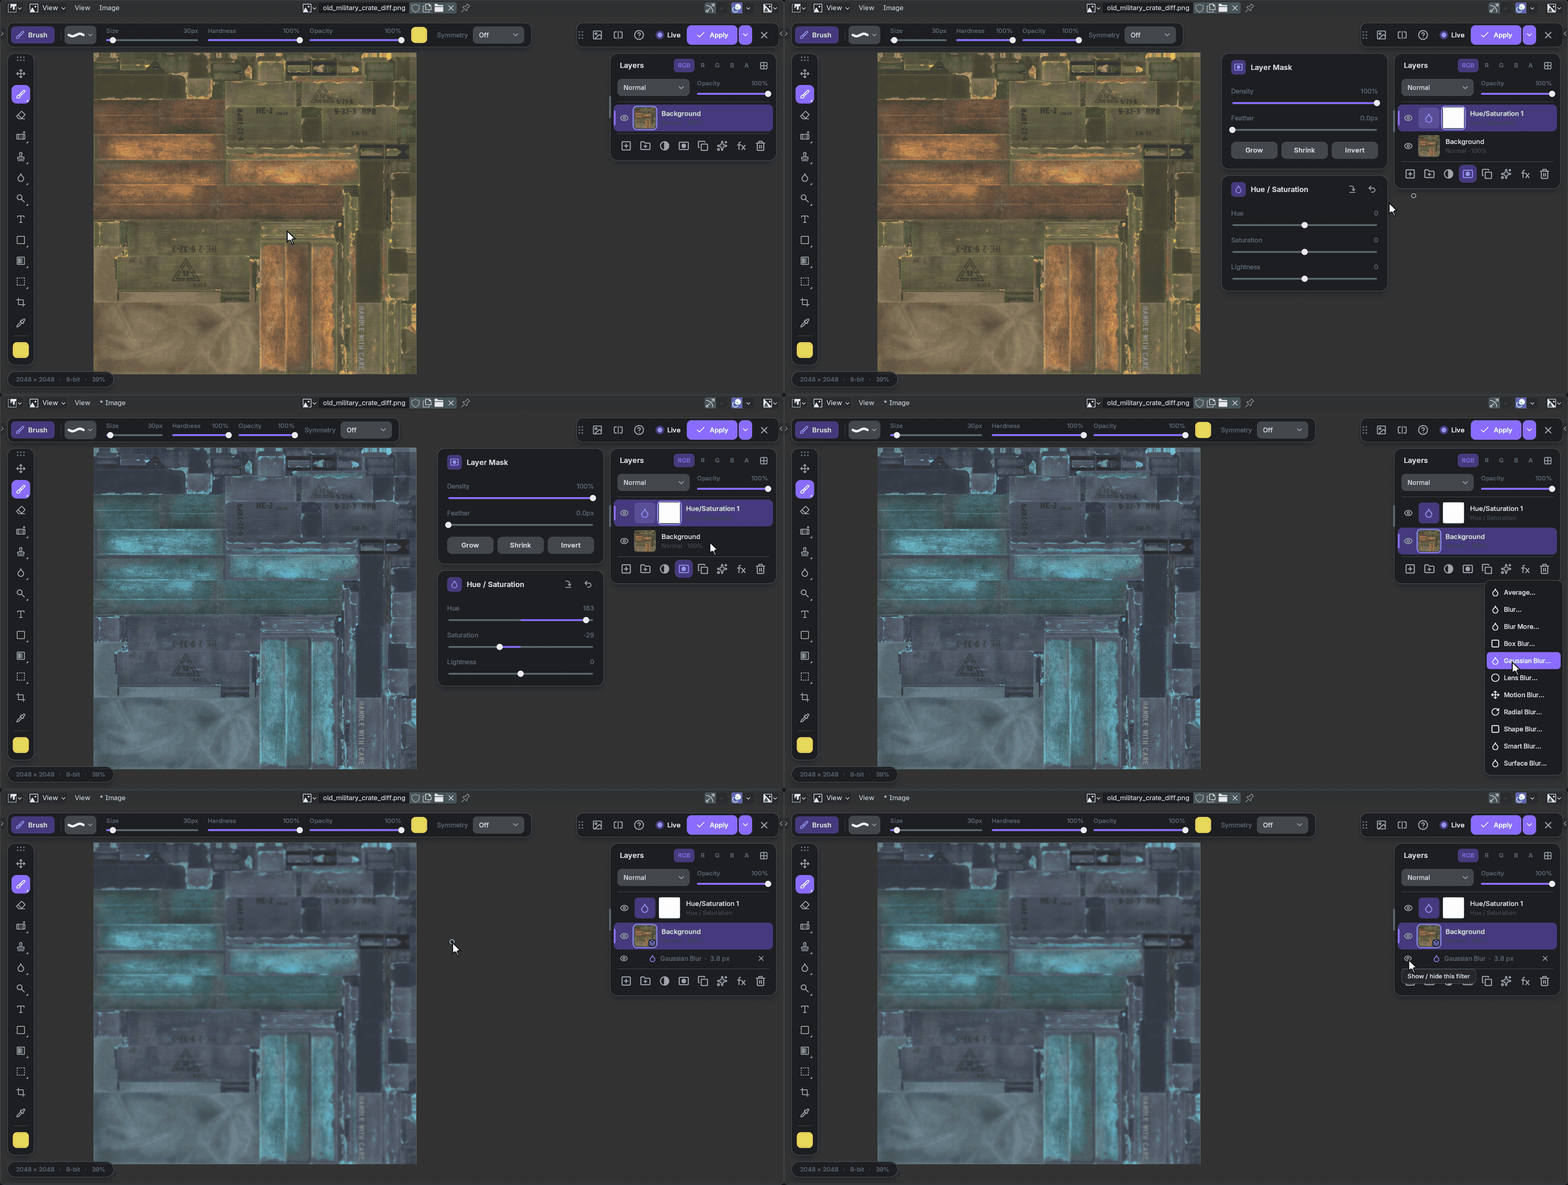
Adjustment and fill layers (the half-circle button): Color, Gradient and Pattern Fill; Brightness / Contrast, Levels, Curves, Exposure, Vibrance, Hue / Saturation, Color Balance, Black & White, Photo Filter, Channel Mixer, Color Lookup, Invert, Posterize, Threshold, Gradient Map, Selective Color. Each comes with a mask and stays editable: click the layer for its settings.
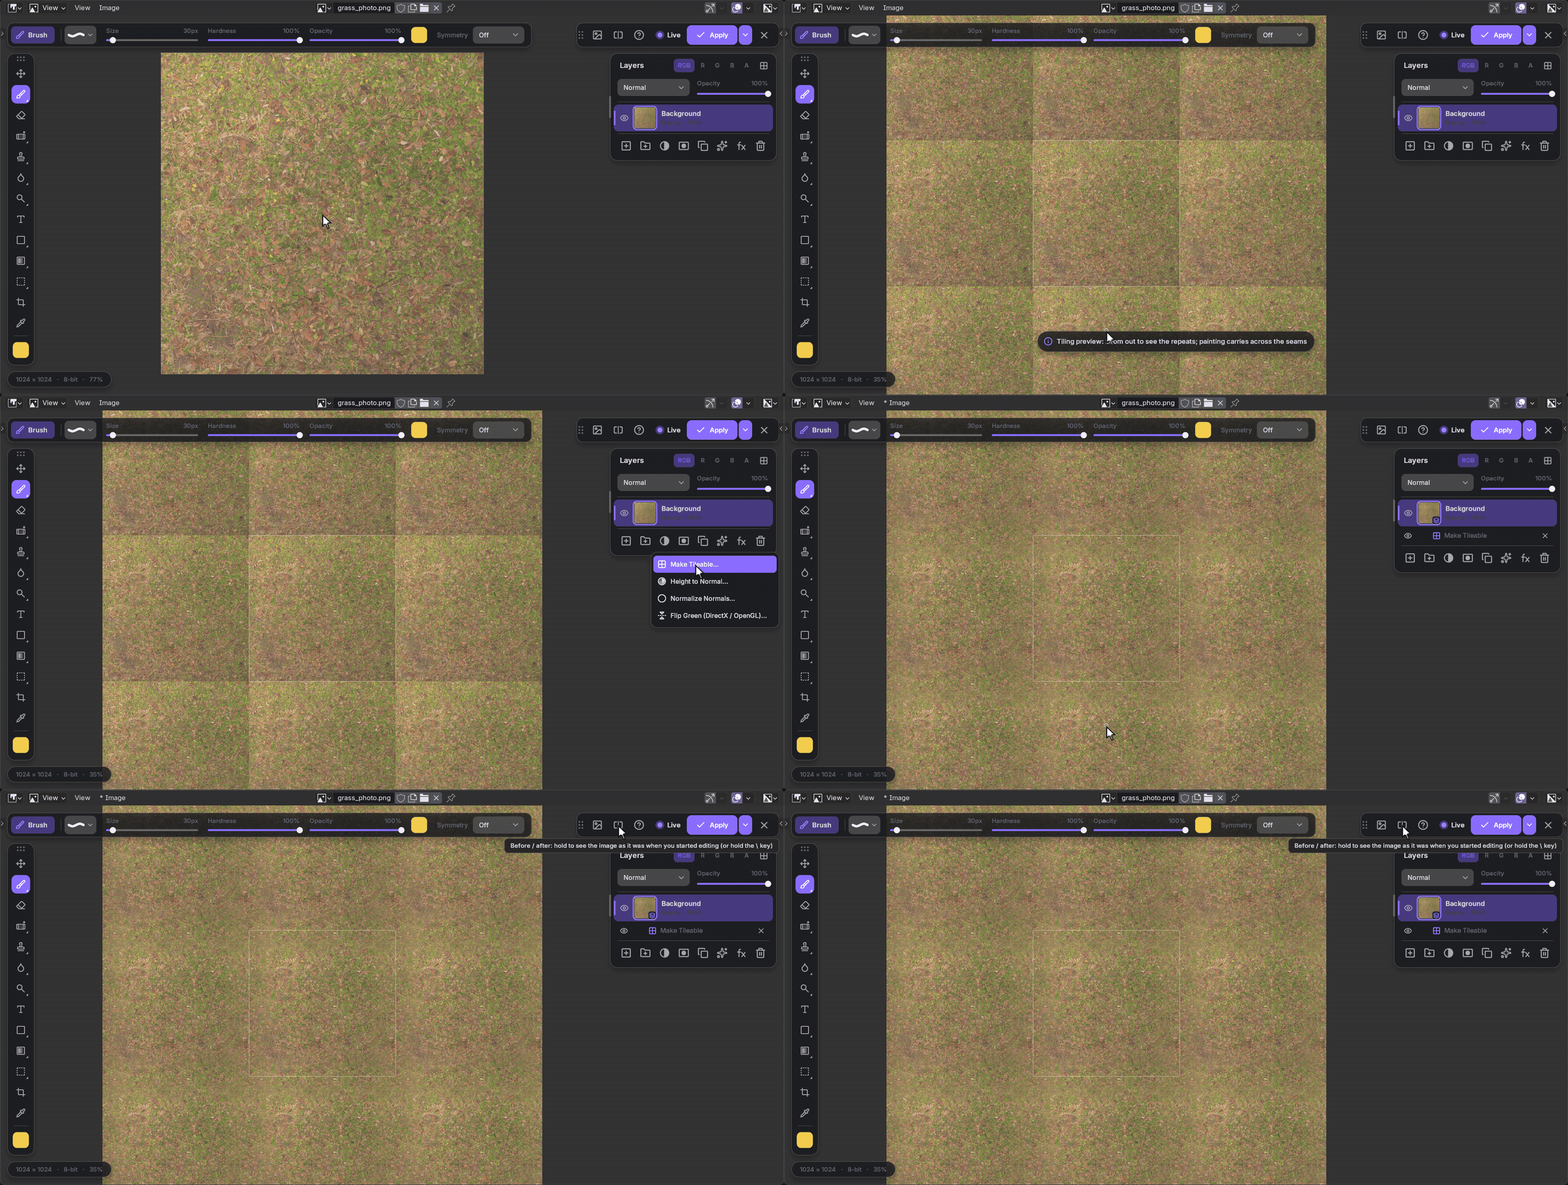
Filters (the sparkle button): Blur, Distort, Noise, Pixelate, Render, Sharpen, Stylize, Other and Texture (Make Tileable, Height to Normal, Normalize Normals, Flip Green). Tick Editable later (smart filter) and the layer becomes a smart object: the filter stays in its list, to change, hide, mask or remove later.


Layer styles (fx): Bevel & Emboss, Stroke, Inner Shadow, Inner Glow, Satin, Color, Gradient and Pattern Overlay, Outer Glow, Drop Shadow. Click an effect for its settings, live; its box turns it on and off. Styles has presets, and Copy / Paste a style between layers. Right-click a layer: Copy, Paste or Clear Layer Style.
9
Text & shapes
Text (T)
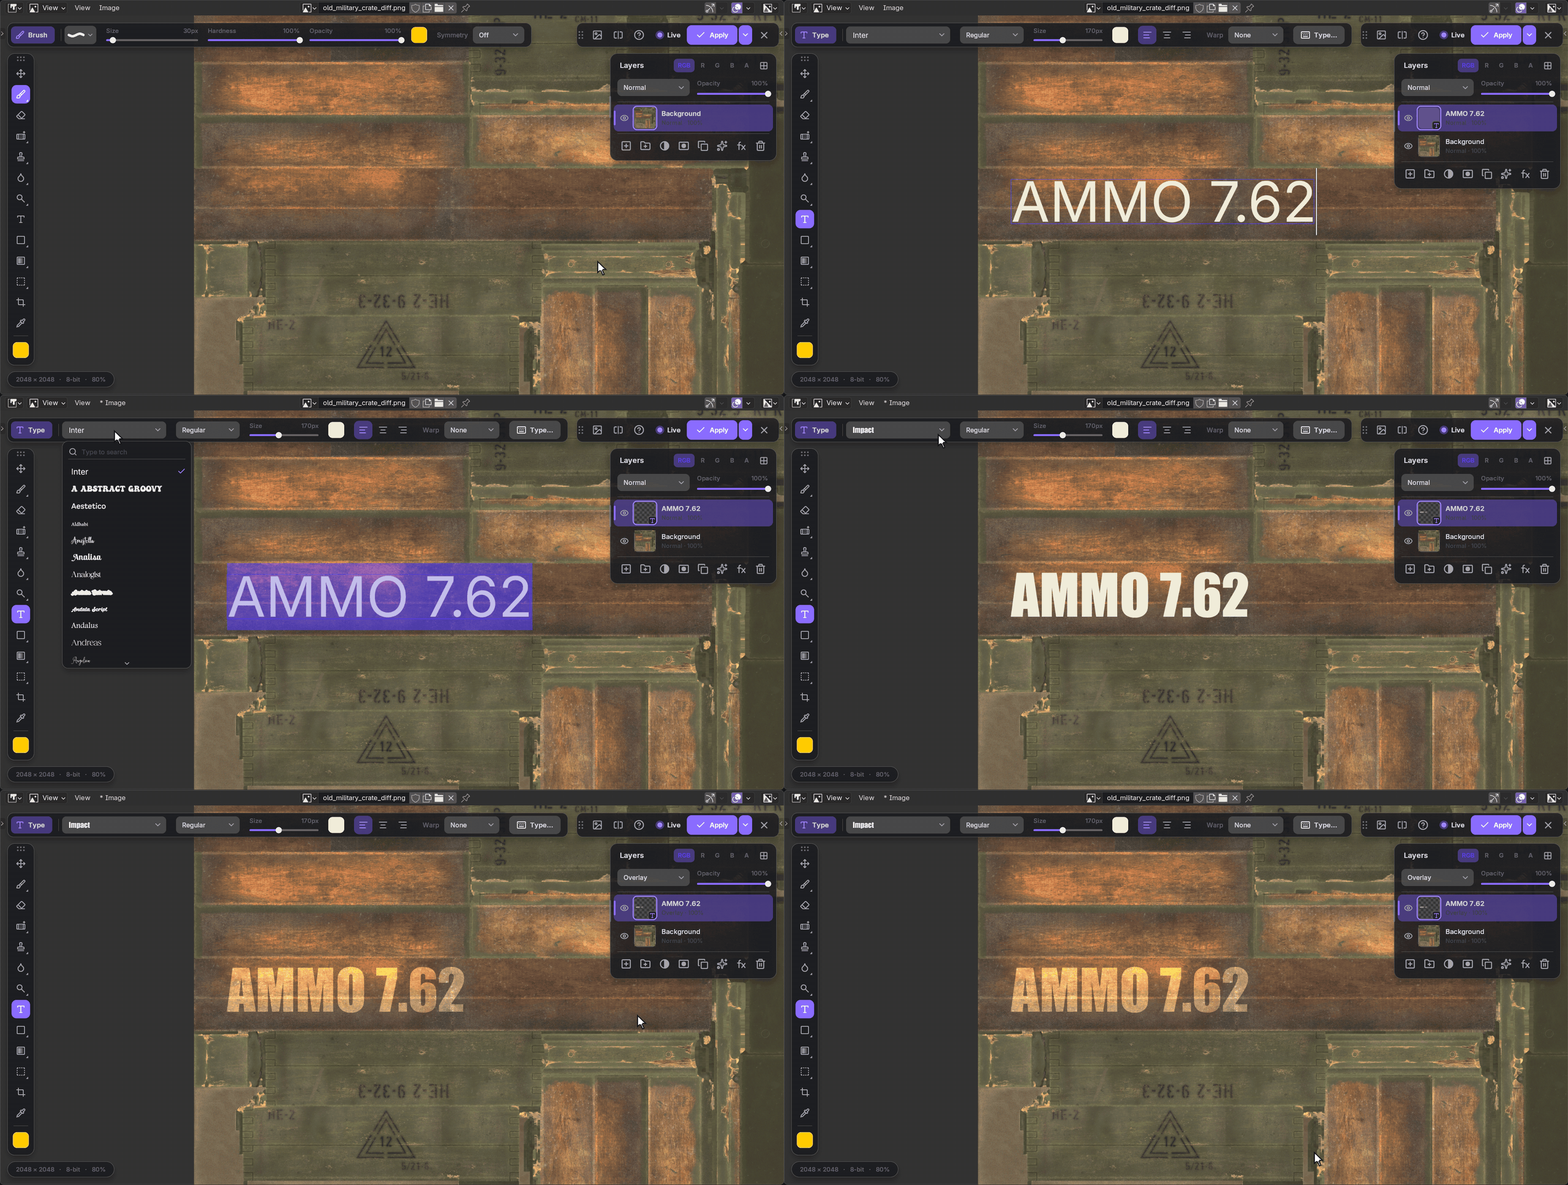
- Click to type on a line, drag for a box the text wraps in
- Click text to edit it; Esc or Ctrl+Enter: done
- Font menu: type a name to find a font, each previewed
- Font, style, size, color change the selected letters
- Warp: Arc, Flag, Wave… it stays editable
- Any language; Type… button for Chinese, Japanese, Korean input
Shapes (U)
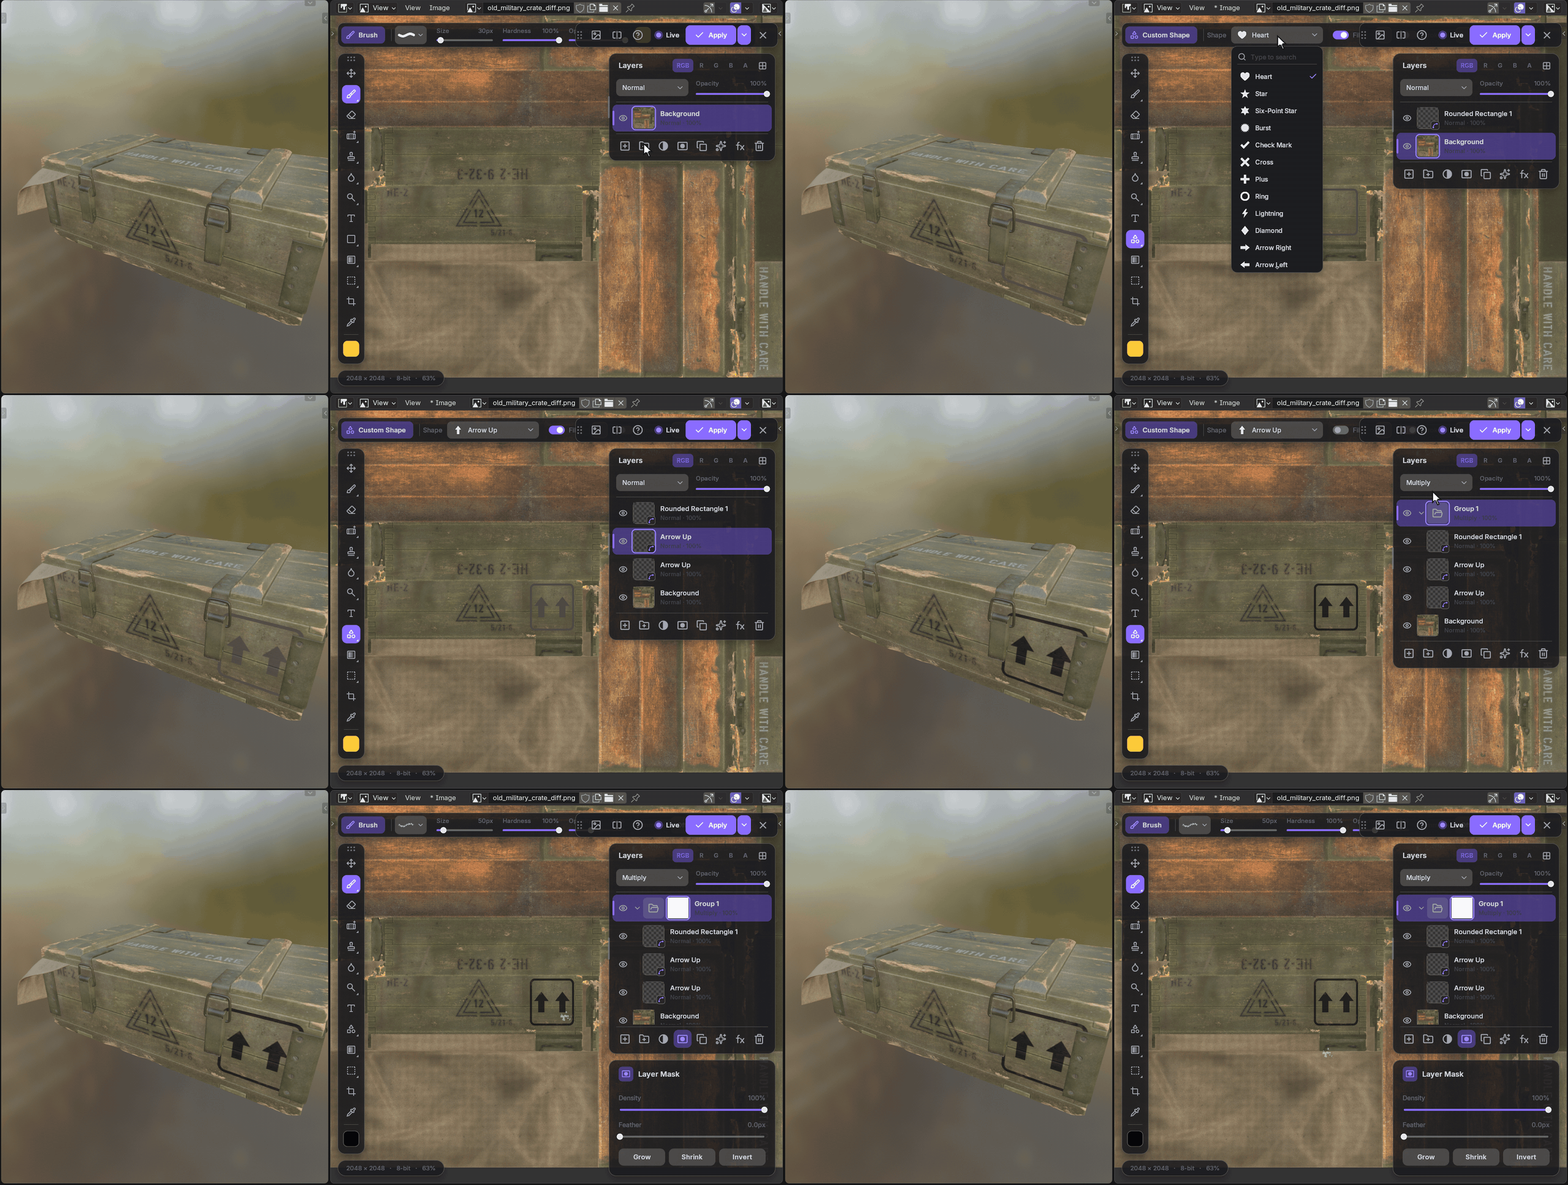
- Rectangle, Ellipse, Polygon (star), Line, Custom Shape
- Drag; Shift: square, circle, 45°; Alt: from the centre
- Fill, stroke, corner radius, sides in the options bar
- 34 custom shapes: hearts, stars, arrows, bubbles, leaves…
- Right-click: Rasterize Shape to paint on it
- Text and shapes are saved as text and shapes in the PSD
10
Saving & applying
Two different things: saving keeps your layers, in a PSD; Apply puts the flattened result into the image your material uses.
Saving the layers
- Save Ctrl+S · Save As Ctrl+Shift+S · Save a Copy Ctrl+Alt+S, over the canvas (Alt+S, Shift+Alt+S if Ctrl+S saves the .blend), or the Image menu
- The first save asks where: by default beside the image, as <image name>.psd
- A .psd image edits its own layers and saves back into its file
- Image > Revert: back to the PSD as last saved
- A PSD saved by another program meanwhile: Reload, or Keep mine
Applying the result
- Apply in Blender only: the image in Blender (save it with Image > Save, or Blender asks on quit)
- Apply and save image file: overwrite its file on disk (no file: packed instead)
- Apply and pack into .blend
- Choose with the arrow beside Apply, or in the Sidebar
- After Apply it's an ordinary image: the .blend renders the same without Layerify

Layers not saved yet aren't dropped silently. Saving the .blend, Layerify asks: Save All (each beside its image), Choose where…, or Not now. Quitting (Ctrl+Q), it lists them first.
Close (×) saves the layers to their PSD first.
Crash? Unsaved layer work is copied in the background every 2 minutes (Preferences); the next time you edit the image, Layerify offers it back.
11
Texture tools

In the Image menu (top bar, or click the info pill):
- Tiling Preview: the image repeated around itself; paint across the seams. Filters > Texture > Make Tileable blends them in one step.
- UV Layout: the UV edges of the meshes using the image, over it.
- Edit Linked Maps Together (on by default): crop, resize, turn or flip the color map and the material's normal, roughness… maps get the same change.
- UDIM: edit one tile, or All Tiles side by side; Apply writes the changed ones.
- Image Size (Ctrl+Alt+I), Canvas Size (Ctrl+Alt+C), rotate, flip.
Channels: RGB · R · G · B · A at the top of the Layers panel shows one channel as grey; painting, fills and filters then change only it (Ctrl+2 to Ctrl+6). Float images (EXR, HDR) are edited in float; 8K textures work.
12
Channel Packer
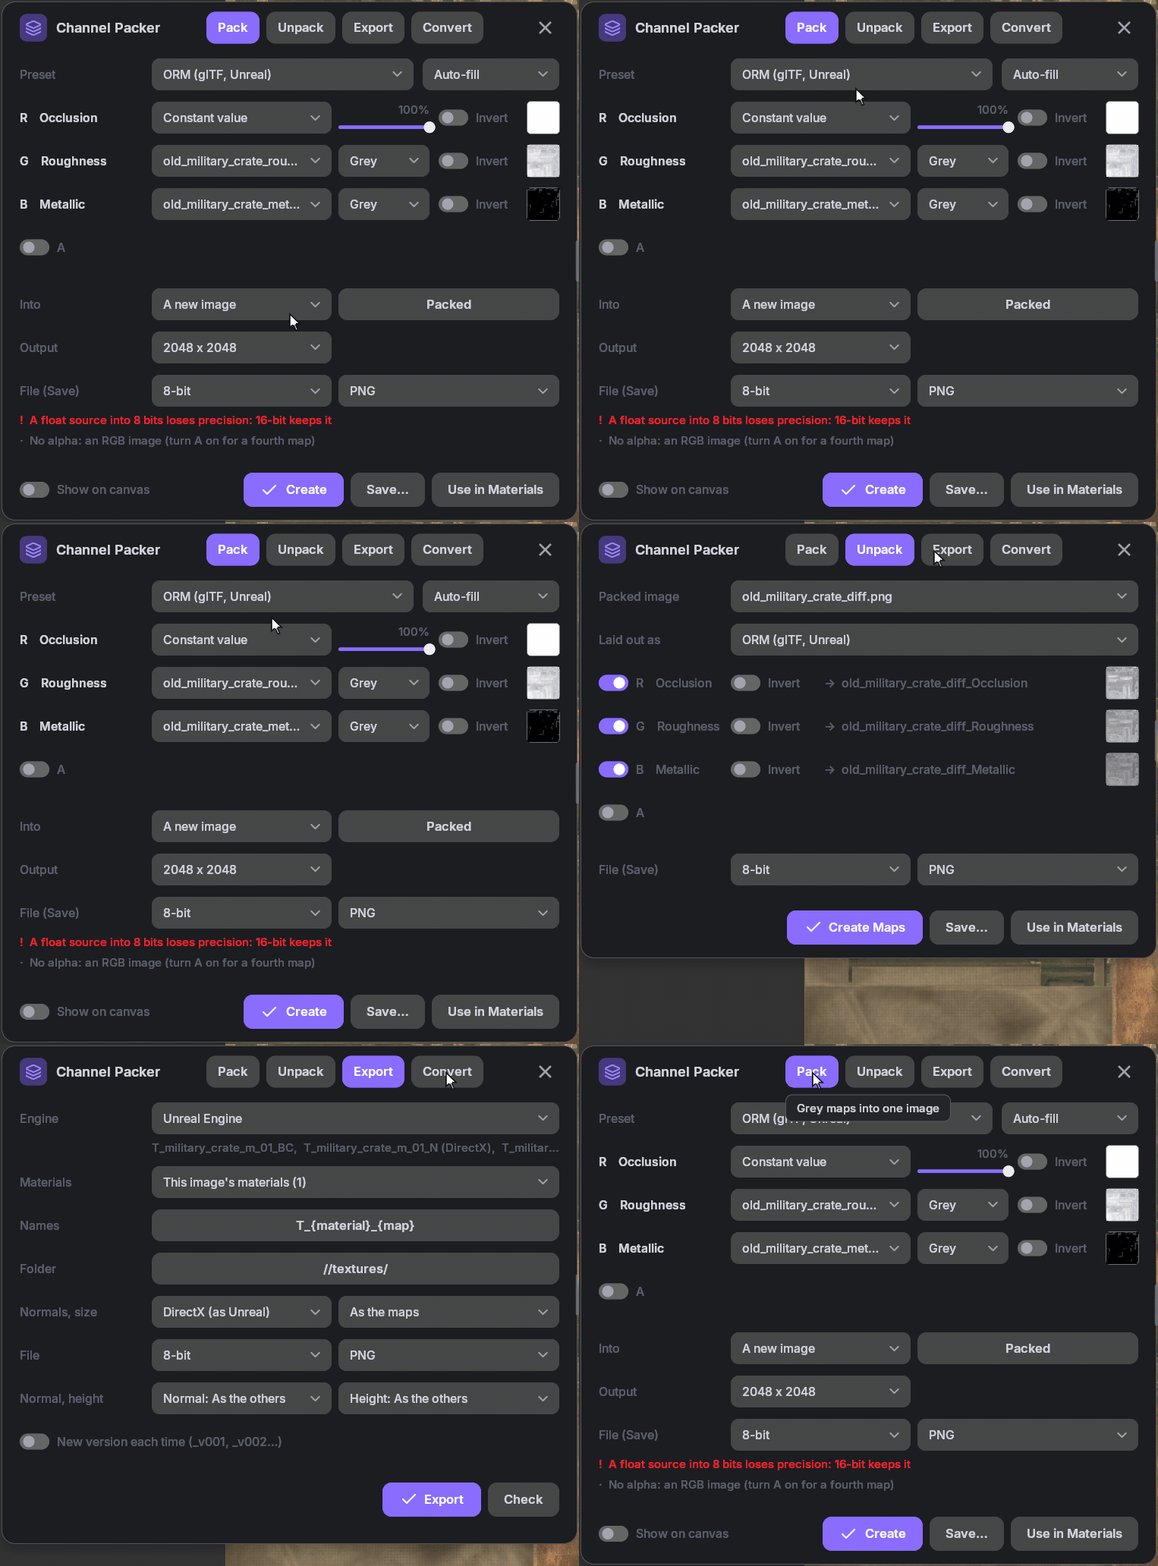
Image > Channel Packer, four tabs:
- Pack: roughness, metallic, AO… into one image's R, G, B, A. Presets for glTF / Unreal (ORM), Unity (mask map) and more; each row a map, a constant or a channel. Click a thumbnail to remap it (Low, High, Gamma); Ctrl+V over a row pastes a map.
- Unpack: a packed image back into separate maps.
- Convert: Spec/Gloss to Metal/Rough and back; UDIM sets tile by tile.
- Export: your materials' texture sets for Unreal, Unity, Godot, glTF or O3DE, with their names and normal-map conventions. Also from the command line, for pipelines.
13
Make it yours
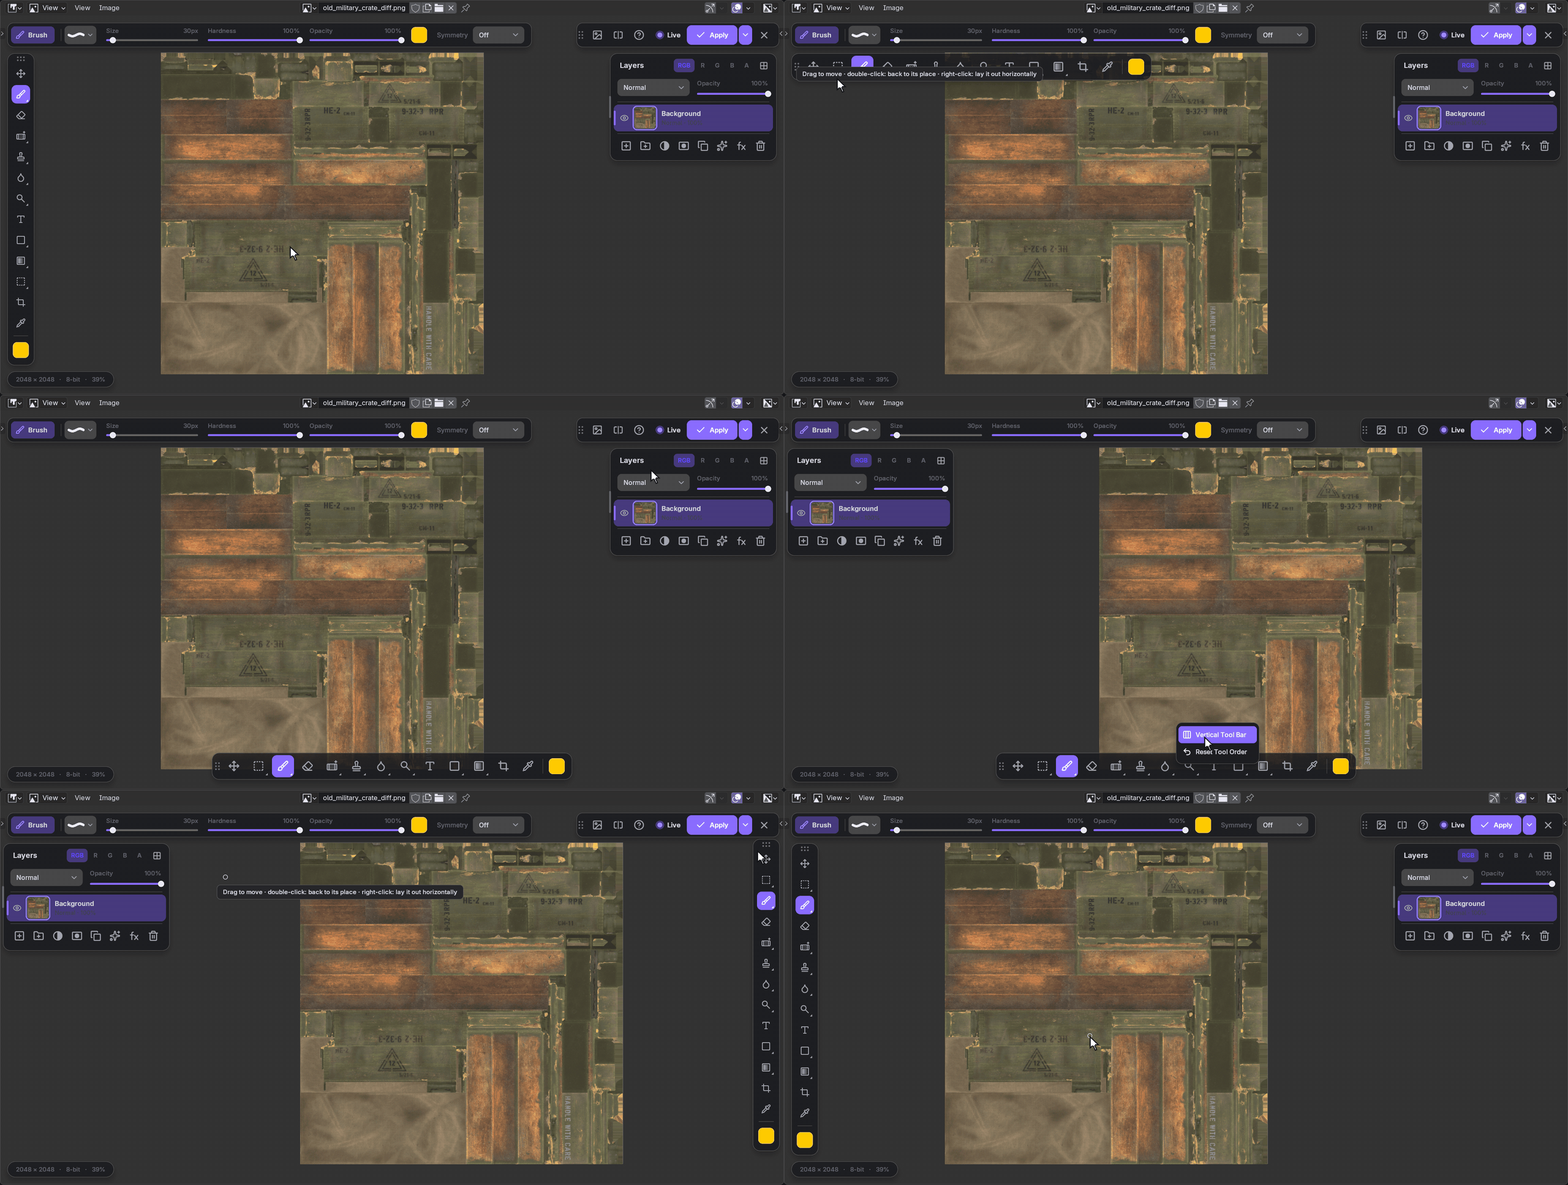
- Tools: drag a tool button to reorder the tool bar; right-click it for Horizontal Tool Bar (along the top or bottom).
- Panels: drag a panel's title or a bar's grip to move it, its side edge to resize it; double-click to put it back. Image > Reset Panel Layout resets everything.
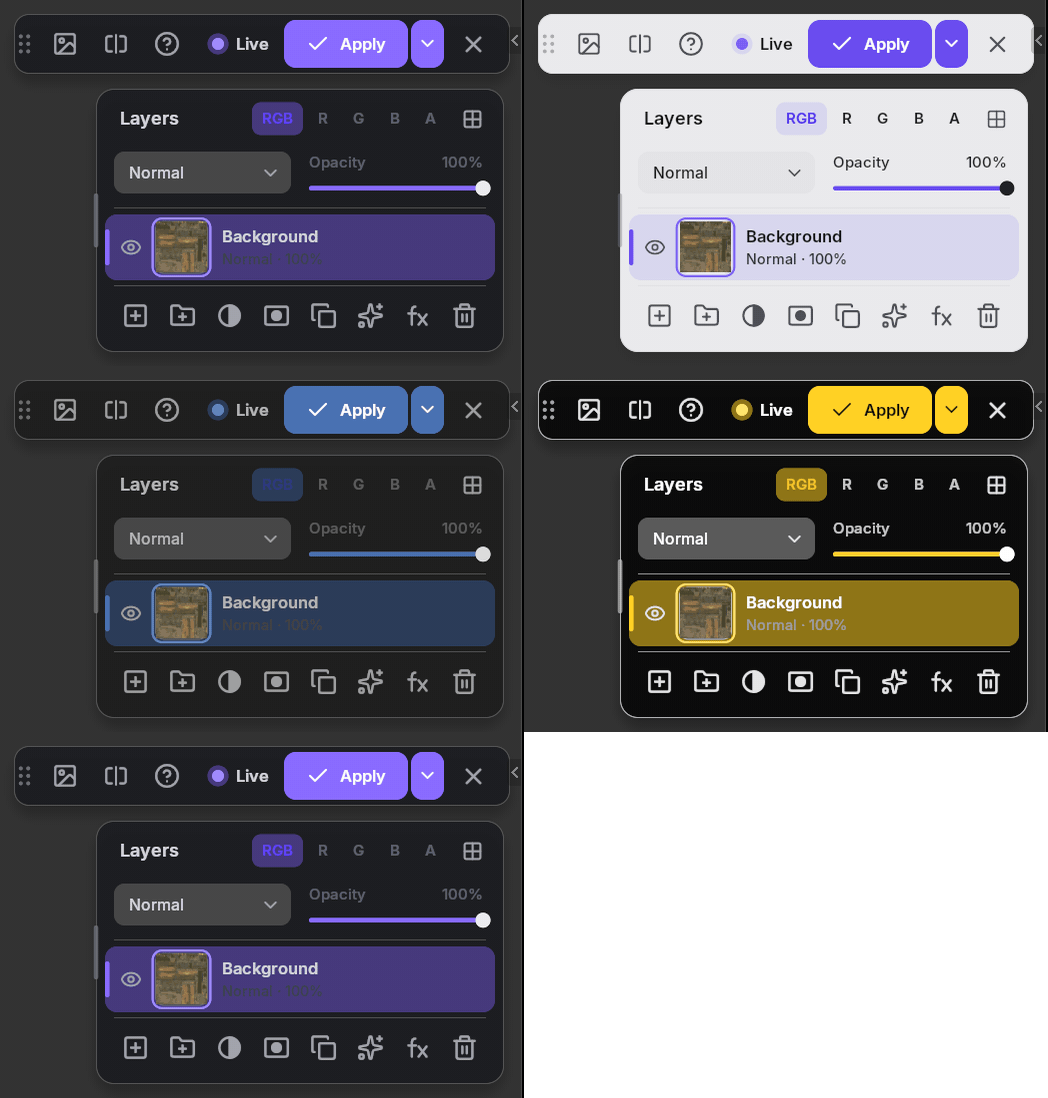
- Colors: Image > Interface Colors: Layerify Dark, Layerify Light, Match Blender (your theme's colors) or High Contrast, your own accent color, the panels' opacity.
- Preferences (Edit > Preferences > Add-ons > Layerify): autosave interval, undo steps (200) and undo memory (8 GB), what Ctrl+S does, the theme.
14
Shortcuts
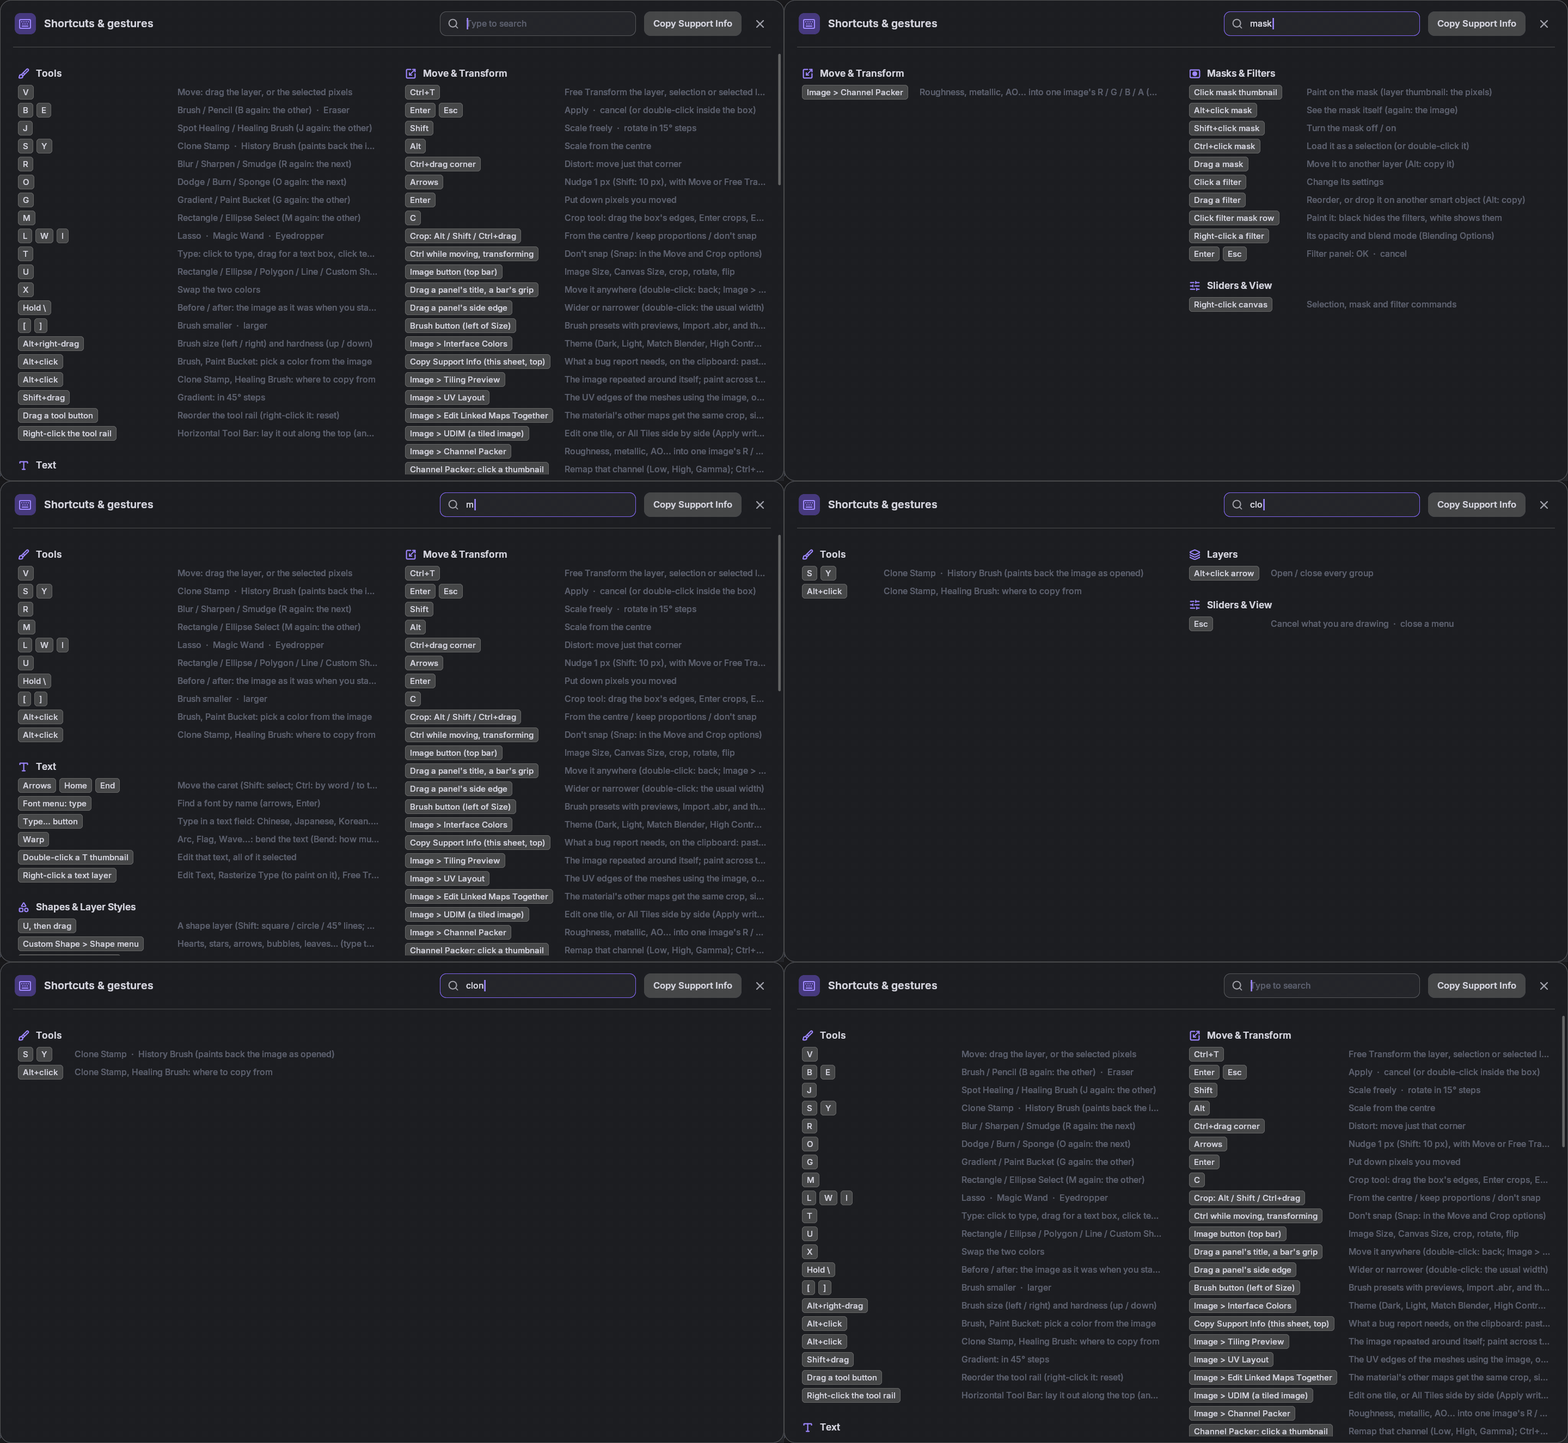
The ones you'll use most (Cmd instead of Ctrl on a Mac). Press ? or F1 for all of them, searchable.
| Keys | Does | Keys | Does |
|---|---|---|---|
| Ctrl+Z · Ctrl+Shift+Z | Undo · redo | Ctrl+T | Free Transform |
| Ctrl+S · Ctrl+Shift+S | Save · save as | Ctrl+J | Layer via copy |
| Ctrl+A · Ctrl+D | Select all · deselect | Ctrl+G | Group |
| Ctrl+Shift+I | Select inverse | Ctrl+E | Merge down |
| [ · ] | Brush smaller · larger | Ctrl+Alt+G | Clipping mask |
| X | Swap colors | Alt+O | Place an image |
| Hold \ | Before / after | Ctrl+Alt+I · C | Image size · canvas size |
| Wheel · middle-drag | Zoom · pan | ? · F1 | All shortcuts |
15
Troubleshooting & support
| If… | Then |
|---|---|
| The Sidebar says "Engine unavailable for this platform" | The zip is for another system (or an Intel Mac runs Blender 5). Install the zip for your system and Blender version. |
| Edit with Layerify is greyed out | The Image Editor shows no image, or that image is already being edited. |
| The model doesn't change as I paint | Turn Live on (top bar), and check the material uses this image; the 3D View must be in Material Preview or Rendered. |
| The image file didn't change | Apply in Blender only doesn't write the file: save the image (Image > Save), or switch Apply to "Apply and save image file". |
| Ctrl+S saved the .blend instead of the layers (or the other way round) | Preferences > Saving: what Ctrl+S does over the canvas. |
| Undo goes back fewer steps on a huge image | Raise Undo memory in Preferences (the oldest steps go first when it's full). |
| Panels are off-screen or in the way | Image > Reset Panel Layout. |
Still stuck, found a bug, or want a feature?
Press ? in Layerify and click Copy Support Info (at the top of the sheet), then message me here on Superhive or on Discord (peakz9155) with it, what you did and what happened.
 Included
Includes 12 months of
- Support from Peakz
- Product updates
Extend this product’s Support Period +12 months: 75% of product price
Have questions before purchasing?
Login to message
| Blender Extension Compatible | Yes |
| Dev Fund Contributor | |
| Published | about 12 hours ago |
| Blender Version | 4.2 - 5.2 |
| Extension Type | Add-on |
| License | GPL |
Discover more products like this
layers image editor layer masks psd adjustment layers Texture Painting seamless textures Brushes Texture editing PBR photoshop channel packer