 TastyVoxels
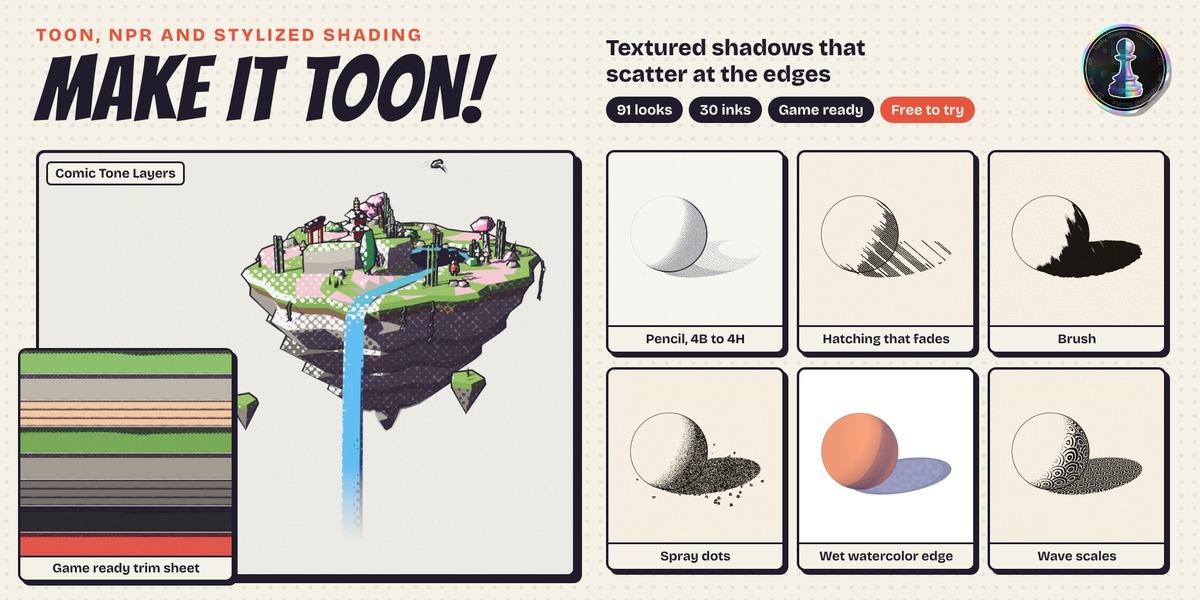
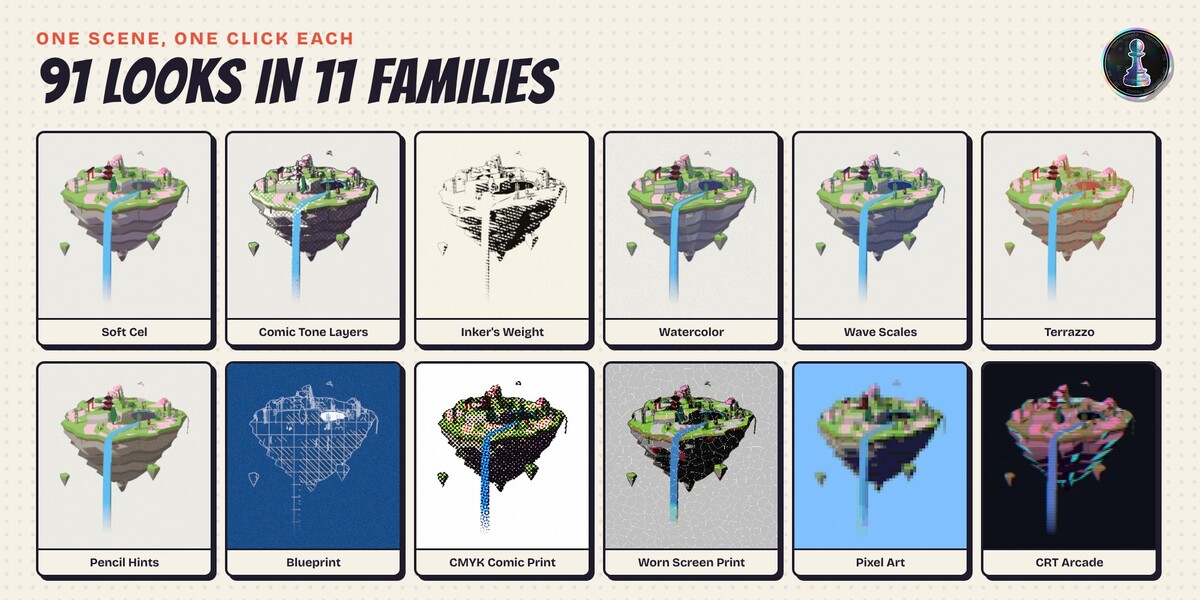
Make it Toon! is a toon, NPR and stylized shading add-on for Blender 5.3 and newer, free to try (pick the Free edition). It turns any Blender scene into an illustration that reacts to real lights and real cast shadows. Pick a look, click once, and your scene becomes cel shaded anime, a comic page with halftone dots, a pen and ink drawing, a copperplate engraving, a watercolor, a blueprint or a woodcut. Move a lamp and the hatching, the dots and the shadows follow it.
Built on what is new in Blender 5.3
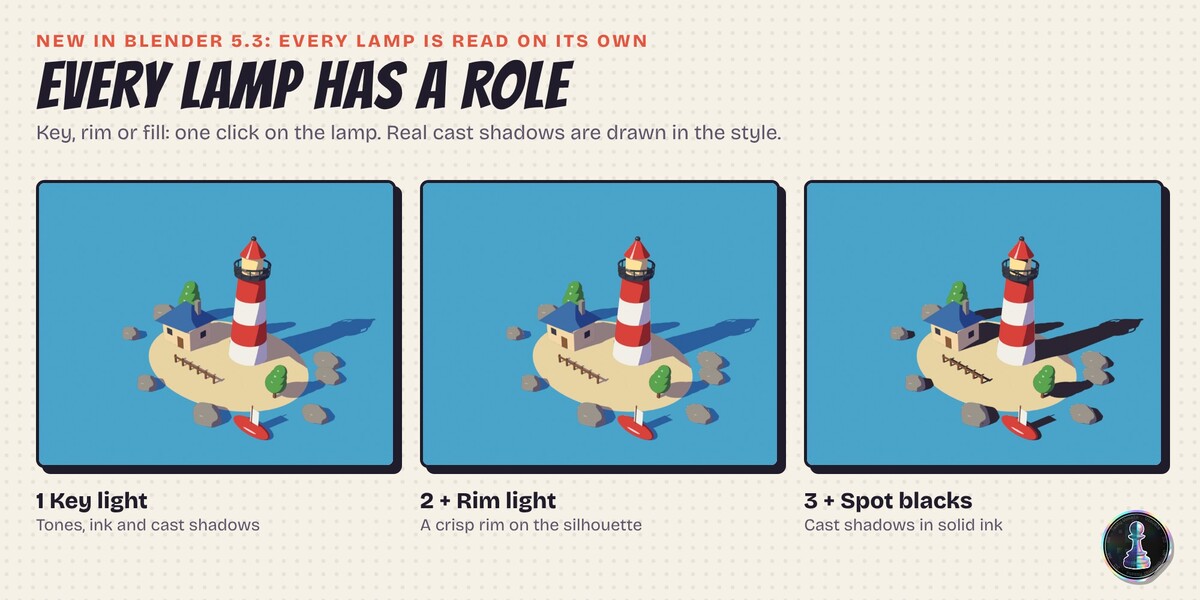
Blender 5.3 added Material Lighting nodes to EEVEE: for the first time a material can read every lamp on its own, with its direction, its colour, its strength and its own cast shadow. Toon shaders until now had to squeeze the whole lighting into one value with a Shader to RGB trick. Make it Toon! is written for the new nodes from the ground up, so you get things that were not possible before:
- Real cast shadows in the style. A shadow falling on the floor is hatched, dotted or painted like the rest of the drawing.
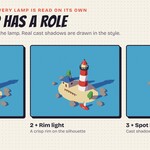
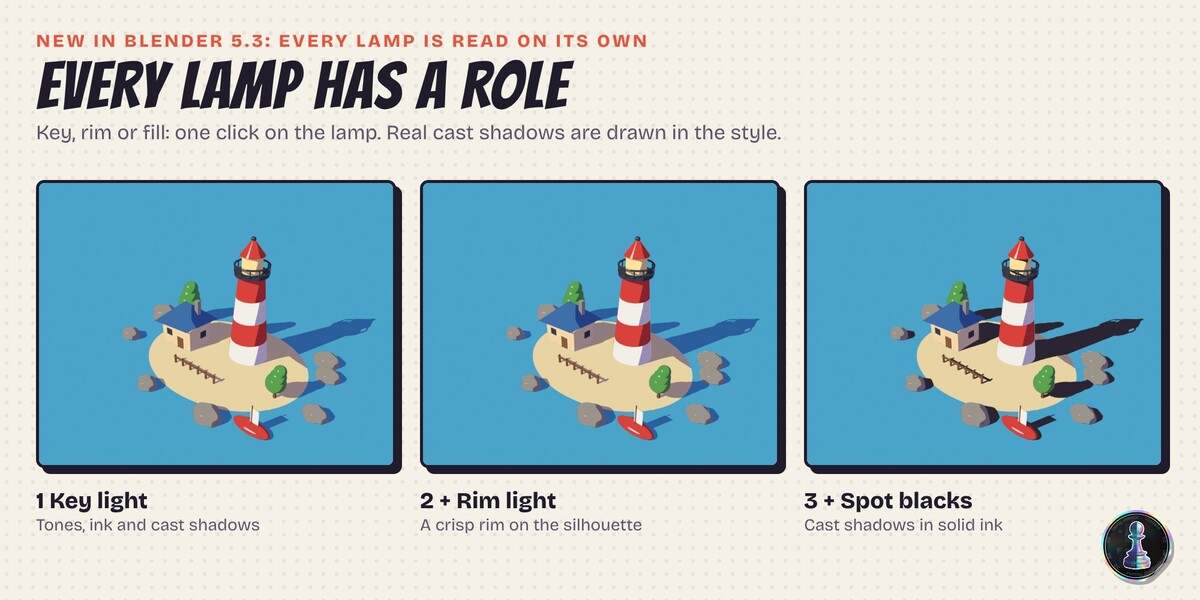
- Light roles. Every lamp is a Key (shapes the tones and the ink), a Rim (only draws a crisp rim on the silhouette) or a Fill (softly lifts the colour). One click on the lamp, nothing to rewire.
- Spot blacks. Fill cast shadows with solid ink, the classic comic and noir trick, while the form shadows keep their hatching.
- Coloured lamps tint the tones like a golden hour or a neon club, if you want them to.
- Projector hatching. Each lamp can project the ink like a slide projector: the lines run across every object in the same direction, stay put when the camera moves and turn when you turn the lamp.
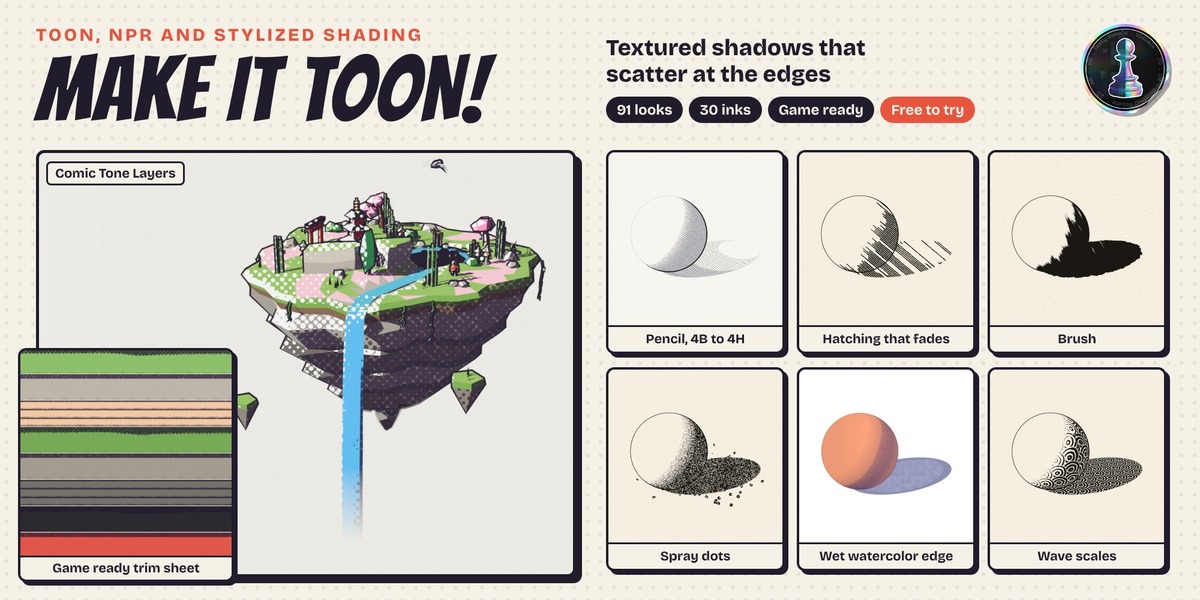
- Shadows that fade and pool. Shadow Fade makes a cast shadow darkest where it touches the object and lighter as it runs away, like a pencil lifting off. Edge Pooling gathers pigment on the inside edge of a shadow, the dark rim of a wet watercolour wash. Hatching thins out stroke by stroke, the way a hand does, instead of fading like a gradient.
- Brushy shadow edges. Cast shadows and the terminator break up like dry brush strokes, one slider.
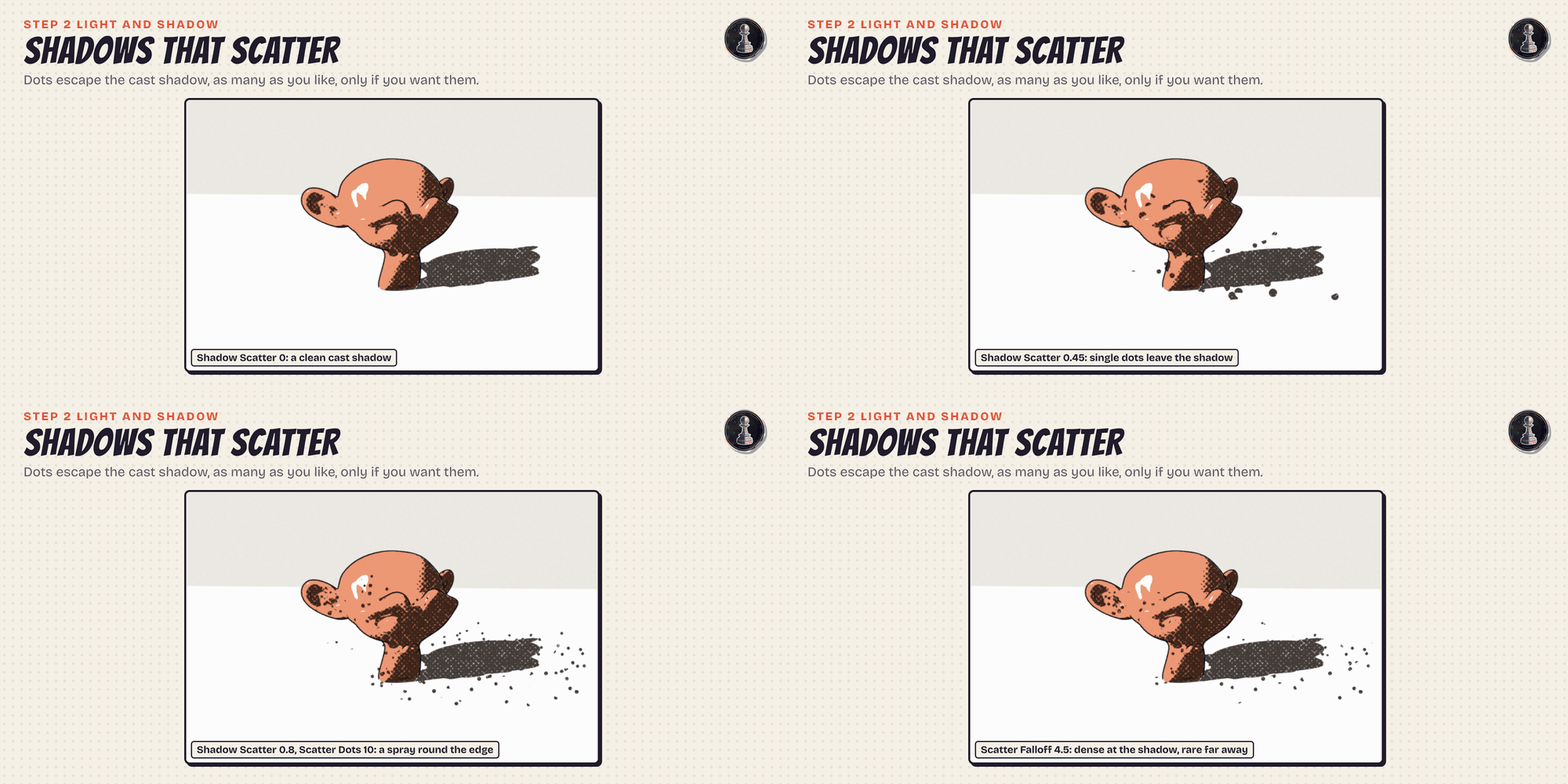
- Shadows that scatter at the edges. Shadow Scatter makes every cast shadow throw a spray of round ink dots around itself, dense next to the shadow and rarer far from it (Scatter Falloff sets how fast), like ink flicked from a brush or a stipple drawing. Each dot looks up the real shadow a random step away, per lamp, so the spray follows the lamp when you move it.
- Strokes that turn with the lamp. Hatching can take its angle from the direction of each light as the camera sees it, so moving a lamp re-draws the strokes.
- A contour line that knows where the light is. The shader draws its own outline, thin on the lit side and heavy on the shadow side, the first rule every inker learns.
- Contact lines with the new Raycast node. A short ray finds where two surfaces almost touch and the gap takes solid ink, the line illustrators draw under a cup or along an arm resting on the body.
- Caustics drawn per lamp. Glass on paper throws a rainbow fan or a rippling web of light that lands inside the glass's own shadow, read for every lamp with the new Shadow Raycast and Light Info nodes.
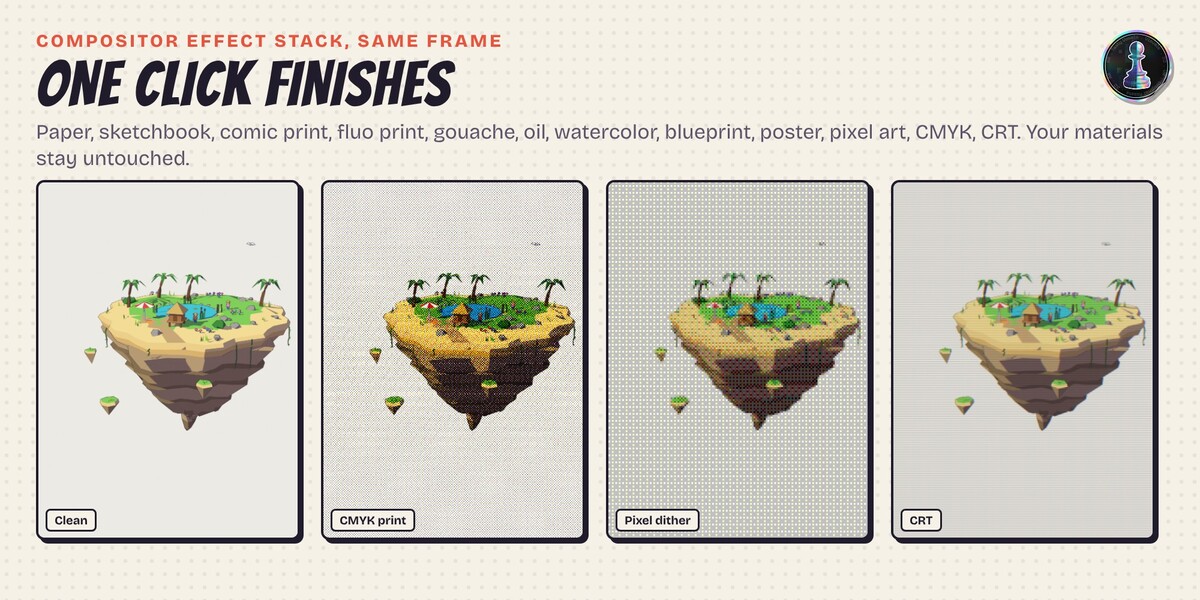
- Finishes on the new compositor effect stack. Paper, halftones, dither, CRT, film lens and a glitch that follows the scene frame, stacked like modifiers on the final image.
- The painter's shadow family. A darker core shadow along the terminator, then reflected light lifting the far side of the shadow, read per lamp from its real angle to the surface.
Designed shadows, not stacked layers
The usual complaint about 3D cel shading is the layer cake: many posterized bands that follow every small bump of the mesh, crawl when the camera moves and look like a cheap filter. Illustrators design a few big shadow shapes instead. Make it Toon! gives you the tools they use: Simple shadow shapes bends the light normals toward a clean volume (the normal trick of anime productions, without editing a single normal by hand), two tones by default with a crisp terminator, a cool shade colour instead of a darker copy of the base, a core shadow, reflected light and ink in the crevices. Posterized looks are still there, when you want that style on purpose.
Seven steps, one panel
The Toon tab in the 3D view sidebar is laid out as seven boxes, top to bottom: 1 Look, 2 Light and Shadow, 3 Style, 4 Lines, 5 Strokes, Effects and Motion, 6 Finish, 7 Bake and Export. You can stop after step 1, the look is already complete. Every slider is also an input of one node group inside the material, so you can keyframe it or open it in the Shader Editor.
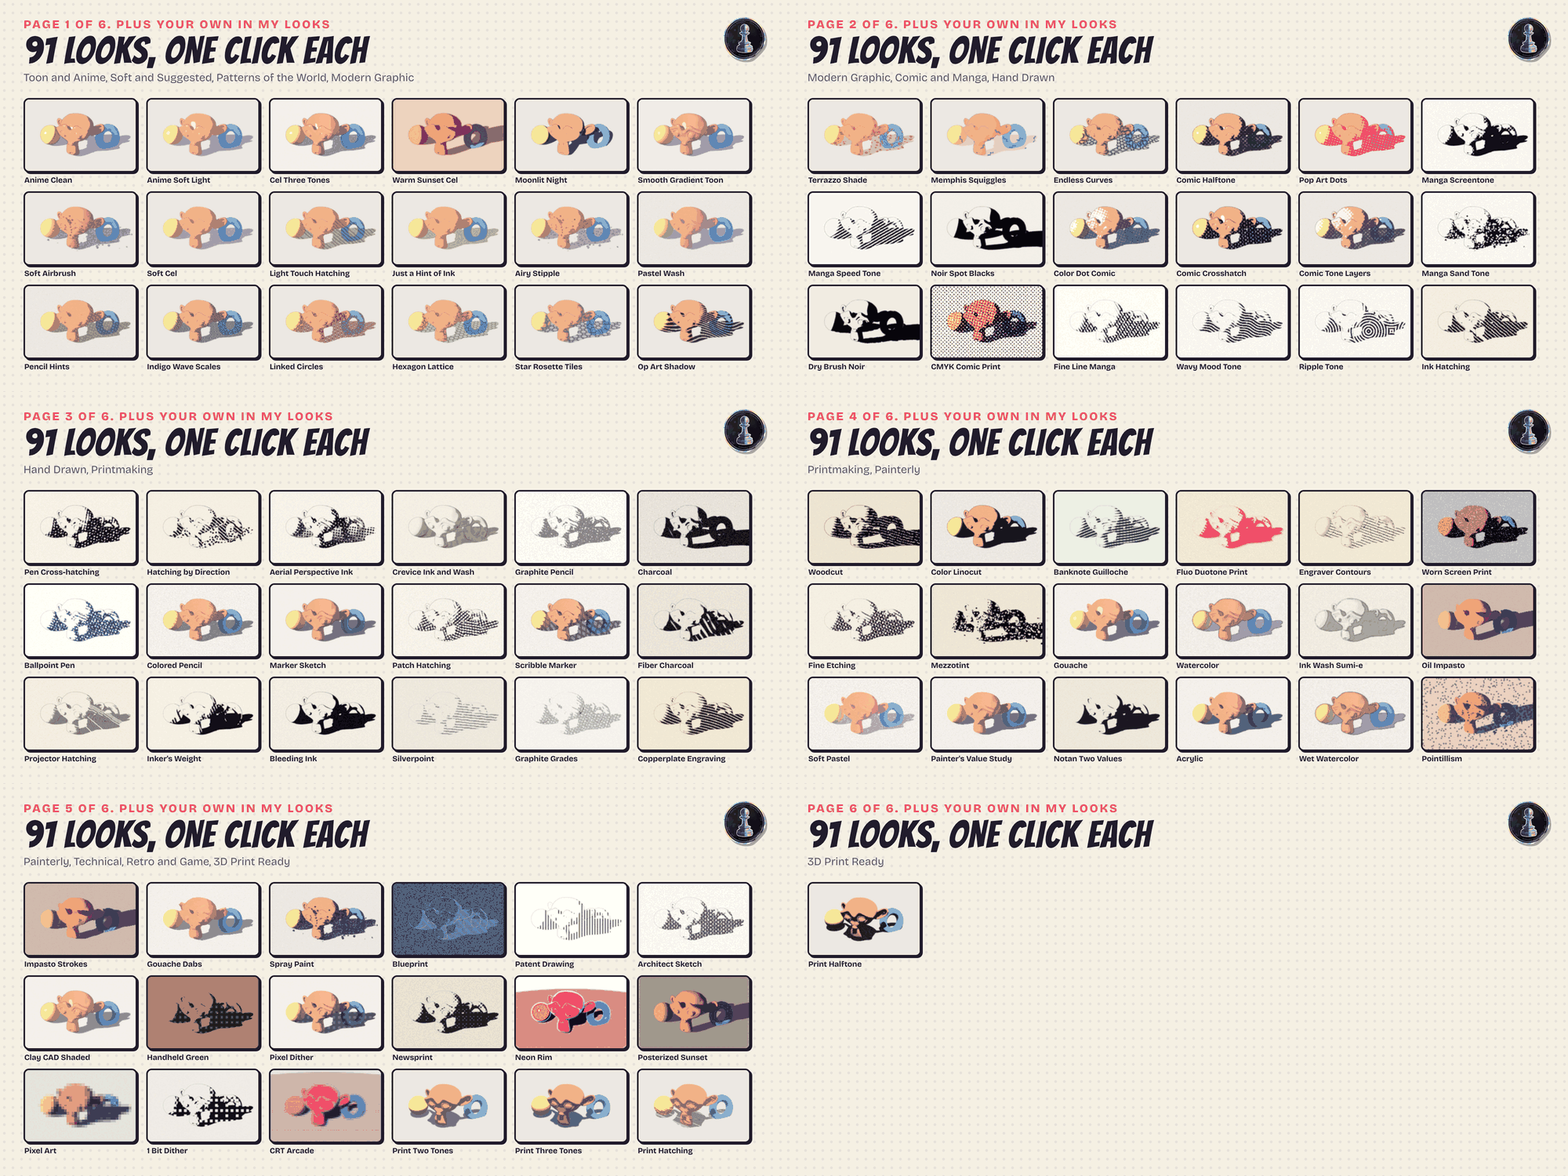
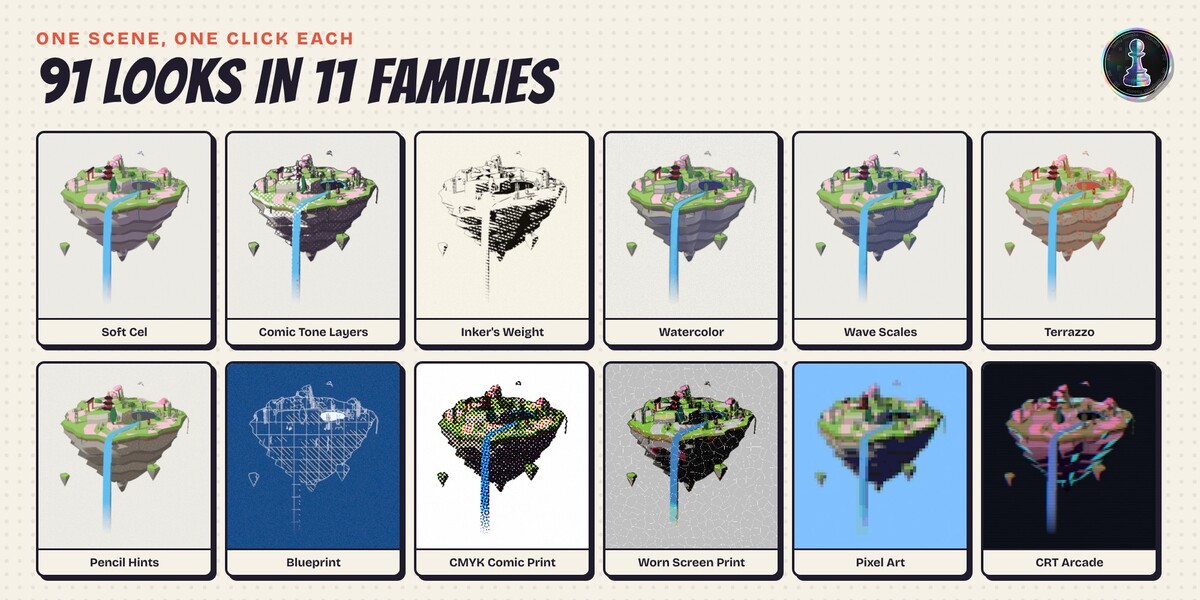
91 looks in 11 families, plus your own
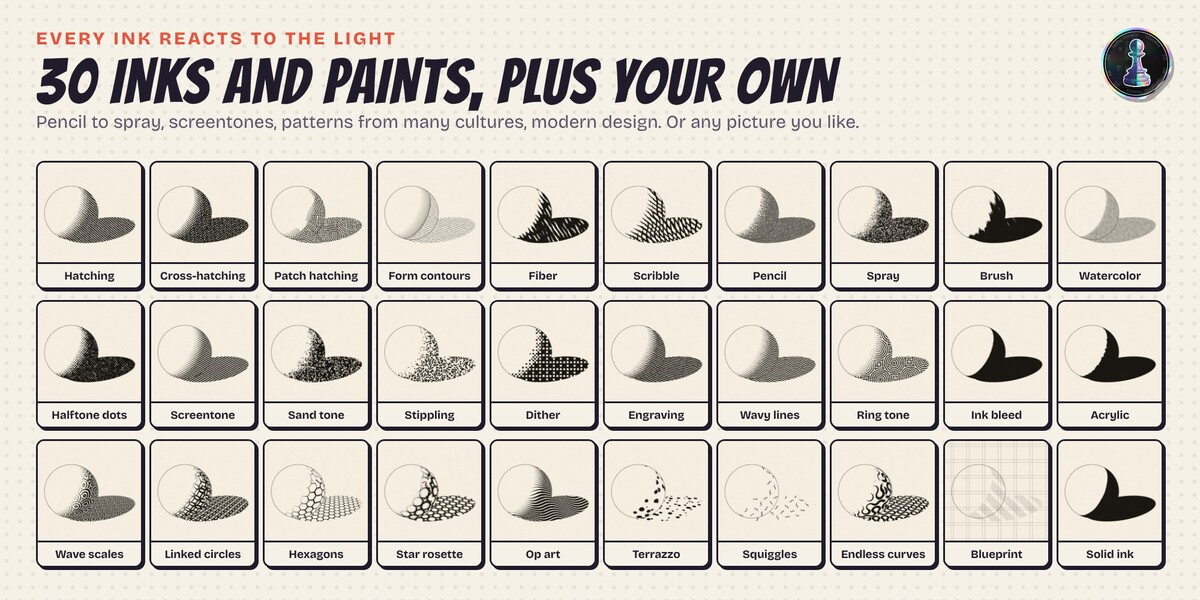
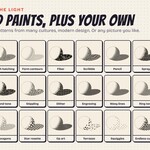
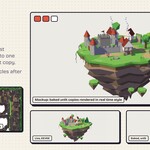
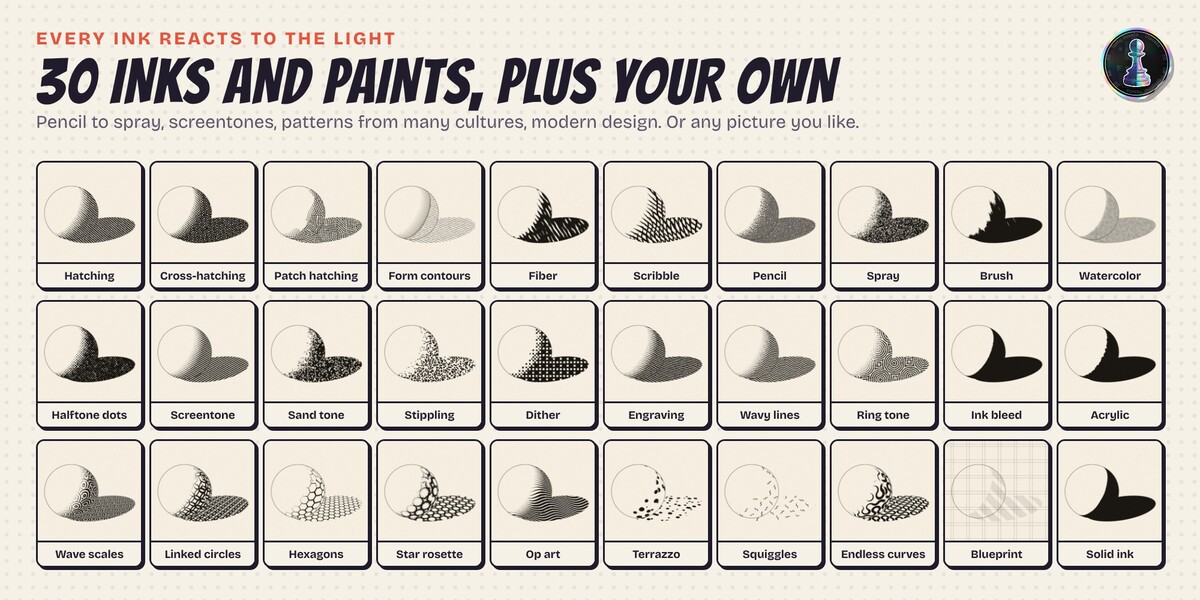
Toon and Anime, Soft and Suggested, Patterns of the World, Modern Graphic, Comic and Manga, Hand Drawn, Printmaking, Painterly, Technical, Retro and Game, 3D Print Ready. Soft and Suggested is for people who find heavy blacks too hard: mid tone shadow colours, ink only where the form turns, never a black flood. Patterns of the World draws the shadow in classic ornament (wave scales, linked circles, hexagon lattices, star rosette tiles) laid on the surfaces like printed cloth. Modern Graphic does the same with op art waves, terrazzo chips, squiggles and endless curves. Duplicate any look to My Looks and make it yours: it is there in every project, and you can export it to a file to share with your team. One switch puts any look's patterns flat on the picture or on the surfaces, in perspective. Each look sets the ink, the tones, a light rig facing your camera, the outline, the paper and a compositor finish. Pen and paper looks repaint the scene in paper and ink; colour looks keep your colours and your Base Color textures, alpha cut-outs and normal maps.
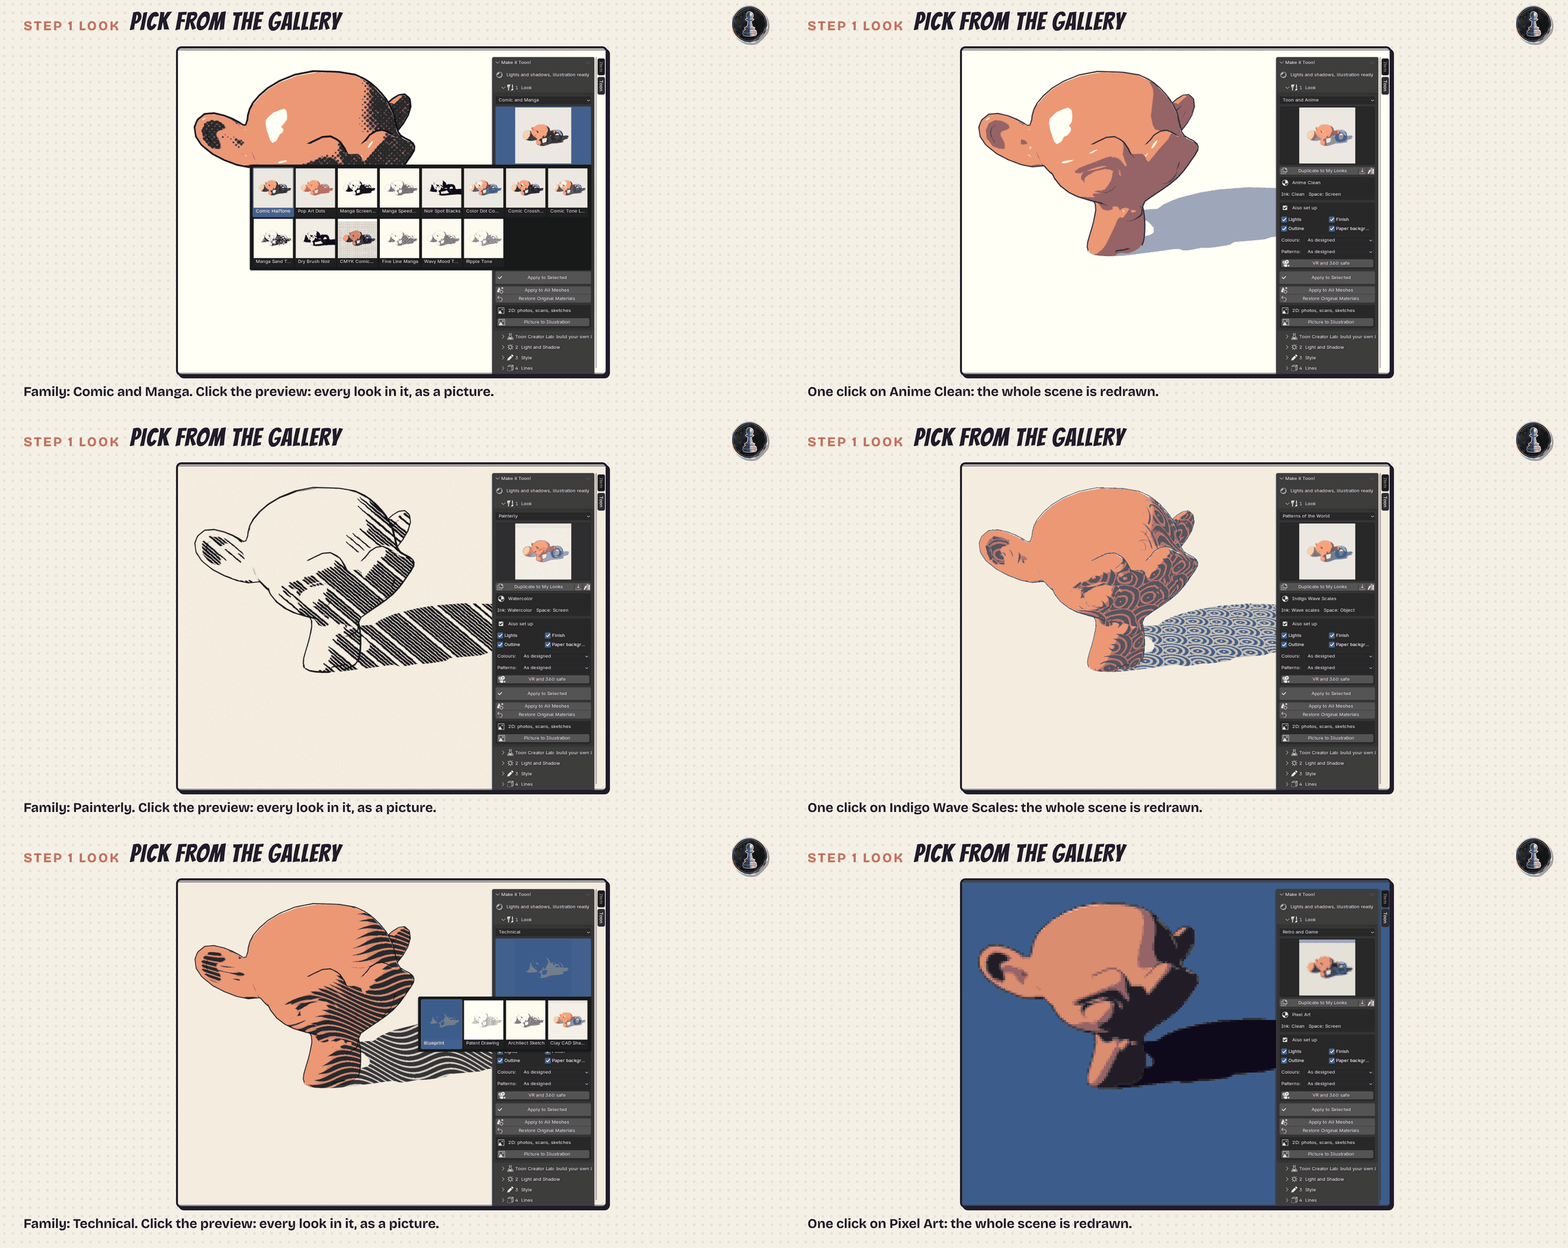
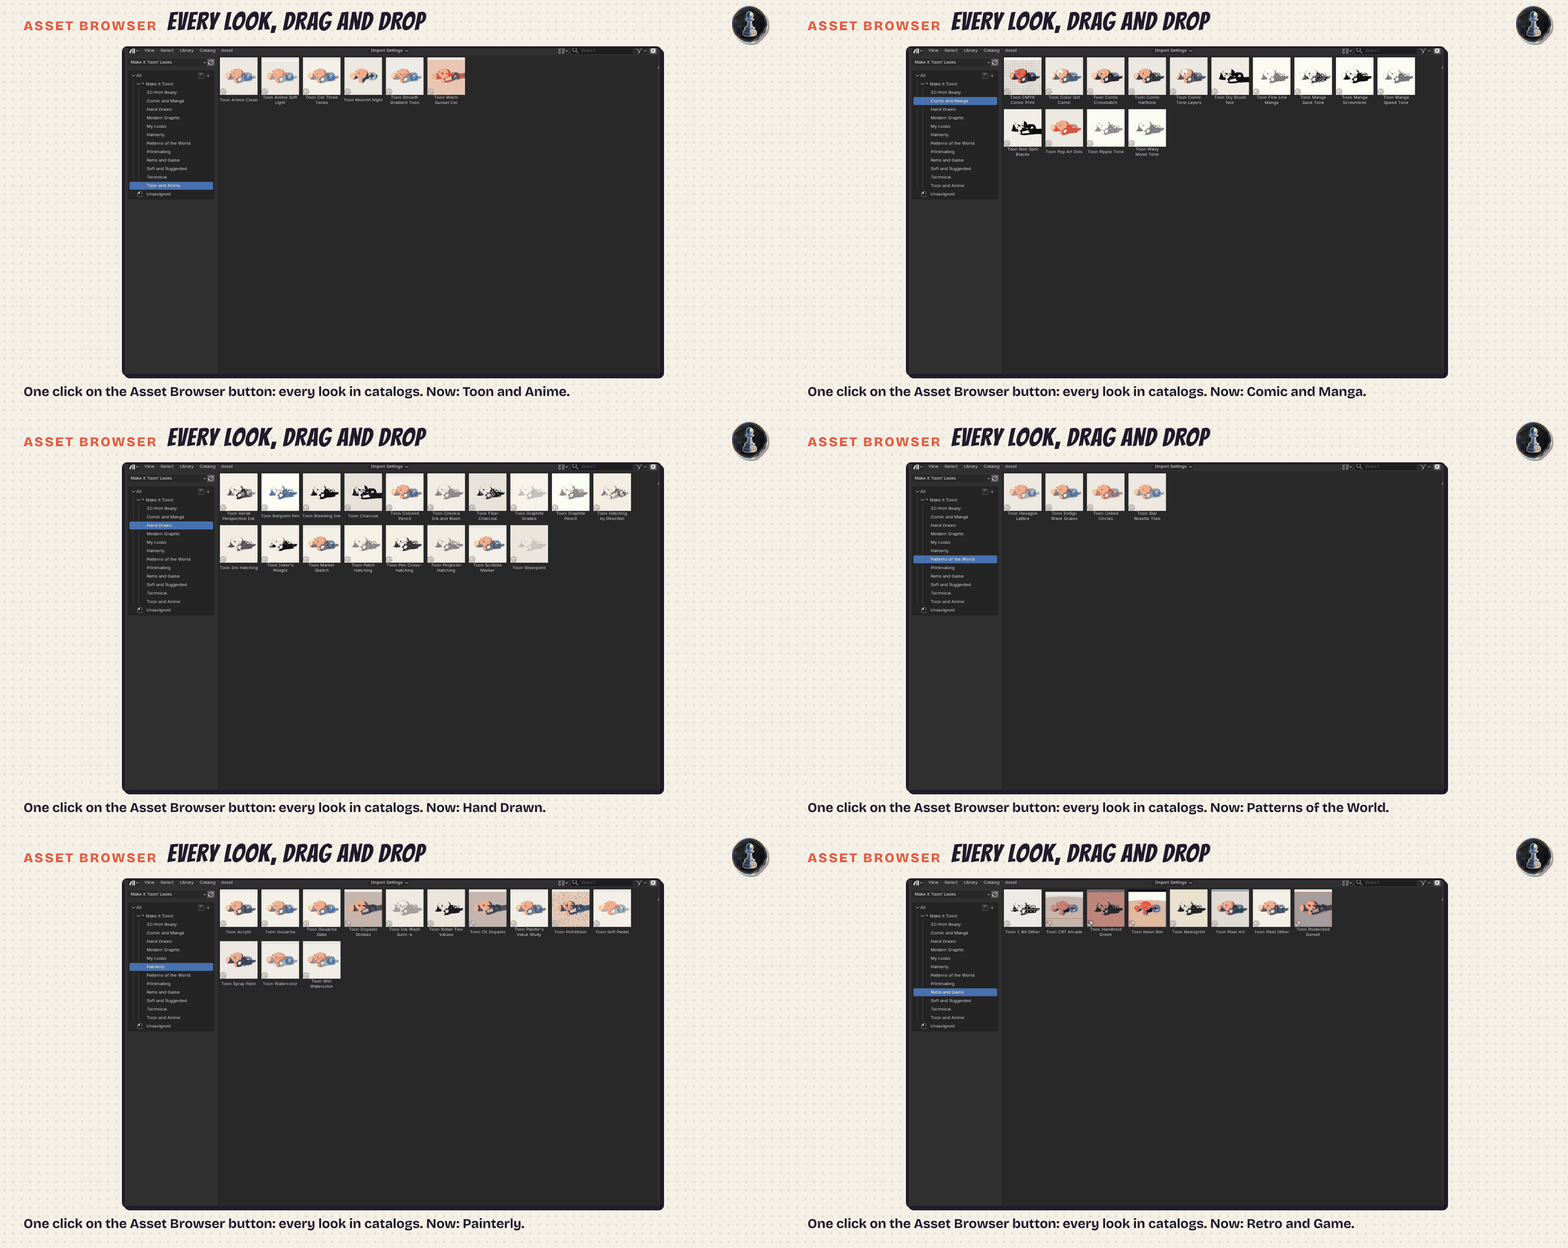
Every look in the Asset Browser. One click on the Asset Browser button next to the gallery puts all the looks (and your own from My Looks) in Blender's Asset Browser, sorted in catalogs by family with their previews. Drag a look onto any object: it arrives as a normal material and reconnects to your scene and camera by itself.
Toon Creator Lab: build your own look in six clicks
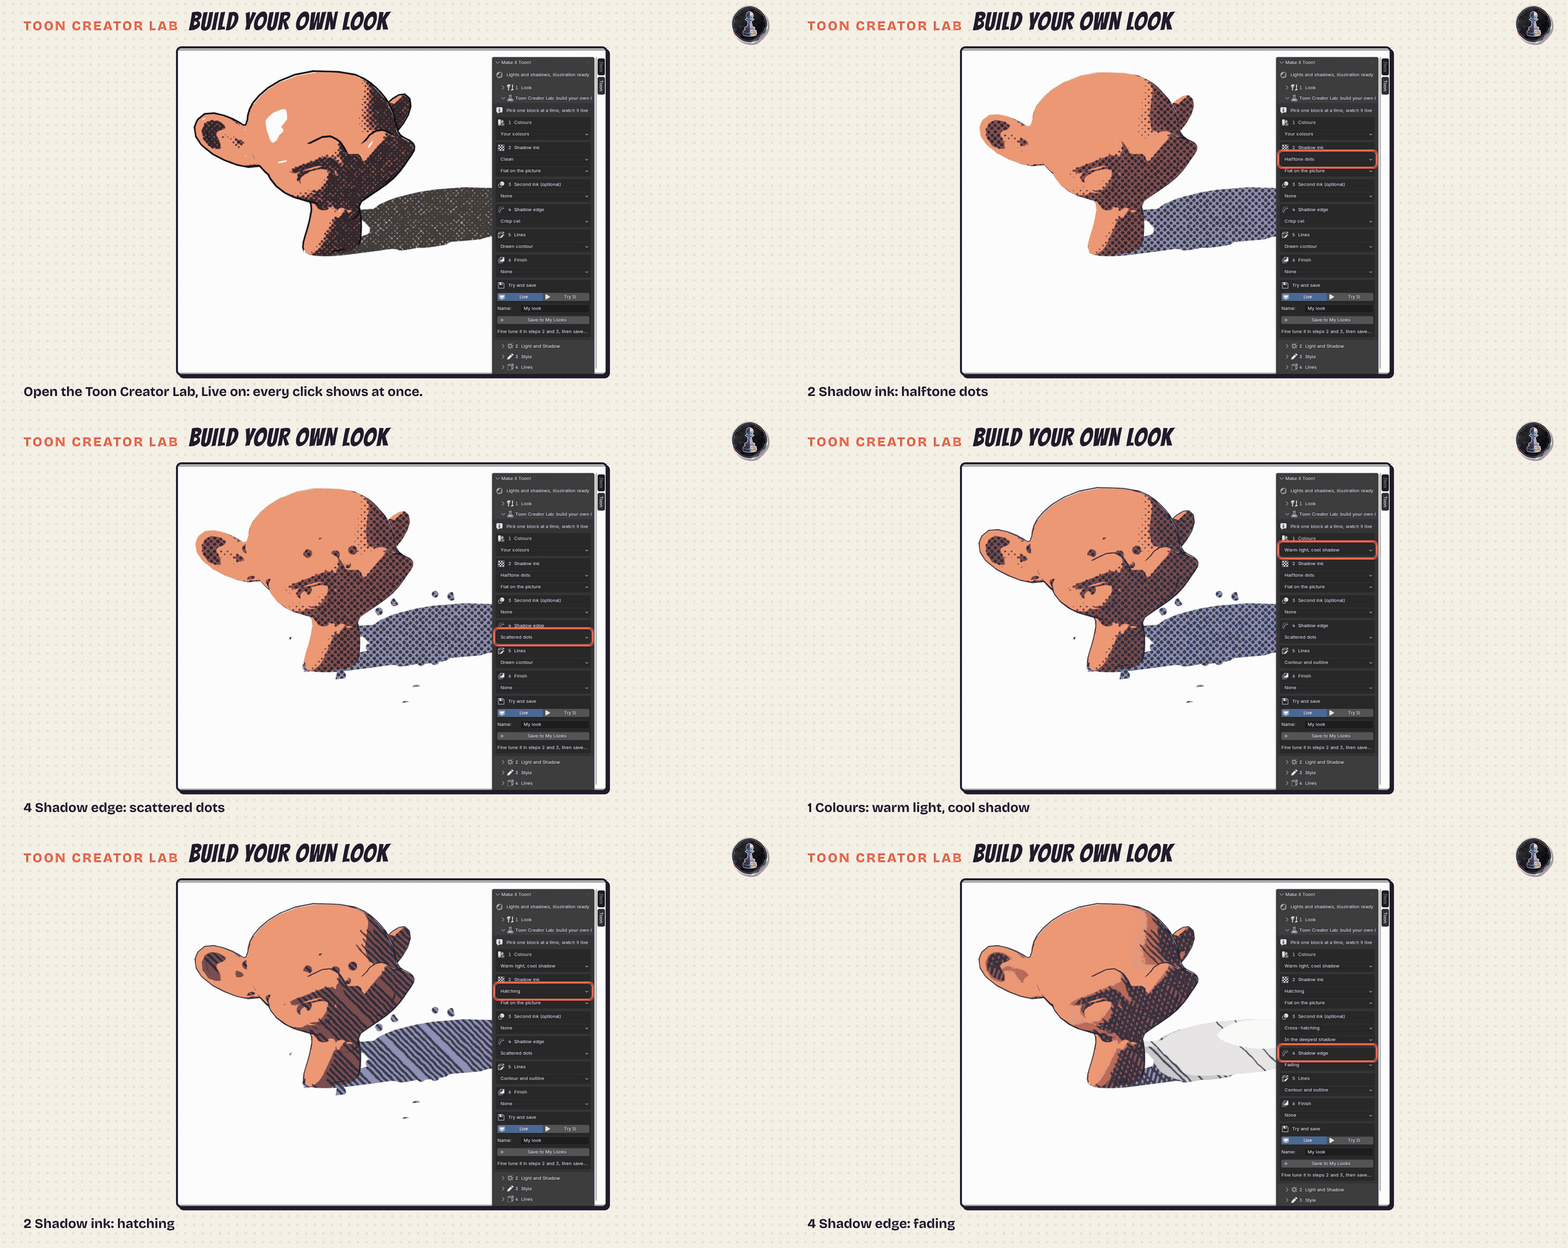
Do not want to browse 91 looks? Build yours. The Creator Lab is six building blocks, one choice each, and every change shows live on the chosen objects: 1 Colours (your colours, paper and ink, graphite, warm and cool, pastel, night, blueprint, duotone, sepia), 2 Shadow ink (any of the 30 inks, flat on the picture or on the surfaces), 3 Second ink and where it takes over, 4 Shadow edge (crisp cel, soft, dry brush, scattered dots, fading, wet pooling), 5 Lines and 6 Finish. Name it and save it to My Looks: it is there in every project, and you can export it to a file for your team.
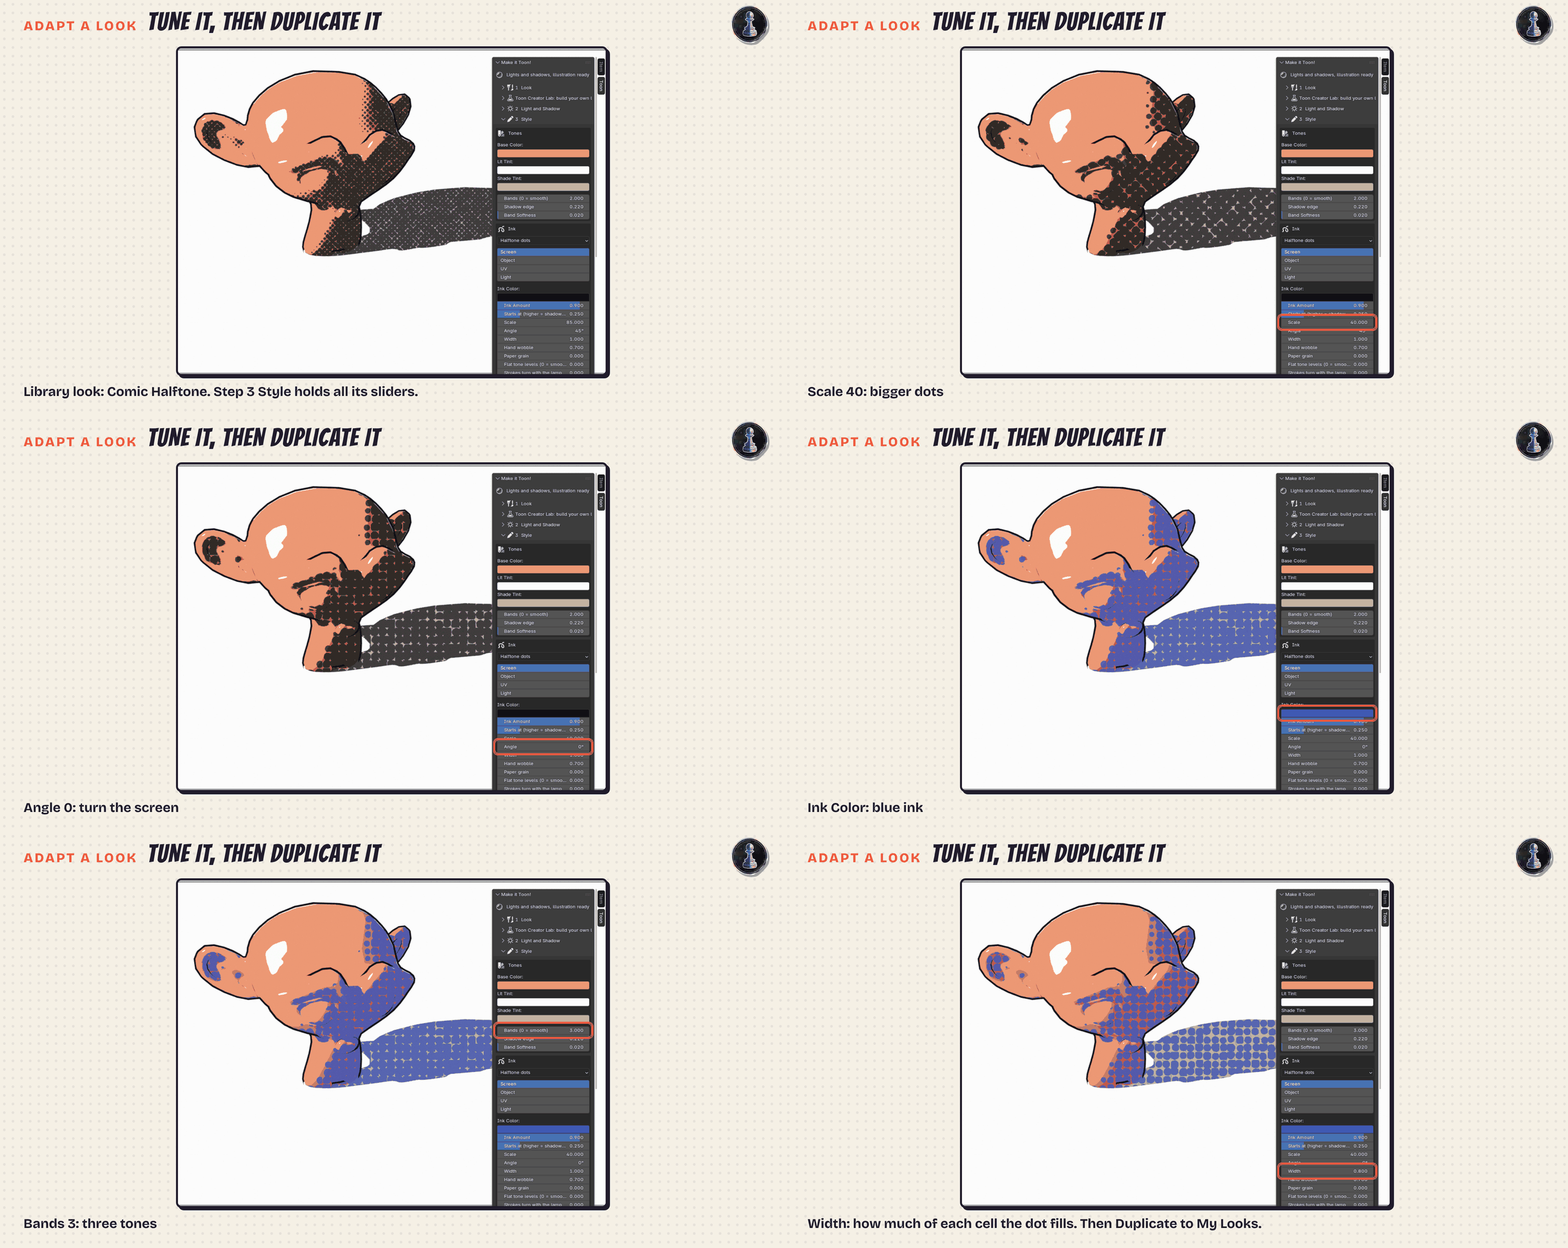
Or start from the library: pick any of the 91 looks, change what you like in steps 2 and 3, and press Duplicate to My Looks. The original stays as it was; your copy is yours to keep tuning.
30 inks and paints, plus any picture you like
Hatching, cross-hatching, patch hatching, spray and airbrush, wavy line tone, concentric tone, wave scales, linked circles, hexagon lattice, star rosettes, op art waves, terrazzo, squiggles, endless curves, form contours, fiber hatching, scribble, halftone dots that can break the mechanical grid like hand placed or worn screens, screentone lines, sand tone, stippling, ordered dither, engraving, brush strokes, pencil, watercolor, ink bleed, acrylic, blueprint grid and solid ink, or clean tones only. Each medium has its own edge: watercolor keeps soft edges while wet and dries with a darker rim, granulation and blooms; ink is crisp and feathers into the paper fibres; acrylic is opaque, with bristle streaks dragged along the stroke. Layer a second ink for the deepest shadows (dots in the mid tones, cross-hatching or solid black in the dark), or let the second ink take over by place instead of by darkness: on faces looking up or down, on edges turning away, on the low parts, far from or near the camera, in crevices, on ridges and bumps, or as the light falls off away from the lamp. One sphere can be stippled on top and hatched on the sides, and far hills can switch to dots like aerial perspective in ink, add light dots in the highlights, snap the tone to flat screentone levels, let crevices take ink like a pencil would, and draw the contact line where things touch (a cup on the table, an arm against the body), found with the new Raycast node of Blender 5.3. Screen patterns never get finer than 6 pixels, so small renders keep clean dots and lines instead of grey noise. Every pattern has scale, angle, line width, hand wobble and paper grain, and starts where you tell it to. Patterns can sit on the screen like printed paper, stick to the surface with a triplanar projection that needs no UVs, follow your UV map, or be projected by the lamps. Line boil redraws the wobble on twos for hand drawn animation.
Real brush strokes, animated effects, wind
- Brush strokes made of geometry. A Geometry Nodes modifier lays stroke cards on the surface, wrapped around the form with random turn, size and length. Each stroke takes the light, shadow and ink of the spot it sits on, with its own bristle edge and a small shift of value, so the object reads as painted. Brush Relief adds the same marks to the light only, like a normal map, without geometry.
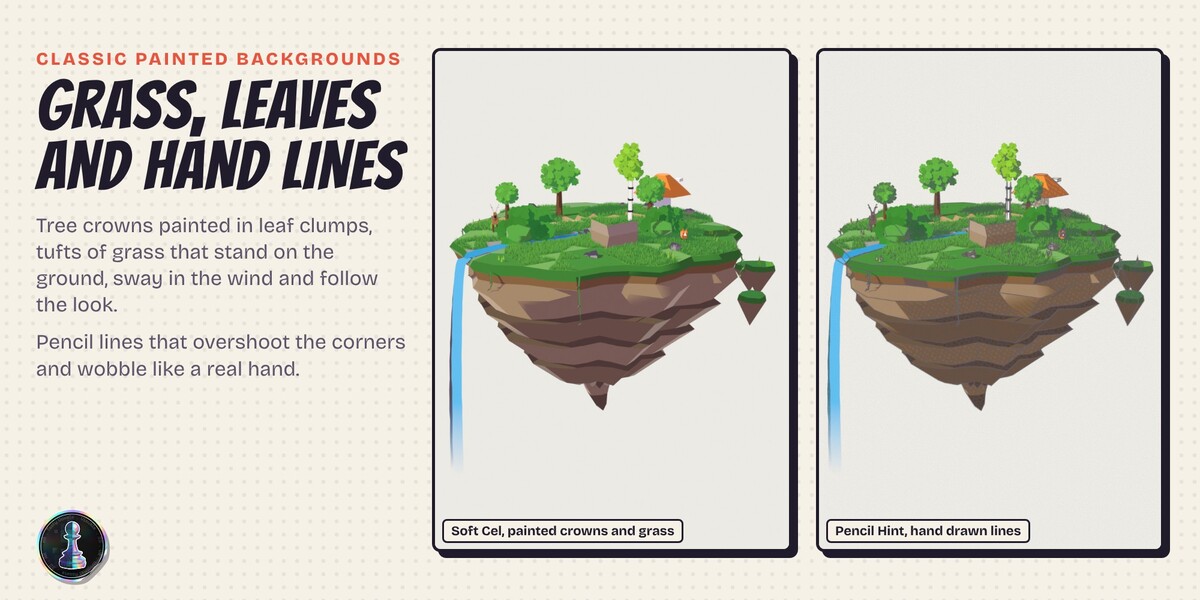
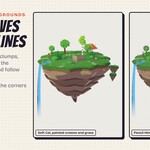
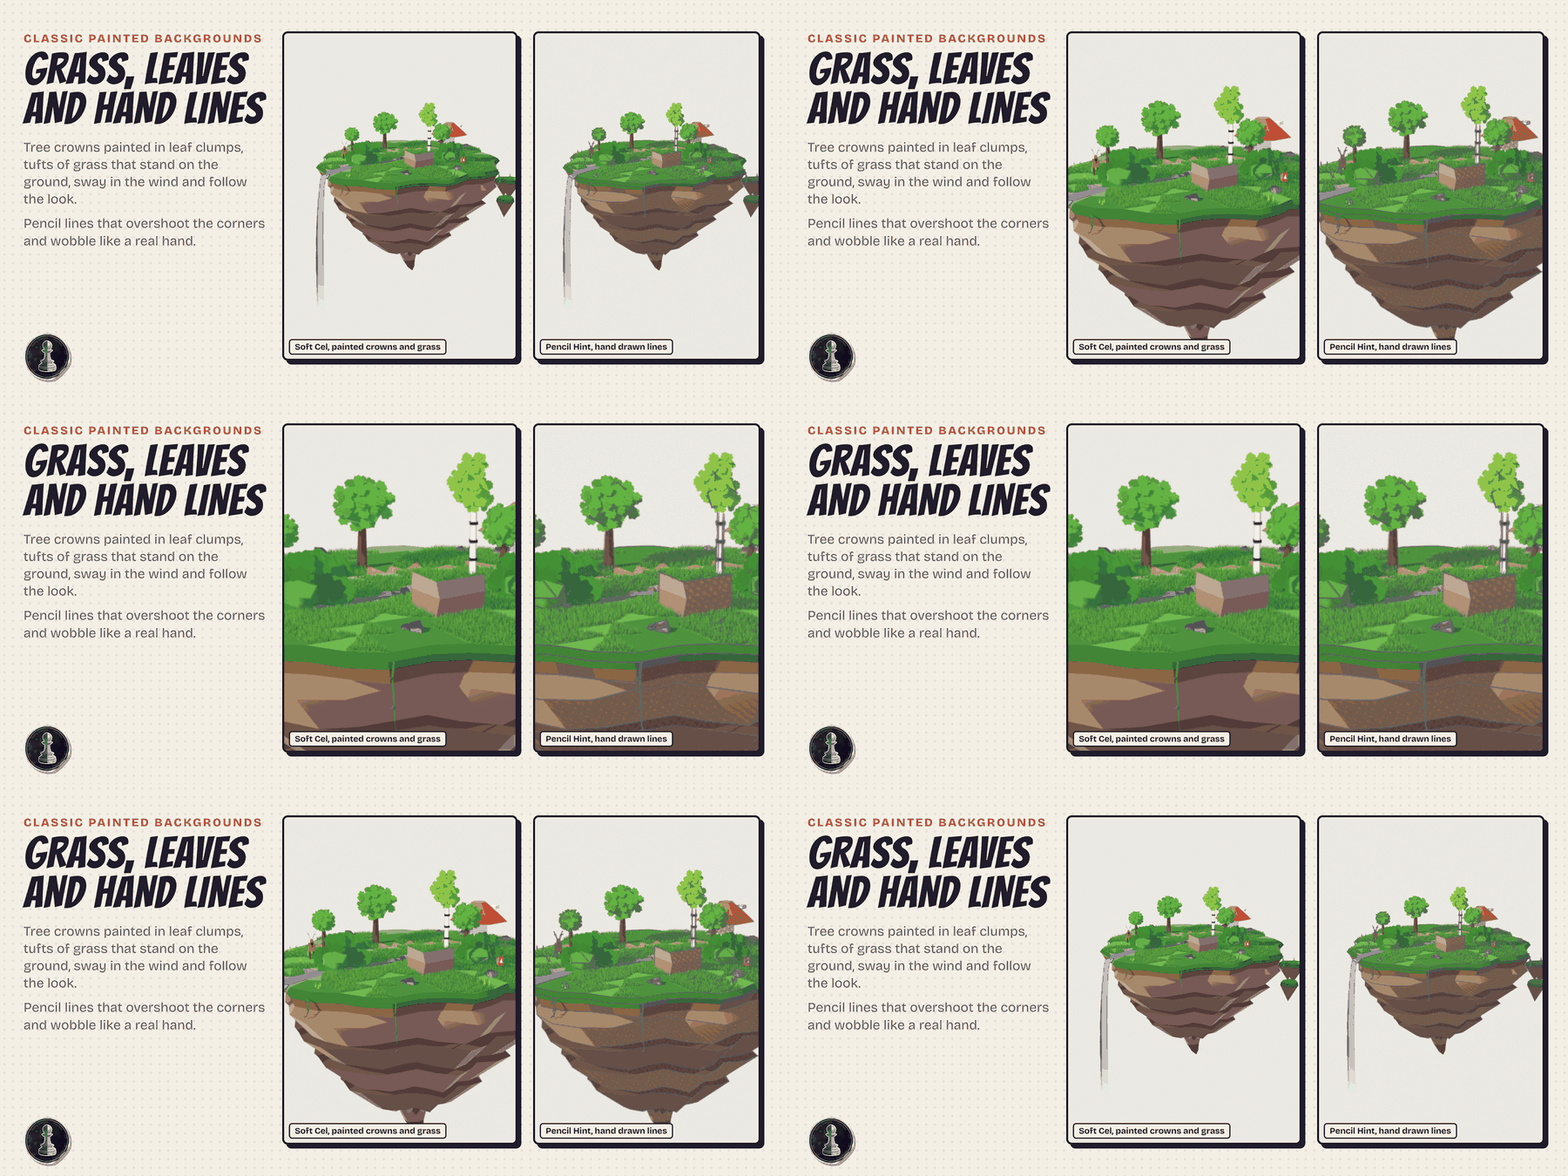
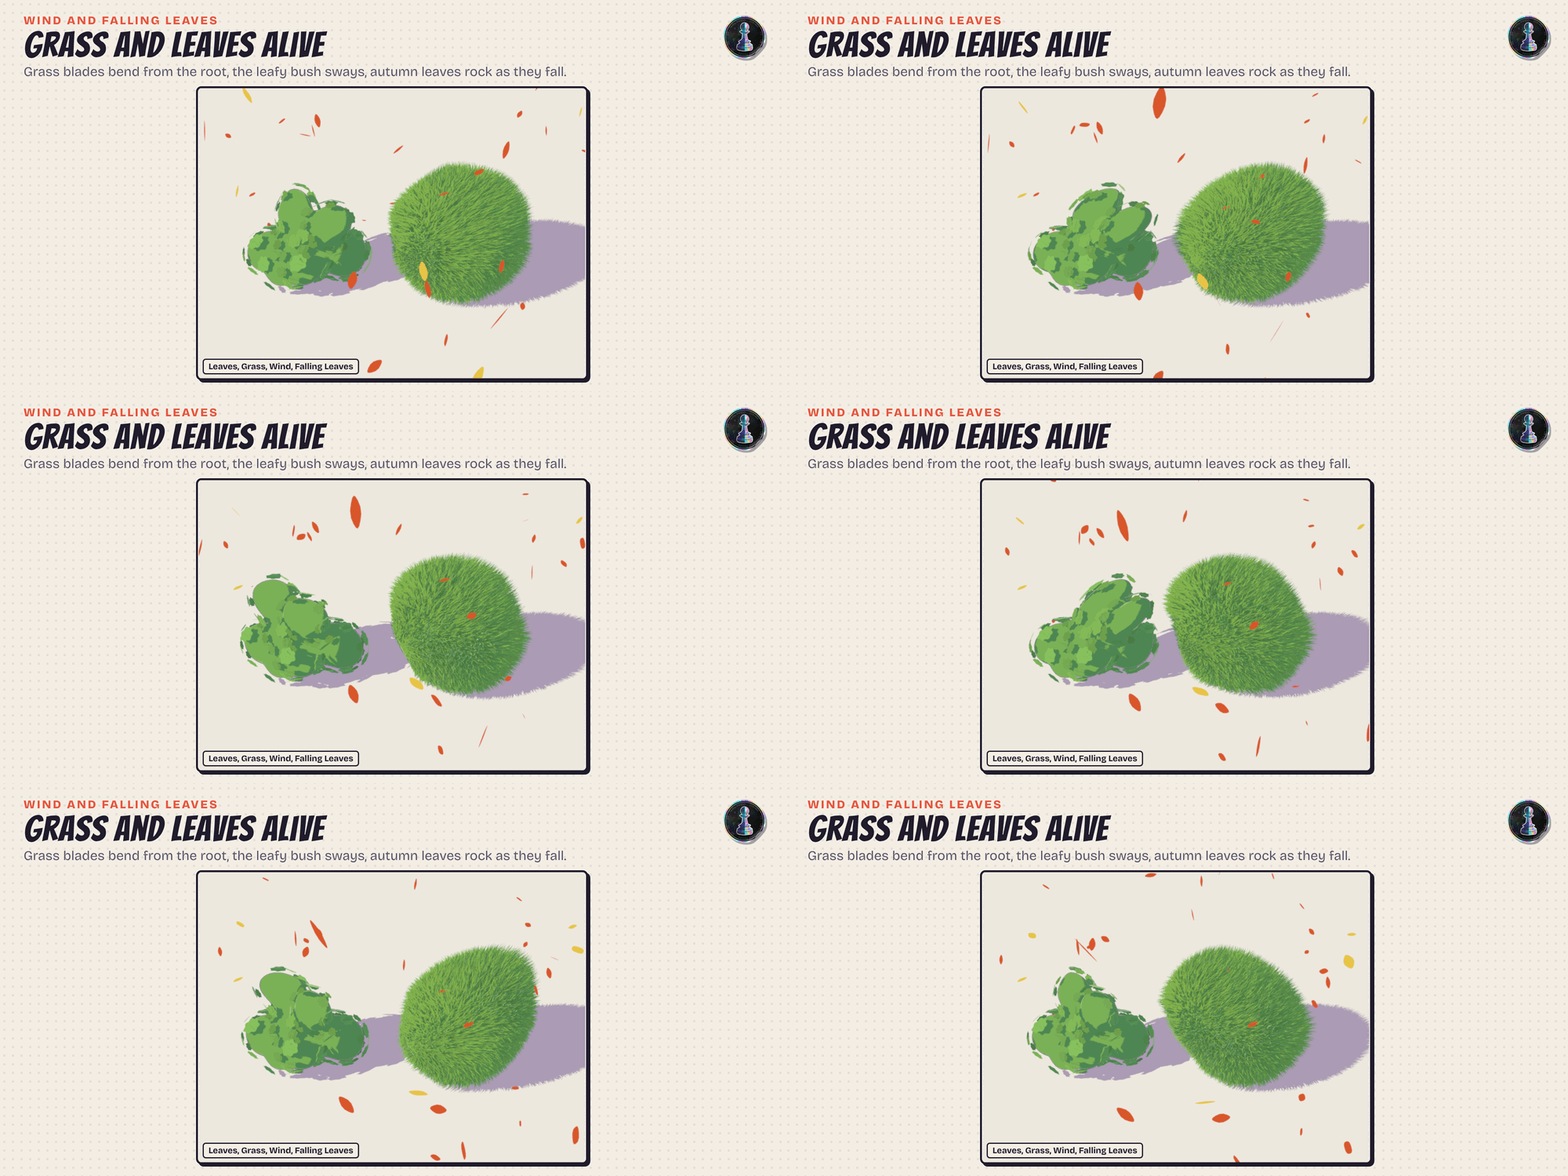
- Grass and painted trees. Grass on Ground grows standing blades in tufts and bare patches, darker at the root and warm at the tip. Painted Crowns cover a tree with big scalloped clumps that turn to the camera and break the silhouette, lit as one simple shape with warm light and cool shadow, the way background painters block in foliage. Leaves does the same with single leaves. Wind makes all of it sway.
- Hand drawn lines. Line Art lines overshoot their ends and curl along the curve like a pencil that did not stop on time, wobble and change width like real pressure, and redraw every few frames. Sketchy goes over each line twice.
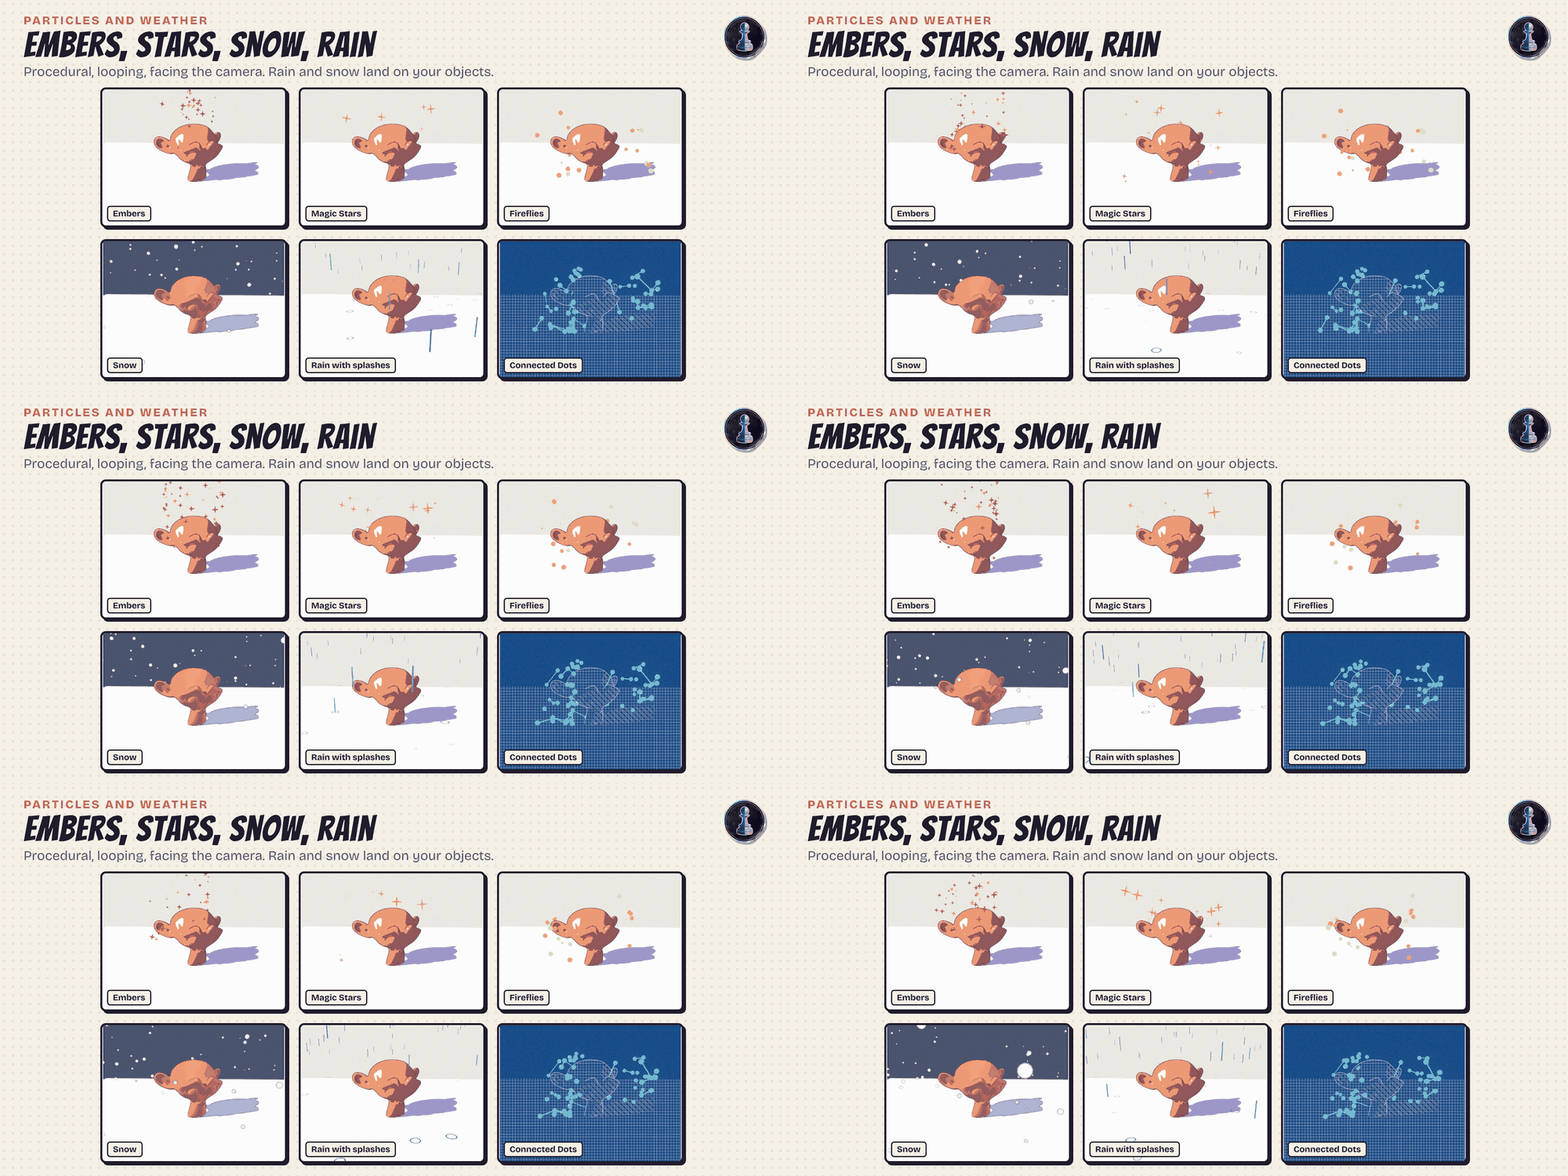
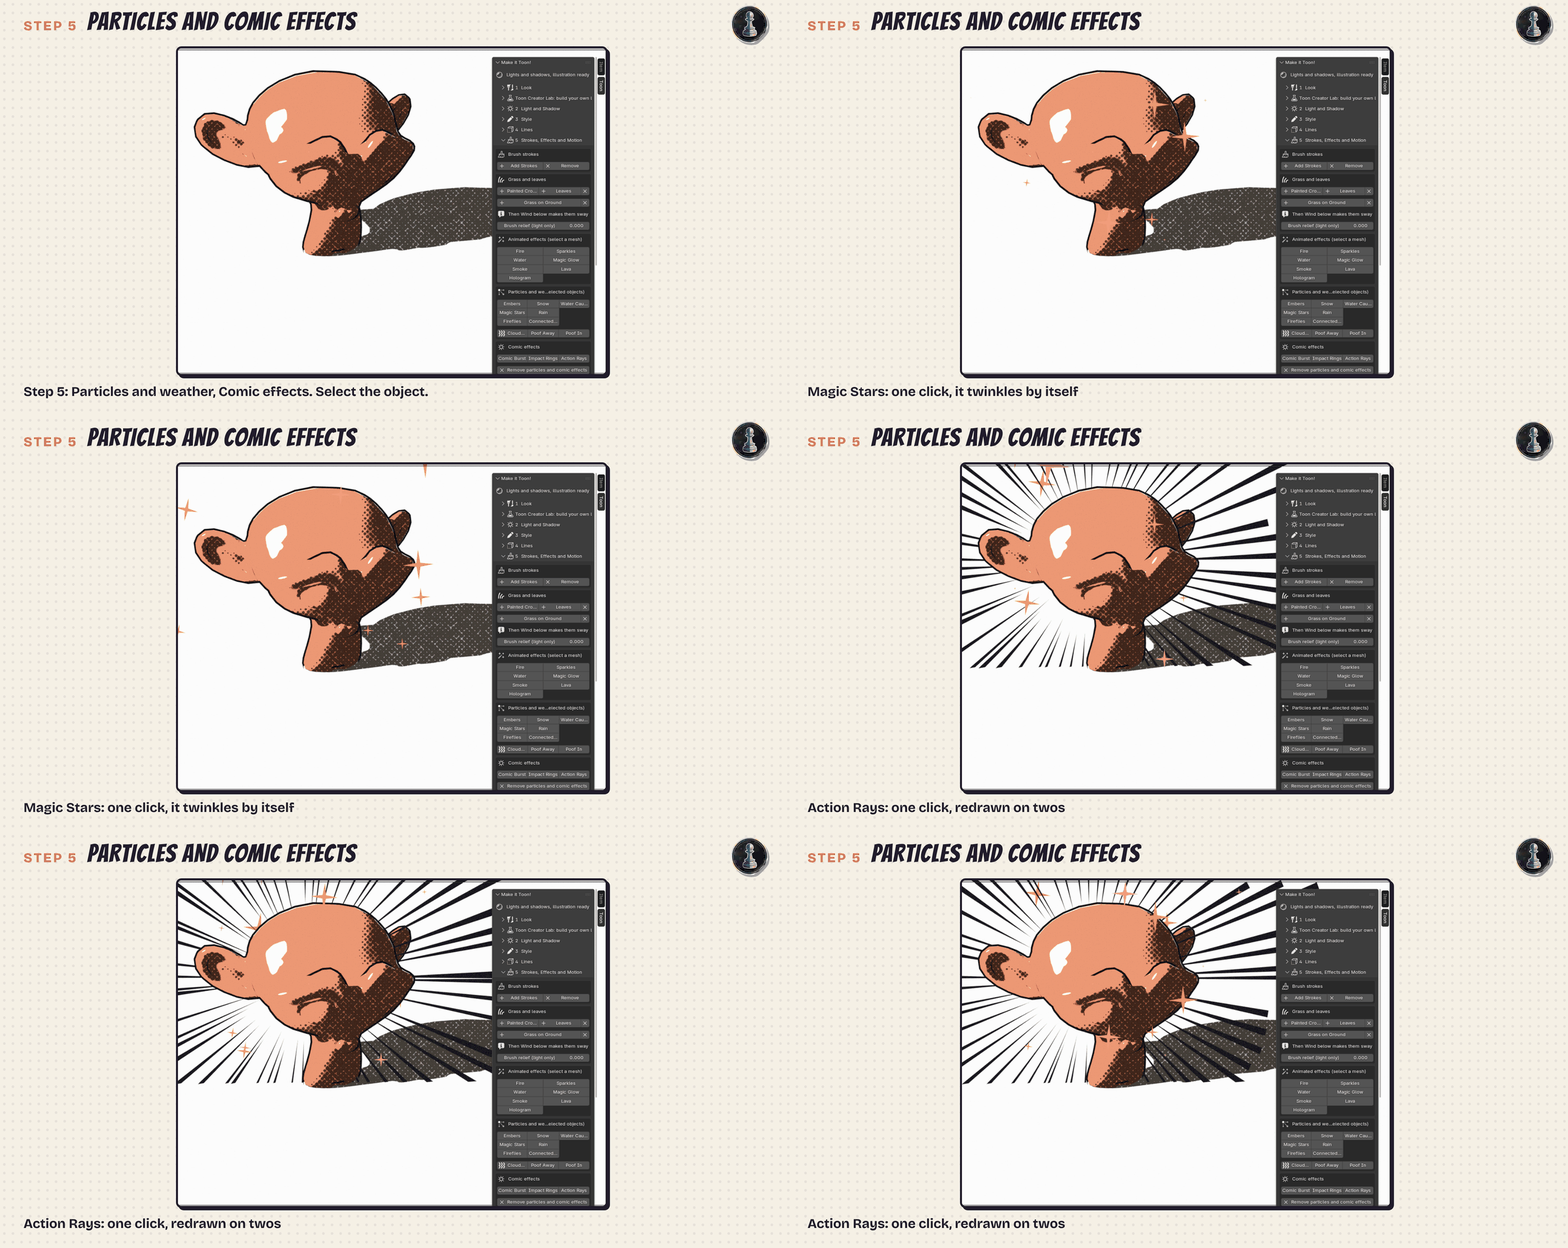
- Particles and weather, all procedural: embers rising and cooling, twinkling magic stars, blinking fireflies, snow that drifts down and stops on whatever it hits, rain that falls onto your objects and opens a splash ring where each drop lands, autumn leaves that rock from side to side as they fall and rest where they land, connected dots that join with lines when they come close, and water caustics: a rippling web of light laid on every surface that faces up, for pools, rivers and aquariums. They loop by themselves, follow the objects when you move them and turn every card to the camera like a drawing. Nothing to simulate or bake.
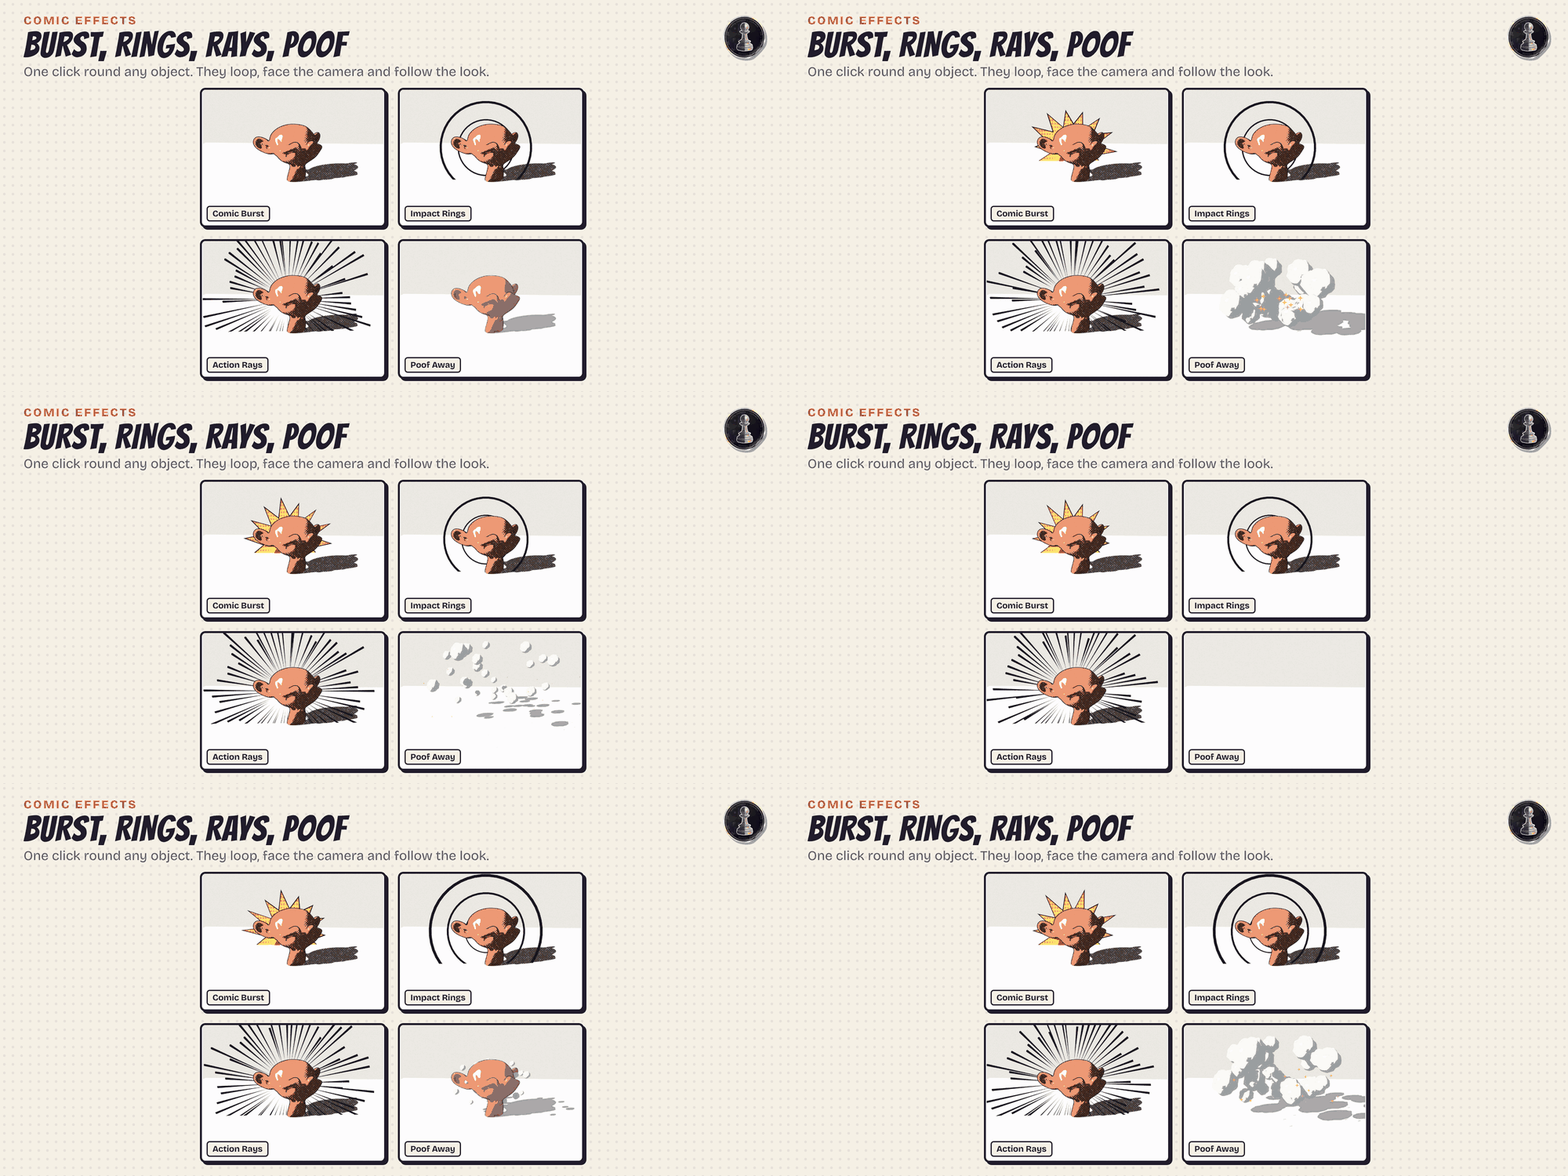
- Comic effects: a jagged explosion behind your character with a halftone fill and an ink edge, impact rings popping out, and radial action rays redrawn on twos. Plus a cartoon Poof: a puff of cloud and sparkles, drawn in the look of your objects, that can hide them (Poof Away) or make them appear (Poof In).
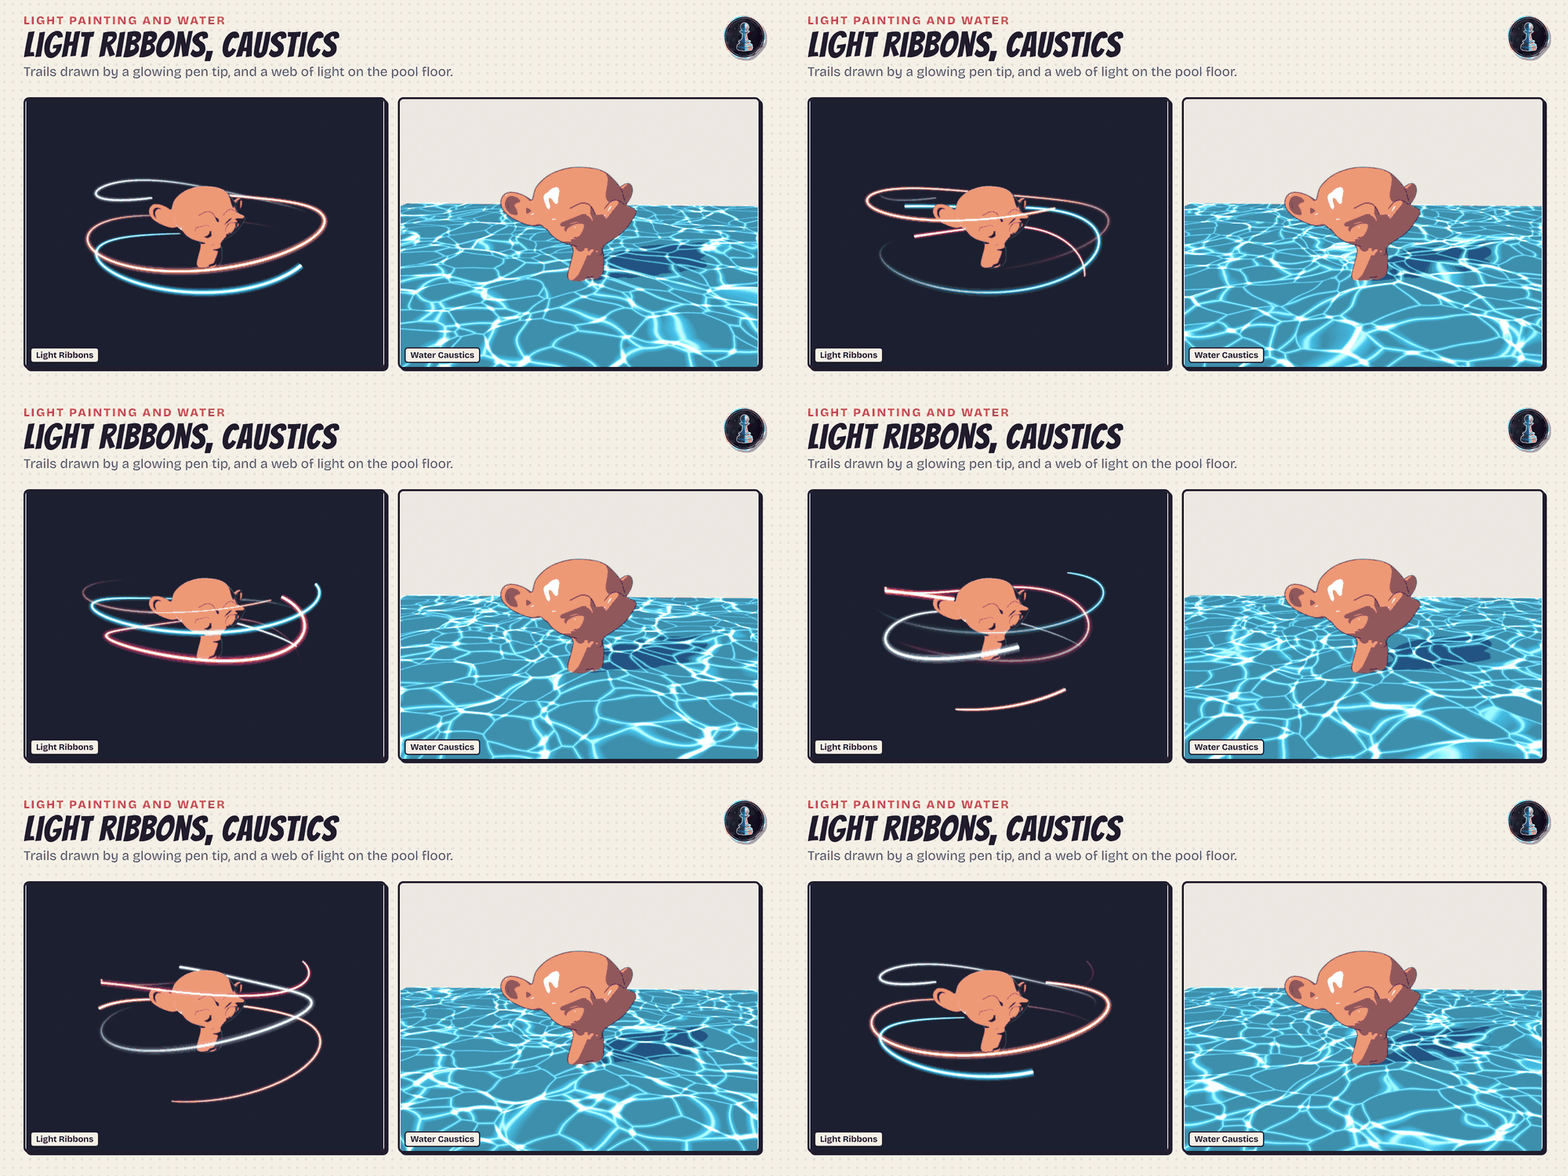
- Grease Pencil manga and light kit: one click gives you a Grease Pencil object ready to draw with manga ink (G-pen, brush pen, white out, non-photo blue pencil, screentone and black fills, with a line boil on twos), or with light: glowing neon, gold, rainbow and marching sparkle strokes in space, like painting in VR. Light Ribbons loop round your objects like light painting: each trail is drawn by a bright head with a soft halo and leaves a fading tail, and the trails take turns so there is always light in the frame.
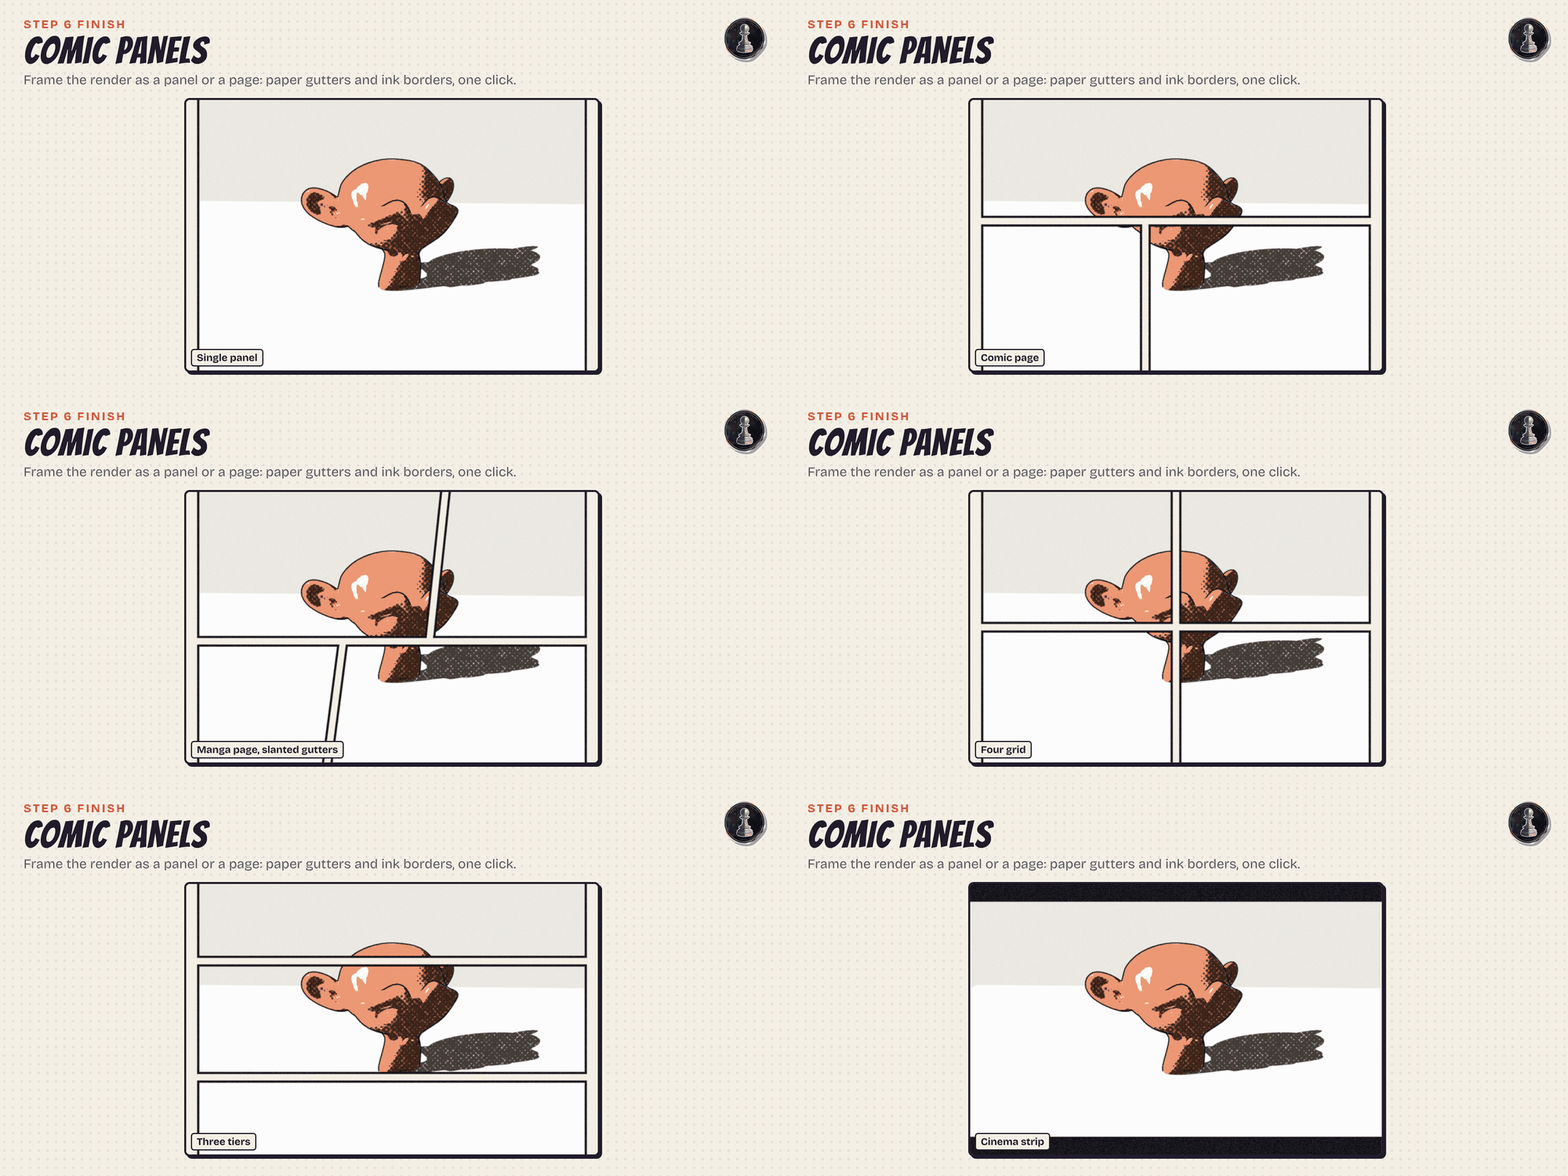
- Comic panels: frame the render as a single panel, two side by side, three tiers, a comic page, a four grid, a manga page with slanted gutters or a cinema strip: paper gutters and ink borders in front of the camera.
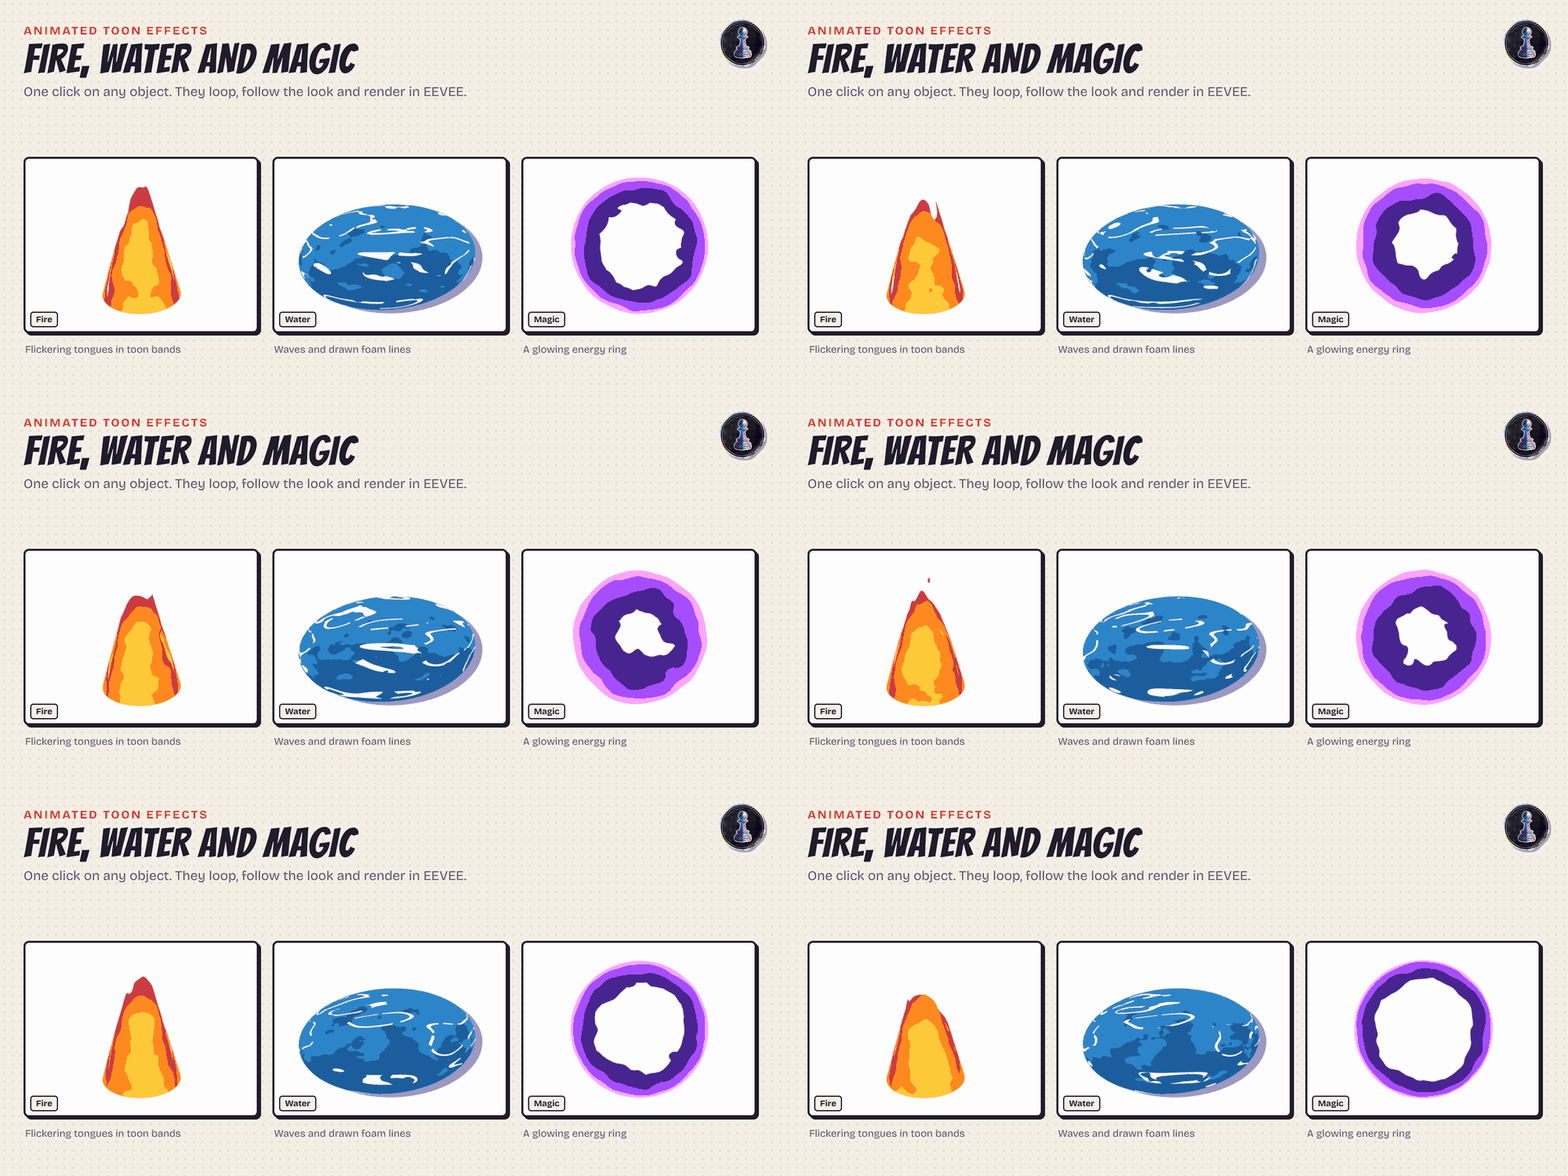
- Seven animated toon effects: fire, water, smoke, hologram, sparkles, magic glow and lava, drawn in flat bands and held on twos like hand drawn effects.
- Wind for leaves, grass, hair and fur: the tips sway, the roots stay put, on twos.
- Making-of timelapse: one click keys the contour, then the ink spreading, then the colour filling in, then the paint drying.
- Ink only in the shadows, or only the ink. Every pattern starts where you tell it, so hatching and screens can live in the shadows alone. Ink Overlay goes further: the paper turns transparent and only the ink and the shadow textures stay, ready to lay over footage, a painting or an AR frame.
- Your own texture as ink. Pick any picture and its dark parts take ink first: a scanned screentone, a brush sheet, a damask, a paisley, a pattern you drew. It works flat on the picture or wrapped on the surfaces.
- A different ink for every lamp. With the new per lamp evaluation of Blender 5.3, the key light can hatch while a second lamp throws dotted shadows, both live in the same picture.
- Pencil grades. Lines can have their own colour: a soft dark pencil for the contours, a hard light one for the shading, a middle one where things meet (the Graphite Grades look does it for you).
- Paint the shadows by hand. One click opens Vertex Paint on the object: black pushes the shadow in, white pushes the light in, grey leaves the lamps in charge. Fix a face shadow, clean a nose, keep a cheek lit, and the lamps still do the rest live.
- Illustration layers. Render the frame as flats, shading, colour, ink and final, as separate PNG files that stack in any painting app (multiply the shading and the ink). Hand the page to a colourist, paint over it, or retouch only the ink.
- Turntable and sprite sheets. One click makes the camera circle your model as a seamless 25 fps loop. Sprite Sheet renders the model from 4, 8 or 16 directions, over the frames of its animation if you like, on a transparent background, packed into one PNG for 2D games.
- Glass on paper: a prism, a glass of water or a marble becomes toon glass with an ink edge and a painted highlight, and lays a drawn caustic on the paper under it: a fan of rainbow bands, a rippling web of light, or a bright focused spot. The caustic is drawn per lamp with the new Material Lighting nodes, so it turns away from each key light and follows its power and colour. Live in EEVEE.
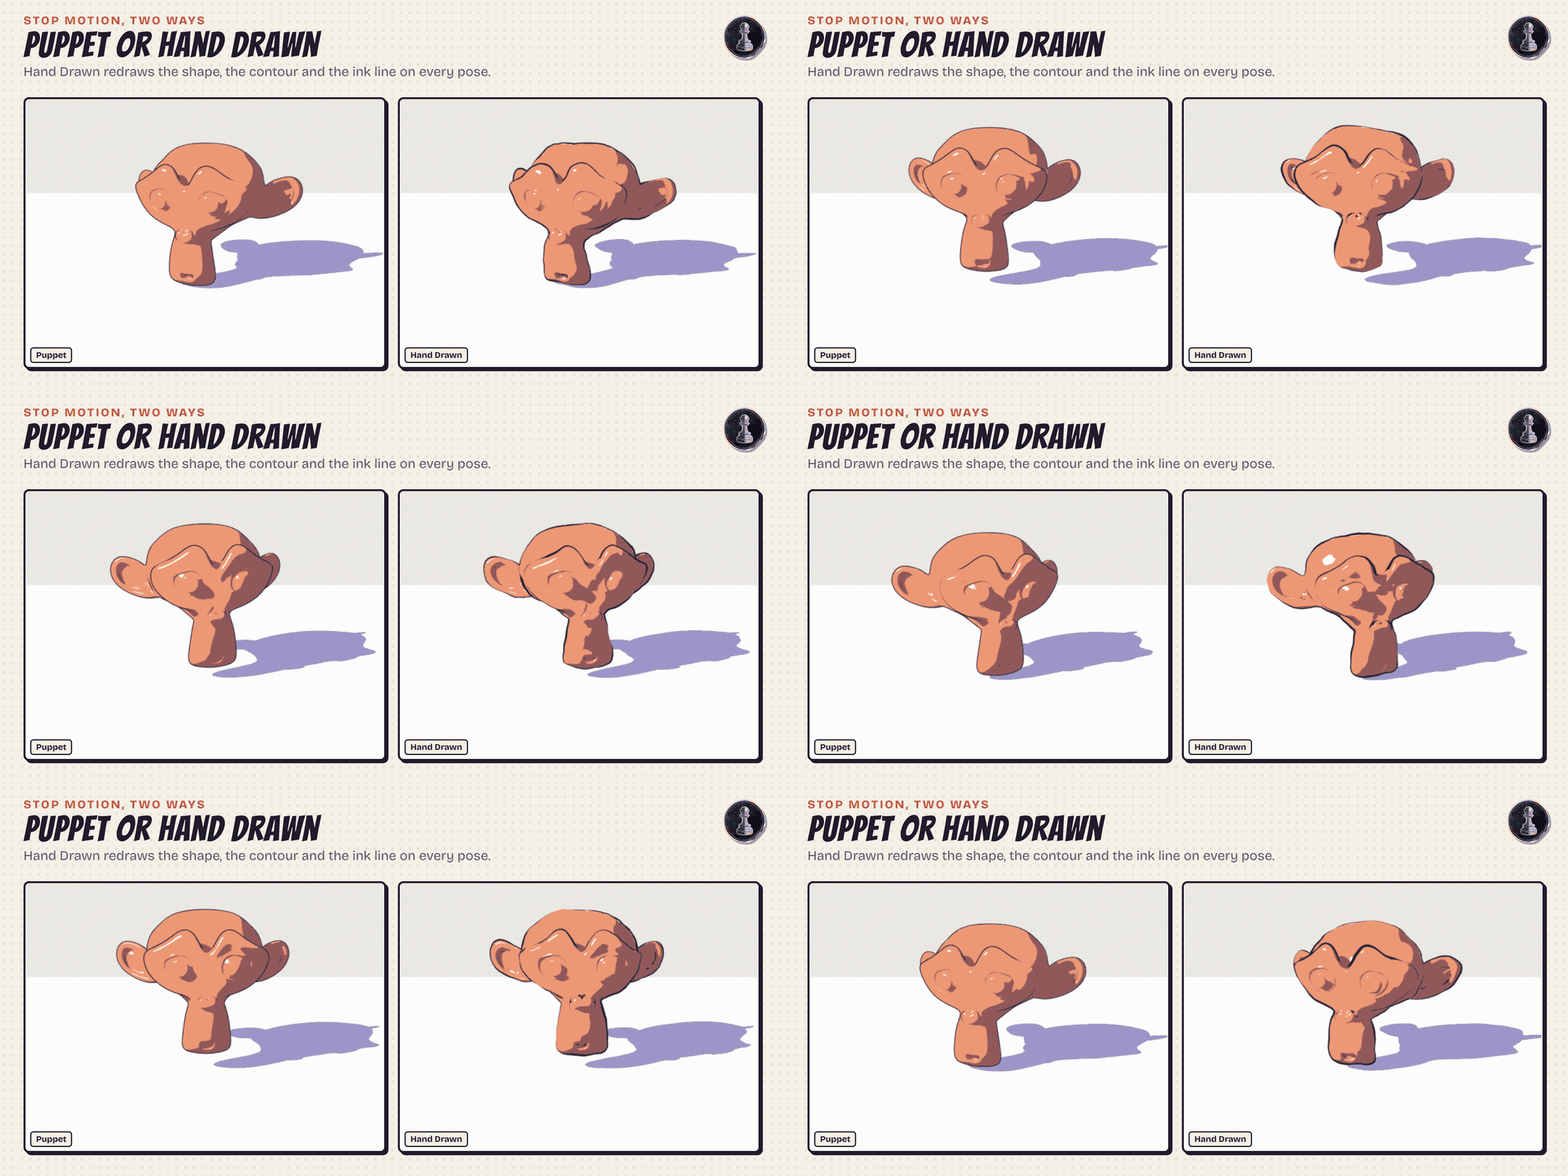
- Stop motion, two ways. Puppet holds the animation of the chosen objects on twos or threes and gives every pose a small hand placed wobble and turn, like a puppet moved between shots. Hand Drawn goes much further: on every pose the shape, the contour and the ink line are redrawn a little differently, irregular, the way an animator draws each frame again by hand, and the line swells and pinches like a brush. Remove takes it all off again.
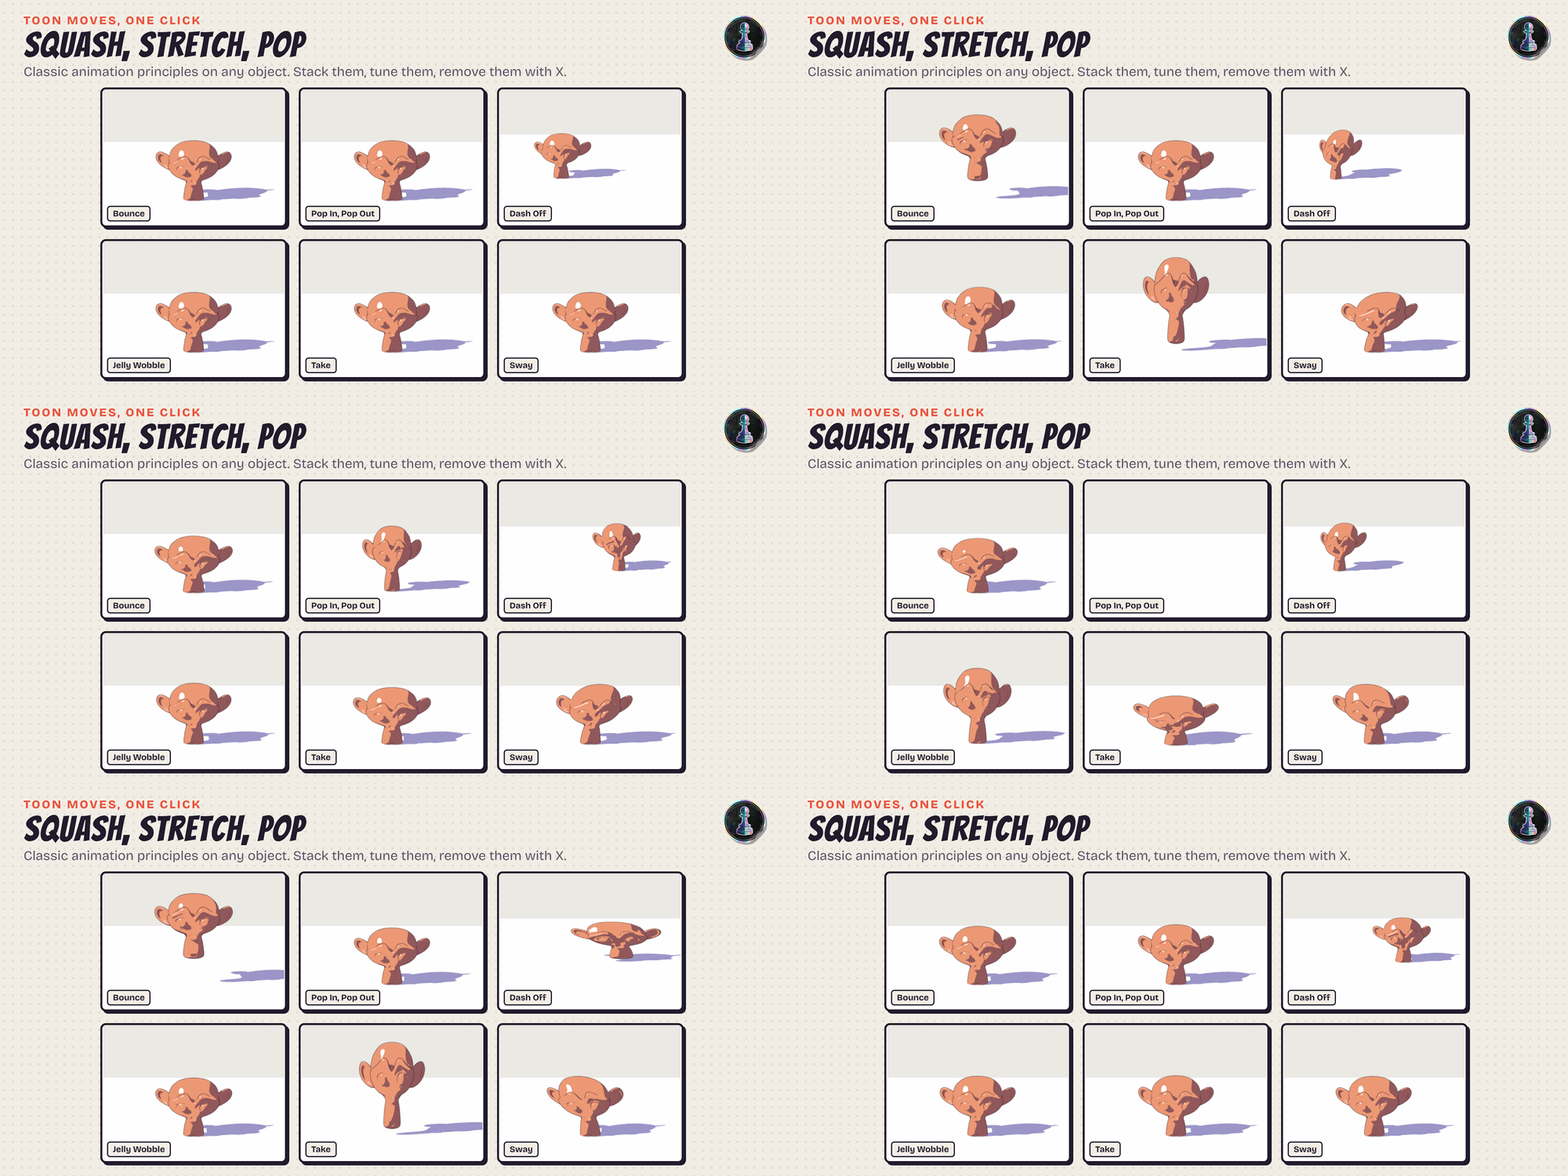
Toon Moves: classic cartoon animation in one click
Nine moves built on the principles of classic animation: squash and stretch that keeps the volume, anticipation before every big move, slow in and slow out, arcs, follow through where the top lags behind the base, and exaggeration on one slider. Pick an object, click a move, press Play. It starts at the current frame, you can stack several, and each one comes off with its own X button. Your keyframes, your rig and the object transform are never touched.
- Bounce, Pop In, Pop Out, Dash Off, Jelly Wobble, Take (the cartoon surprise), Idle Breathe, Sway and Shiver.
- Right in the panel: Start, Length, Loop, Strength, Height of the hop and Bend. To redraw the timing by hand, each move keeps its shape in five editable curves.
- The outline, the Line Art, the art objects and the brush strokes all follow the move.
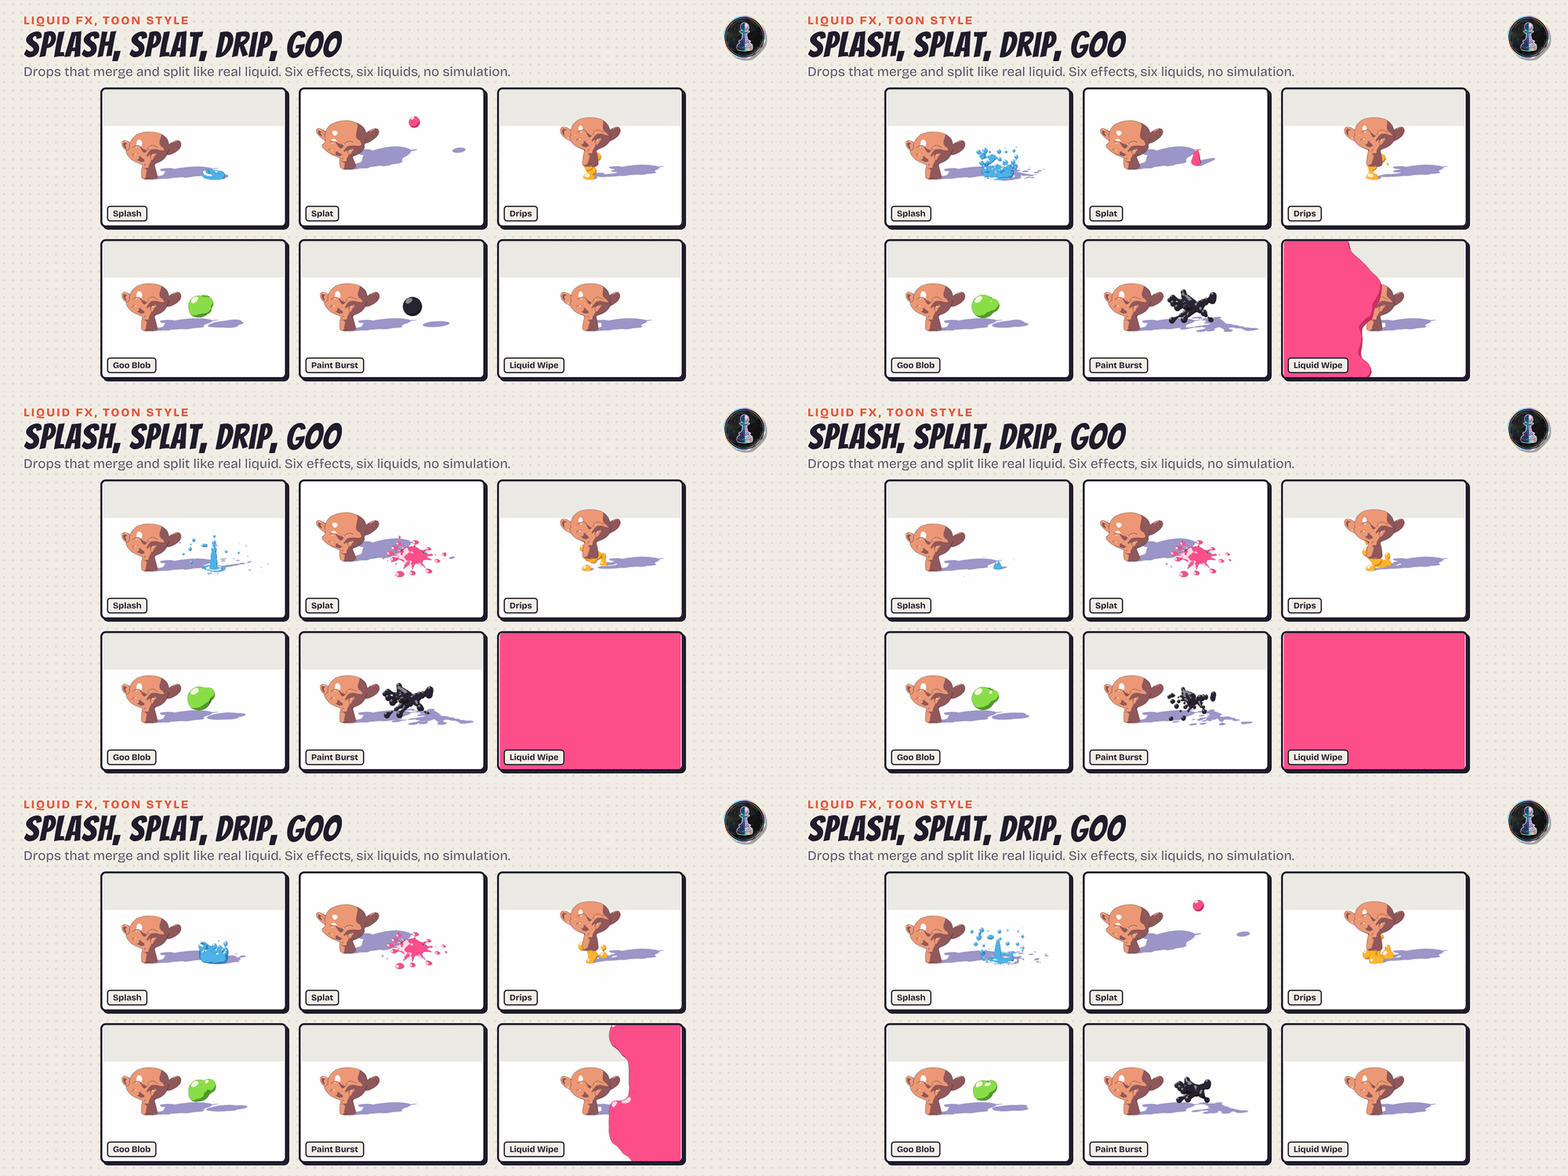
Liquid FX: splashes, drips and goo
Liquid motion graphics in toon style, made of drops that pull into each other and break apart like real liquid. Six effects, six liquids (water, paint, slime, honey, ink, milk), drawn with two flat tones, a hard highlight and an ink rim. They loop on their own, scrub anywhere on the timeline and need no simulation or baking.
- Splash: a crown splash with drops flying out on arcs and a jet rising from the middle.
- Splat: a blob falls, hits the ground and spreads into a puddle with fingers.
- Drips: drops gather under your objects, stretch, let go and fall.
- Goo Blob: a living blob that wobbles and morphs.
- Paint Burst: liquid shooting out in tendrils, then drooping and drying away.
- Liquid Wipe: a transition that floods the view, then clears it.
Art Objects: the object itself becomes art
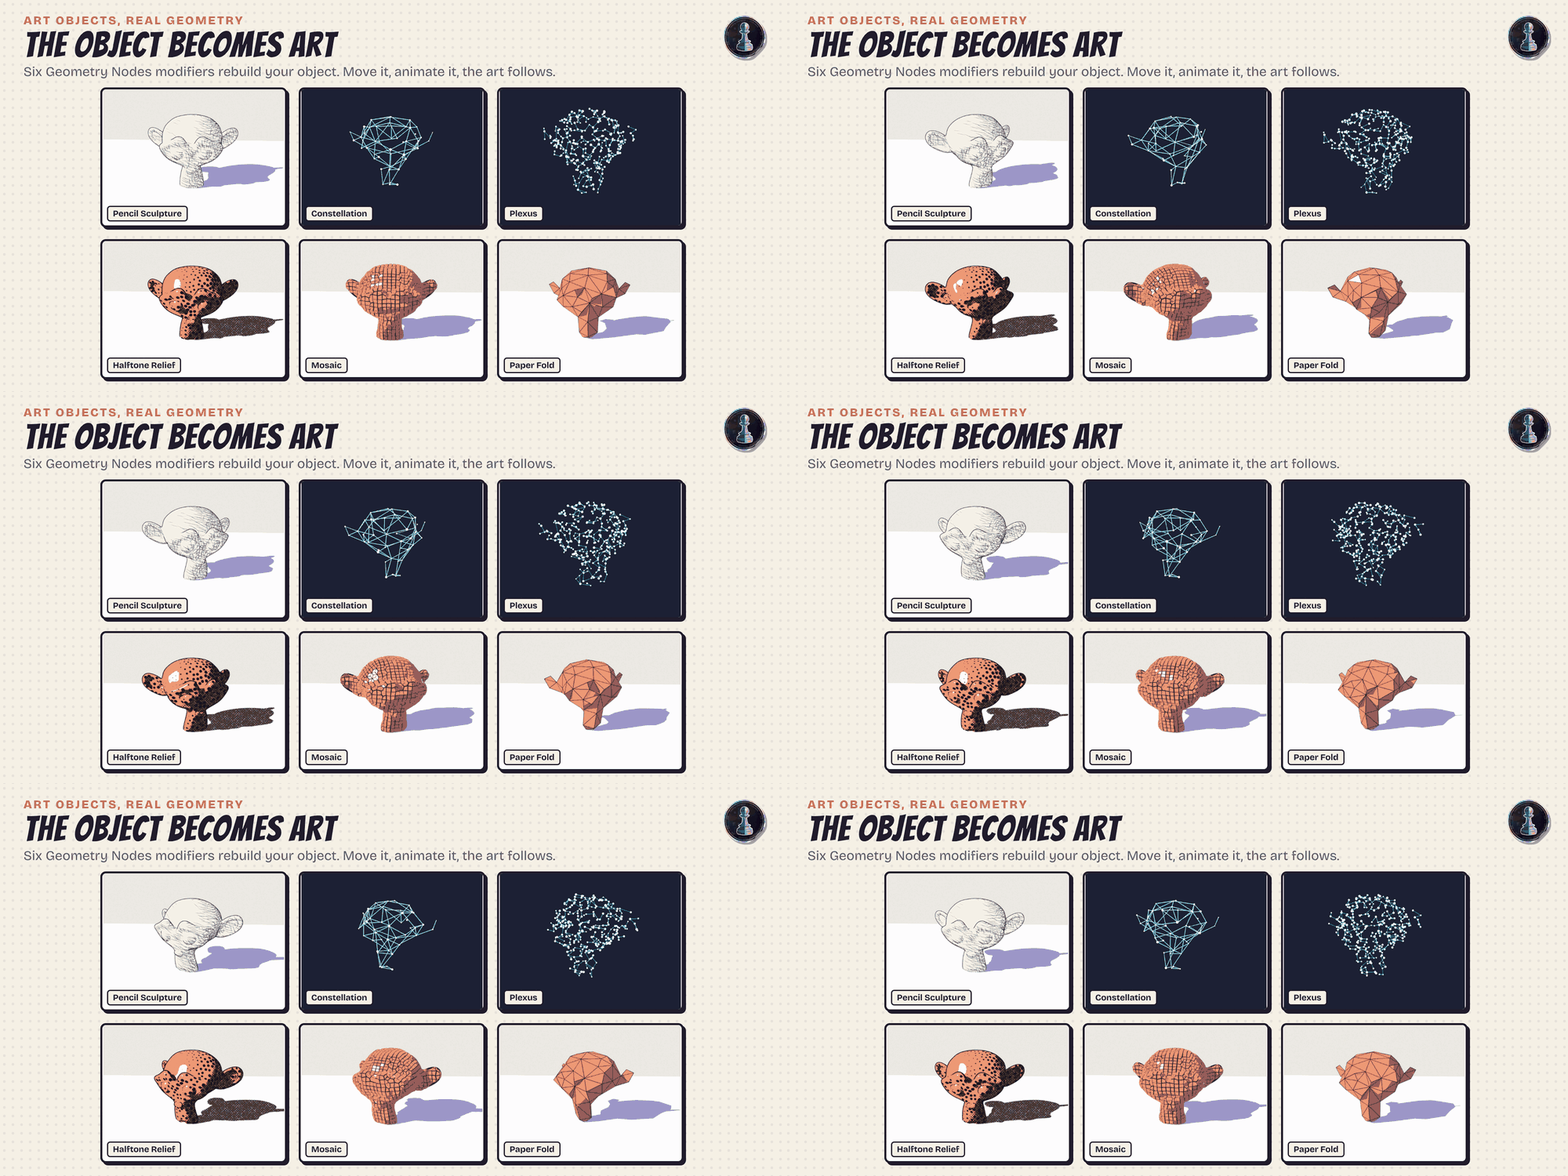
Six Geometry Nodes modifiers that rebuild your object out of real geometry, not just a material on its surface. Move it, animate it or deform it and the art follows. They read the key light of your scene, so the shadow side gets the dense work, the way an artist would do it.
- Pencil Sculpture. The object is rebuilt from graphite strokes in space: hatching that wraps round the form and bends with it, pressed harder and crossed twice in the shadows, on a paper white body with its ink outline.
- Constellation. The surface collapses into a net of glowing stars joined by thin lines, like a star chart of your object. Each star twinkles on its own beat.
- Plexus. Dots breathe on and off the surface and reach for each other: the lines thin out as the dots drift apart and snap when they go too far.
- Halftone Relief. Raised printing dots on the surface, bigger in shadow and tiny in the light, like a comic print you could touch.
- Mosaic. The form is cut into an even grid of small tiles, each one shifted and tilted a hair so it catches the light alone, set in dark grout. The tiles keep the look of your object.
- Paper Fold. The object folded from flat paper facets, every fold drawn with an ink line.
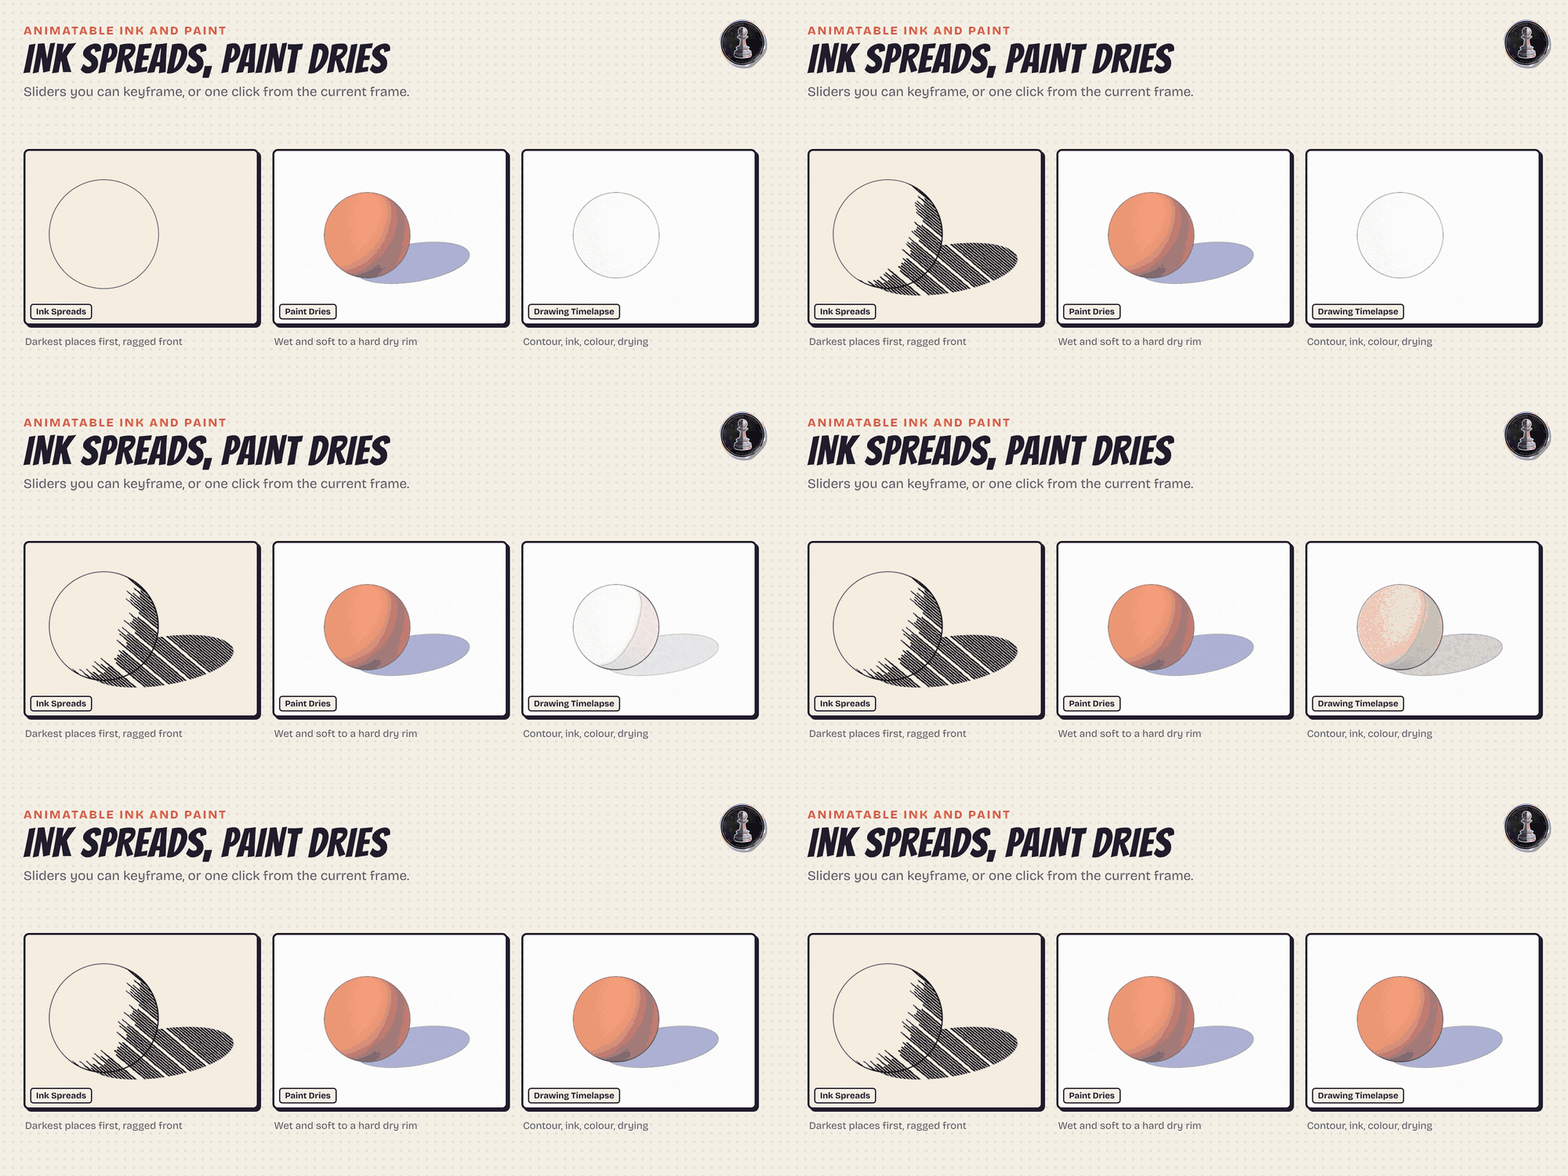
Ink that spreads, paint that dries
Two animatable sliders and two one-click buttons: Ink Spreads makes the ink arrive in the darkest places first and soak outward with a ragged front, Paint Dries takes a wash from wet (soft, dark, saturated) to dry (hard rim, a shade lighter). Keyframes stay editable in the Graph Editor.
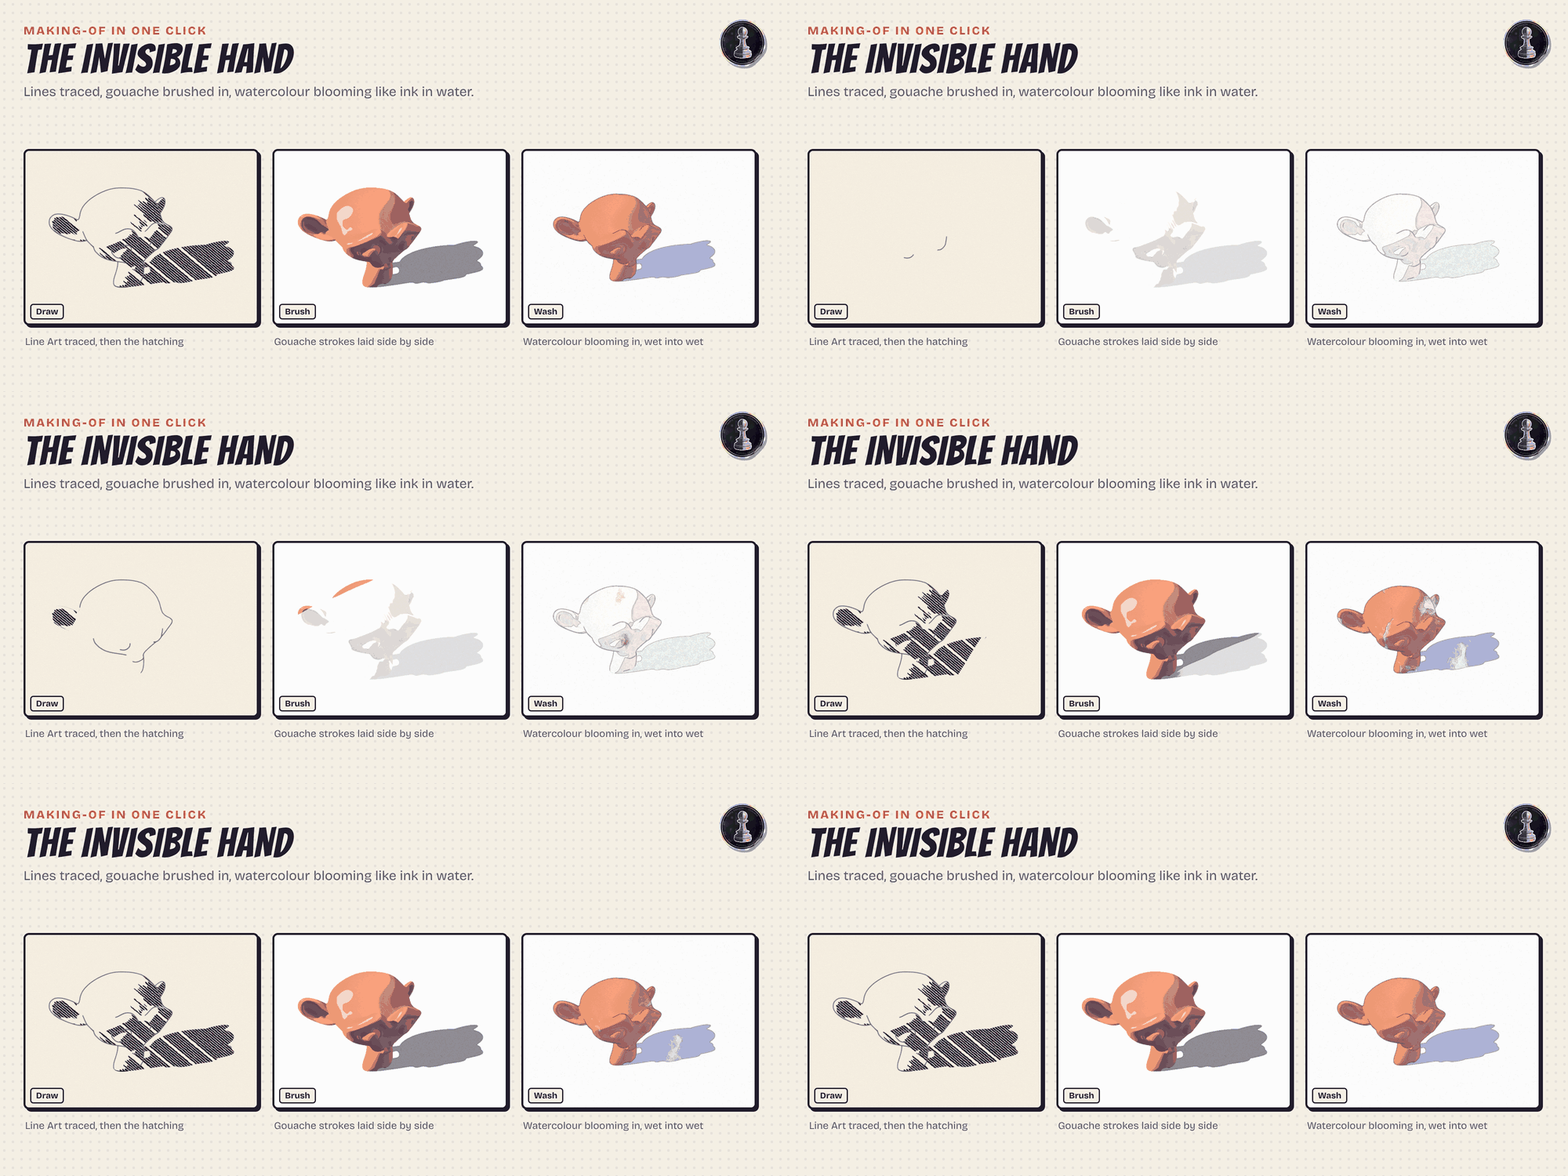
The invisible hand
One click and the picture makes itself, as if an invisible hand were drawing it. Draw traces the Line Art stroke by stroke and hatches the ink in, patch by patch, each patch filled by a stroke sweeping across it. Paint lays the colour in brush dabs over the drawing, and the wash can dry at the end. Invisible Hand does both, one after the other. Two animatable sliders, Drawn so far and Painted so far, so you can retime it in the Graph Editor.
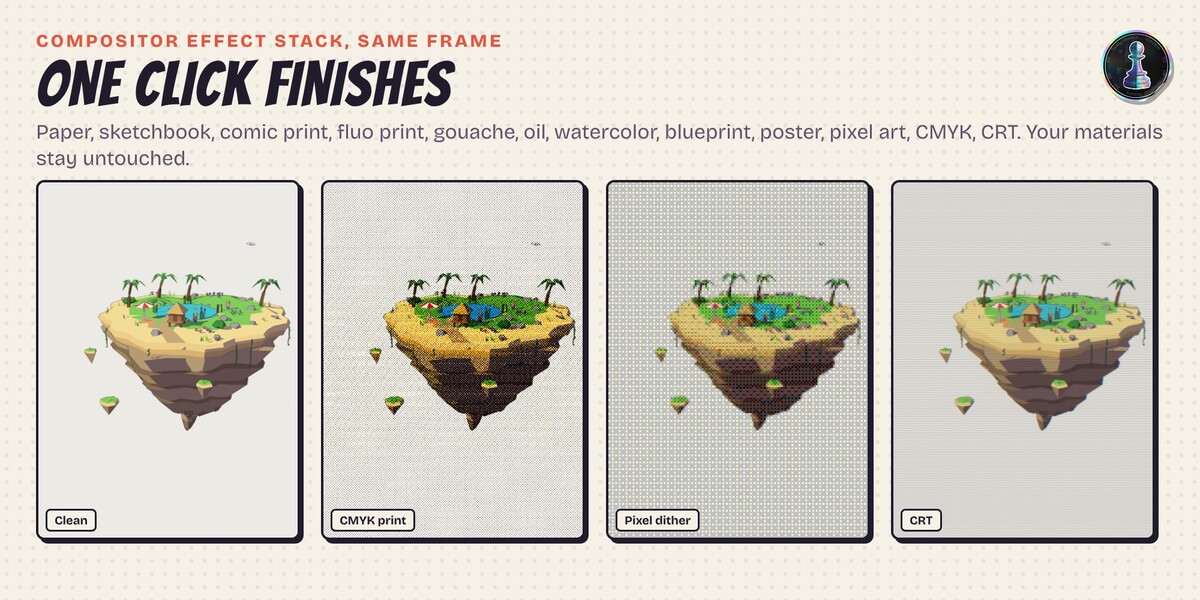
Lines and finishes
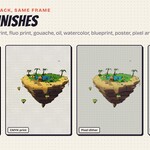
An ink outline that works live in EEVEE and in Cycles, with one line weight for the whole scene, or Grease Pencil Line Art for contours, creases and intersections. Then the finish: paper, sketchbook, comic print, fluo print, gouache, oil, watercolor, blueprint, poster, pixel art, pixel dither, CMYK print, CRT monitor, tape glitch, film lens, worn screen print and 1 bit noise, built for the new compositor effect stack of Blender 5.3. Pixel art, ordered and noise dither, a four plate CMYK halftone at print angles, CRT scanlines with phosphor mask and colour fringe, worn ink with cracks and speckles, chromatic aberration with lens distortion, vignette, and a video glitch that jumps bands of the image sideways every few frames are all single effects you can stack and tune. They run on the final image, also in the viewport, and never touch your materials.
3D scenes, and photos and sketches too
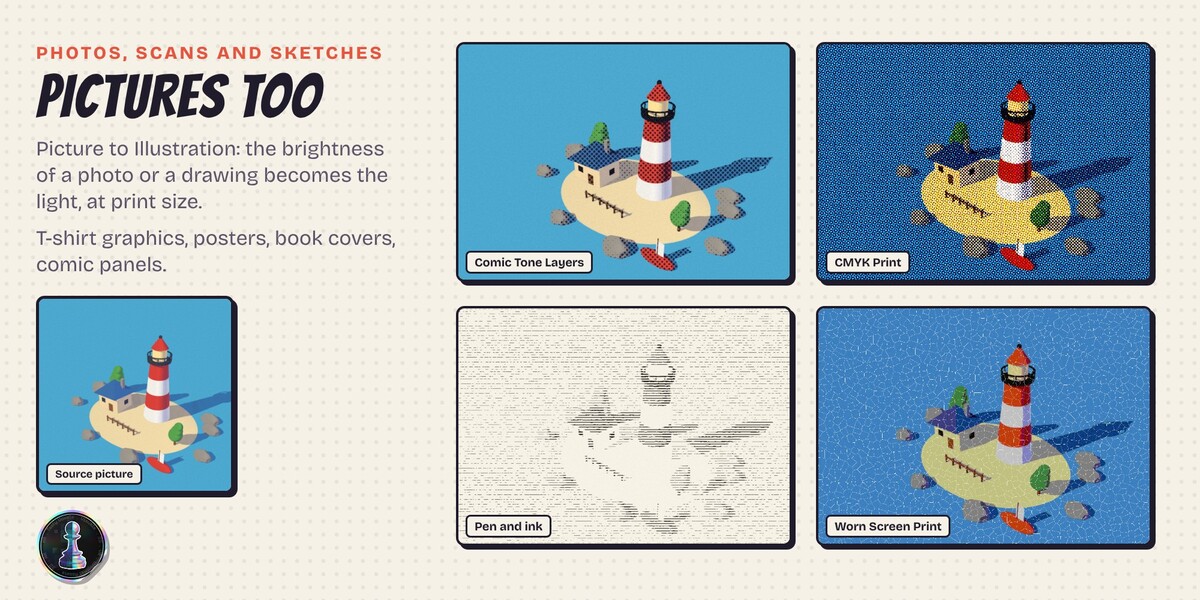
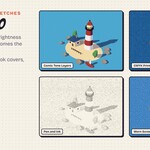
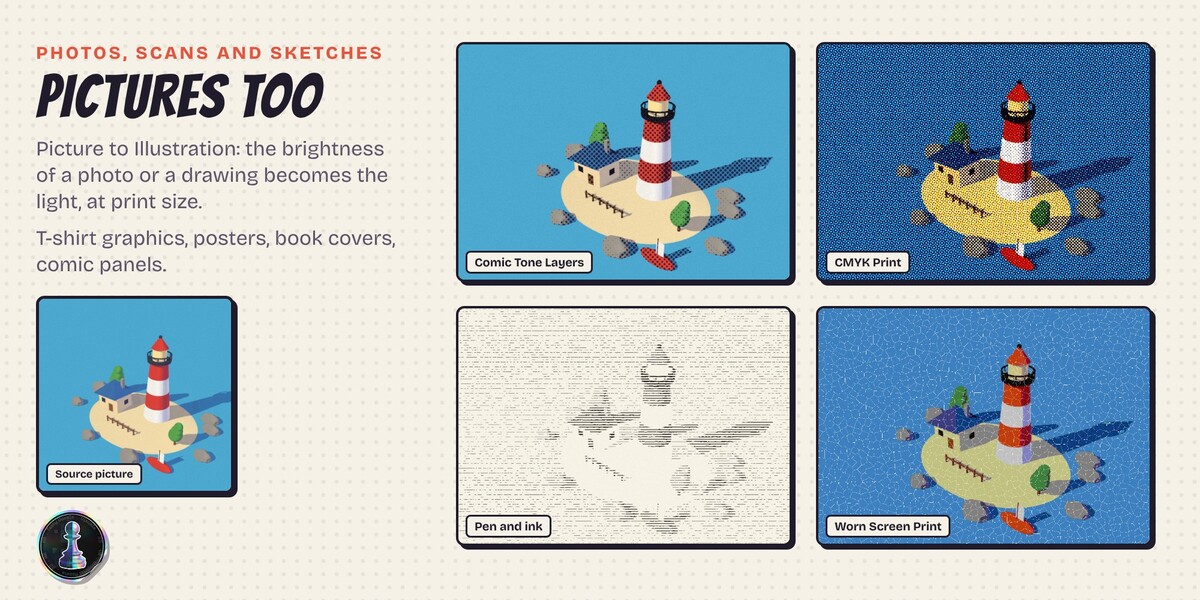
Picture to Illustration turns a photo, a scan or a pencil sketch into the same looks: the brightness of the picture is the light. Make a t-shirt graphic, a gig poster, a book cover or a comic panel from a reference photo or from your own drawing, at print size.
Bake it: Cycles, games, VR and 3D printing
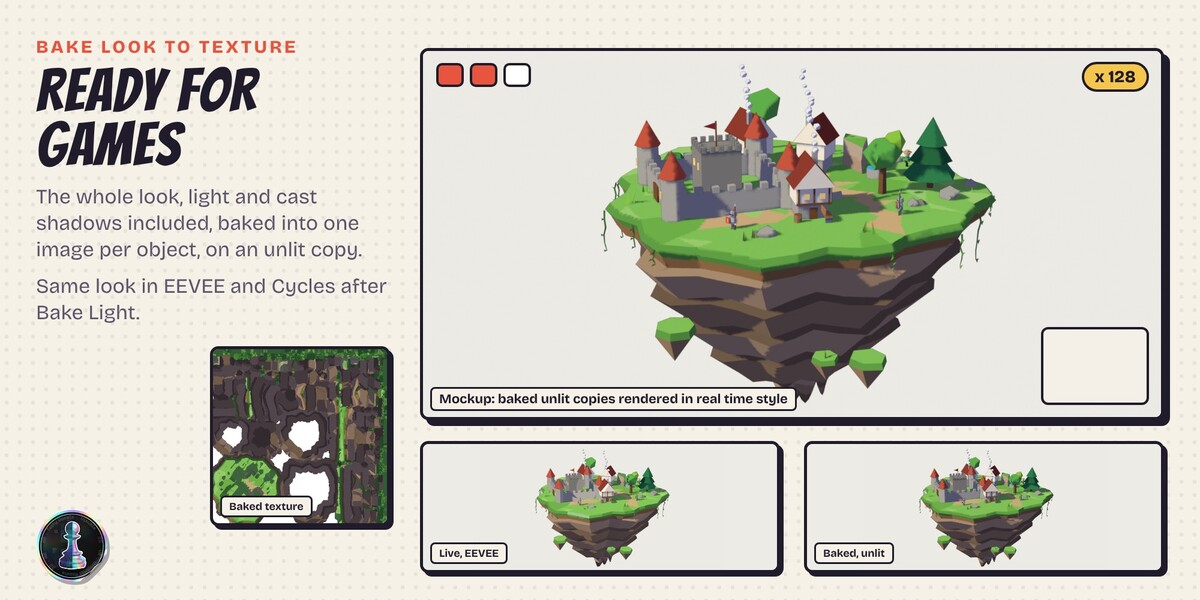
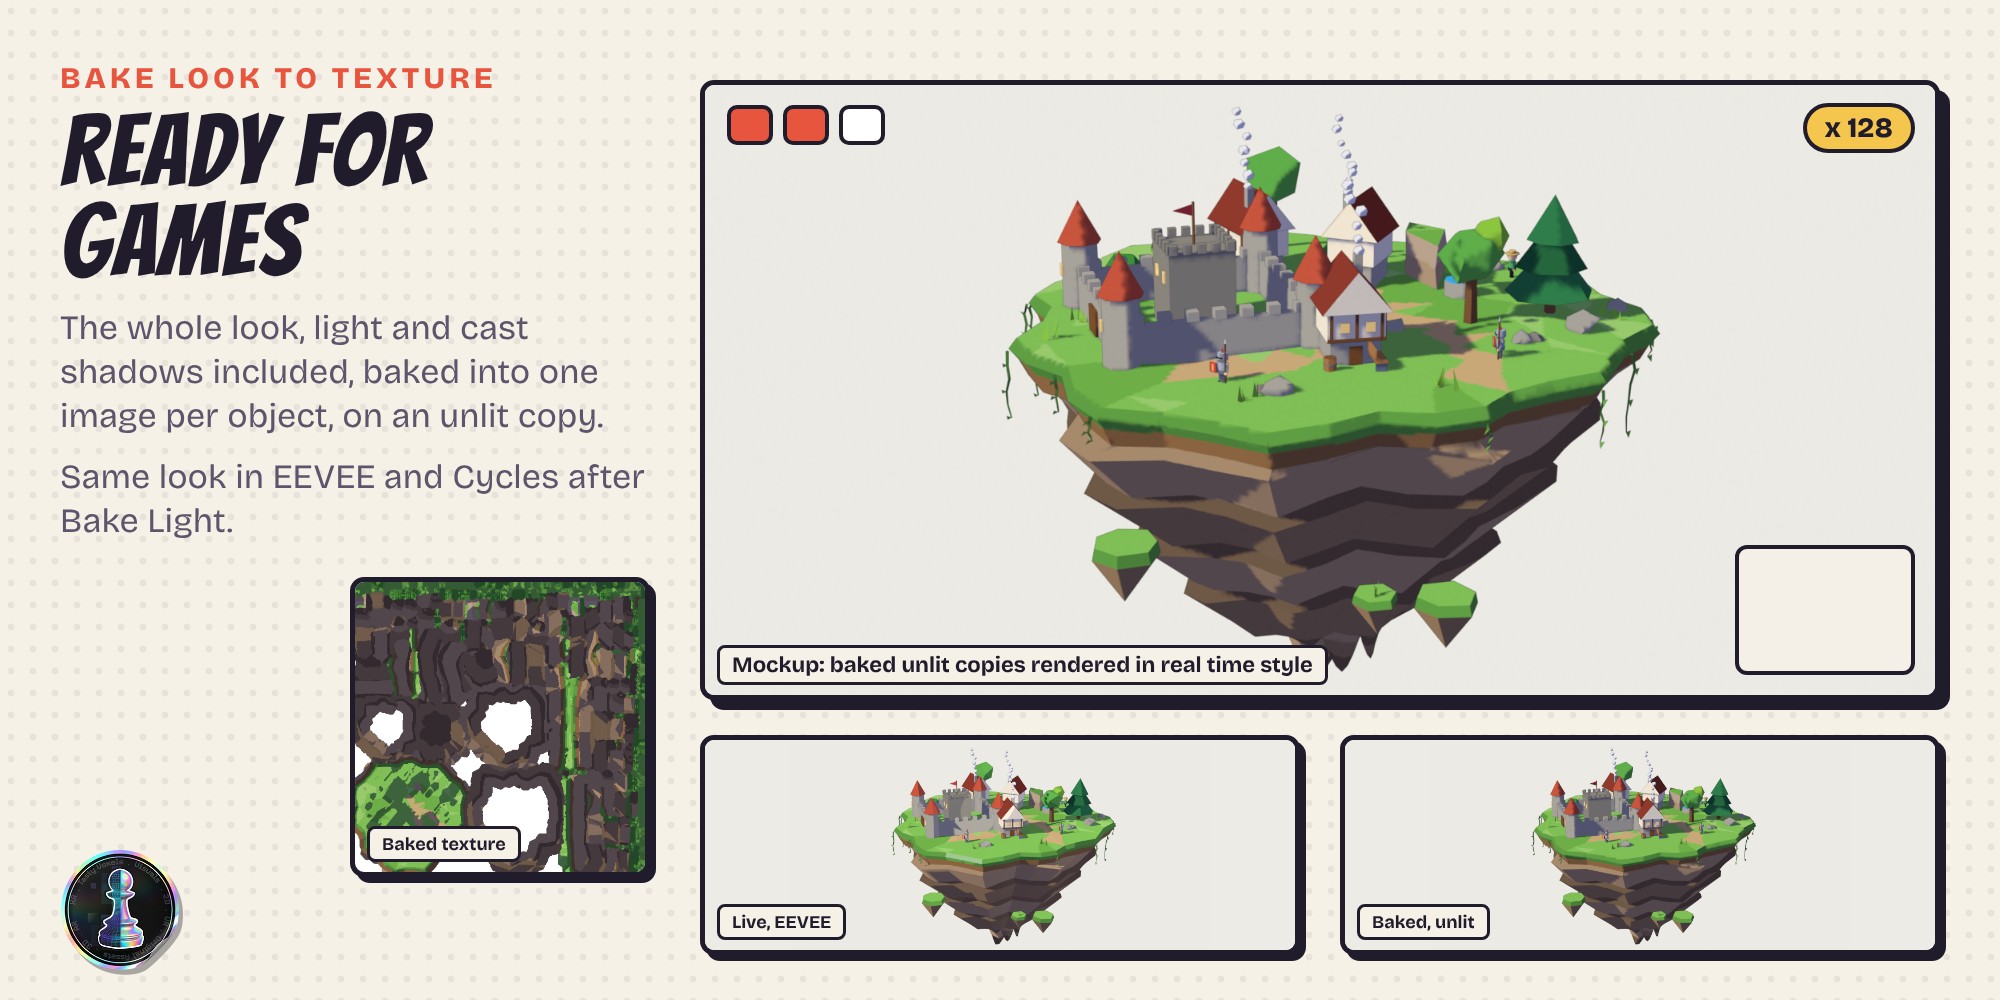
- Bake Light puts the lamps and their cast shadows into the mesh, as a light map texture or as vertex colours. From then on the look renders the same in EEVEE and in Cycles.
- Bake Look to Texture bakes the whole look into one image per object and makes an unlit copy, ready for game engines, AR and VR. Your original stays in the file, hidden. The VR and 360 safe option keeps every pattern on the surfaces, identical in both eyes and without a seam in panoramas.
- Trim Sheet for games renders one strip per toon material (a rounded beam, a bevelled plank and a grooved plank, in turn) lit and inked by the look, packed into one square PNG with a text file of the UV band of each material: map walls, beams and floors of modular game meshes to it.
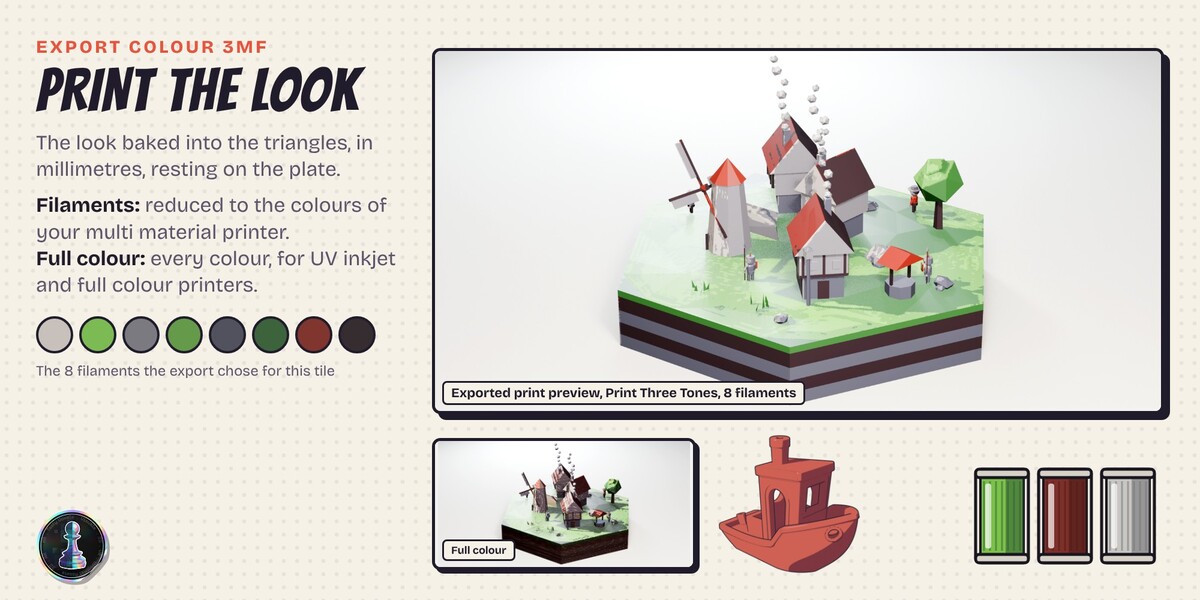
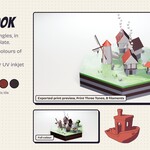
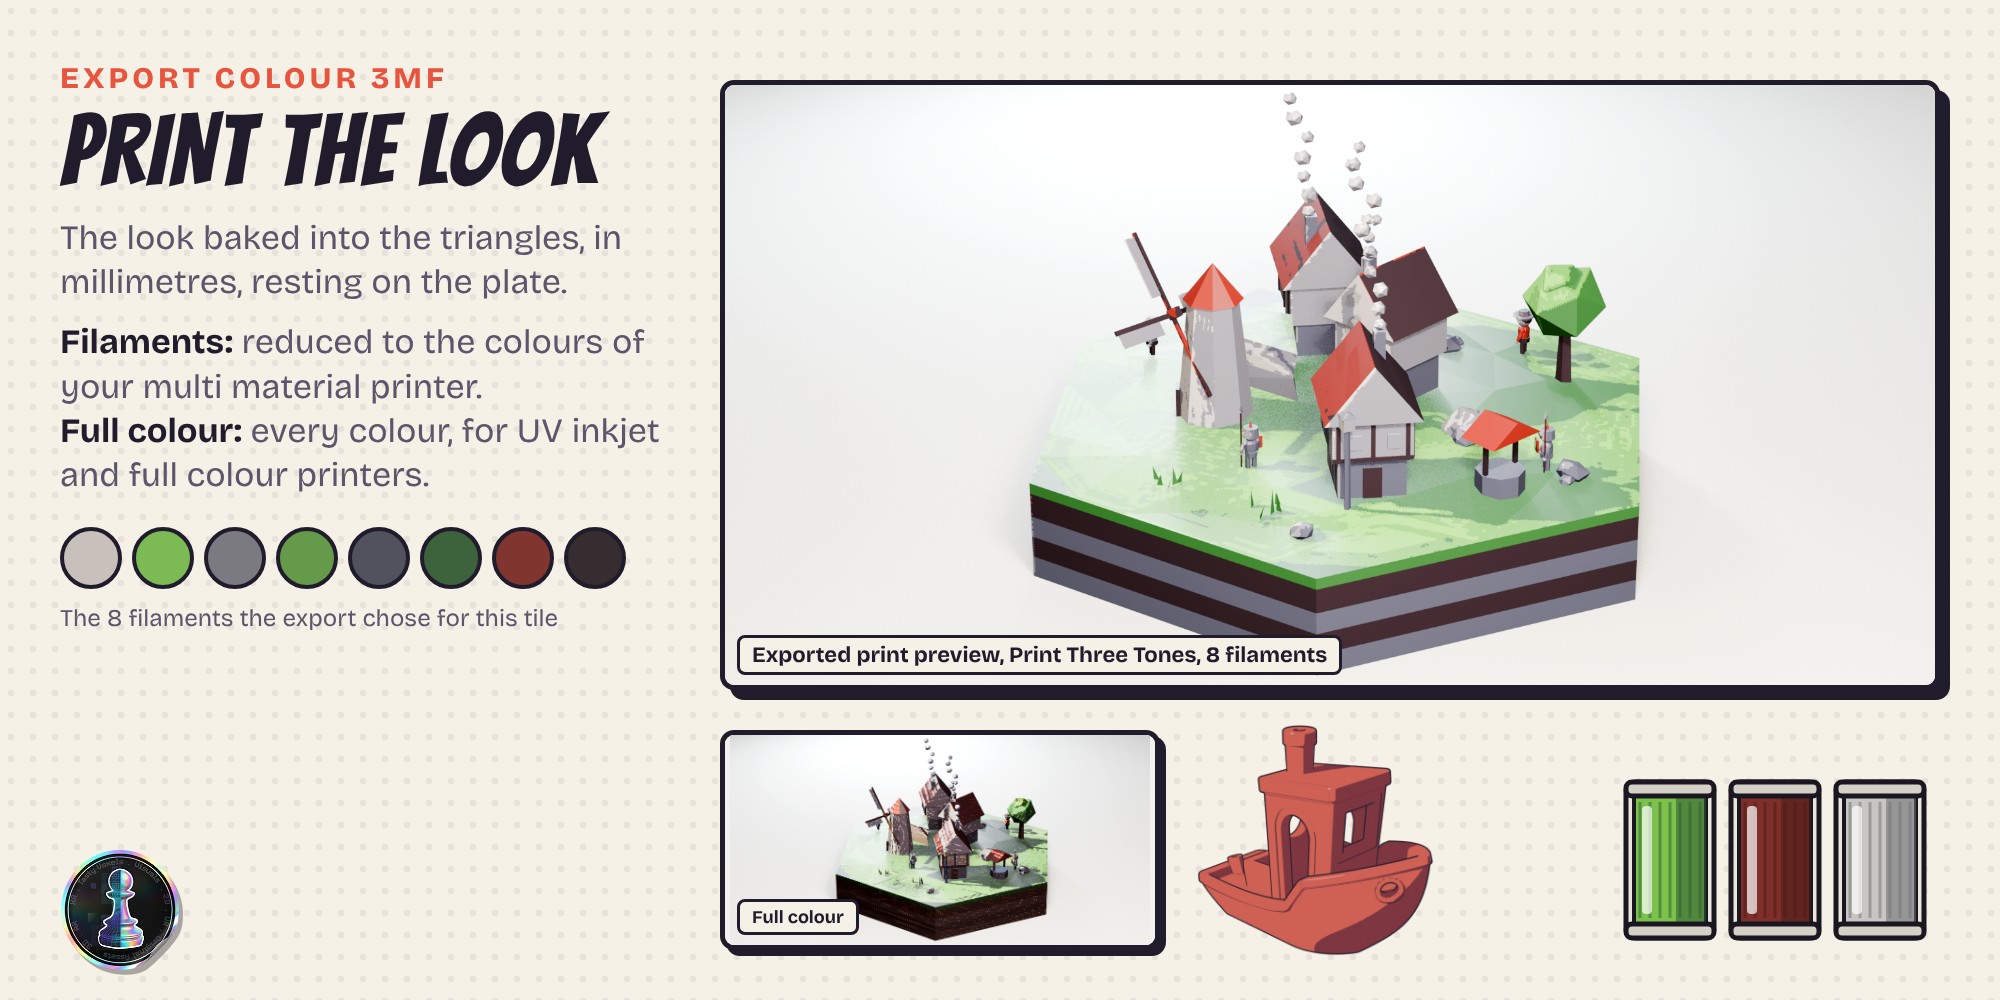
- Export Colour 3MF bakes the look into the triangles of a print copy, in millimetres, resting on the plate. Filaments mode reduces it to the colours of your multi material printer and lists them; Full colour mode keeps every colour for UV inkjet and full colour printers. A preview copy shows you the result before you slice.
What people make with it
- Print and merch: t-shirt graphics in worn screen print or one ink halftone, gig posters, book covers in engraving or watercolor, fluo stencil print style zines, packaging and labels.
- Comics and manga: backgrounds and props with screentones, sand tone, crosshatching and spot blacks, framed panel by panel.
- AR and augmented print: one scene rendered for the printed cover or poster and baked to textures for the AR animation on top, so they match.
- Games and VR: stylized assets baked to unlit textures, pixel art sprites rendered from 3D, VR and 360 scenes that stay steady in both eyes.
- Animation and social: pen and ink explainers with line boil, titles with ink that spreads, watercolor that dries on screen, anime shots with clean shadow shapes.
- Architecture and product: architect sketches, patent drawings, blueprints, manual illustrations.
- Painters and teachers: value studies and notan on a 3D maquette, light and shadow lessons with each shadow element on its own slider.
- 3D printing: figures and dioramas printed with their drawn shading, in a few filaments or in full colour.
Try it free
Pick the Free edition variant to try Make it Toon! at no cost. It has five looks, each with its own ink: Comic Halftone (halftone dots), Charcoal (brush), Op Art Shadow, Terrazzo Shade and Engraver Contours (form contours). Steps 1 to 4 and 6 work in full: light roles, real cast shadows, shadow scatter, fade and pooling, lines and compositor finishes.
What the Free edition leaves out, and is in the full version: the other 86 looks and 25 inks, your own texture as ink, My Looks, step 5 (brush strokes, grass and painted trees, animated effects, wind, stop motion, glass caustics, drawing timelapse, invisible hand, particles and weather, water caustics, comic effects, poof), the Grease Pencil manga and light kit, comic panel frames, step 7 (bake light for Cycles, bake to textures, colour 3MF, trim sheets, sprite sheets, turntable, illustration layers, ink overlay), hand drawn lines, painted shadows and Picture to Illustration. Uninstall the Free edition before you install the full version.
What you need to know before buying
- Blender 5.3 or newer only. The add-on is built on nodes that do not exist in older versions.
- The live look is EEVEE. The Material Lighting nodes are an EEVEE feature in 5.3. For Cycles press Bake Light first; highlights and rim lights stay live only.
- Look at it in Rendered view. Material Preview uses its own studio lamps, not yours. The panel has a button for it.
- One key light looks best. Every key light adds its own share, like real light. Give the other lamps the Rim or Fill role.
- Screen patterns cannot be baked. For textures and prints switch the pattern to Object, as the 3D Print Ready looks already do.
- Updates and support are included for good: no support period, no renewal fee.
Made with my other add-ons
The islands in these pictures (the forest island with the waterfall, the zen garden island, the floating castle, the tropical island, the medieval hex tile with the mill) were built with my add-on Make It Float! (floating island dioramas, on Superhive in beta), never with someone else's demo files. My Make It Cardboard! (cardboard houses, cities and packaging, on Superhive in beta) is another good stage for these looks.
Also from me on Superhive: If Bool (conditional booleans, pockets and casting moulds), RegoSplit (cut models for 3D printing, with pins and colour inlays), Rego Kit Card (snap-together kit cards for 3D printing) and Blendertronika (make music inside Blender).
In development, coming to Superhive: Make It Snow! (snow that settles and builds up), Make a World! (procedural rocks, cliffs and rocky landscapes), Make a Gift! (wrap any object in gift paper), Print it Flexy! (print in place flexible tentacles and chains), Rego ArchiKit (walls, roofs, doors and windows by click and drag) and a chalk and marker animator for blackboards.
Keywords
Blender 5.3 toon shader, Blender 5.3 stylized texturing, Blender 5.3 NPR, cel shading, anime shader, comic shader, manga screentone, halftone, crosshatch, hatching shader, pencil shader, ink drawing, watercolor shader, painterly, brush strokes, stylized grass and foliage, Grease Pencil Line Art, hand drawn lines, EEVEE toon, Material Lighting nodes, light accumulation, shadow raycast, compositor effects, chromatic aberration, stop motion, sprite sheet, bake toon to texture, game art, colour 3MF, 3D printing.
No AI inside the product
No model, no inference, no telemetry, no network access, no data collection. It is node trees and Python that run offline forever. I have been programming since long before generative tools were mainstream. AI assists me today: it writes code with me, and it helps me translate my documentation into English, which is not my first language. What ships, the looks and the defaults are my decisions.