Make It Toon! Lights and Shadows, Illustration Ready - Toon, NPR and Stylized Shading for Blender
 TastyVoxels
Make it Toon! - Documentation (version 1.0.9)
Requirements
Blender 5.3 or newer. Make it Toon! is optimized for Blender 5.3: the add-on is built on the Material Lighting nodes that arrived in Blender 5.3 (Light Accumulation, Light Evaluation, Shadow Raycast, Light Info and the Light mode of the Attribute node). Older versions of Blender do not have these nodes, so the add-on will not install there.
Install
- Edit > Preferences > Get Extensions > the arrow menu at the top right > Install from Disk.
- Pick the zip you downloaded (do not unzip it).
- Open the 3D View sidebar (N) and click the Toon tab.
The panel works in seven steps
Each step is its own box, top to bottom. You can stop after step 1: the look is already complete.
1. Look
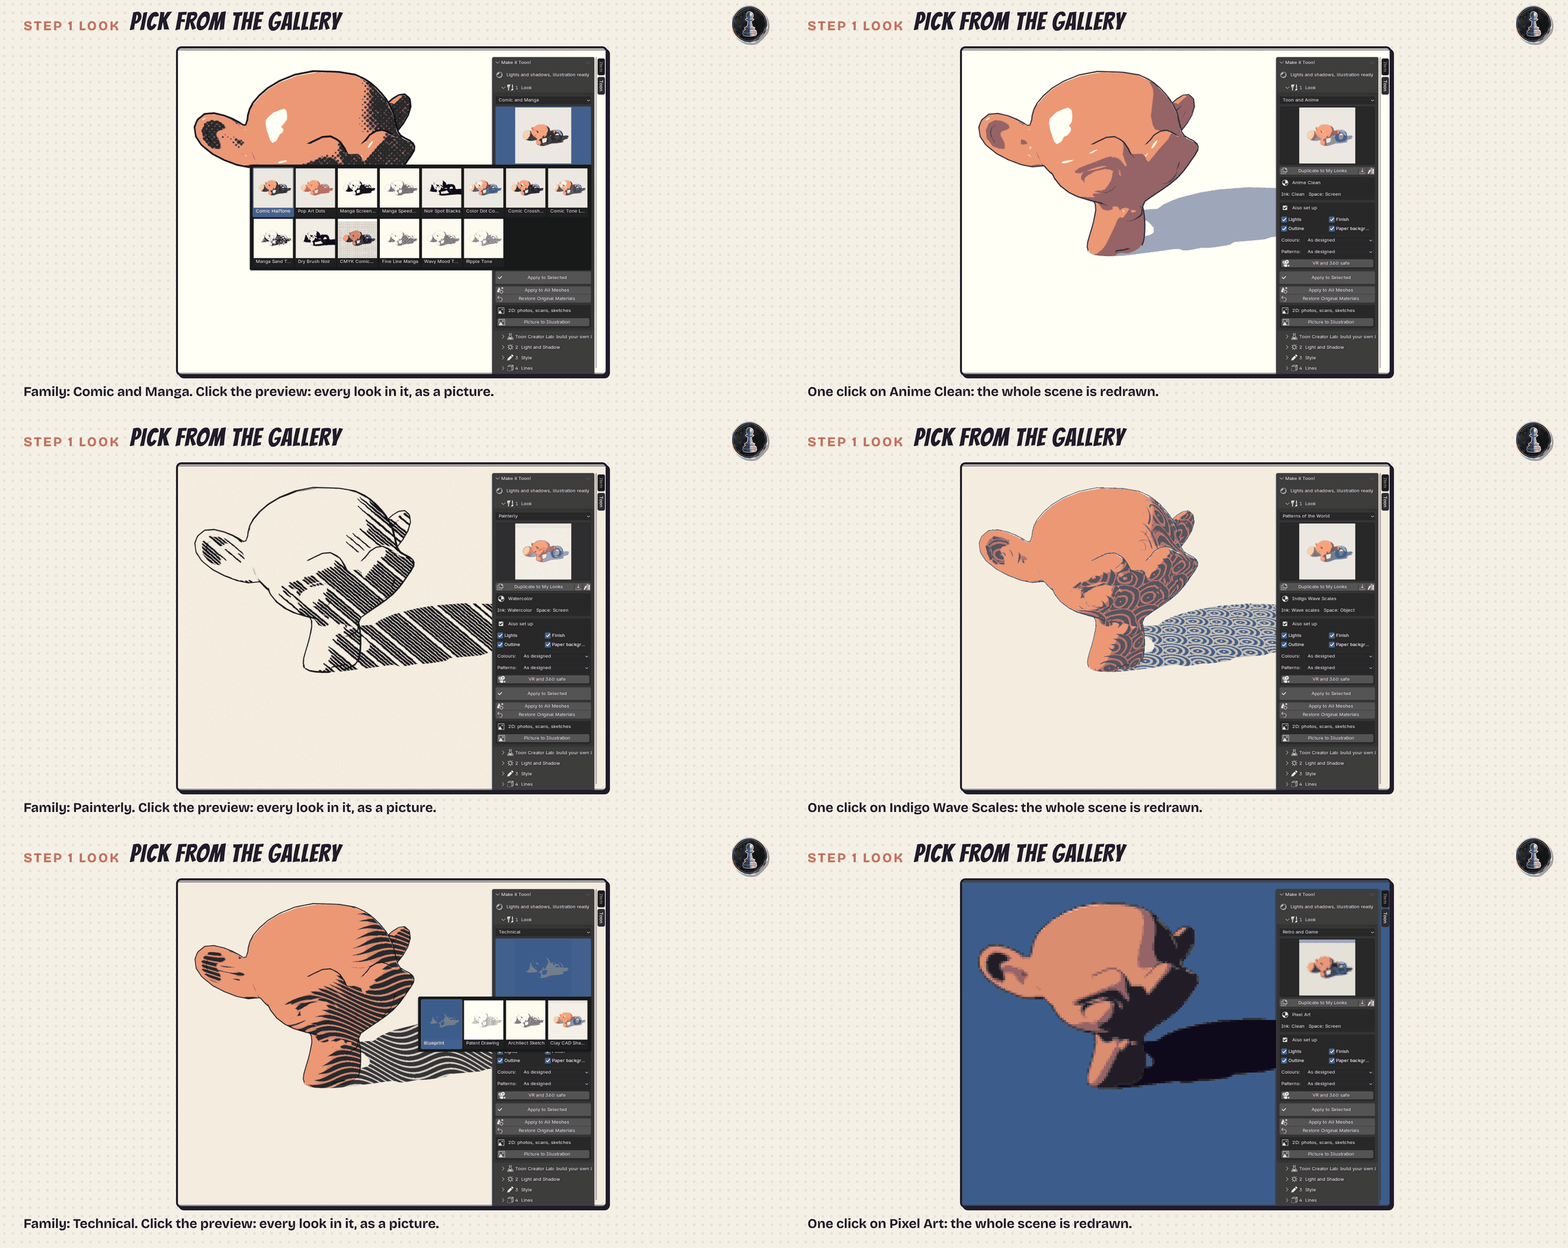
Every node tree the add-on builds is laid out in readable columns, left to right, with no node on top of another, so you can open any material in the Shader Editor and follow it.
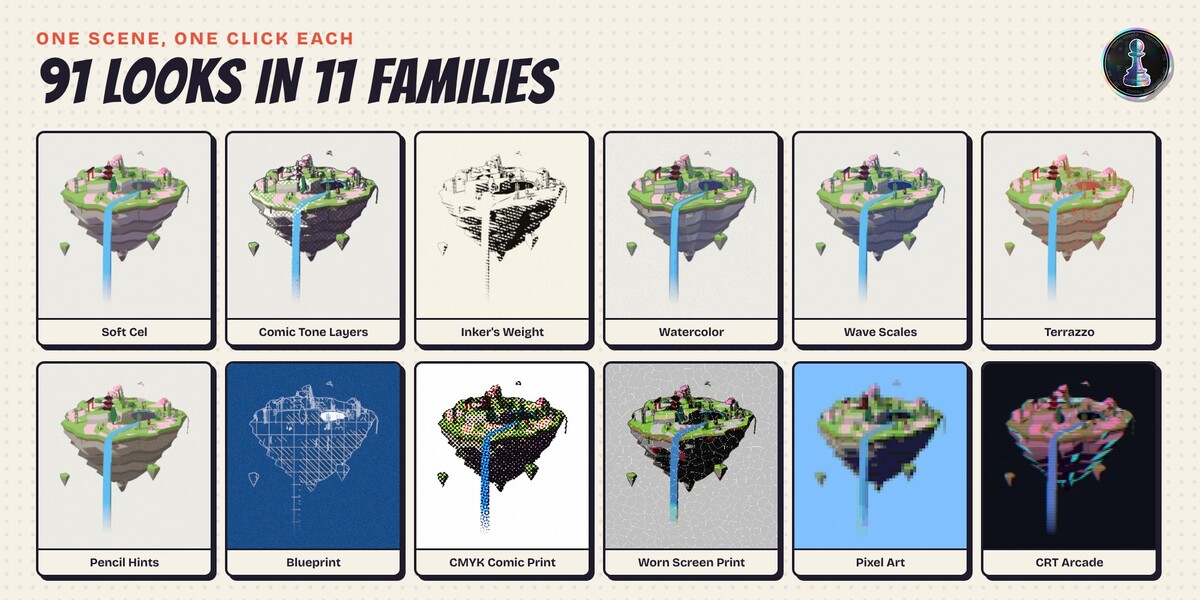
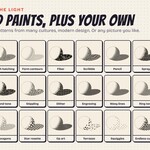
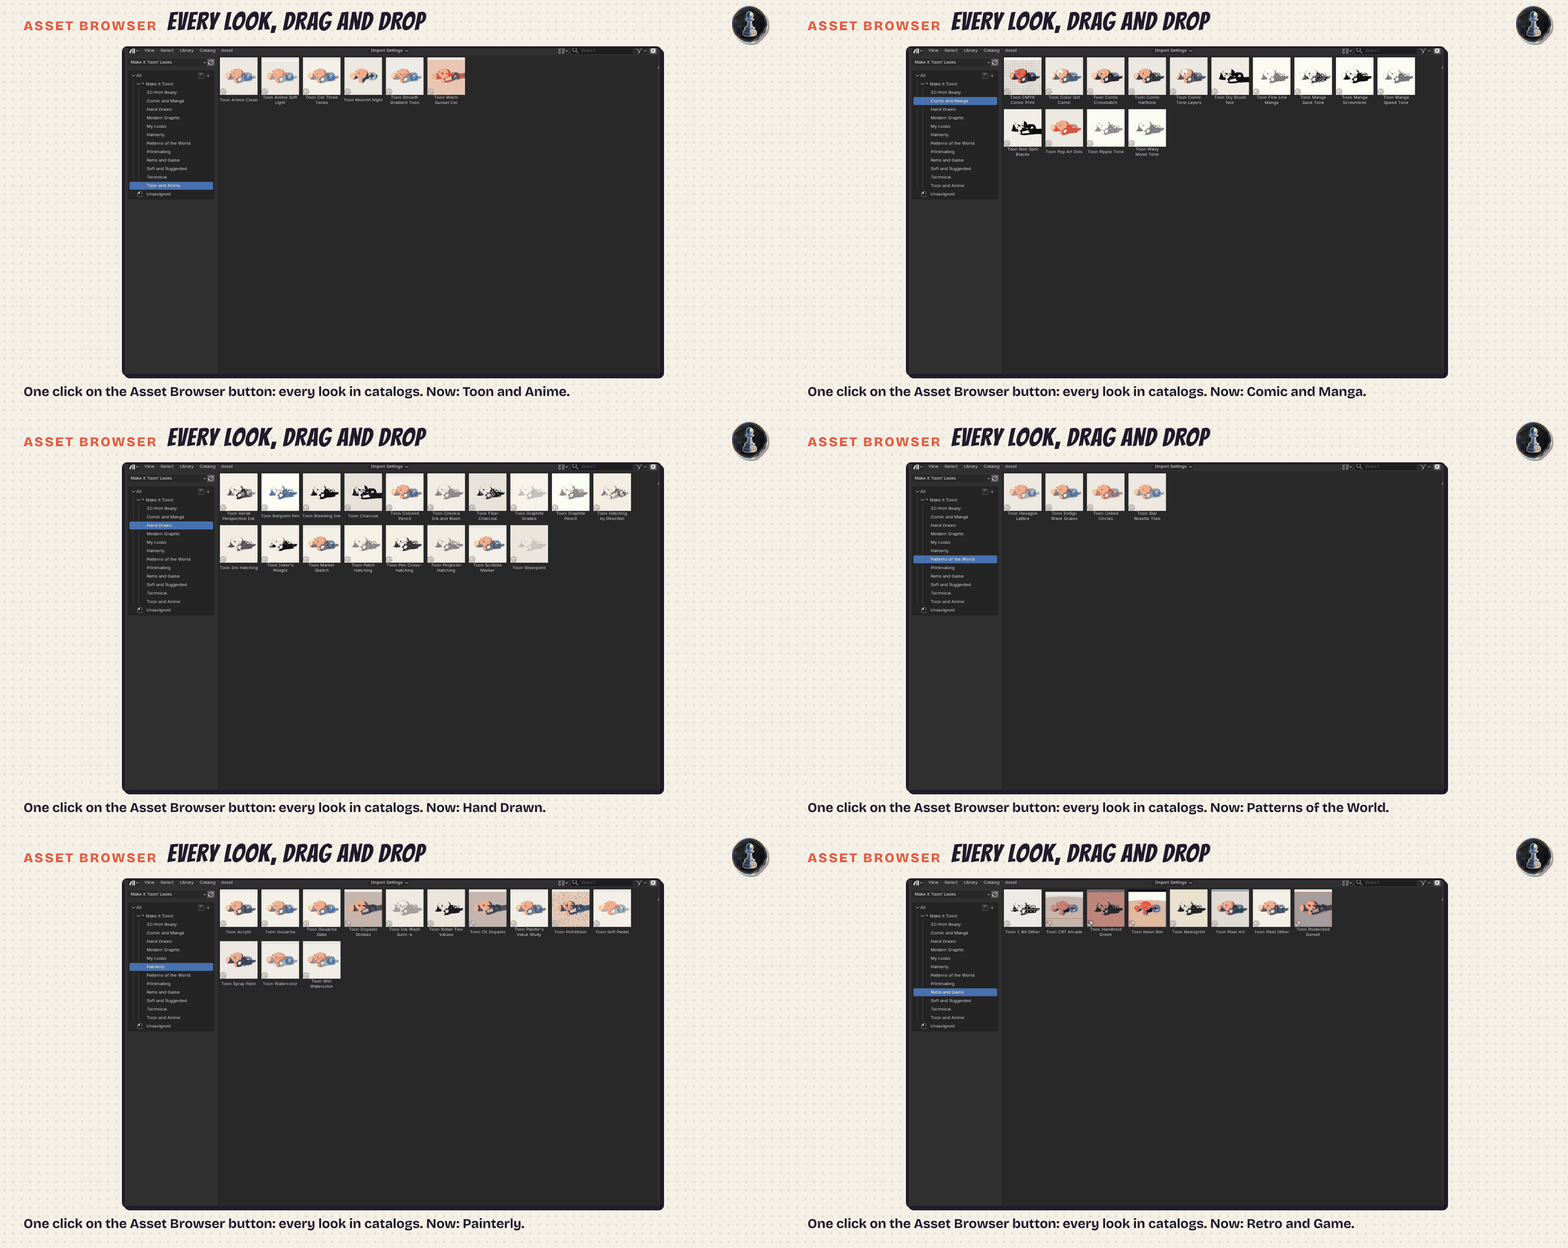
- Pick a family (Toon and Anime, Soft and Suggested, Patterns of the World, Modern Graphic, Comic and Manga, Hand Drawn, Printmaking, Painterly, Technical, Retro and Game, 3D Print Ready, My Looks) and click a thumbnail. There are 91 looks.
- Also set up: Lights (the look's light rig, other lights are hidden, not deleted), Outline, Finish (compositor effects), Paper background.
- Patterns: As designed, Flat on the picture (patterns face the camera like printed paper) or On the surfaces (patterns follow perspective and form and stay put when the camera moves).
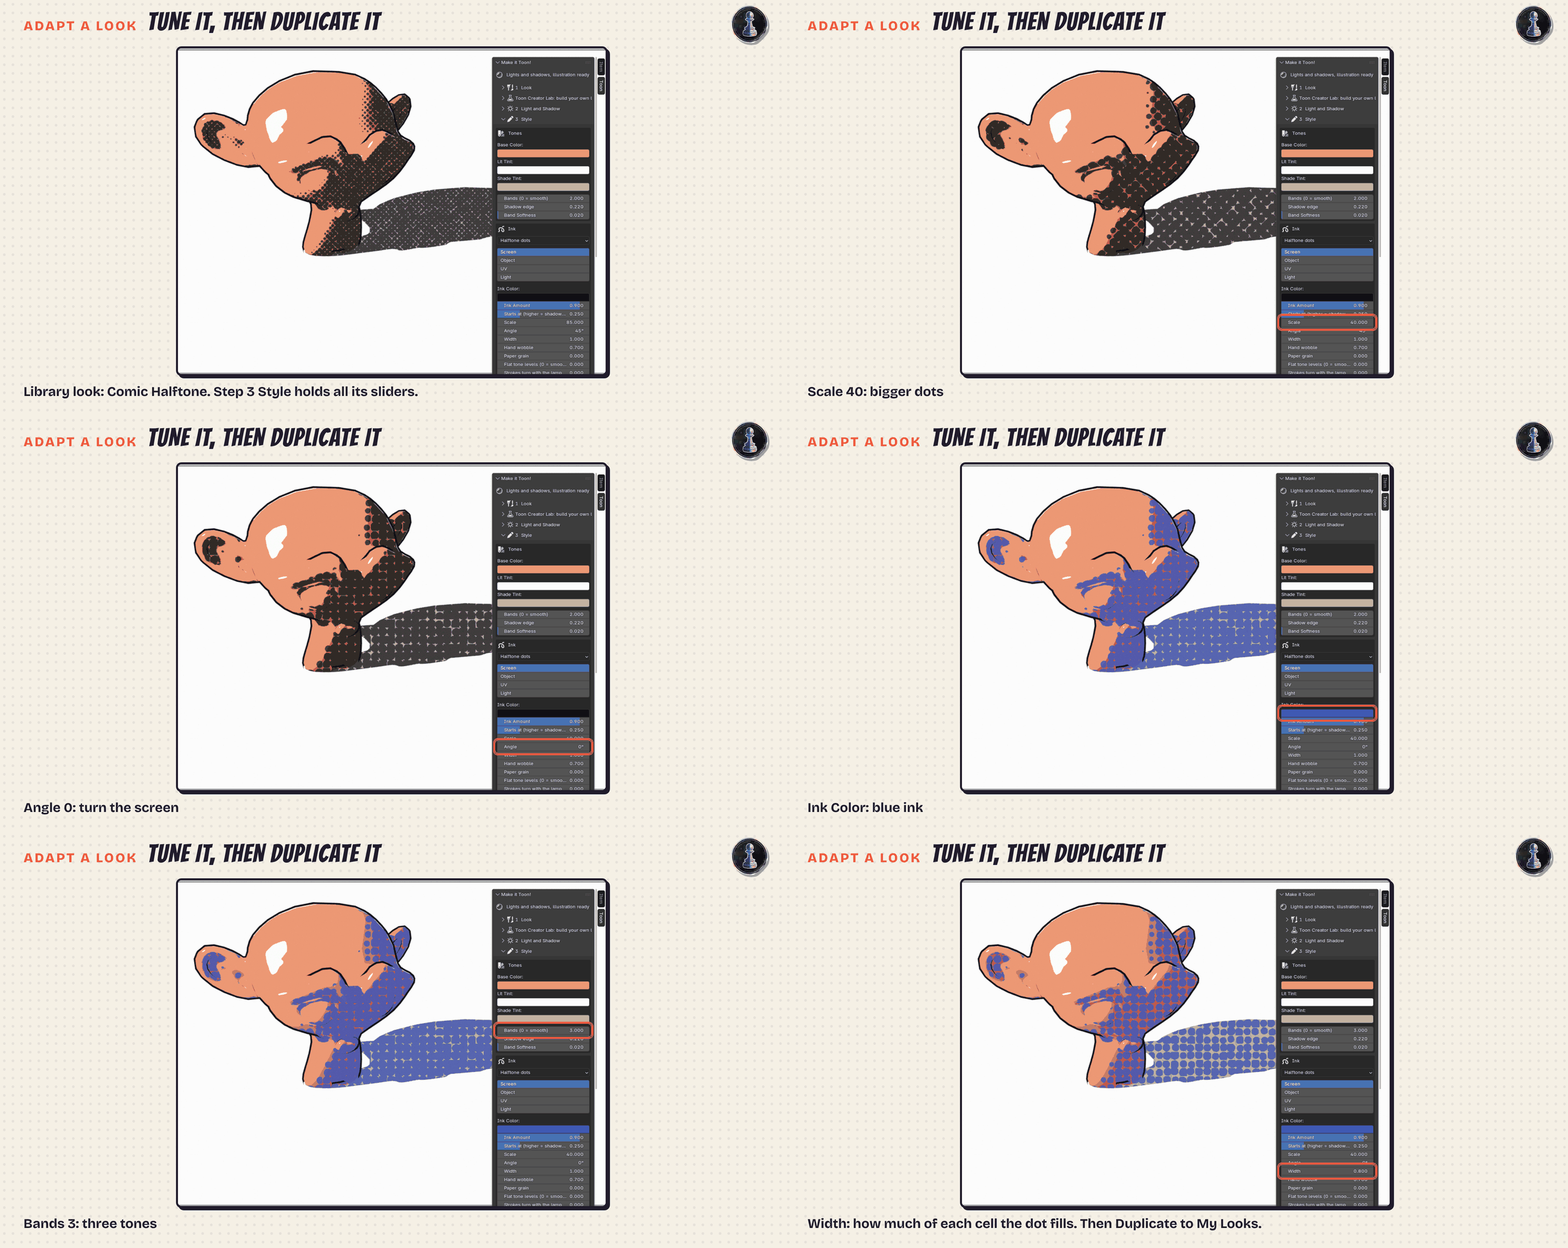
- Duplicate to My Looks: stores the look of the active object (sliders, inks, pattern space, rig, finish, your texture) in My Looks, in Blender's user config folder, so it is there in every project. The icons next to it import looks from a .json file, export the picked one, or delete it. Saved looks keep the colours of the objects you apply them to.
- Colours: As designed keeps your colours on colour looks and repaints in the paper colour on pen-and-paper looks. Keep mine always keeps your colours and textures. Paper always repaints.
- Apply to Chosen or Apply to All Meshes. Your original materials are never edited: the add-on makes a TOON copy and swaps it in. Restore Original Materials swaps them back.
- Image textures on Base Color, alpha cut-outs and normal maps of your original Principled material are carried over.
- VR and 360 safe: patterns are put in Object space (identical in both eyes, no seam at the 360 wrap) and no image space finish is added.
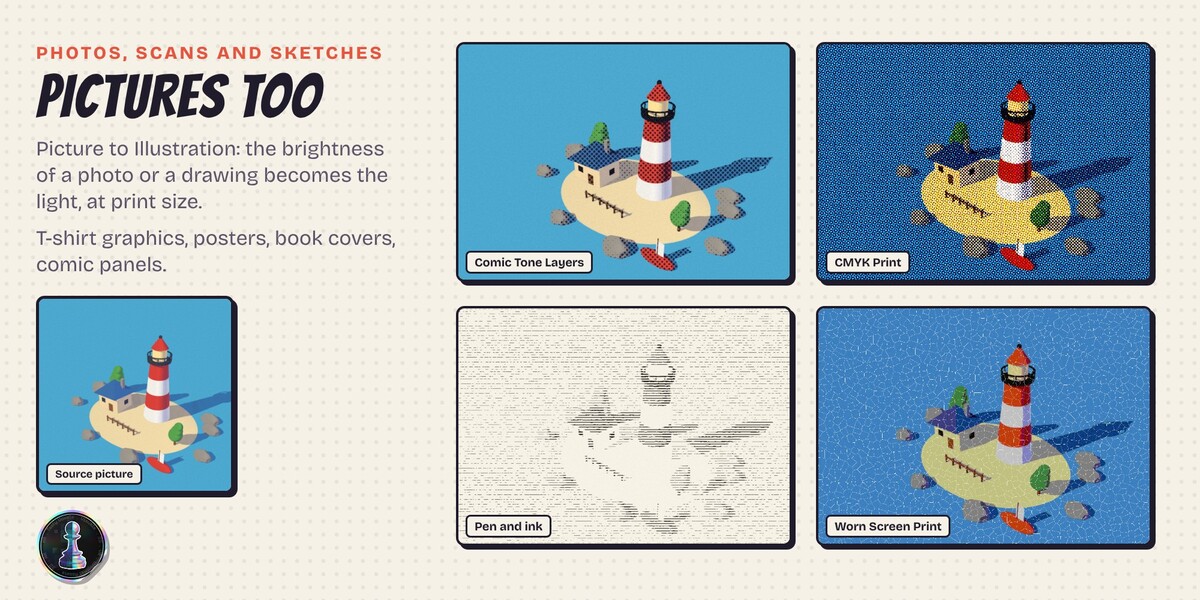
- Picture to Illustration: pick a photo, scan or sketch. The add-on makes a picture plane, an orthographic camera and a render size that matches the picture (longest side up to the value you choose), and applies the picked look. The brightness of the picture is the light: use Brightness in step 3 to move the tones, and Picture colours to keep its colours or repaint it in paper and ink. Pictures have no 3D shape, so rim lights, cast shadow roles and contour lines do not apply to them.
Looks in the Asset Browser
The Asset Browser button (next to Duplicate to My Looks) writes a small library file with one material per look, your own looks included, each with its preview, sorted in catalogs named after the families, and adds it to Preferences, File Paths, Asset Libraries as Make it Toon! Looks, set to Append. Open an Asset Browser, pick that library and drag a look onto an object. The material arrives without scene drivers and the add-on reconnects it to your scene and camera at once. Dragging gives you the material only; the light rig, outline and finish of a look come with Apply in step 1. Press the button again after saving new looks to My Looks.
Toon Creator Lab
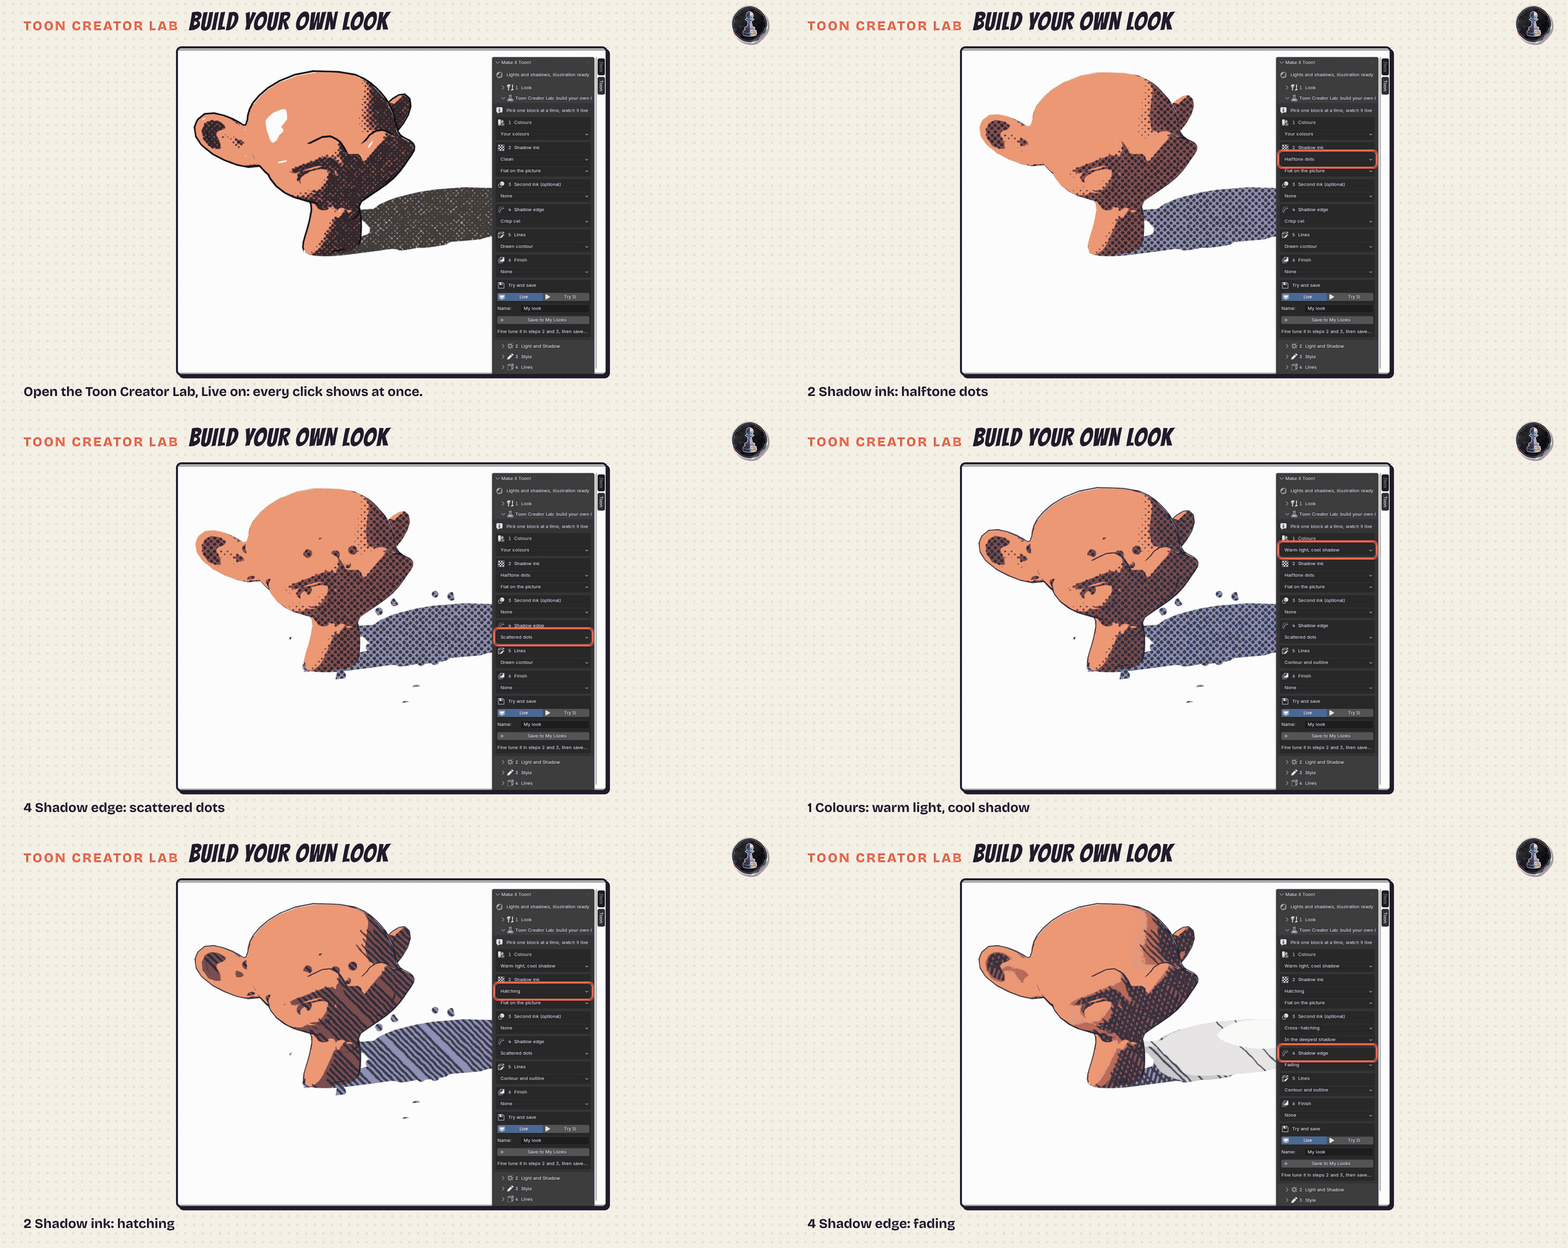
Open the Toon Creator Lab box under step 1. Pick one choice in each block: Colours, Shadow ink (and Patterns: flat on the picture or on the surfaces), Second ink (and Where), Shadow edge, Lines, Finish. With Live on, every change is applied to the picked objects at once; with Live off, press Try It. Give it a name and press Save to My Looks. The look keeps the lamps already in your scene; on a scene with no lamps it adds a key and rim rig. Every choice becomes a normal setting, so you can fine tune it in steps 2 and 3 and save it again under the same name to update it.
Duplicate to My Looks (step 1) saves the look on the active object, with all your changes, as a new look of yours. The library look it came from is not changed.
2. Light and Shadow
- Light rig: Key light, Key and rim, Key and fill, Golden hour, Moonlight, Noir side light, Neon club, Overhead. The rig is placed relative to the active camera.
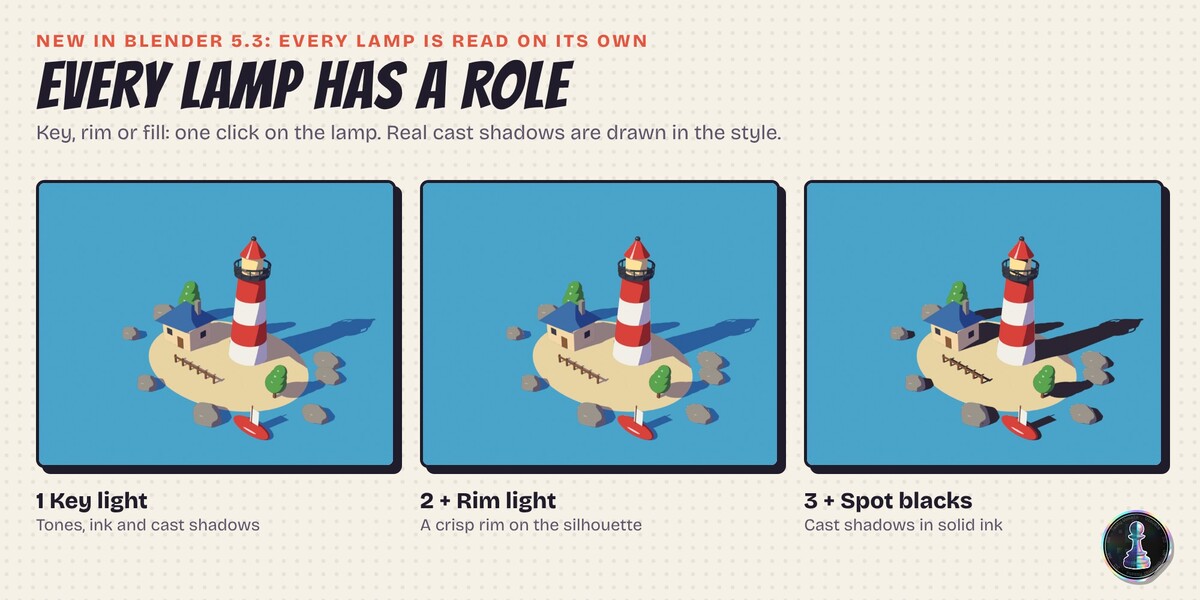
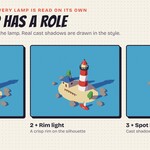
- Light roles: pick any light and give it a role. Key lights shape the tones, the ink and the cast shadows. Rim lights only draw a crisp rim on the silhouette. Fill lights softly lift the colour without ink. The role is stored on the light object as the custom property toon_role (0, 1, 2) and the material reads it per light.
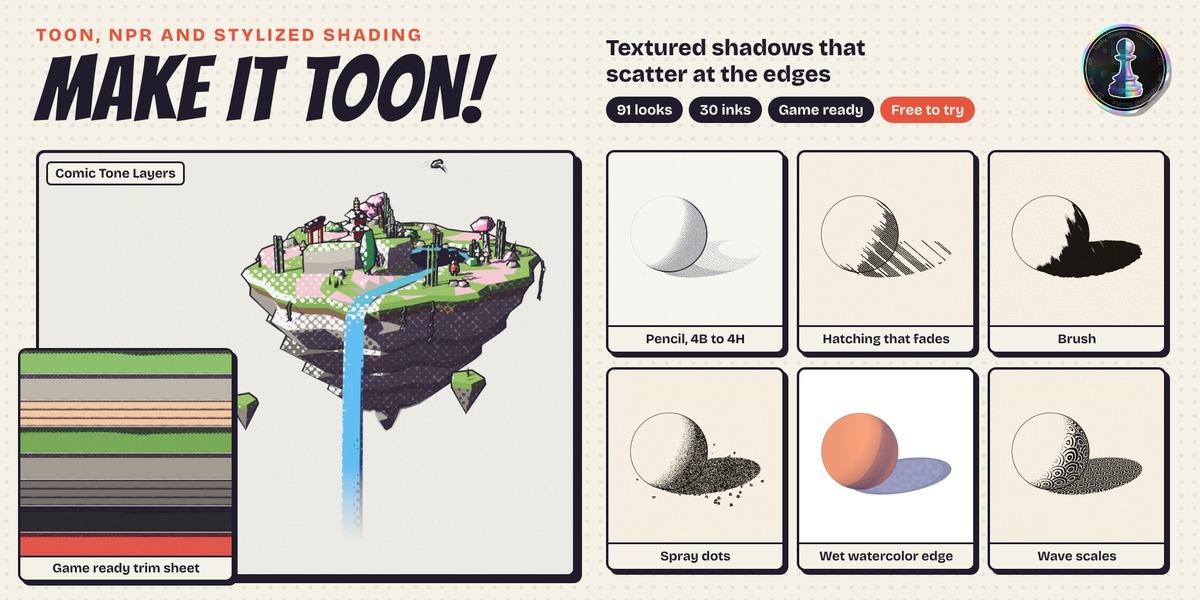
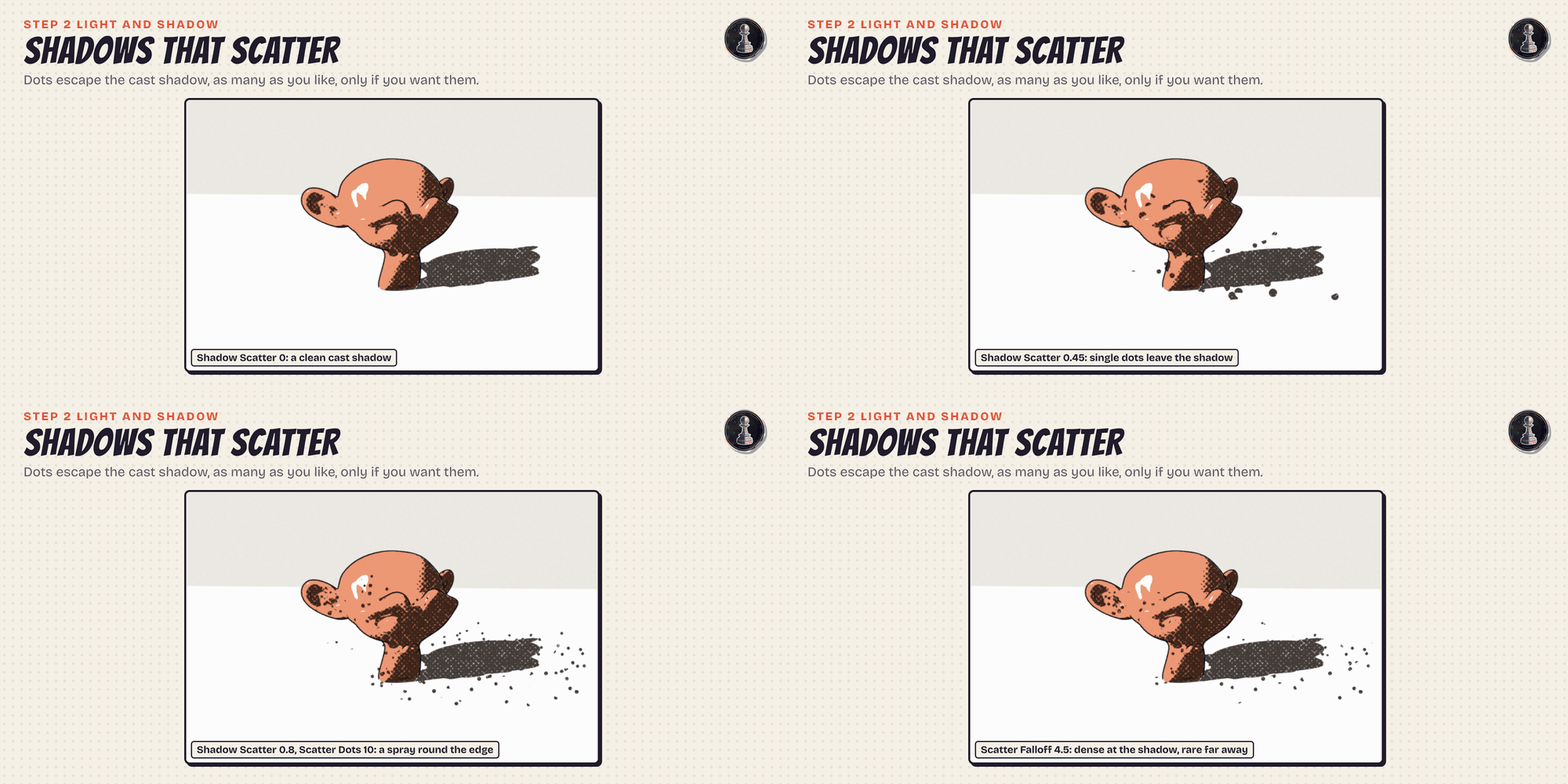
- Light gain scales all lights for the look. Ambient sets how dark the shadow side gets. Cast Shadows blends real cast shadows in or out. Shadow Softness softens them. Spot Blacks fills cast shadows with solid ink, the classic comic and noir trick. Light colour tints lets coloured lights tint the tones. Fill lights sets how much fill lights lift. Brushy Edges and Edge Scale break the shadow edges up like dry brush. Shadow Scatter throws a spray of round ink dots around every cast shadow, thinning out with the distance; Scatter Dots sets how fine the dots are and Scatter Falloff how fast they thin out: higher keeps most dots close to the shadow and sends only a few far away. Shadow Fade makes a cast shadow darkest where it touches the object and lighter as it runs away from it, like a pencil pressing hard at the contact and lifting off at the tip; Fade Range is the length of that fade in metres. Edge Pooling gathers pigment along the inside edge of a shadow, the dark rim of a wet watercolour wash; Pooling Width sets how wide the rim is. Dots keep their size on screen, near and far. Stipple, spray and sand looks use a little of it already. Live light only. Ink in crevices (Occlusion) darkens creases so they take ink. Ink where things touch (Contact Ink) fills the narrow gap where two surfaces almost meet with solid ink, using the Raycast node of Blender 5.3; Contact Range is the gap size in metres. Core Shadow and Core Width add a darker band just past the terminator; Reflected Light lifts the far side of the shadow, as painters do. Simple shadow shapes bends the light normals toward a clean volume around the object origin, so the shadow becomes one designed shape instead of many small islands (flat floors are left alone).
- Paint Shadows: opens Vertex Paint on a colour attribute named toon_shade of the active object, filled with grey. Paint black to push the shadow in, white to push the light in; grey leaves the lamps in charge. Strength scales the effect, Clear removes the attribute. Works live and with baked light.
- Accents: crisp specular highlight (amount, size, colour), view rim (a fresnel rim that needs no light) and rim lights strength.
3. Style
- Tones: Base Color (or from texture), Lit Tint, Shade Tint, Bands (0 = smooth gradient, 2 = classic cel, 3 to 6 = posterized), Shadow edge, Band Softness.
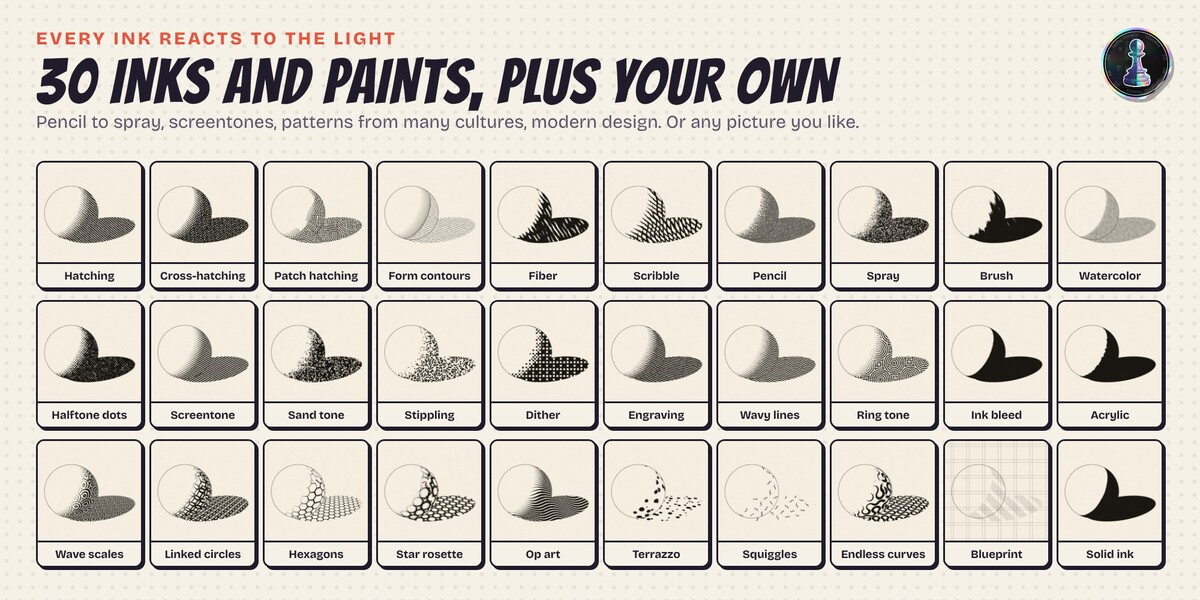
- Ink pattern: Clean, Hatching, Cross-hatching, Halftone dots, Screentone lines, Stippling, Ordered dither, Engraving, Brush strokes, Pencil sketch, Watercolor, Blueprint grid, Solid ink, Patch hatching, Scribble, Sand tone, Form contours, Fiber hatching, Ink bleed, Acrylic, Spray and airbrush, Wavy line tone, Concentric tone, Wave scales, Linked circles, Hexagon lattice, Star rosettes, Op art waves, Terrazzo chips, Squiggles, Truchet arcs, Your texture (pick a picture: its dark parts take ink first; it tiles at the pattern Scale). Hatching and cross-hatching thin out the way a hand does: in light tones whole strokes are left out instead of every line fading together. Halftone dots get looser with Hand wobble: dots move off the grid and change size, like a hand placed or worn screen.
- Strokes turn with the lamp (Follow Light): the hatching angle follows the direction of each light as seen from the camera.
- Contour line: an outline drawn by the shader, thin on the lit side and heavier on the shadow side. Contour Width sets its weight.
- Media in motion: Ink spread (0 to 1) reveals the ink from the darkest areas outward; Wet paint (0 to 1) takes watercolor and ink bleed from wet to dry. Ink Spreads and Paint Dries keyframe them from the current frame (50 frames, editable in the operator panel).
- Chosen per lamp (Second ink, Where): every key lamp draws with the first or the second ink. Pick it on the lamp in step 2 (Draws with: First ink, Second ink). Live light only.
- Lines with their own colour: Line Color and Own colour for lines give the contour line a colour of its own, for example a soft dark pencil for contours over a hard light pencil for the shading.
- Flat tone levels: 0 keeps the tone smooth; 1 to 6 snaps it to flat screentone levels.
- Second ink: a second ink pattern. Where picks the place it takes over: Deepest shadows (from Deep Start on, for example dots in the mid tones and solid black in the dark), Faces looking up, Faces looking down, Turning edges, Low parts, Far from the camera, Near the camera, Crevices, Ridges and bumps, Far from the lamp. Starts at moves the border; Range (in metres) sets the distance for the camera, lamp, crevice and relief modes.
- Highlight halftone: light dots in the brightest areas, amount and start.
- Pattern space: Screen sits on the image like printed paper, best for stills. Object sticks to the surface with a triplanar projection (no UVs needed), best for animation, game textures and 3D printing. UV follows your UV map. Light lets every lamp project the pattern like a slide projector: steady when the camera moves and continuous across objects. Light space is live only; a bake uses Object.
- Ink colour, amount, where the pattern starts, scale, angle, line width, hand wobble and paper grain.
- Screen patterns never get finer than 6 pixels of the final render: if Scale asks for more cells than the image can show, the cells grow to stay clean.
- Line boil redraws the wobble every N frames (2 = on twos), like hand drawn animation.
- Copy to Chosen copies every setting to the other toon materials of the picked objects. Reset to Look goes back to the look's values.
Everything in this panel is the input of one node group (TOON Controls) inside the material, so you can also edit it in the Shader Editor, keyframe it or drive it.
4. Lines
- Outline: an inverted hull (Solidify modifier named TOON Outline plus its own material). Works live in EEVEE and in Cycles. Width is in percent of the object size.
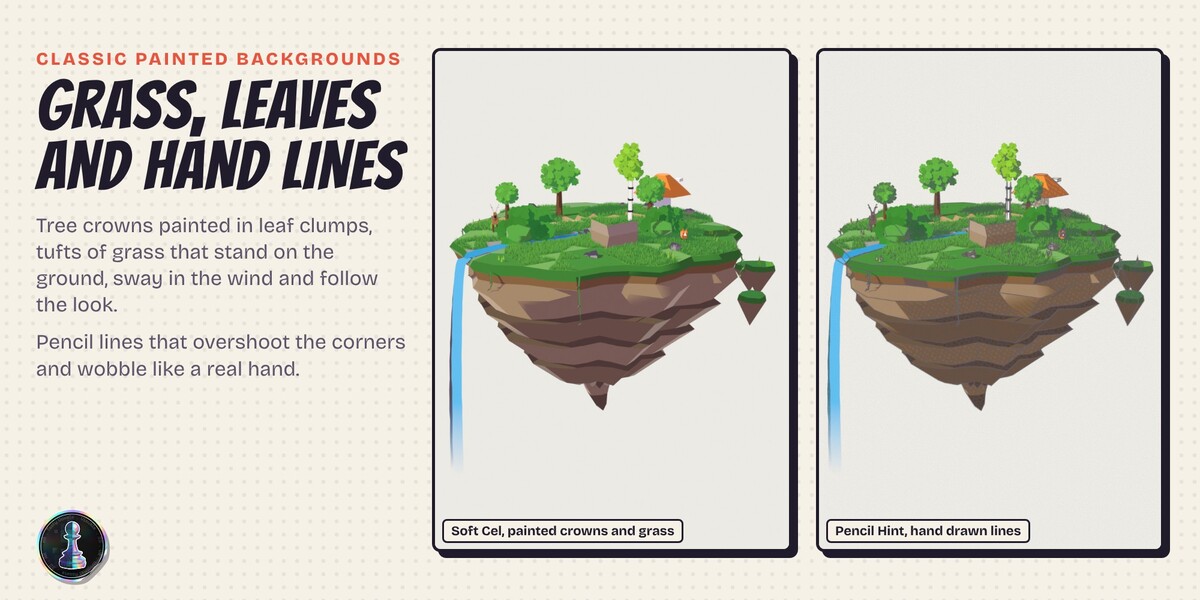
- Hand Drawn and Sketchy (after Line Art): Grease Pencil modifiers make the lines overshoot and curl at the ends, wobble and change width, and redraw every 2 frames; Sketchy adds a second faded pass. Remove them in the modifier stack of TOON Line Art.
- Line Art: adds a scene Grease Pencil Line Art object for contours, creases and intersections, with a line weight measured in pixels. It switches the hull outlines off (they would hide their own lines); they stay on the objects and can be switched back on in the modifier stack.
Grease Pencil kit (step 4): Manga Ink makes a Grease Pencil object TOON Manga Ink with the materials G-Pen Ink, Brush Pen, White Out, Blue Pencil, Screentone Fill and Black Fill, a line boil on twos (Noise modifier TOON Boil) and a draw-on (Build modifier TOON Draw On, off until you switch it on), and puts you in Draw mode. Light Strokes makes TOON Light Strokes with Neon Pink, Neon Cyan, Gold Light, Pure Light, Rainbow (a hue gradient along the stroke) and Sparkle Trail (marching dashes), a Glow effect and a soft flicker. The glow shows best on darker looks and backgrounds. Light Ribbons adds TOON Light Ribbons: light painting trails that loop round the chosen objects, outside their bounds so they never pass through them, with their face turned to the scene camera. Each trail is drawn by a bright head with a hot core and a soft halo and leaves a fading tail; the trails take turns, so the 72 frame loop never goes dark. It looks best on a dark background.
Toon Moves (step 5): nine one click moves for the chosen objects, from the current frame: Bounce, Pop In, Pop Out, Dash Off, Jelly Wobble, Take, Idle Breathe, Sway and Shiver. Each is a Geometry Nodes modifier TOON Move plus the name of the move, placed after subdivision and before the outline, so the line, the Line Art, the art objects and the strokes follow it; keyframes, rigs and the object transform are not changed. The panel lists the moves of the active object with Start (frame), Length (frames), Loop, Strength (exaggeration), Height (of the hop, in scene units) and Bend (how far the top lags behind the base, a share of the object size), and an X to remove each one; Remove all moves clears them. More settings sit in the modifier: Travel (where Dash Off goes, along the screen right by default), Squash Axis, Pivot at Base and On Twos. Squash and stretch keeps the volume (taller is thinner). To change the timing of a move, open its node group: the curves Height, Squash, Travel, Bend and Scale draw the move from 0 (start) to 1 (end) and you can drag their points. Moves stack: Pop In at frame 1 and Bounce from frame 15, for example.
Liquid FX (step 5): six toon liquid effects, each an object TOON Liquid plus the name, with a Geometry Nodes modifier. Pick the liquid first (Water, Paint, Slime, Honey, Ink, Milk). Splash, Splat, Goo Blob and Paint Burst appear beside the chosen objects (or at the 3D cursor), at the origin of their own object: grab the object to move them. Drips hang from the underside of the chosen objects and fall to the surface below them. Liquid Wipe rides on the scene camera and floods the whole view, then clears it, as a transition. In the modifier: Size (of a drop), Height (how high it flies or falls from), Speed, Seed, Smoothness (how much near drops pull into each other) and On Twos. The drops are meshed every frame from a softened distance field, so they merge and split by themselves; nothing is simulated or baked. The liquid material reads from the view, so it looks the same in any scene and in EEVEE and Cycles. Remove liquid effects deletes the chosen ones, or all of them if none is chosen.
Falling Leaves (particles, step 5): leaves that rock from side to side as they fall from above the chosen objects and rest on whatever they land on, before the next ones come down. Pair it with Wind on the tree crowns and the grass.
Art Objects (step 4): six Geometry Nodes modifiers, TOON Art Object on each chosen object, rebuild it out of geometry. Pencil Sculpture (graphite strokes wrapped on the form, crossed in the shadows, on a paper body), Constellation (the surface collapsed to twinkling stars and lines), Plexus (breathing dots joined by lines that thin and snap), Halftone Relief (raised dots, bigger in shadow), Mosaic (an even grid of tilted tiles in dark grout, wearing the look of the object) and Paper Fold (flat paper facets with inked folds). In the modifier: Size sets the stroke, star, dot or tile size, Amount how much of it, Keep Body shows or hides the plain object under the art, Seed shuffles it. The shading follows the key light of the scene: after moving the lamp press Follow the Light. Back to Object removes the modifier and gives back the outline and Line Art settings. Constellation and Plexus glow, so they read best on a dark background.
5. Strokes, Effects and Motion
- Add Strokes: a Geometry Nodes modifier (TOON Brush Strokes) scatters stroke cards over the picked objects. Coverage (about how many layers of strokes), stroke size in percent of the object, length and random turn are in the operator panel; the modifier exposes them too. Every stroke uses a stroke copy of the face's own toon material, so it picks up light, shadow and ink where it sits. Remove takes modifier and stroke materials away. The Impasto Strokes and Gouache Dabs looks add strokes for you.
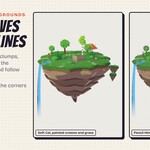
- Grass and leaves: Grass on Ground grows standing blades on the faces that look up (Geometry Nodes modifier TOON Grass: blades per square metre, height, width, lean, slope limit), in tufts with bare patches. Painted Crowns lays big scalloped clumps on a tree crown, pushed out of the surface and turned to the scene camera; Leaves lays single leaf cards. Both set a warm light and cool shadow and one simple shadow shape on the crown. Add Wind afterwards to make them sway. The cards never grow on the outline shell.
- Brush relief: bends the light with stroke shaped noise, no geometry (live light only).
- Animated effects: Fire, Water, Smoke, Hologram, Sparkles, Magic Glow, Lava. Pick a mesh (a sphere, a plane, a flame shape) and click: it gets an animated toon material, on twos by default, with speed and scale in the operator panel.
- Particles and weather: Embers, Magic Stars, Fireflies, Snow, Rain, Connected Dots and Water Caustics (a rippling web of light on every face of the picked objects that looks up; Size sets the size of the cells). Pick the objects and click: you get one object named after the effect, with a Geometry Nodes modifier. It reads the picked objects (through a collection made for it, TOON Targets), the scene camera and the scene time: it loops by itself, follows the objects and turns every card to the camera. Snow and Rain fall from above the objects onto whatever they hit (pick the ground too); rain opens a splash ring where each drop lands. Tune Count, Size, Speed, Height (how far they rise or fall, or how close Connected Dots link), Seed and On Twos in the modifier. The cards are excluded from Line Art and cast no shadow.
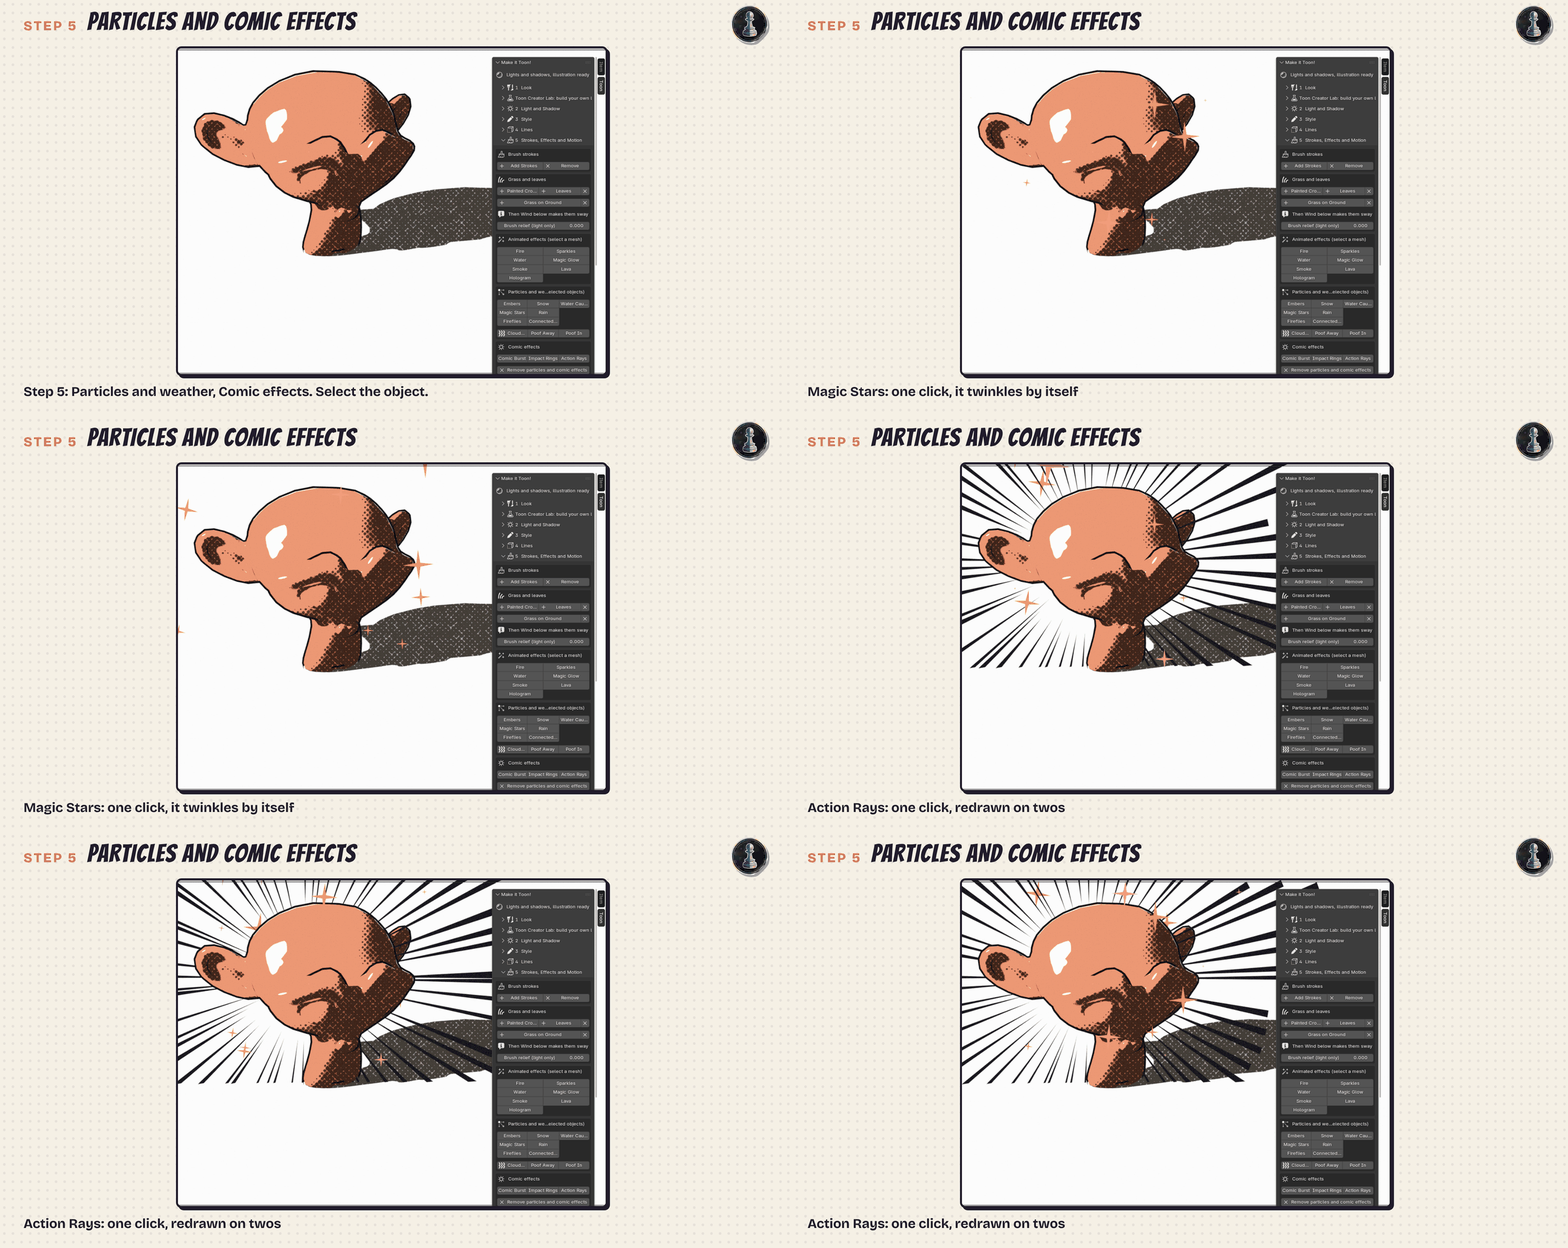
- Comic effects: Comic Burst (a jagged explosion behind the objects, halftone fill, ink edge, popping on a loop), Impact Rings and Action Rays (radial speed lines redrawn on twos). Same modifier and inputs as the particles. Remove particles and comic effects removes the picked ones, or all of them if none is picked.
- Poof: Cloud Puff, Poof Away (the objects are hidden when the puff clears) and Poof In (they appear inside it), keyed from the current frame. The cloud is drawn in the look of the objects; the sparkles turn to the camera.
- Wind: a Geometry Nodes modifier (TOON Wind) sways leaves, grass, hair and fur; the push grows with height above the object origin, so roots stay put. Strength, gust size, speed, direction and on twos are on the modifier.
- Glass on paper: pick a glass object and click Prism Rainbow, Water Glass or Lens Spot. The object gets a toon glass material (your materials are kept and come back with Remove) and a caustic sheet is placed on the surface under it, on the side away from the key light. The caustic is computed per lamp inside Light Accumulation, so its direction, brightness and colour follow each key light; rim and fill lights are ignored. When you move the lamp a lot, press Follow Light to slide the sheet to the new spot. Live in EEVEE only.
- Stop Motion, two buttons. Puppet holds the animation of the chosen objects on twos or threes (Hold frames) and adds a small hand placed wobble and turn to every pose, as F-Curve modifiers you can edit in the Graph Editor. Objects without animation get a key first, so they wobble in place. The ink boil of their toon materials follows the same step. Hand Drawn does the same with a stronger wobble, and on every held pose redraws the drawing: a Geometry Nodes modifier TOON Hand Boil (right after the outline) swells and dips the surface a little with a noise that changes only on a new pose, the outline hull swells and pinches on its own like a brush line, the contour of the material boils (Line Boil) and the Line Art strokes wobble on the same beat. Turn Amount and Line Wobble down in the modifier for a calmer hand. The X button takes everything off.
- Drawing Timelapse: keys contour, ink spread, colour fill and drying one after the other, from the current frame. Colour fill can also be set by hand (0 = paper and ink only).
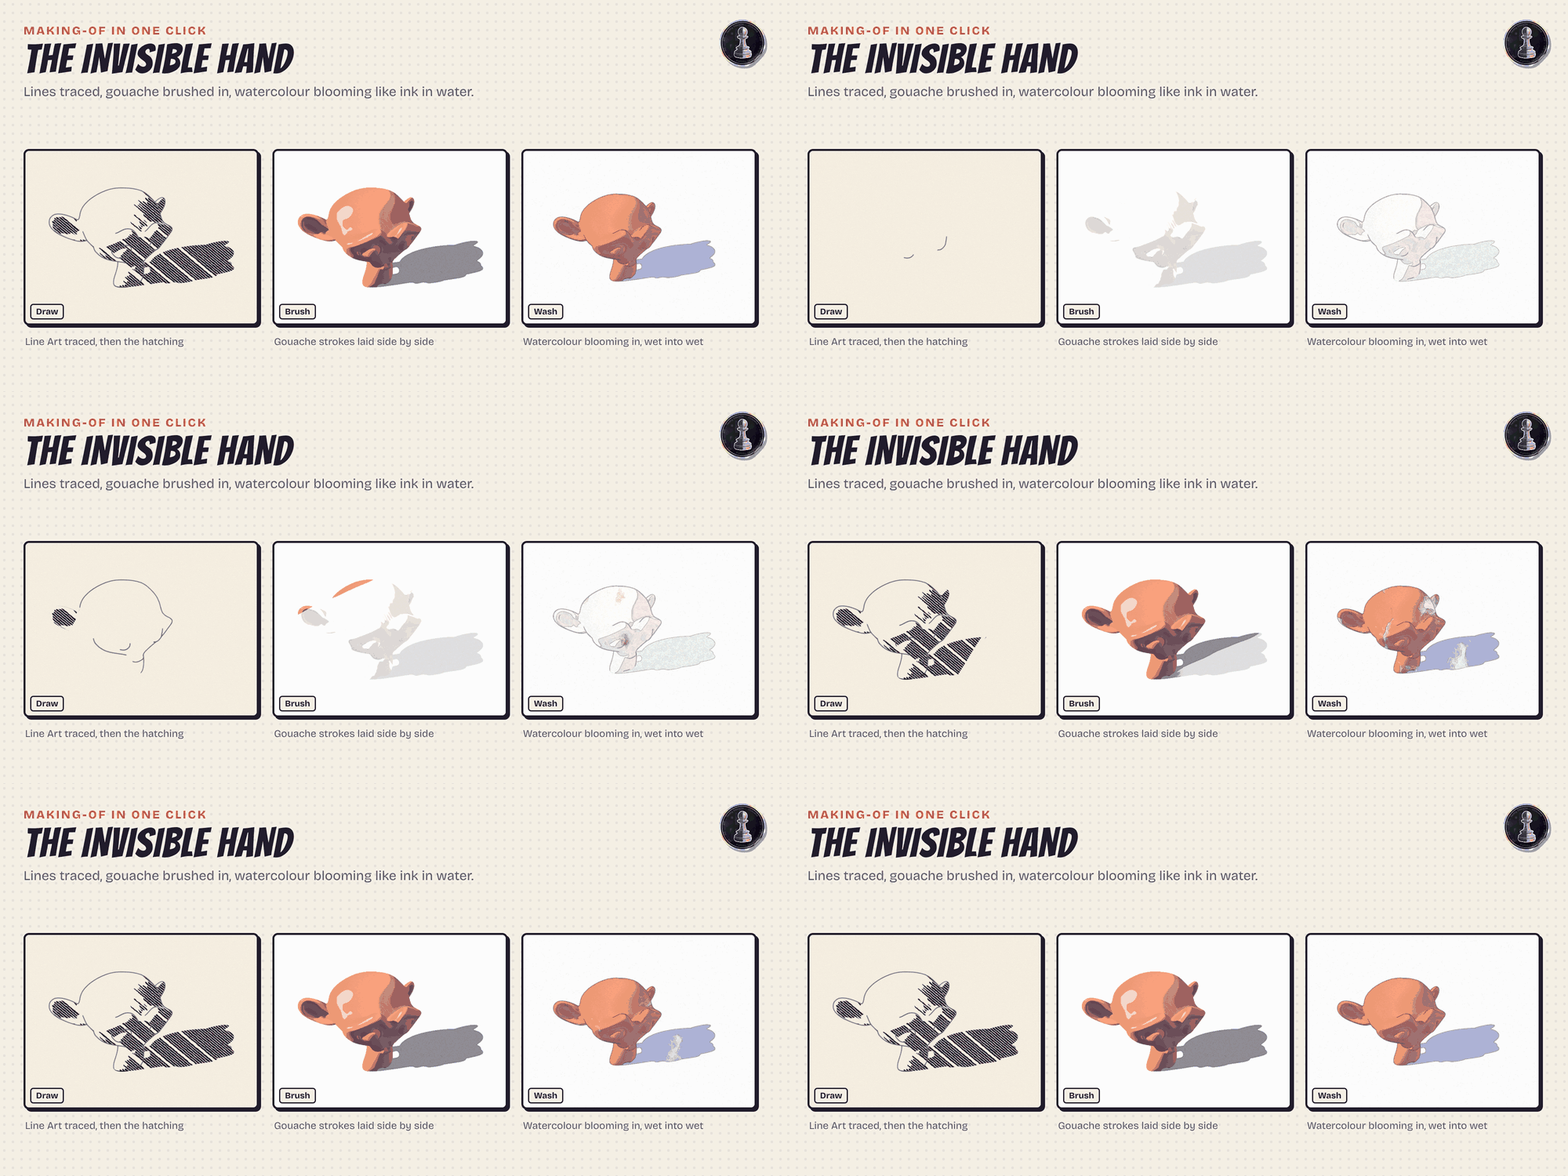
- Invisible Hand: the picture makes itself from the current frame. Draw traces the Line Art stroke by stroke (a Build modifier named TOON Invisible Hand on the Line Art object) and hatches the ink in line by line, back and forth. Paint lays the colour in brush strokes side by side; on watercolour and ink wash looks (detected from the pattern) the colour blooms from a few drops and spreads with a wet edge instead, and can dry at the end. The slider Paint Wash switches between the two. Invisible Hand does both, one after the other. The sliders Drawn so far and Painted so far are what gets keyframed: 1 = finished.
6. Finish
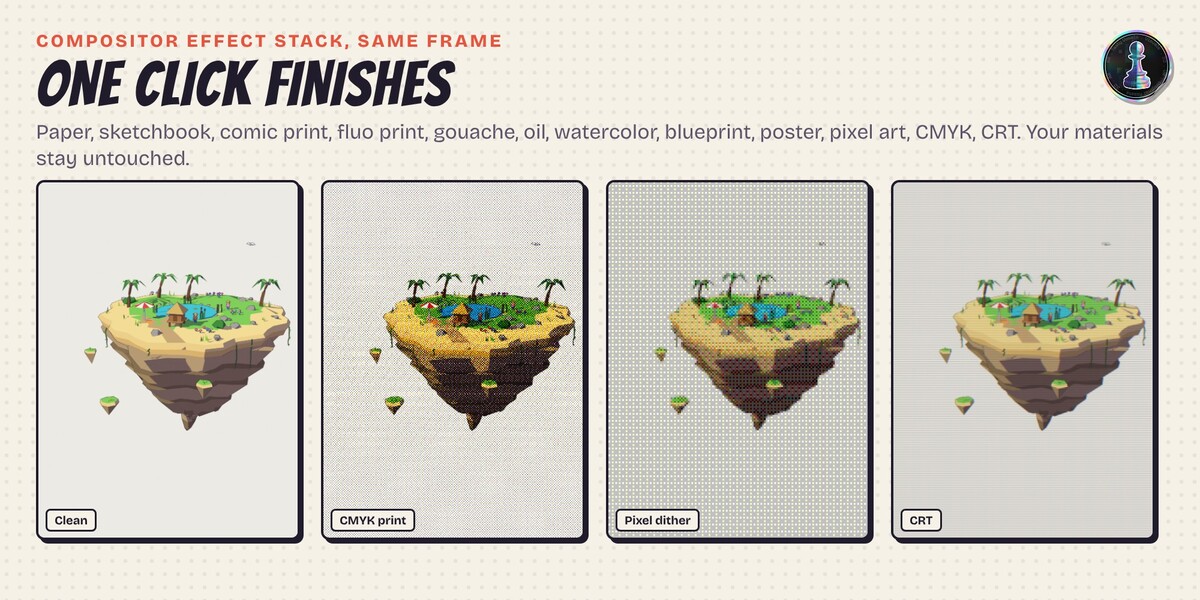
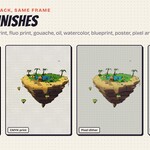
- One click finishes for the Blender 5.3 compositor effect stack: Clean, Paper, Sketchbook, Comic Print, Fluo Print, Gouache, Oil, Watercolor, Blueprint, Poster, Pixel Art, Pixel Dither, 1 Bit Noise, CMYK Print, CRT Monitor, Tape Glitch, Film Lens, Worn Screen Print.
- Single effects: Paper, Ink Edges, Paint Strokes (anisotropic Kuwahara), Print Offset, Grain, Glow, Pigment Edges, Posterize, Pixel Art, Ordered Dither (Bayer), Noise Dither, CMYK Halftone (C 15, M 75, Y 0, K 45), CRT Screen, Worn Print, Chromatic Aberration (with lens distortion), Vignette, Glitch (bands of the image jump sideways every few frames, following the scene frame). Dither, posterize and halftone work on display values, so dark tones do not collapse to black. They run on the final image, also in the viewport compositor, and never touch your materials.
- Finishes replace only the add-on's own effects. Effects you added yourself stay where they are.
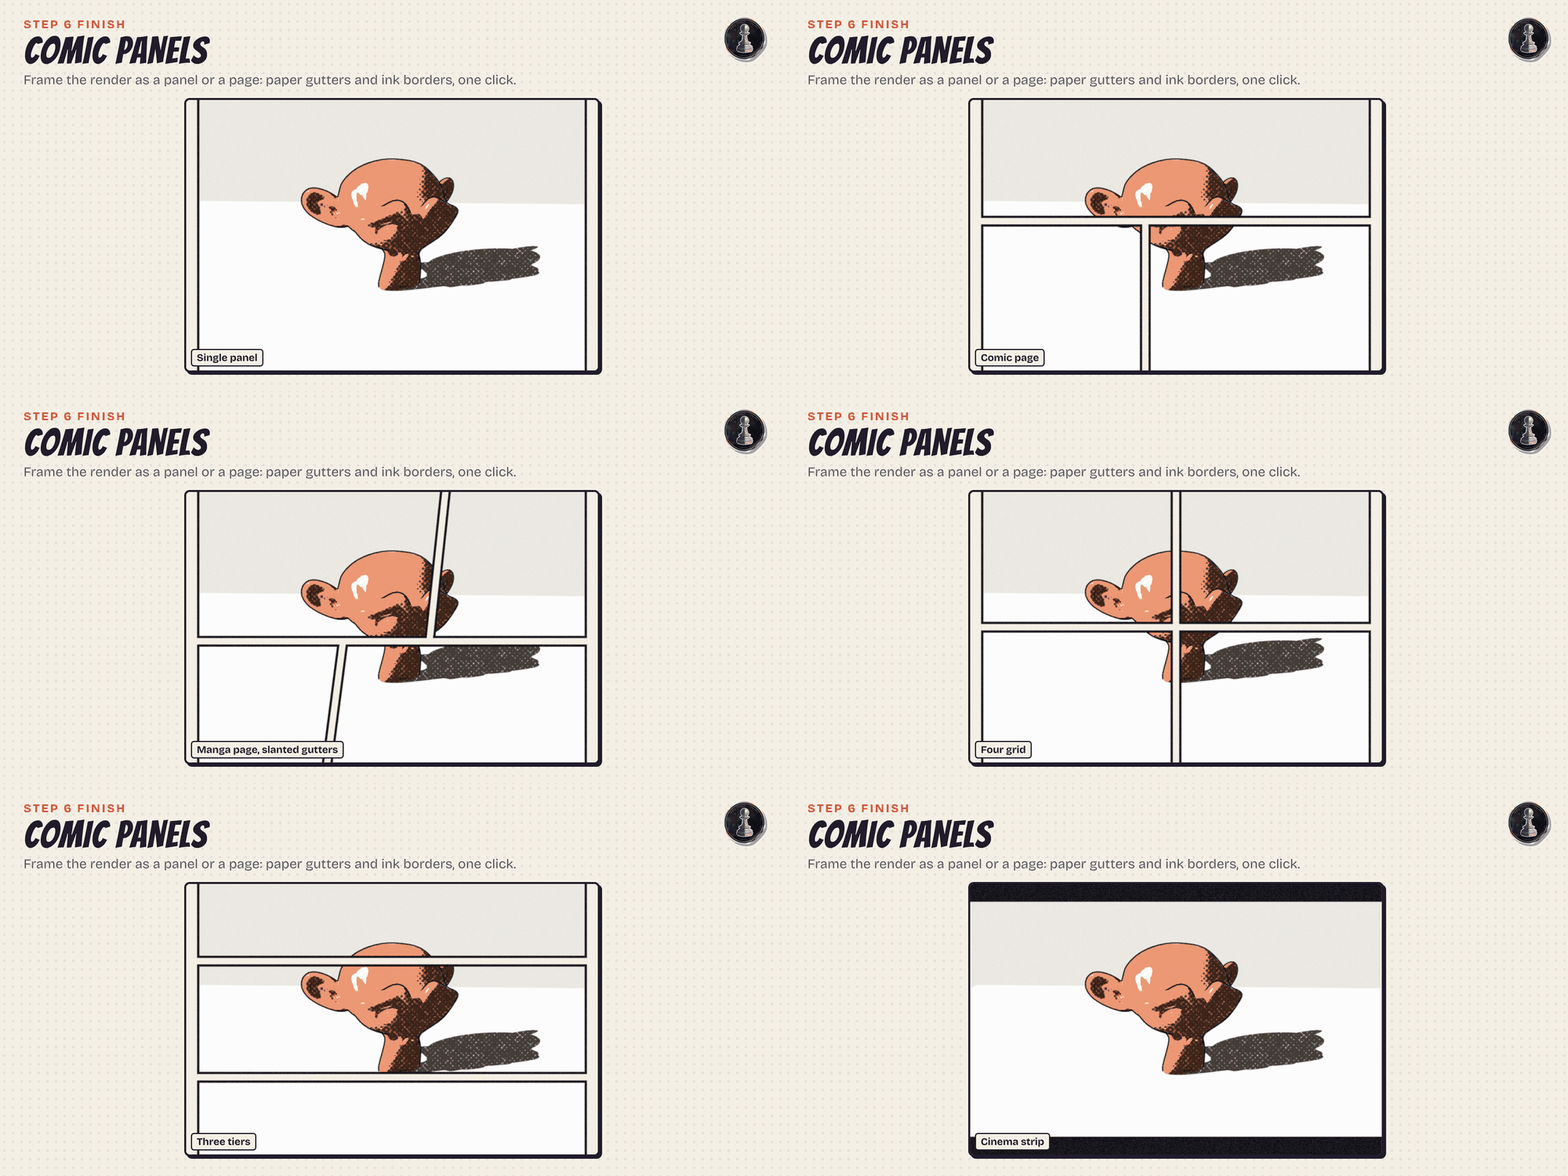
- Comic panels: Single panel, Two side by side, Three tiers, Comic page, Four grid, Manga page (slanted gutters) and Cinema strip. A frame object (TOON Panel Frame) is parented to the camera just past its clip start and cut to the camera frame: paper gutters and ink borders over one continuous picture. Pick a layout again after changing the lens or the render size. Remove Panel Frame takes it away.
7. Bake and Export
- Ink Overlay: only the ink and the shadow textures stay, the rest becomes transparent. It sets the colour fill of every toon material to paper, turns on a transparent render background and adds the Ink Only, Transparent effect: every pixel becomes as opaque as it is darker than the paper, so soft pencil and light stipple stay, with their own tone, on any background (Threshold drops the faint paper grain). The viewport compositor is switched on so you see it live. Render to PNG to keep the transparency. Off puts the colour back.
- Turntable: an empty TOON Turntable at the base of the picked objects carries the scene camera once around in the number of frames you choose, as a seamless loop at 25 fps. Sprite Sheet: renders the picked objects from N directions (and every N frames of the scene range, or only the current frame) on a transparent background and saves one PNG: one row per direction, one column per frame.
- Trim Sheet for games: renders one strip per toon material of the picked objects (up to 16; a rounded beam, a bevelled plank and a grooved plank, in turn), lit by a raking key light and inked by the look, into one square PNG. A text file next to it lists the UV band (V from and to) of each material, so you can map the walls, beams and floors of modular game meshes. View dependent shine is left out. Your scene is put back as it was.
- Render Illustration Layers: renders the current frame five times and saves PNG files in the folder you pick: 1 flats (base colours, transparent background), 2 shading (light and shadow, multiply it over the flats), 3 colour (shaded colour without ink, transparent), 4 ink (ink, patterns and lines on white, multiply it on top), 5 final (with the finish). Your settings are put back afterwards.
- Bake Light: the key lights and their cast shadows are baked into the object with a Cycles diffuse bake, either into a light map texture (default: sharp shadows even on big low poly faces; a UV map is made automatically if the mesh has none) or into vertices (a colour attribute, fast, for dense meshes). From then on the look renders the same in EEVEE and in Cycles. Live goes back to the live lights.
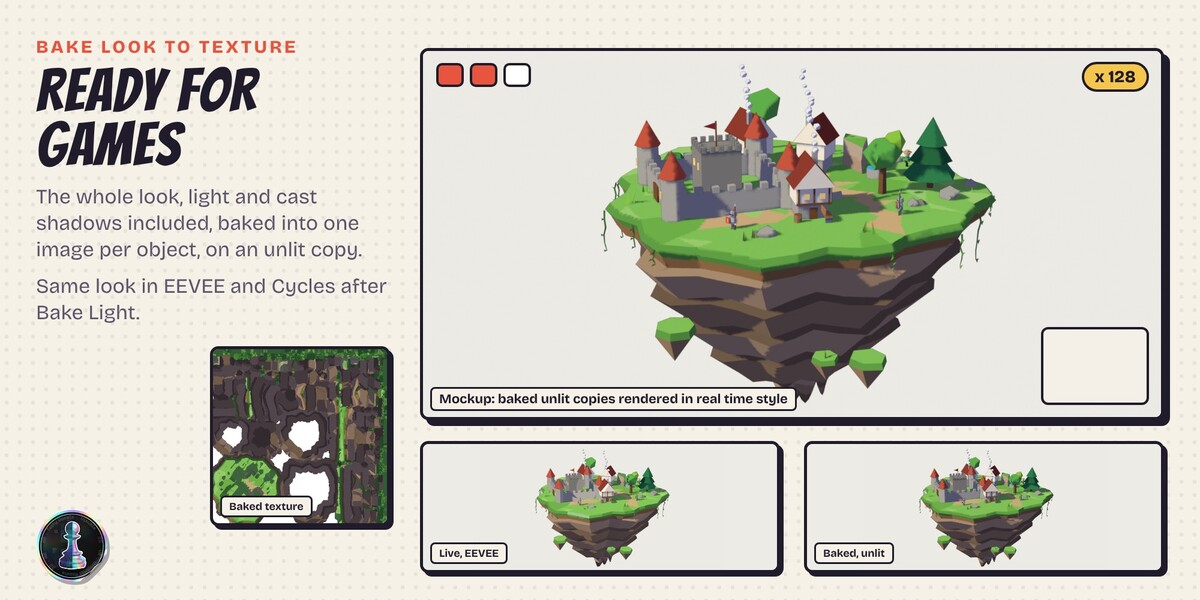
- Bake Look to Texture: the whole look is baked into one image per object. A copy of the object gets an unlit material with that image, ready for game engines and real time viewers. The original is hidden, not deleted. Images are saved in a toon_bakes folder next to your .blend (or packed if the file is not saved yet). Objects without UVs get an automatic Smart UV map.
-
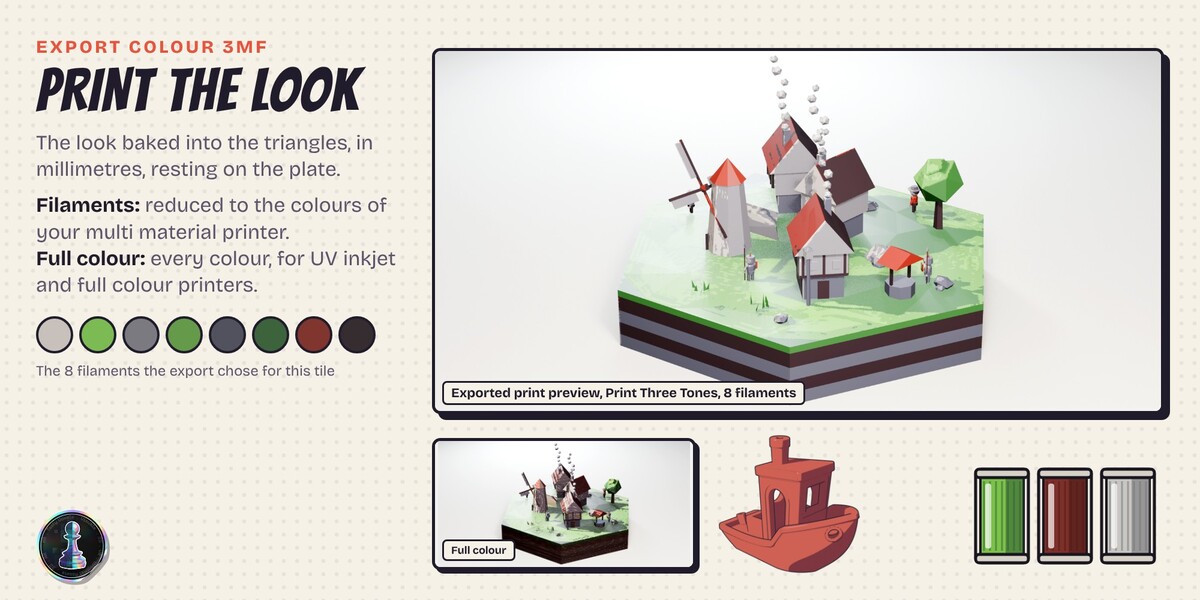
Export Colour 3MF: the look is baked into the triangles of a print copy and saved as a 3MF in millimetres, resting on the build plate.
- Longest side: the printed size in mm.
- Colour detail: the largest triangle edge in mm. Fine lines need small triangles: 0.4 to 0.6 mm for FDM, 0.1 to 0.2 mm for UV inkjet. Smaller means heavier files.
- Filaments: the look is reduced to N colours, one per triangle, for multi material FDM. The colours are listed after export, lightest first.
- Full colour: every triangle corner keeps its colour, for full colour and UV inkjet printers.
- A preview copy appears in the TOON Print collection so you can check the result before slicing.
Good to know
- Use Rendered view. The look reacts to the scene lights. Material Preview uses its own studio lights, so the panel offers a button to switch the viewport to Rendered.
- Live light is EEVEE. The Material Lighting nodes are an EEVEE feature in Blender 5.3. In Cycles the live look stays dark: bake the light first (step 7), then Cycles renders it exactly.
- One key light looks best. Every key light adds its own share, like real light. Use rim and fill roles for the other lights.
- Screen patterns cannot be baked. They live on the image, not on the surface. Switch the pattern space to Object before baking textures or printing. The 3D Print Ready looks already use Object.
- The view transform is set to Standard so the colours you pick are the colours you get.
- The add-on avoids a Blender 5.3 limitation: a Shader to RGB node placed after Light Accumulation returns black. The style is computed inside the per-light chain instead, so nothing in the look depends on Shader to RGB.
Support
Write to me through Superhive messages. Updates and support are included for good: no support period, no renewal fee.
Have questions about this product?
Login to message
| Blender Extension Compatible | Yes |
| Downloads | 2 |
| Dev Fund Contributor | |
| Published | about 2 hours ago |
| Blender Version | 5.3 |
| Extension Type | Add-on |
| Render Engine Used | Cycles, Eevee |
| License | GPL |
Discover more products like this
NPR cel-shading manga screentone toon anime halftone engraving watercolor hatching comic crosshatch