Measure Flow
 Tachyon Studio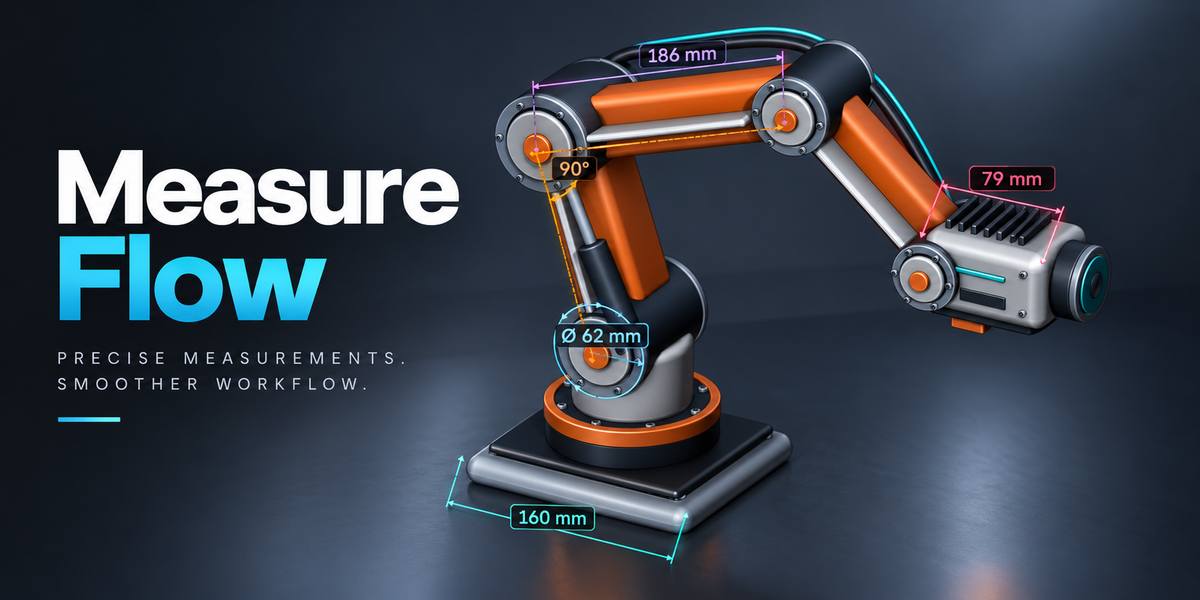


TACHYON STUDIO · DOCUMENTATION
Measure Flow
The complete user manual.
Blender 3.0–5.2One installerWorks offlineMEASURE FLOW 0.1.15
Install, measure, organize and export. Choose a chapter below.
JUMP TO A SECTION
1. Installation and updates2. Your first measurements3. Sidebar, selection and modes4. Measurement tools5. Face area and face edges6. Snapping and live bevels7. Saved measurements, Freeze and export8. Accuracy and tracking limits9. Preferences and support10. Troubleshooting11. Compatibility12. Files, license and creditsCHAPTER 01
Installation and updates
- Blender 3.0–4.1: Preferences → Add-ons → Install, select measure-flow-0.1.15.zip, then enable Measure Flow.
- Blender 4.2+: Preferences → Get Extensions → menu → Install from Disk, select the same measure-flow-0.1.15.zip.
- Open the 3D View sidebar with N, then choose Measure.
- Ctrl Alt M starts a distance measurement. Remap it in Blender's Keymap preferences if desired.
If 0.1.8 failed to enable with _RestrictData, save your work and restart Blender before installing this update to clear its partially registered classes. Replace the earlier package; only enable one copy of Measure Flow. Saved measurements remain in your .blend files.
Update or remove the add-on
Save your blend file before updating. Install the new ZIP over the same existing package; keep only one enabled copy. Check version 0.1.15 in the add-on's Support preferences. Restart after an earlier failed registration before trying again.
To disable or uninstall, find Measure Flow in Preferences. Use its enable checkbox or the package's remove/uninstall action. Saved measurement data remains in the blend file, but needs the add-on to display or edit it. Keep a backup before changing installation formats; automatic transfer of preferences between separate legacy and Extension installations is not provided.
Back to contents ↑CHAPTER 02
Your first measurements
Measure your first edge
- Start with a default cube. Select it and press Tab for Edit Mode.
- Switch to Edge Select and select a single edge.
- In the Measure sidebar, click Lengths of Selected Edges.
- A saved length label appears beside the edge. An unchanged default cube gives 2 Blender units (or 2 m with metric scale 1).
- Press Ctrl Z to undo or Ctrl Shift Z to redo.
Pick a custom distance
- Return to Object Mode and click Distance, or press Ctrl Alt M with the pointer over the 3D Viewport.
- Click the start, then the end. You may add more distances in the same session.
- Press Enter to keep completed measurements. Esc or right-click cancels the current session.
- Click a saved row to rename it, change its color or adjust its label offset.
Keep your work
Save the blend file to retain measurements. The add-on must be enabled to display them. All Modes shows measurements created in other modes. Use Freeze to keep a live value fixed and Unfreeze to restore its original links.
Back to contents ↑CHAPTER 03
Sidebar, selection and modes
- Measure Flow: compact tool grid plus Snap, Ignore Live Bevel, Chain, and Random Colors. Edit Mode highlights distance between two vertices, selected-edge lengths, or face area and face-edge lengths.
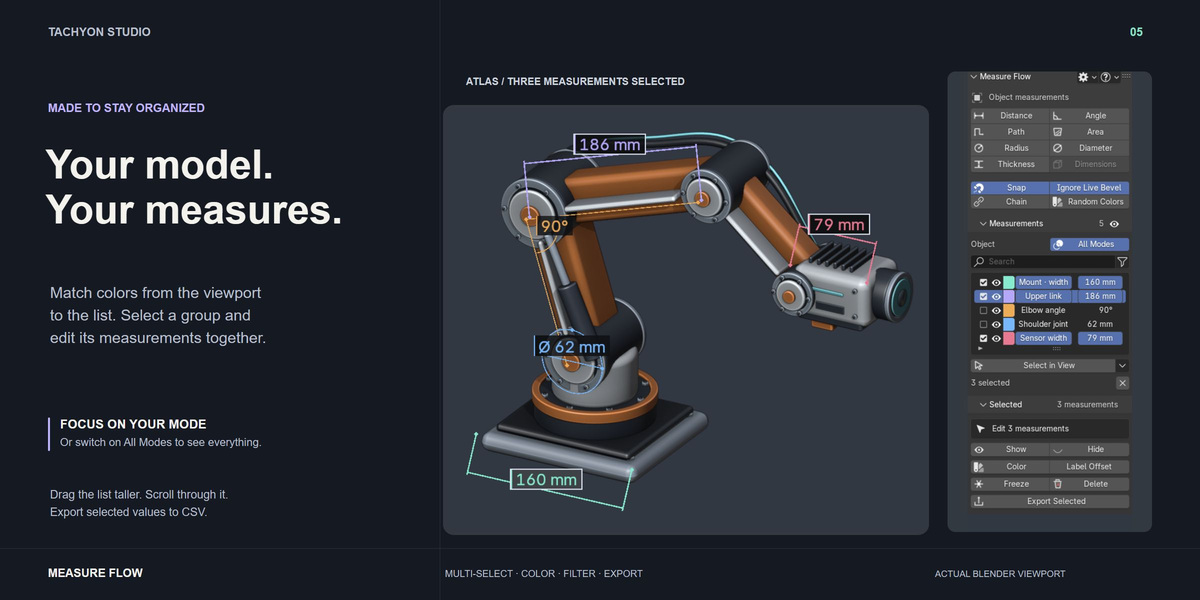
- Measurements: search by name or type, filter with the funnel, and use the color swatches and right-aligned values to identify each result. The header eye toggles all overlays; each row eye toggles one measurement. Search only filters the list, never the viewport or exported data.
- Selected: for one result, rename it, copy its value, and switch between Style and Points. For multiple results, use batch Show, Hide, Color, Label Offset, Freeze, Delete, or Export Selected. Face snapshots expose the global fill-opacity control when selected individually.
- The gear in the Measure Flow header opens units, precision, display, and snapping settings. The question mark opens shortcut help.
- The arrow beside Select in View opens Select All Shown, Deselect All, Export All to CSV, and Clear All Measurements.
- The measuring HUD sits at the bottom-left, clear of the toolbar, and wraps its help text to the available viewport width.
Tool and action buttons use original 32×32 icons, white by default. Open gear → Button icons or the add-on's Preferences to change Icon color or turn off Custom tool icons. Status marks keep their own colors. Measurement colors and their swatches are independent. Blender's built-in icons are used when custom icons are off or missing, and in background sessions.
The list and selected editor can be collapsed independently. Search/type filters do not change the active measurement or add scene undo steps; they reset when opening a file.
Click a measurement name or value to select it, Ctrl-click to add/remove it, and Shift-click to extend a range from the previous selection. Checkboxes also toggle individual measurements. Drag the dotted grip at the bottom of the list to make it taller or shorter. Use the mouse wheel over the list or its right-hand scrollbar to browse; selection persists when rows scroll out of view. With Select in View on, Shift-click or Ctrl-click labels to add/remove measurements. All selected labels receive a light outline.
All Modes controls both the saved list and viewport. Off (the default) shows measurements created in the current Object, Vertex, Edge, or Face mode. Turn it on to see measurements from every mode. Combined mesh selection modes show their matching records; measurements created with combined modes stay visible in all mesh Edit modes. Older records without mode information remain visible everywhere. Mode filtering never deletes records or clears selections. The Selected panel warns when a batch includes measurements outside the current filter. Batch actions affect all selected records, including those scrolled out of view or hidden by filters. All Modes is a session display preference and resets when opening a file.
Back to contents ↑CHAPTER 04
Measurement tools
| Tool | How to use it | Updates |
|---|---|---|
| Distance | Click start and end; repeat as needed; Enter saves the session | Follows attached transforms and original vertices |
| Angle | Click arm, corner, arm; Enter saves | Follows the three points |
| Path | Click points along a route; Enter saves the total length | Follows each point |
| Area / Outline Area | Click a simple planar boundary in order; Enter closes and saves | Follows points; rejects crossed or warped boundaries |
| Radius / Diameter | Click three non-collinear points on a circle; Enter saves | Recomputes the circle through those points |
| Thickness | In Object Mode, hover a closed mesh and click a face; Enter saves | Stored pair follows the object's transform |

| Dimensions | Select geometry objects and click Dimensions | Live combined world-axis bounds, including evaluated modifiers |
| Two Vertices | In Vertex Select, select exactly two vertices, including across objects | Follows original mesh vertices |
| Selected Edges | In Edge Select, select one or more edges | Follows original mesh vertices |

| Face Edges | In Face Select, click Lengths of Face Edges | One live distance per unique selected-face edge |

| Face Area | In Edit Mode, select one or more faces and click Face Area | Snapshot of combined world-space surface area, including object scale |
CHAPTER 05
Face area and face edges

- Select a mesh and press Tab for Edit Mode.
- Switch to Face Select and select a face, or Shift-select several faces.
- Click Area of Selected Faces in the Measure sidebar, or right-click → Measure Face Area.
You can also use F3 → Measure Selected Face Area or the Face menu.
The area is saved immediately and displayed in square units. Multiple faces contribute to one total, including selections across objects in multi-object Edit Mode. They do not need to share a plane. Hidden faces are excluded; face selection stays unchanged. The measurement uses the edit mesh before modifiers, so generated bevel surfaces are excluded. It is a snapshot: run it again after editing or scaling the mesh.
Area snapshots lightly tint the measured faces with their measurement color. The fill preserves holes and separate faces, stays behind foreground geometry, and is saved with the snapshot. It does not change materials or add scene objects. Use the header gear → Area fill, or Selected → All area fills, to change its strength; zero hides the fill. The tint captures the original position and shape, just like the area value. Remeasure after moving or editing the geometry. Snapshots from versions before 0.1.5 retain their values and labels, but need to be measured again to capture faces for shading.
Face Select offers Area of Selected Faces and Lengths of Face Edges above the tool grid. The second button adds a separate length for each edge of your selected faces, counting shared edges once per object. All new lengths are selected together, stay visible in Face Mode, and undo together. They follow original mesh vertices and object transforms, including scale. Hidden faces are skipped; generated bevel edges are excluded. Selected linked instances use their own transforms. The limit is 200 unique edges per operation. Use right-click → Measure Face Edges or F3 → Measure Edges of Selected Faces for the same action.
Use Outline to pick a custom boundary. In Object Mode, Area draws an outline.
All measurements save inside the .blend file. The add-on must be enabled to view or edit them. Enter keeps a measurement session; Esc/right-click discards the entire current session. Saved measurements from earlier sessions remain. Undo reverses each completed session as one action. For distance sessions, an unfinished final segment is discarded on Enter; finished segments are retained.
Ctrl Z undoes and Ctrl Shift Z redoes saved measurement actions in both Object and Edit Mode, including selected-face areas, selected edges, point moves, Freeze/Unfreeze, Delete, Clear All, colors, names, visibility, and display settings. While picking, these shortcuts undo/redo individual clicks; Backspace also undoes a click. In Edit Mode, consecutive adjustments of the same numeric/color control form one undo step until another action intervenes. Keep Blender's Global Undo enabled.
Back to contents ↑CHAPTER 06
Snapping and live bevels
- Snap is enabled by default. In Object Mode, vertices take priority, followed by nearby edges, then the surface. In Edit Mode, snapping follows Vertex, Edge, or Face selection. If no eligible element is nearby, the hint explicitly shows View plane. Combined selection modes allow each enabled element type.
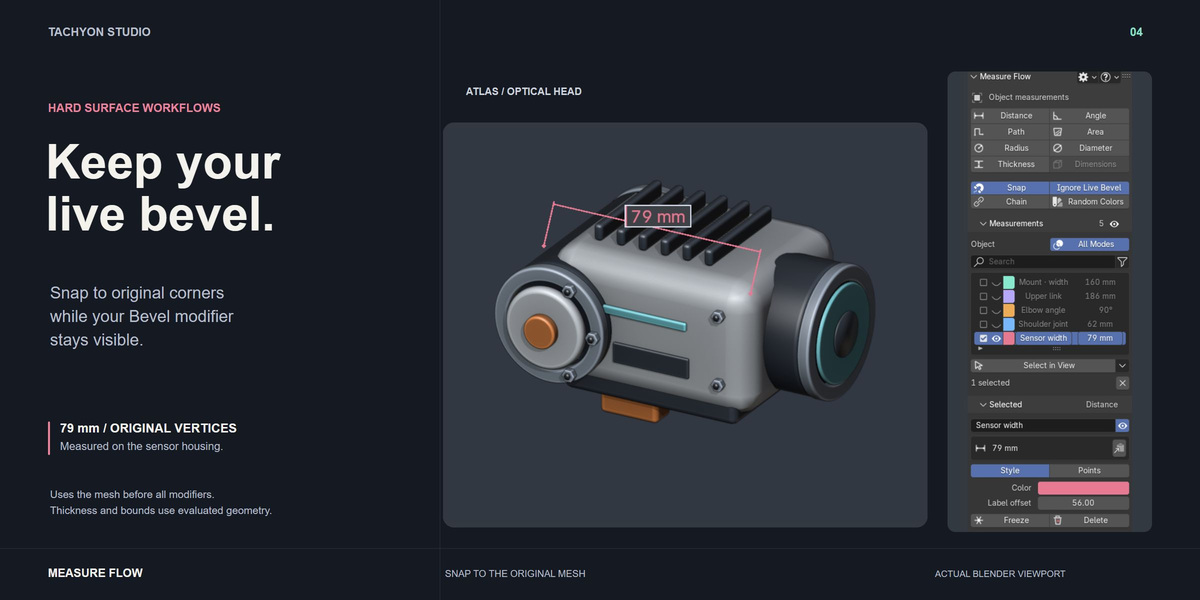
- Ignore Live Bevel uses original mesh vertices, edges, and faces on objects with an enabled Bevel modifier. The bevel stays visible, and you can snap to the original sharp corners even outside the rounded silhouette. Press B while measuring to toggle it. Saved original-vertex points stay attached when bevel width or segments change.
- This option uses the mesh before all modifiers on affected objects. Objects without a visible Bevel modifier retain normal evaluated snapping. Thickness and Dimensions still measure the evaluated result.
- Shift temporarily disables geometry snapping and places points on the view plane through the last point (initially through the 3D cursor).
- Ctrl snaps that view-plane position to the configured world grid. Grid step is in Blender units, displayed according to scene units.
- X / Y / Z constrains the next point in world space. Press the same key again to unlock. Axis-constrained and grid points are fixed world points.
- Ctrl Z / Backspace undoes the last click, reopening a completed segment if needed. Ctrl Shift Z redoes it. Middle mouse, wheel and numpad navigation work while measuring.
- Chain starts the next distance at the previous endpoint.
- Edit-mode snapping uses the live edit mesh. Original vertices attach by index; evaluated modifier/shape-key points attach to the object transform.
CHAPTER 07
Saved measurements, Freeze and export
Select a row in the sidebar, or turn on Select in View and click viewport labels. The toggle stays highlighted and active after each selection. Click it again or press Esc to turn it off. Orbit, pan, zoom, sidebar controls, and clicks away from labels continue to work. Selection pauses while placing or moving measurement points, then resumes. This toggle is local to the viewport session and resets when opening a file. Rename it, change its offset/color, hide it, copy its displayed value, or move individual points.
Freeze and Unfreeze
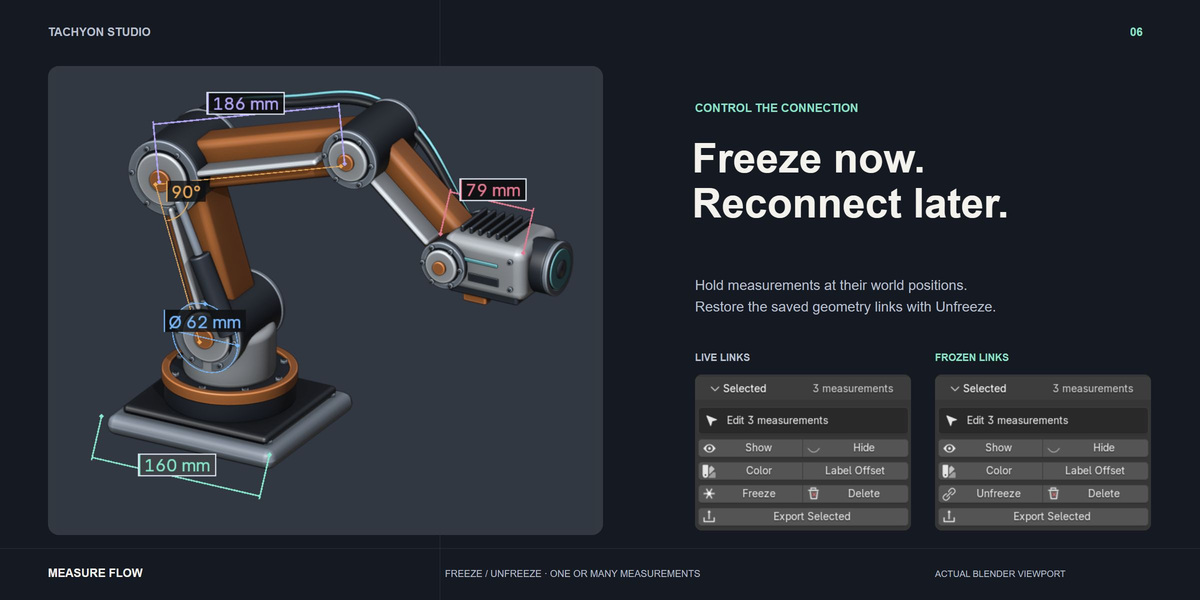
Freeze holds the measurement at its current world coordinates and keeps its original geometry links. The same button becomes Unfreeze for one or several frozen measurements. Unfreeze restores those links at the geometry's current positions, including live Dimensions. With mixed frozen/live selections, Unfreeze restores the frozen subset and leaves the rest alone.
The stored links survive saving and reopening the blend file. Missing objects or detected topology changes cancel the whole action and keep every selected snapshot frozen. Moving a frozen point edits only its fixed snapshot; Unfreeze returns to the original links.
Face-area snapshots and measurements drawn entirely at fixed points have no live links to restore. Measurements frozen in 0.1.14 or earlier also have no saved links: use Undo or measure them again.
Measurement colors
Every row has an editable color swatch matching the viewport. Click the swatch to change that measurement's color directly. Selection keeps the same color and adds a light outline around the label and a thicker line.
Turn on Random Colors to give each newly saved measurement a bright random color. This applies to all tools, including each chained distance, selected edge, face area, and X/Y/Z dimension. Colors are stored with the measurements and survive reopening. Turning the toggle on or off leaves existing measurements unchanged. With it off, new measurements use teal, and dimensions default to their X/Y/Z axis colors. Measurements draw over the scene and respect Blender's Show Overlays switch.
Units and CSV export
Units can follow the scene or use meters, centimeters, millimeters, inches, feet, or raw Blender units. Scene unit scale is applied once to lengths and squared for areas; angles use degrees. CSV exports include numeric values, units, invalid-reference status, visibility, and world coordinates. World coordinate columns always use raw Blender units. CSV includes hidden measurements as well. Export Selected includes only selected records; Export All includes every mode regardless of the current display filters. Batch edits and deletion undo as one action.
Back to contents ↑CHAPTER 08
Accuracy and tracking limits
- Vertex references follow the original mesh, not a modifier cage. A changed mesh, object deletion, or changed vertex/edge/face counts invalidates the reference. Reordering vertices without changing counts cannot be reliably detected; re-pick after such topology edits.
- Surface and edge points follow object transforms, not subsequent surface deformation. Evaluated vertices on meshes with modifiers or shape keys use this same behavior.
- Thickness finds the first opposite intersection on the same mesh along the inward face normal. It requires outward normals and closed geometry; internal surfaces, very thin shells and nearly coplanar faces need care. It is a sampled distance, not an automatic wall-thickness field.
- Dimensions are an enclosing world-axis box. Rotated objects may have larger box dimensions than local object dimensions. Collection/geometry-node instances without realized geometry are not expanded into their own bounds.
- Snap candidates come from the visible face under the pointer. Loose edges and isolated vertices cannot be picked by the viewport snapper; use Selected Edges / two vertices in Edit Mode.
- Face area is intentionally a snapshot. Re-run it after geometry changes. Polygon area is live but requires coplanar, non-intersecting points.
- Overlays are viewport annotations, not renderable geometry or dimension objects.
CHAPTER 09
Preferences and support
Open Edit → Preferences → Add-ons → Measure Flow, or use Measure → gear → Add-on Preferences.
- Appearance: white tool icons by default, a custom color picker, Reset to White, and live icon previews. Turn off Custom tool icons to use Blender's built-in icons.
- Shortcuts: edit the launch shortcut using Blender's native keymap control and find the controls for measuring and selecting. The default launch shortcut is Ctrl Alt M.
- Support: Discord Support, maintainer Tachyon Studio, version and license information, and Copy Support Info for issue reports. The copied text contains only the add-on version, maintainer, Blender version, and platform.
Appearance and keymap changes use Blender's normal preference-saving behavior. Units, decimals, text size, area fill, and snapping remain per-scene settings in the sidebar gear menu and are saved in the .blend file.
CHAPTER 10
Troubleshooting
| Symptom | Check and safe next step |
|---|---|
| I cannot find the panel | Place the pointer over the 3D Viewport, press N, and choose Measure. Confirm the add-on is enabled and only one copy is installed. |
| Labels have disappeared | Enable Blender's Show Overlays, the Measurements header eye, and each row's eye. Turn on All Modes to include measurements made in other selection modes. |
| Face tools are unavailable | Select a mesh, enter Edit Mode and switch to Face Select. Select at least one visible face. |
| An area value or tint did not move | Face Area is a snapshot. Measure the faces again after moving, scaling or editing the geometry. |
| A saved measurement says Unavailable | Its object or mesh reference changed. Repick the affected points. Avoid relying on old vertex indices after topology edits. |
| Freeze is gray | A measurement drawn only from fixed world points or a face-area snapshot has no live links to freeze. |
| Unfreeze cannot restore a selection | A source object is missing or a topology change was detected. The batch stays frozen; restore the original geometry or measure again. Records frozen in 0.1.14 or earlier have no stored links. |
| Ctrl Z does not undo my saved action | Finish or cancel the current picking session first and keep Blender's Global Undo enabled. During picking, Ctrl Z undoes clicks within that session. |
| A selected batch includes unexpected items | Selection survives scrolling and filtering. Read the Selected panel's outside-filter warning and deselect unwanted measurements. |
| The launch shortcut conflicts | Use the Shortcuts tab in the add-on preferences to change Ctrl Alt M using Blender's keymap control. |
| I cannot snap to a loose edge | The viewport snapper searches the visible face under the pointer. Use selected-edge or two-vertex tools in Edit Mode for loose geometry. |
| A CSV fails to write | Choose a writable output folder, close any program locking the CSV and retry Export. |
CHAPTER 11
Compatibility
An original viewport measurement add-on by Tachyon Studio for general modeling, architecture, and fabrication. Supported release range: Blender 3.0–5.2. Install the same measure-flow-0.1.15.zip on every supported version. Tested on Windows x64: 3.0.1, 3.1.2, 3.2.2, 3.3.21, 3.4.1, 3.5.1, 3.6.23, 4.0.2, 4.1.1, 4.2.23, 4.3.2, 4.4.3, 4.5.13, 5.0.1, 5.1.2 and 5.2.0. macOS and Linux have not been tested. Future Blender versions are not automatically certified.
Back to contents ↑CHAPTER 12
Files, license and credits
GPL-3.0-or-later. Original implementation; no third-party add-on code or branding is included.
The installer includes readable Python source, original tool icons, README, changelog and the GPL-3.0-or-later license. It uses Blender's bundled Python/API modules and the Python standard library. No external account, downloaded dependency, telemetry or online activation is required. The Discord button opens an optional support website; CSV export writes to a location you choose.
Individual (1 seat), Team (up to 6 seats) and Studio (up to 20 seats) all include commercial use and the same complete add-on and downloads. For more than 20 seats, contact Tachyon Studio. The included GPL license governs the software and its granted rights; purchase-tier wording does not remove those rights. No additional support duration, response-time guarantee or lifetime update promise is made here.
Developed with AI-assisted coding under Tachyon Studio's direction and iterative workflow/interface feedback. Documentation illustrations are captures of the functioning add-on, not generated UI mockups.
Back to contents ↑Need a hand?
Contact Tachyon Studio through Superhive or join the Discord community. Include your Blender and add-on versions when reporting an issue.


-
$6.99
For 1 person (1 seat). Commercial use included.
-
$27.96
For a team of up to 6 people (6 seats). Commercial use included.
-
$69.90
For a studio of up to 20 people (20 seats). Commercial use included. Need more than 20 seats? Contact us directly.
Have questions about this product?
Login to message
| Blender Extension Compatible | Yes |
| Published | 1 day ago |
| Blender Version | 3.0 - 5.2 |
| Extension Type | Add-on |
| License | GPL |
Discover more products like this
measurement distance dimensions area radius edge length viewport snapping diameter angle thickness modeling