 Dynos
Dynos


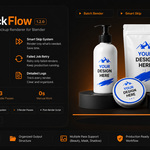
⚡ Blender Add-on · Free & PRO · Blender 4.0+
Stop rendering one file at a time.
MockFlow does it all.
Drop in your designs, hit render, walk away. MockFlow batch-renders every design × camera × variant — Beauty, Mask, and Shadow passes included.
∞
Design Combos
3
Render Passes
0s
Manual Swaps
4.0+
Blender
● Drop Designs › ● Assign Slots › ● Pick Cameras › ● Run Batch › ● Done.
Core Features
Everything your pipeline needs — inside one panel
No external scripts. No copy-pasting file paths. MockFlow handles the full rendering loop from the Blender sidebar.
🗂
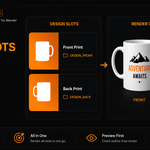
Multi Design Slots
Target multiple Image Texture nodes at once — front, back, sticker, label — each with its own design folder.
📷
Multi-Camera Rendering
Render all cameras with a shared prefix, only the active camera, or a hand-picked selection — in a single pass.
🎨
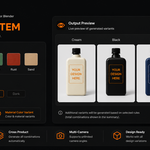
Color Variant System
Add material targets, assign multiple colors per material. MockFlow renders every combination automatically.
👁
Texture Preview
Thumbnail preview of all designs in each slot directly in the sidebar. Check before committing to a full batch.
🔁
Failed Job Retry
Crashed mid-batch? MockFlow saves every failed job. Retry only what failed — not the whole queue again.
📐
Multi-Resolution Export
Render once at 4000px, auto-export at 2000px, 1000px, 500px. No re-rendering needed. Requires Pillow.
🪝
Post-Render Script Hook
Run any Python script after batch — upload to cloud, notify Telegram/Discord, compress files.
🧾
Manifest CSV Export
Auto-generate a CSV of every output file with design, camera, variant, pass, resolution. Ready for automation.
📋
Render History
Every session logged with date, counts, duration, and a one-click link to open the output folder.
⚡
Render Presets
One-click presets: Marketplace 2000px PNG, Shopify 3000px JPG, Transparent Mockup, Web WEBP, HD 4000px.
🎛
Combination Modes
Match designs by filename across slots, or generate every possible combination automatically.
🗓
Render Queue & Scheduling
Queue jobs and schedule batch renders to start at a specific time — render overnight while you sleep.
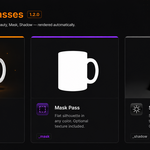
Render Passes
Three outputs per render, automatically
MockFlow renders Beauty, Mask, and Shadow passes for every job in a single batch. No scene switching, no manual setup.
Smart Skip System
Re-render only what actually changed
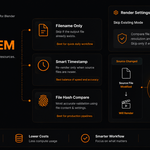
Three skip modes — pick the one that matches how often your designs and settings change.
Filename Only
Skip if output already exists. No metadata check. Best for final delivery runs.
Smart Timestamp
Re-render only when source texture is newer than output. Best for daily iteration workflows.
File Hash Compare
Hashes texture + camera + variant + settings. Guaranteed accuracy for large production pipelines.
Perfect For
Built for the workflows that break other tools
👕
Print-on-Demand
🛍
E-commerce Stores
📦
Packaging Mockups
🏷
Label & Sticker
🖼
Marketplace Assets
🎨
Product Visualization
🏭
Studio Pipelines
📸
Client Previews
Pricing
Free to start. Pro when you're ready.
The free version is fully functional. Upgrade to PRO for production-ready output.
Free
$0
No credit card needed
⚠ Free Limitations
Max resolution: 500 × 500 px
Watermark on every output
Watermark on every output
RECOMMENDED
PRO
$23
One-time · All future PRO features
✓ No restrictions
Unlimited resolution · No watermark
Commercial use · Priority updates
Commercial use · Priority updates
| Feature | Free | PRO |
|---|---|---|
| Multi Design Slots | ✓ | ✓ |
| Batch Rendering | ✓ | ✓ |
| Smart Skip System | ✓ | ✓ |
| Texture Preview | ✓ | ✓ |
| Variant System | ✓ | ✓ |
| Failed Job Retry | ✓ | ✓ |
| Max Resolution | 500×500 | Unlimited |
| Watermark | Yes | None |
| Commercial Use | — | ✓ |
| Multi-Resolution Export | — | ✓ |
| Post-Render Script | — | ✓ |
| Manifest CSV Export | — | ✓ |
| Render History Panel | — | ✓ |
| All Future PRO Features | — | ✓ |
Quick Start
Up and running in 5 minutes
1
Install the add-on
Edit → Preferences → Add-ons → Install from Disk
Select the ZIP file. Enable MockFlow.
Select the ZIP file. Enable MockFlow.
2
Open the panel
In 3D Viewport, press N → MockFlow tab.
3
Name your texture nodes
In Shader Editor, name Image Texture nodes: DESIGN_MAIN, DESIGN_BACK, etc.
4
Add slots and cameras
Add a design slot per texture node, point it to your folder. Name cameras with the CAM_ prefix.
5
Dry Run, then Render
Click Dry Run to preview file count. Then click Run Batch Render.
Tips
Get the most out of every batch
→Always run Dry Run before a large batch — it catches naming errors in seconds, not after 2 hours of rendering.
→Use Smart Timestamp for day-to-day work. Switch to File Hash Compare when settings change frequently.
→PNG only when you need transparency. JPG and WEBP write 3–4× faster for the same visual quality.
→Enable Write Render Log for any session over 50 files. It's the first thing to check when something goes wrong.
→Start with Free to validate your workflow and node setup — upgrade to PRO when ready for production output.
→After a crash, click Retry Failed Jobs — never restart the full batch from zero.
Start free. Render without limits.
Download free to test your workflow — no credit card needed. Upgrade to PRO to remove the watermark, unlock unlimited resolution, and get commercial use rights.