Modelling Helper
 Bonaventure Labs


Installation Instructions
- Download the modelling_helper-1.0.0.zip file from your Superhive purchase/receipt page. Do not unzip it.
- Open Blender (4.2 or newer).
- Go to Edit > Preferences > Get Extensions (or Add-ons, depending on your Blender version).
- Click the dropdown arrow (top-right of the window) and choose Install from Disk....
- Select the modelling_helper-1.0.0.zip file and click Install from Disk.
- Confirm the Modelling Helper extension is enabled (checkbox ticked).
Alternatively, if you purchased through Superhive, you can drag and drop the file you downloaded from your receipt page directly into a Blender window to install it.
How to Use
- Open the 3D Viewport.
- Press N to open the sidebar (if it isn't already open).
- Click the Modelling Helper tab.
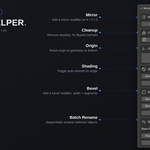
- Select an object, then use any of the panel sections:
- Mirror — click X, Y, or Z to add a mirror modifier on that axis.
- Cleanup — click to remove doubles/degenerate geometry and fix normals on the active mesh.
- Origin — click "To Geometry" or "To Bottom" to reposition the object's origin.
- Shading — set your smoothing angle, then click "Toggle Auto Smooth".
- Bevel — set width/segments, then click "Add Bevel" to add a Bevel modifier.
- Batch Rename — set a base name and start number, select multiple objects, then click "Rename Selected" to rename them sequentially (e.g. Prop_001, Prop_002, ...)
Support
For questions, bug reports, or feature requests, please reach out through your Superhive inbox / product support page, and I'll get back to you within 72 hours.
$8
Have questions about this product?
Login to message
| Blender Extension Compatible | Yes |
| Published | about 2 months ago |
| Blender Version | 4.2 - 5.2 |
| Extension Type | Add-on |
| Render Engine Used | Cycles, Eevee |
| License | GPL |
Discover more products like this
2026-add-ons-for-blender 3d addon 3d model 3d-modelling mesh 3d modeling workflow 3d花,花,geomety,节点