Peek A Node
 Trestle Trotter


Note: This Documentation is also available in the Documentation Website: Peek a Node Docs
Table of Contents
- Welcome
- Installation
- Quick Start Guide
- Global Collections
- Hierarchy & Operations
- Custom Collections
- Nodes in Peek
Welcome to Peek a Node
Peek a Node is the ultimate add-on for Blender that simplifies your node workflow.
Getting Started
Check out the Quick Start Guide to get up and running in minutes.

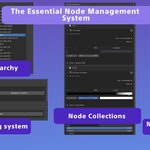
Documentation Sections
- Global Collections: The easiest way to using Peek.
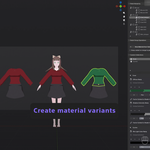
- Hierarchy & Operations: Manage node groups, root materials, and variants.
- Custom Collections: Curate specific parameters inside node groups.
- Nodes in Peek: Individual node operations and organization.
Videos
Documentation PDF Versions
Installation
Getting started with Peek a Node is simple. Follow these steps to install the add-on in Blender.
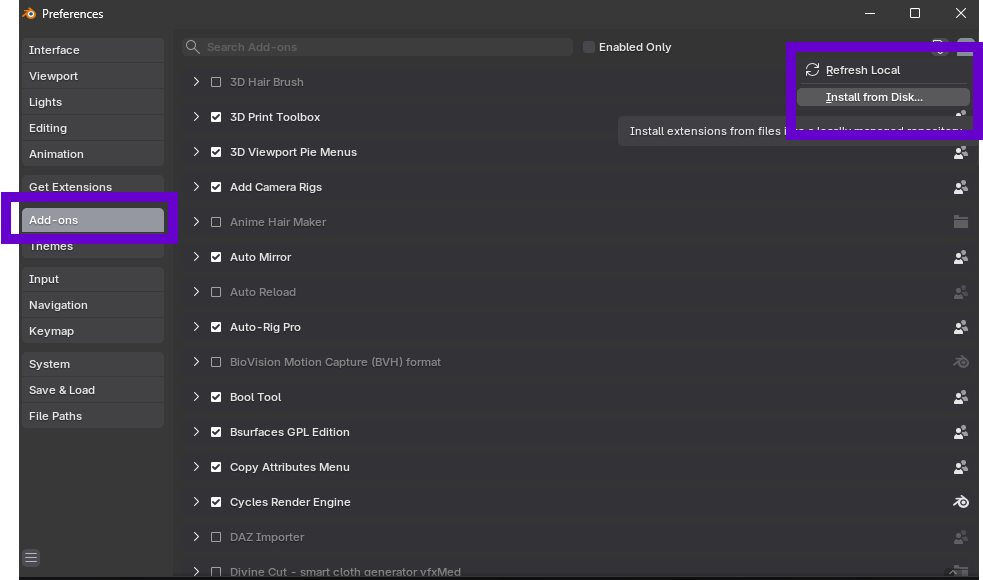
1. Open Preferences: Navigate to Edit > Preferences > Add-ons.
2. Install from Disk: Click the Install... button (or "Install from Disk..." from the dropdown).
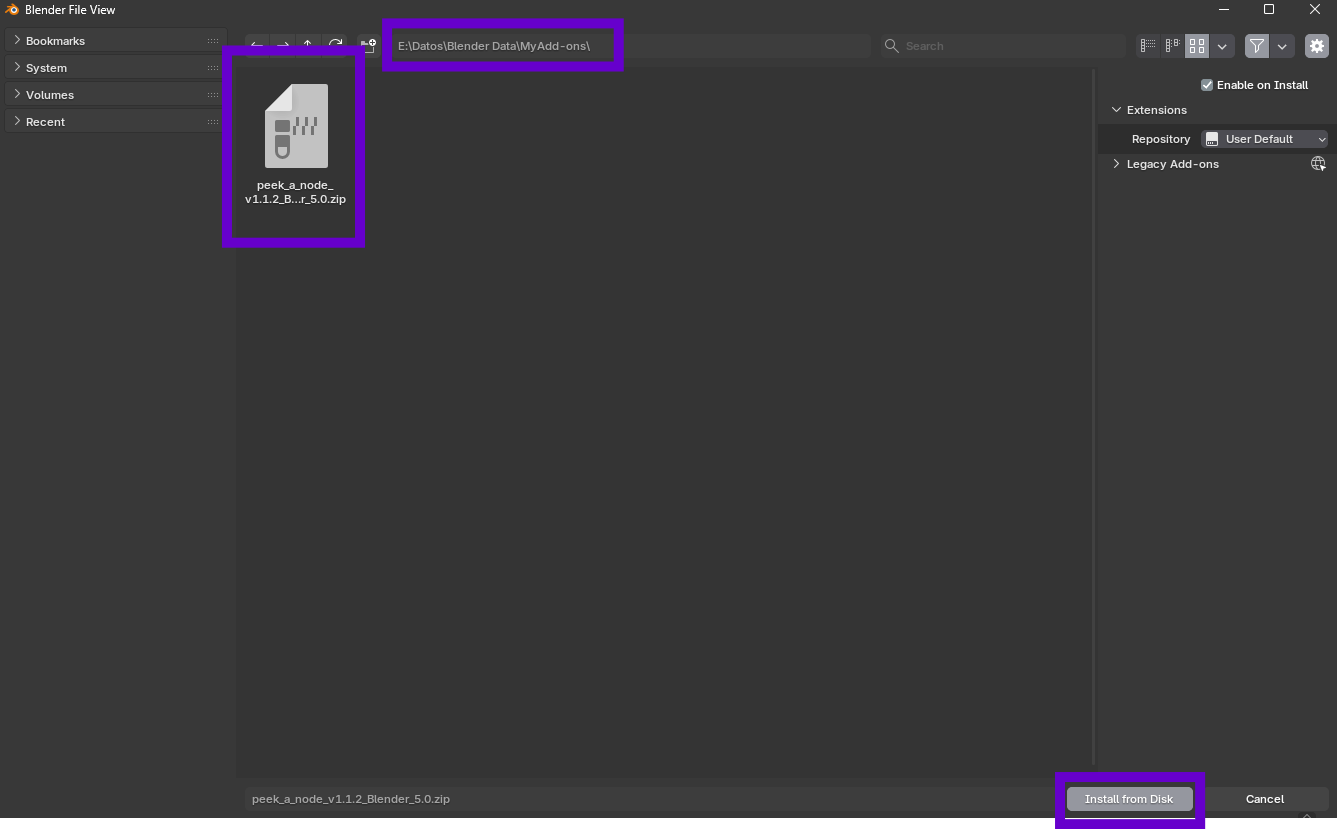
3. Locate File: Navigate to where you downloaded the .zip file for the add-on. Select it and click Install Add-on.
4. Enable: Enable the add-on by checking the box next to its name.
You are now ready to use Peek a Node!
Quick Start Guide
Get up and running with Peek a Node in minutes.
1. Installation
First, install the add-on via Blender Preferences. (See Installation Guide above).
2. Basic Usage (Global Collections)
The fastest way to use Peek is with Global Collections.
- Open the Shader Editor.
- Right-click on any node.
- Select Peek Options -> New Global Collection.
- Name your collection.
The node will instantly appear in the Peek Sidebar (N-Panel), allowing you to edit it without searching through the node graph.
3. Advanced Usage (Node Groups)
For complex materials using Node Groups, use the Peek Hierarchy.
- Right-click on a Node Group.
- Select Peek Options -> Peek Node Group.
- Navigate inside the group and add nodes to Custom Collections.
Global Collections
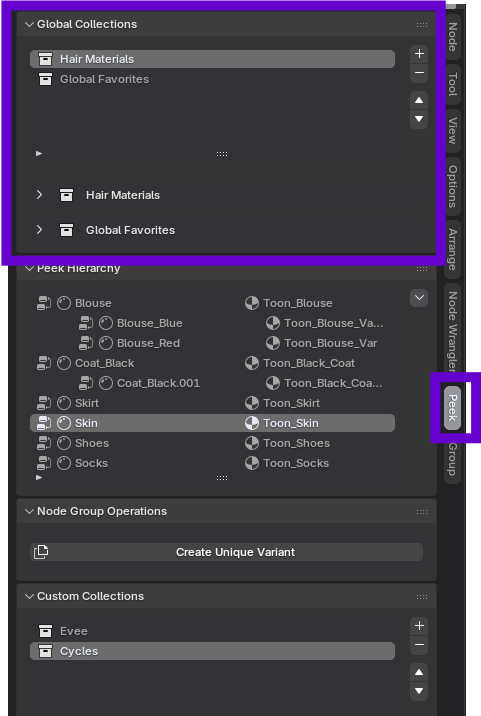
Global Collections are the easiest way of using Peek. These are node collections that can be seen globally from the Peek sidebar panel.
Adding a Node to Global Collections
Right-click on any node in the shader editor that you want to add to the sidebar and select:
(If collections already exist, you will see them listed or can create a new one)
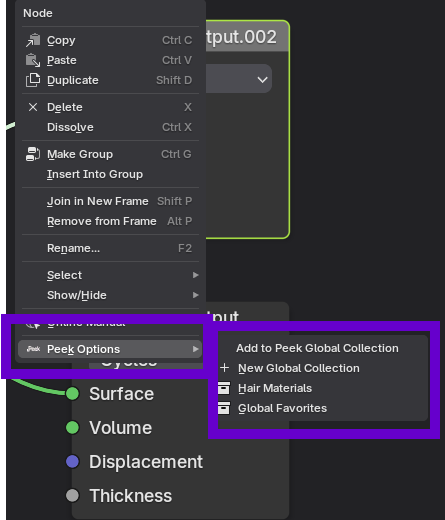
Enter the name of the collection when prompted, and the node will appear in the Global Collections sub-panel.
Managing Collections
You can add, delete, and reorder the node collections using the up/down arrows next to the Global Collections List.
WARNING: Nodes in a global collection are bound to the specific material to which they belong.
If you later add the parent node group to the Peek Hierarchy (Advanced Mode), nodes in Global Collections from that group will be pruned to prioritize the hierarchy view.
Hierarchy & Operations
The core power of Peek a Node comes from its Hierarchy system, allowing you to manage node groups and materials contextually.
Peek a Node Group
To start, right-click on any node group and select:
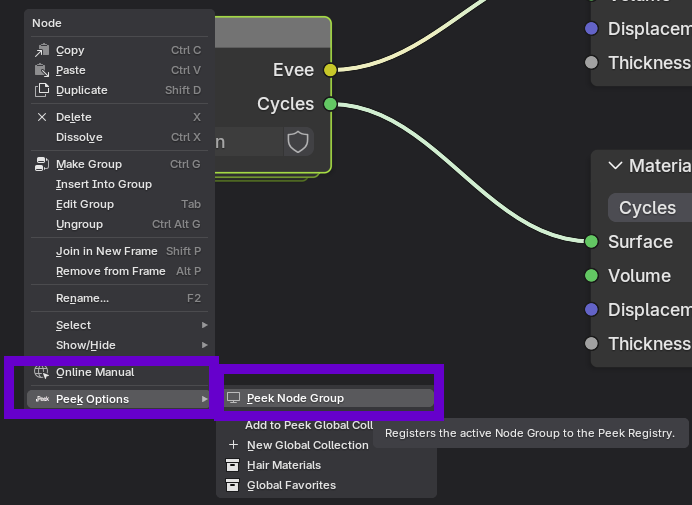
This adds the node group to the Peek Hierarchy.
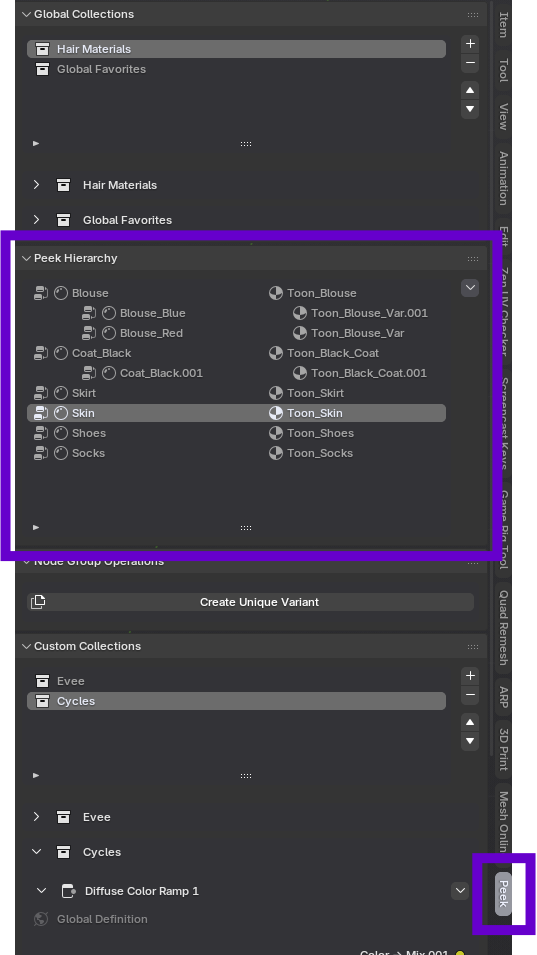
The Peek Hierarchy
The hierarchy shows the relationship between your node groups and the materials they belong to.
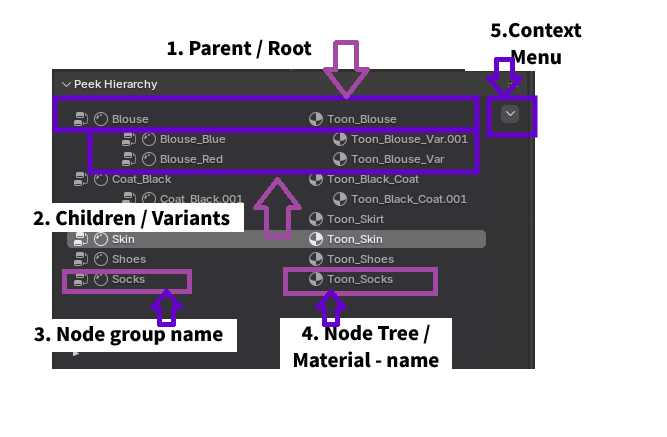
Parts of the Hierarchy
- Parent or Root Material: A root level material in the Hierarchy, from which variants can be created.
- Children Variants: Variants of the root material are displayed with an indentation below the root material.
- Node Group: The node group that is being visualized in the Hierarchy. Its name can be changed by double clicking it.
- Node Tree / Material: The node tree / material that the node group belongs to. Its name can be changed by double clicking it.
Hierarchy Context Menu
Clicking the dropdown arrow next to a hierarchy item reveals the following management operations:
- Apply Material to Selected Object: Instantly applies the current material—including all active Peek configurations and variants—to any other objects currently selected in the 3D Viewport. This ensures consistent material assignment across your scene.
- Remove node group and material from file: Permanently deletes the node group data from the Blender project file. Caution: This is a destructive action that will remove the node group from all materials that reference it.
- Remove from peek view: Stops tracking this node group in the Peek sidebar. The node group and its data remain in your project and material, but it will no longer clutter your Peek Hierarchy interface.
Node Group Operations
As mentioned earlier, Peek distinguishes between a Root Material (the original) and Variants.
Root Material
When a node group is first added to the hierarchy, it is designated as the Root Material. This represents the master version of your material.
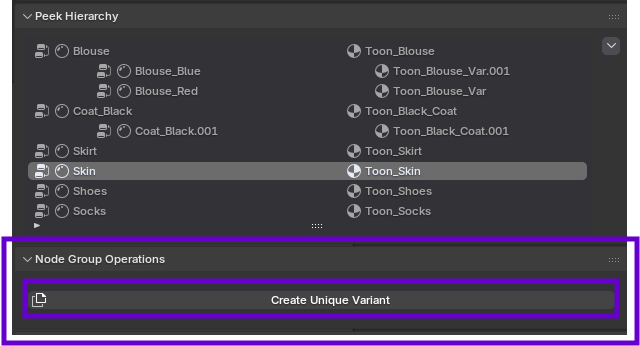
Node Group Operations Panel -> Create Unique Variant
This creates a new unique variant material instance that branches off from the root, allowing for safe experimentation.
Unique Variants
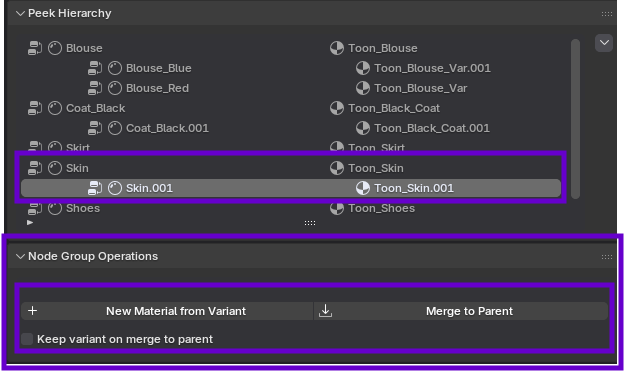
A Unique Variant appears as a child of the Root Material in the hierarchy. This structure allows you to manage multiple iterations of a material on the same object or across different objects.
Merging Variants To Parent
Once you are satisfied with a variant, you can commit its changes back to the Root Material or manage its persistence (Peek allows you to save as many variants as you need from a Root Material) using the Merge operations.
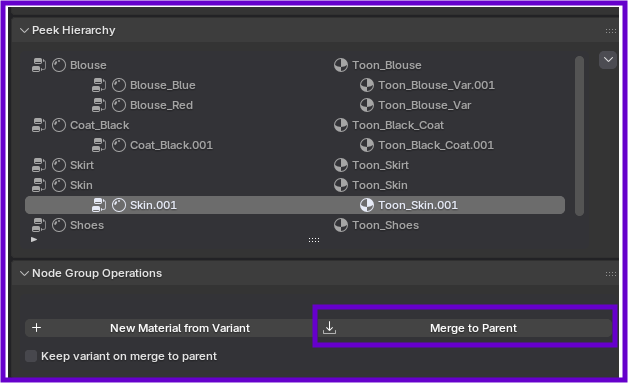
Merge to Parent:
This option from the Node Group Operations Panel overwrites the Root Material's settings with those of the currently selected variant. This effectively promotes the variant to become the new Root Material from which subsequent variants will inherit.
New Material from Variant:
This option from the Node Group Operations Panel creates a new material from the currently selected variant. The variant won't depend on the Root Material anymore and it's currently the only way to remove a variant from a Root Material.
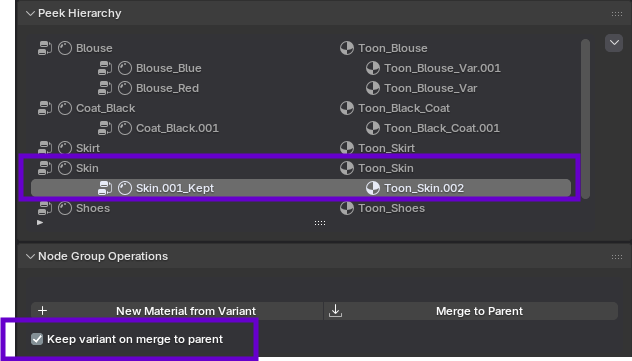
Option: Keep Variant on Merge
This toggle controls the post-merge behavior of the variant itself:
- If Disabled (Default): The variant is deleted after its settings are merged into the Root. The object reverts to using the updated Root Material.
- If Enabled: The variant is preserved as a separate, independent, and unlinked material on the object, even after its settings have been merged into the parent Root.
Custom Collections
When you have added a Node Group to the Peek Hierarchy, you can curate exactly which parameters are exposed in the sidebar using Custom Collections.
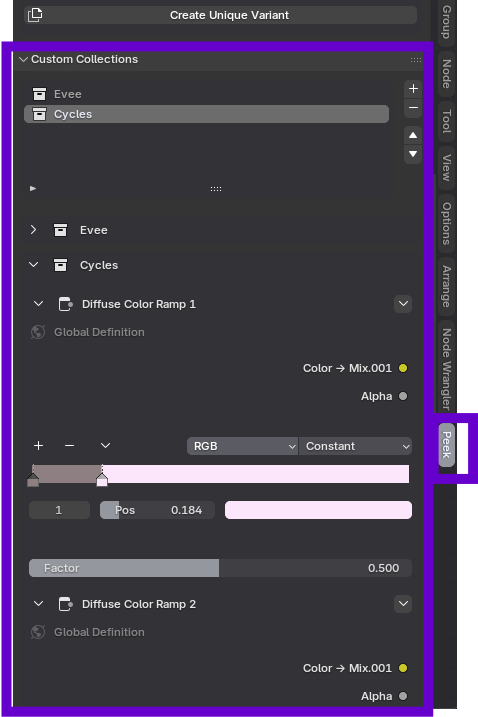
Creating a Custom Collection
Inside the node group you are peeking:
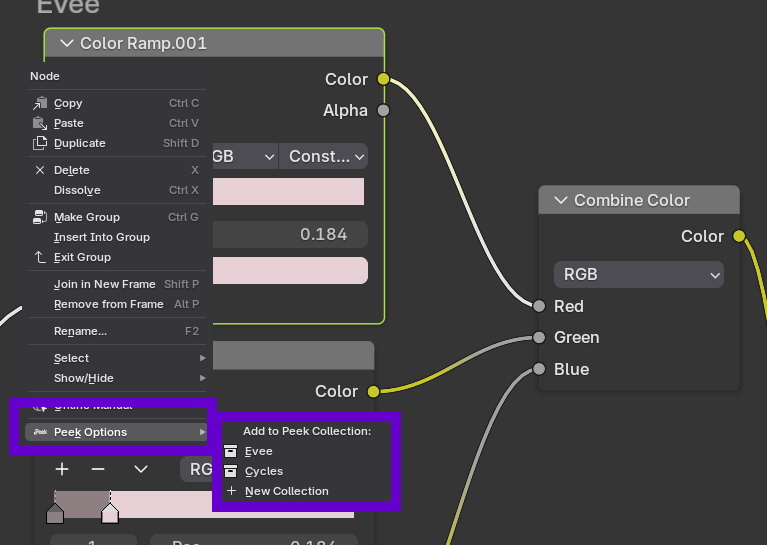
- Right-click on a node you want to expose.
- Select: Context Menu -> Peek Options -> New Collection.
- Enter a collection name (Default is "My Controls").
The node will appear in the Custom Collections sub-panel of the sidebar. This allows you to build a clean, custom interface for complex node groups without exposing every single node.
Nodes in Peek
Individual nodes within the Peek sidebar have their own context menu for quick organization.
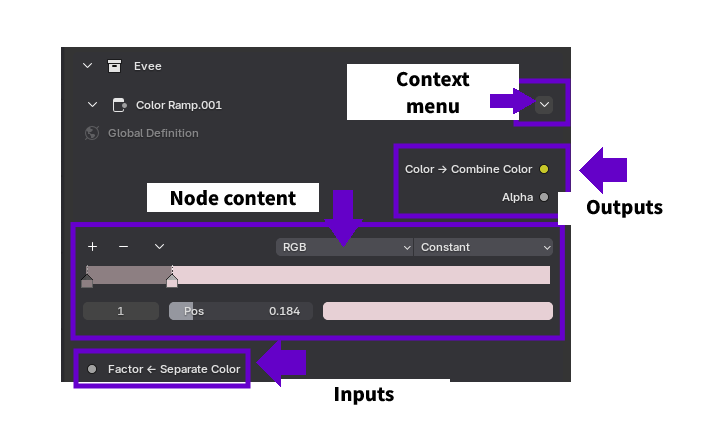
Node Operations
Clicking the dropdown arrow on a node provides the following options:
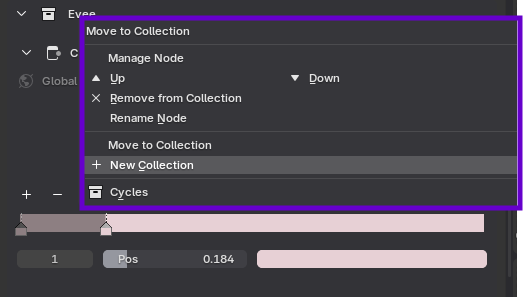
- Up/Down Arrows: Relocates the node within the current collection, allowing you to reorder parameters for better visual organization and logic flow.
- Remove from Collection: Unlinks the node from the current Peek collection. This is a non-destructive action; the node remains fully functional (and visible) within the Shader Editor, but will no longer appear in the sidebar interface.
- Rename Node: Updates the display label of the node exclusively within the Peek sidebar. This allows for user-friendly naming conventions (e.g., "Dirt Level") without altering the actual data block name or affecting other references in Blender.
- Move Collection: Transfers the node to an existing collection or initiates the creation of a new collection. This is useful for restructuring your interface as your node graph grows in complexity.

Discover more products like this
shader-node materials Blender Shader Addon hierarchy-organization Add-on collections Panel material-management hierarchy