 X W Z
X W Z



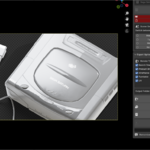
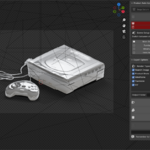


Product Autouploader - Complete User Guide
A comprehensive guide to using the Product Lighting Setup addon for professional 3D product visualization and marketplace export.
📖 Table of Contents
- System Overview
- Installation & Setup
- User Interface Guide
- Complete Workflow
- Lighting System
- Camera System
- Export Pipeline
- Marketplace Requirements
- Troubleshooting
- Best Practices
🔧 System Overview
How The Addon Works
The Product Lighting Setup addon operates in three main phases:
- Scene Analysis: Analyzes your selected model collection to determine optimal lighting and camera positioning
- Studio Creation: Automatically generates a complete studio environment with professional lighting and multiple camera angles
- Export Processing: Renders and exports your model in the exact specifications required by each marketplace
Core Components
- Scene Setup Engine: Creates the lighting rig and camera positions
- Format Exporter: Handles multiple 3D file format exports
- Product Renderer: Manages rendering for different marketplace specifications
- Metadata Generator: AI-powered description and tag generation
⚙️ Installation & Setup
Installing the Addon
- Download the addon .zip file
- Open Blender and go to
Edit → Preferences → Add-ons - Click
Install...and select the downloaded .zip file - Enable "Product Lighting Setup" from the add-ons list
- The addon panel will appear in the 3D Viewport sidebar (press
Nif hidden)
Initial Configuration
- Navigate to the "Product Auto Uploader" panel
- For AI metadata generation, add your Gemini API key in the export options
- Set your default export directory
- Configure your preferred render settings
🖥️ User Interface Guide
Product Scene Setup Panel
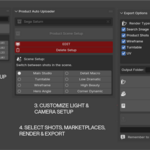
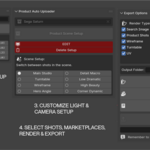
Located in the 3D Viewport sidebar under "Product Auto Uploader":
Model Selection
- Collection Dropdown: Select the collection containing your product model
- Auto-Detection: The addon automatically finds collections in your scene
Lighting Controls
- Base Strength: Master brightness control for all lights (default: 5.0)
- Key Light: Primary light intensity multiplier (default: 1.0)
- Fill Light: Secondary light for shadow fill (default: 0.6)
- Rim Light: Edge highlighting light (default: 0.8)
Action Buttons
- Product Scene Setup: Creates the complete studio environment
- Edit: Modify existing lighting setup
- Delete Setup: Remove studio components and reset scene
Camera Controls
Eight preset camera buttons for instant angle switching:
- Main Studio: Primary product shot
- Turntable: 360° rotation view
- Wireframe: Technical mesh display
- Hero Angle: Dynamic perspective
- Detail Macro: Close-up detail view
- Low Dramatic: Low angle shot
- High Beauty: Elevated beauty shot
- Corner Dynamic: Three-quarter view
Export Options Panel
Marketplace Selection
Checkboxes for target marketplaces:
- TurboSquid
- CGTrader
- Fab (Epic Games)
- BlenderKit
- Envato Elements
- Superhive
Render Types
- Search Image: Marketplace thumbnail
- Product Shots: Multiple angle beauty renders
- Wireframe: Technical mesh visualization
- Turntable: 360° animation frames
- UV: Texture mapping layout
Export Formats
- .blend: Native Blender format
- .obj: Universal 3D format
- .fbx: Autodesk format
- .glb: Web-ready format
- .usd: Universal Scene Description
📋 Complete Workflow
Pre-Setup Preparation
-
Model Organization:
- Place your model at world origin (0, 0, 0)
- Orient model facing forward (+Y direction)
- Group all model components in a single collection
- Apply all transforms (scale, rotation, location)
-
Scene Cleanup:
- Remove default cube, light, and camera
- Clear any existing lighting setups
- Ensure proper scale (real-world dimensions work best)
Studio Setup Process
-
Select Model Collection:
- Use the dropdown in the Product Scene Setup panel
- Verify the correct collection is highlighted
-
Configure Lighting:
- Adjust Base Strength based on model size and material
- Fine-tune individual light multipliers if needed
- Preview settings with viewport shading
-
Execute Setup:
- Click "Product Scene Setup"
- Wait for studio creation to complete
- Verify all components are created correctly
Review and Adjust
-
Camera Preview:
- Test each camera angle using the preset buttons
- Check composition and framing
- Verify model visibility from all angles
-
Lighting Review:
- Switch to rendered viewport shading
- Check for proper illumination and shadow balance
- Use "Edit" mode to adjust if necessary
Export Process
-
Marketplace Selection:
- Choose target platforms based on your selling strategy
- Each marketplace has different requirements automatically applied
-
Render Configuration:
- Select required render types for each platform
- Set output directory for organized file management
-
Execute Export:
- Click "RENDER PRODUCT" for image generation
- Click "EXPORT FORMATS" for 3D file exports
- Click "EXPORT METADATA" for AI-generated descriptions
💡 Lighting System
Three-Point Lighting Setup
The addon uses professional studio lighting principles:
Key Light (Primary)
- Position: Front-left, elevated 45°
- Purpose: Main illumination and primary shadow casting
- Intensity: Highest of the three lights
- Type: Area light with soft shadows
Fill Light (Secondary)
- Position: Front-right, slightly lower than key
- Purpose: Softens shadows created by key light
- Intensity: 60% of key light by default
- Type: Area light with very soft shadows
Rim Light (Accent)
- Position: Behind and above the model
- Purpose: Edge definition and subject separation
- Intensity: 80% of key light by default
- Type: Area light with controlled spill
Additional Components
Shadow Catcher
- Invisible ground plane that captures realistic shadows
- Automatically scaled to model bounds
- Material set to shadow catcher mode
Environment Lighting
- Subtle HDRI environment for realistic reflections
- Low intensity to avoid competing with studio lights
- Neutral color temperature
📸 Camera System
Camera Positioning Algorithm
Cameras are positioned based on model bounding box analysis:
- Bounding Box Calculation: Determines model dimensions and center
- Distance Calculation: Sets optimal viewing distance based on size
- Height Adjustment: Positions cameras at appropriate elevations
- Focus Point: All cameras target the model center
Individual Camera Specifications
Main Studio Camera
- Angle: 30° from front, slightly elevated
- Distance: 1.5x model diagonal
- Purpose: Primary marketplace thumbnail
- Focal Length: 85mm equivalent for minimal distortion
Turntable Camera
- Position: Fixed distance, 15° elevation
- Animation: 360° rotation over 36 frames
- Purpose: Smooth rotation animations
- Settings: Consistent framing throughout rotation
Wireframe Camera
- Type: Orthographic projection
- Position: Front view, centered
- Purpose: Technical mesh visualization
- Material Override: Wireframe display mode
Specialty Cameras
- Hero Angle: Dynamic low angle for dramatic impact
- Detail Macro: Close-up positioning for texture detail
- High Beauty: Elevated angle for elegant presentation
- Corner Dynamic: Three-quarter view showing multiple faces
📦 Export Pipeline
Render Engine Configuration
Automatic render settings optimization:
- Engine: Cycles for photorealistic results
- Samples: Optimized per render type (128-512)
- Denoising: OptiX/OpenImageDenoise enabled
- Color Management: sRGB for web compatibility
Format Export Process
3D File Formats
- .blend: Complete scene with materials and lighting
- .obj: Mesh only with MTL material file
- .fbx: Mesh with embedded materials and animations
- .glb: Optimized for web viewing and AR
- .usd: Industry standard for complex scenes
Image Specifications
- Format: PNG with alpha for transparency
- Bit Depth: 8-bit for compatibility
- Color Space: sRGB for web display
- Compression: Optimized for file size vs quality
Metadata Generation
AI-Powered Descriptions
- Model Analysis: Examines geometry and materials
- Context Generation: Creates relevant product descriptions
- Tag Creation: Generates searchable keywords
- Marketplace Optimization: Tailors content per platform
Technical Specifications
- Polygon Count: Automatic face/vertex counting
- Texture Information: Resolution and format details
- Material Properties: Shader and texture listings
- Dimensional Data: Real-world size measurements
🏪 Marketplace Requirements
Platform-Specific Configurations
TurboSquid
- Search Image: 2000×2000px square format
- Product Images: 1920×1080px, maximum 5 images
- Turntable: 36 frames, 10° increments
- UV Layout: Required for textured models
- File Formats: .max preferred, .obj/.fbx accepted
CGTrader
- Search Image: 1920×1080px landscape
- Product Images: Multiple angles, wireframe versions
- Descriptions: Detailed technical specifications
- Tags: Extensive keyword requirements
Fab (Epic Games)
- Quality Standards: High polygon, game-ready assets
- Materials: PBR workflow required
- Optimization: LOD levels for performance
- Documentation: Usage guidelines and examples
BlenderKit
- Native Format: .blend files with proper organization
- Material Setup: Cycles/Eevee compatible shaders
- Clean Geometry: Optimized mesh topology
- Preview: 2000×2000px hero shot
Envato Elements
- Creative Focus: Artistic and commercial appeal
- Multiple Formats: Broad software compatibility
- Usage Rights: Clear licensing information
- Quality Assurance: High visual and technical standards
Superhive
- Modern Platform: Latest format support
- Web Optimization: .glb format prioritized
- Interactive Preview: 3D viewer compatibility
- Metadata Rich: Comprehensive tagging system
🔧 Troubleshooting
Common Issues and Solutions
Lighting Problems
- Too Bright: Reduce Base Strength value
- Too Dark: Increase Base Strength or individual light multipliers
- Harsh Shadows: Increase Fill Light value
- Flat Lighting: Ensure Rim Light is properly positioned
Camera Issues
- Model Not Visible: Check collection selection and model position
- Wrong Scale: Verify model is at world origin with proper scale
- Poor Framing: Model may be too large/small for auto-positioning
- Camera Not Switching: Ensure setup completed successfully
Export Problems
- Render Failures: Check available GPU memory and reduce samples
- Format Export Errors: Verify model has no ngons or loose geometry
- Missing Textures: Ensure all image textures are properly linked
- Large File Sizes: Optimize texture resolution and polygon count
Metadata Generation
- API Errors: Verify Gemini API key is correct and active
- Generic Descriptions: Provide more specific model information
- Missing Tags: Ensure model has recognizable features and materials
Performance Optimization
Scene Optimization
- Remove unnecessary objects before setup
- Use instances for repeated elements
- Optimize material complexity for faster rendering
- Consider using simplified proxy models for turntables
Render Optimization
- Adjust sample counts based on scene complexity
- Use GPU acceleration when available
- Enable denoising to reduce required samples
- Render in batches for large export sets
✨ Best Practices
Model Preparation
- Clean Topology: Remove duplicate vertices, merge close vertices
- Proper Normals: Ensure all faces have correct orientation
- UV Mapping: Create clean, non-overlapping UV layouts
- Material Setup: Use PBR materials with proper texture connections
- Scale Consistency: Apply transforms and use real-world scale
Studio Setup Strategy
- Test First: Start with default settings before customization
- Iterative Approach: Make small adjustments and test frequently
- Reference Comparison: Compare results with marketplace examples
- Multiple Angles: Preview all camera angles before final render
Export Workflow
- Batch Processing: Select multiple marketplaces for efficient export
- Quality Control: Review renders before uploading to marketplaces
- File Organization: Use clear folder structure for easy asset management
- Version Control: Save incremental versions of your setup
Marketplace Success Tips
- Keyword Research: Study successful products in your category
- Quality Consistency: Maintain high standards across all products
- Platform Optimization: Tailor descriptions for each marketplace
- Regular Updates: Keep product information current and accurate
Technical Excellence
- Geometry Optimization: Balance detail with performance
- Texture Efficiency: Use appropriate resolution for model scale
- Format Selection: Choose formats based on end-user needs
- Documentation: Include clear usage instructions with exports
Master the art of 3D product presentation with professional studio lighting and automated marketplace workflows. Create stunning product visuals that sell!
Have questions about this product?
Login to message
Discover more products like this
product photography product-visualization 3d marketplace cgtrader Automated Export Camera setup Export blenderkit Studio Lighting TurboSquid product automation