Reshoot — One-Click Ai Shots From Your Blender Render
 Pardesco LLC



Getting started
From zero to your first AI-rendered shot in about ten minutes.
1. You need a ComfyUI
The extension talks to a ComfyUI server running on your own machine. Either works: ComfyUI Desktop (easiest, from comfy.org), or ComfyUI standard/portable.
Both normally serve on port 8188. Desktop picks the next free port if something already holds 8188 — so if you run Desktop and a portable ComfyUI, Desktop lands on 8189 or higher. Test Connection probes 8188-8191 and 8000 (used by older Desktop builds) automatically, so a normal local install needs no configuration.
If your ComfyUI runs somewhere else, its own window prints the address it is serving on ("To see the GUI go to: ..."). Paste that into the extension preferences.
2. You need at least one checkpoint model
Any SDXL-family checkpoint works for the bundled capsules. The gallery and the demo video were made with RealVisXL V5.0, which is strong on product and material realism; Juggernaut XL is another good choice. Put the file in ComfyUI's models/checkpoints/ folder. You are responsible for the license terms of the models you choose.
Steps and CFG depend on your checkpoint. This is the single most common cause of disappointing output. The capsule defaults (20-30 steps, CFG 6-6.5) suit a normal SDXL checkpoint. If you use a turbo or lightning checkpoint, drop to about 8 steps and CFG 2.0 — leaving the defaults on a turbo model produces washed-out, over-cooked images.
For Product Studio Pro (the depth-guided capsule) you also need an SDXL depth ControlNet. The documented one is xinsir ControlNet-Union SDXL (Apache-2.0), file diffusion_pytorch_model_promax.safetensors, into models/controlnet/.
3. Install the extension
Blender → Edit → Preferences → Get Extensions → arrow menu → Install from Disk... → pick the extension ZIP.
4. Connect
Open the sidebar in the 3D viewport (press N) → Reshoot tab → Test Connection. You should see the ComfyUI version, your GPU, and model counts.
5. Run the diagnostic
Select the Diagnostic — Text to Image capsule and click Generate. This proves the whole round trip without touching your scene. The result appears in the Image Editor and in the History list.
6. First real shot
Open tutorial/product_studio_tutorial.blend, then:
- Select the Product Studio capsule.
- Keep the defaults (or drop to 8 steps / CFG 2.0 on a turbo checkpoint).
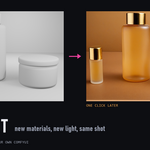
- Click Generate. The active camera is rendered, sent through the workflow, and the result comes back into the Image Editor.
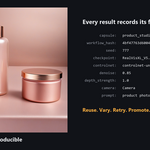
- Click Variation on the history row to explore alternatives — every result records its seed and settings, so anything can be reproduced.
7. The depth-guided upgrade
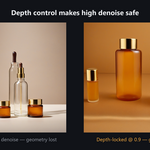
With the ControlNet installed, switch to Product Studio Pro and keep the defaults (Denoise 0.85, Depth Strength 1.0). The depth pass locks your geometry while the AI completely repaints materials and lighting — this is the capsule that makes high-denoise iteration safe. Going much above 0.85 starts inviting invented scenery.
Where things live
- Your capsules: panel → folder icon opens the user capsule folder. Drop a capsule folder in, hit refresh.
-
Results and metadata: every result has a
.jsonsidecar with the full recipe (capsule, version, workflow hash, inputs, seed). -
Promoted results:
arb_outputs/next to your saved.blend.
Settings and models
Reshoot doesn't ship a model. It drives whatever your ComfyUI can run, which means the settings that give good results depend on the checkpoint you chose.
Steps and CFG depend on your checkpoint type
The capsule defaults assume a normal checkpoint; a turbo model at those defaults produces washed-out, over-cooked images, and a normal model at turbo settings produces soft, undercooked ones.
- Normal SDXL (RealVisXL, Juggernaut XL, SDXL base) — 25-35 steps, CFG 5.5-7. The capsule defaults. Best quality; about 10s per 1024² image on a mid-range modern GPU.
- Turbo / DPM++ SDE turbo — 6-10 steps, CFG 1.5-2.5. Much faster, visibly softer. Good for iterating, then re-run the keeper at full settings.
- Lightning / Hyper (4-8 step) — 4-8 steps, CFG 1-2. Follow whatever the model card says.
If a checkpoint's name contains "turbo", "lightning", "hyper", or "LCM", it wants low steps and low CFG.
Denoise: how much of your render survives
Denoise is the dial that decides whether you get your shot back.
- 0.3-0.5 — a pass of polish. Materials barely change.
- 0.5-0.7 — materials and lighting change; composition mostly holds. The Product Studio default sits here.
- 0.7-0.8 — strong reinterpretation. Without depth control, objects start to move, merge, or disappear.
- 0.8-0.86 — total material rebuild. Only safe with a depth ControlNet — this is what Product Studio Pro is for, and where its default sits.
- Above ~0.86 — even with depth control, the model starts inventing scene furniture: a plinth under a product, a table edge, an extra bottle. Depth cannot forbid this; it happens in the empty regions of the frame, where the depth map has nothing to say.
- 1.0 — your render is ignored entirely.
That last case is the one that costs people an afternoon. High denoise with depth control keeps your objects honest, because that is where the depth signal is — but the empty floor and backdrop are unconstrained, and a diffusion model asked for "product photography" is happy to fill them with props. If you see an invented plinth or an extra bottle, lower denoise before you touch anything else; it is a far stronger lever than depth strength.
The useful rule: if you want a big material change, don't raise denoise on a plain capsule — switch to the depth-guided one. That is the whole difference between the two Product Studio capsules.
Depth Strength (Product Studio Pro)
- 0.4-0.6 — loose guidance; silhouettes drift a little.
- 0.7-0.9 — geometry holds; slightly softer adherence to your shapes.
- 1.0 — the default. Firm hold on your objects with no flattening in practice.
- 1.1-1.3 — rigid enough to start looking embossed, and it fights strong lighting prompts.
Depth control is held for the whole of sampling. Raising this is not the fix for invented scenery — see the denoise list above. Depth strength governs how closely the image follows your geometry, and it has nothing to say about the empty parts of the frame.
Prompting for a scene you already built
Your render already fixes the composition, so the prompt's job is material, light, and mood — not layout.
- Name what is actually there, and count it. "Three cosmetic containers: a slim tube on the left, a tall capped bottle in the centre, a short round jar on the right" keeps the model from dropping one or adding a fourth.
- Never ask for a category. "A cosmetic set", "a skincare range", "a product lineup" all read as permission to add products, and the model will take it.
- Say the surface is continuous. Counter-intuitive but real: naming a backdrop material ("slate backdrop", "marble backdrop") invites the model to build a slab or a table with a hard front edge. Ask instead for a "continuous seamless backdrop, no table, no ledge, no pedestal".
- Describe the material and the light, since those are what you are changing: "deep amber glass, warm rim light".
- Leave camera and framing out. You already chose them; asking for a "wide angle product shot" fights your own render.
- Keep "text, letters, logo" in the negative. Diffusion models invent label text on packaging.
Very dark materials from a light render
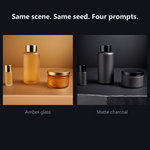
Asking a light-toned clay render for "matte black" tends to come back beige or grey — img2img starts from your pixels, and there is a limit to how far a white surface will travel at a denoise that still preserves geometry. Name the value you want rather than the extreme, and light it accordingly: "matte charcoal grey ceramic with black caps, dramatic rim lighting" lands where "matte black ceramic" does not. The alternative is to darken the materials in your Blender render first.
Resolution
Render at the resolution your model was trained for: 1024×1024 or similar for SDXL. Feeding a 512² render to an SDXL model wastes most of its quality, and very large renders can exceed VRAM in ComfyUI rather than in Blender. Use the Refine & Upscale capsule to go bigger after you like a result.
Using other model families
Reshoot talks to ComfyUI over its normal API, so any model your ComfyUI can run will work — the bundled capsules simply happen to target SDXL. Pointing Reshoot at a different family means writing a capsule for it: export the workflow API JSON from ComfyUI and describe its inputs.
Two practical things to check before committing to a family:
Does it have a depth ControlNet you can actually get? The geometry-lock behaviour that makes high denoise safe needs one. SDXL's ControlNet ecosystem is the most mature; newer families often have community LoRAs or partial solutions instead of a maintained ControlNet. Without one, you are limited to lower denoise.
What is the model's licence? These differ sharply within the same family, and Stable-Diffusion-family membership implies nothing:
- SDXL and most SDXL finetunes — CreativeML Open RAIL++-M or similar. Commercial use generally yes; check the specific finetune.
- FLUX.1 [schnell] — Apache-2.0. Commercial use yes.
- FLUX.2 [klein] — Apache-2.0. Commercial use yes.
- FLUX.1 [dev], FLUX.2 [dev] — non-commercial licence. Commercial use no, not without a separate licence from Black Forest Labs.
- Qwen-Image — Apache-2.0. Commercial use yes.
Reshoot neither enforces nor checks any of this — it will happily drive a model you are not licensed to use commercially. The obligation is yours. If your output is going to a client, confirm the licence of the exact checkpoint you generated with, and remember that a merge or finetune inherits restrictions from what it was built on.
Workflow capsules
A capsule packages a ComfyUI workflow so it can be run from Blender with no graph knowledge: pick it in the panel, adjust its inputs, click Generate.
Anatomy
A capsule folder contains:
-
capsule.json— metadata and input bindings (required). -
workflow_api.json— ComfyUI API-format workflow (required). -
preview.png,README.md,LICENSES.md— all optional.
Bundled capsules ship inside the extension (read-only). Your own capsules go in the user capsule folder (panel → folder icon), which survives extension updates. Drop a folder in, click refresh, done — no code changes.
Input types
-
string— text field. -
integer— int field, optional min/max clamp. -
float— float field, optional min/max clamp. -
seed— int field.-1means random per generation; the used seed is recorded. -
model_checkpoint— text field. Empty means the first checkpoint on the server; the name is verified. -
blender_pass— automatic. Rendered from the active camera and uploaded. Each pass may appear once per capsule.
Render passes
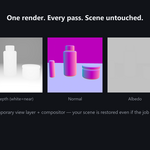
-
combined— the beauty render, display transform applied (what F12 shows). -
depth— mist-based depth. White = near (ControlNet/MiDaS convention), 8-bit black and white, linear between the near/far recorded in the result sidecar. -
normal— the render normal pass, remapped from [-1,1] to [0,1], 8-bit RGB, world-space. -
albedo— diffuse colour, sRGB, no film look. -
mask_selected— Cryptomatte matte of selected objects, binary black and white. Requires a selection when generating.
Capsules using only combined take a fast path (plain render). Any other pass runs the non-destructive pipeline: a temporary view layer and temporary compositor nodes produce every pass in ONE render, then everything is restored — your compositor, view layers, and mist settings are untouched even if the job fails. Passes beyond combined need EEVEE or Cycles, not Workbench.
Each input binding names the workflow value to patch by node id and field, for example node "5", field "inputs.seed". Bindings are validated when the capsule loads — a broken binding shows an error in the panel instead of failing mid-generation.
Rules the add-on enforces
- The workflow file is never edited; every job patches a deep copy.
- Node classes listed in the capsule's requirements are checked against the server before anything renders.
- Every result gets a
.jsonsidecar recording capsule id and version, a workflow hash, all input values, the seed actually used, camera, frame, and the server profile — enough to reproduce the image. - Files may be saved with a UTF-8 BOM (the Notepad and PowerShell default); both JSON files tolerate it.
Getting a workflow_api.json
In ComfyUI: enable dev mode, build your graph, then Export (API format). Only API-format exports work — the regular save format contains UI data the server cannot execute.
Troubleshooting
Every error in the panel has a title, a plain-language cause, and a suggested fix. These are the ones people actually hit.
"ComfyUI server not found"
- Is ComfyUI actually running? Open its web page in a browser:
http://127.0.0.1:8188covers both portable and a normal Desktop install. If the page doesn't load, the extension can't reach it either. -
Running Desktop alongside a portable ComfyUI? Only one of them can have 8188; Desktop takes the next free port, usually
8189. Test Connection probes8188-8191and8000, but if Desktop has gone further out, read the port from its own log line and paste that full address into the extension preferences. - Changed the port? Enter the full address in the extension preferences.
- Remote server: make sure it's reachable from this machine and uses
http(s)://host:portwith no username or password in the URL — those are rejected by design.
"The server has no model checkpoints installed"
ComfyUI found no files in models/checkpoints/. Install an SDXL checkpoint and click Test Connection again. If you use extra model paths, confirm ComfyUI's own web UI can see the model first — the extension only sees what the server sees.
"...does not provide the node 'X' this capsule requires"
The capsule needs a node your ComfyUI doesn't have. For bundled capsules all nodes are ComfyUI core, so this usually means a very old ComfyUI; update it. For third-party capsules, check that capsule's README for its dependencies.
"Render engine cannot produce these passes"
Depth, normal, albedo and mask passes need EEVEE or Cycles. Workbench only supports plain-render capsules. Switch the scene's render engine.
First Pro generation is slow
The first depth-controlled run loads the ControlNet (~2.5 GB) into VRAM; subsequent runs are much faster. Low-VRAM GPUs may unload and reload models between jobs — that's ComfyUI managing memory, not a hang.
Gibberish text appears on products
Diffusion models invent label text. The default negative prompt already discourages it; adding "text, letters, logo" to the negative helps, and higher Depth Strength on the Pro capsule reduces label drift.
The result contains objects that aren't in my scene
An extra bottle, a plinth under a product, a tray or a table edge that exists in no render anywhere. This is the most common quality complaint, and it has three fixes in a definite order.
- 1. Lower Denoise. Much the strongest lever. Depth control keeps your objects honest, because that is where the depth signal is — but the empty floor and backdrop carry no depth information, so nothing contradicts the model when it decides to furnish them. With the depth-guided capsule, around 0.85 is the practical ceiling; above roughly 0.86 invented scenery starts appearing however high you push Depth Strength.
- 2. Stop asking for a category. "A cosmetic set", "a product lineup" and similar read as permission to add products. Name the objects you actually rendered, and how many.
- 3. Say the surface is continuous. Naming a backdrop material invites a stone slab or a table with a hard front edge. Ask for a "continuous seamless backdrop, no table, no ledge, no pedestal" instead.
Raising Depth Strength is the obvious move and the least effective one; try it only after the three above.
Result looks nothing like my scene
- Plain img2img capsules at high Denoise (0.8+) will repaint composition — that's expected; use the depth-guided capsule for structure lock.
- Check the depth map (History row → View Input): the near/far range is computed from your scene, and a huge stray object far behind the camera can flatten the depth contrast.
"The job disappeared from the server"
ComfyUI was restarted or crashed while the job was queued or running. Check the ComfyUI console for the underlying error, then Retry from the History row.
Blender closed mid-generation, or leftovers in the scene
The pass pipeline restores your scene even when a job fails. If Blender itself was killed mid-render, the next generation automatically cleans up the extension's tagged temporary view layer and compositor nodes — your own nodes are never touched.
Anything else
Panel → History → ? (support bundle) writes a redacted zip: system info and job history with all personal paths stripped, no images, no credentials. Attach it to your support request.
Privacy and networking
Short version: local by default, nothing leaves your machine unless you point the extension at a remote server yourself.
What the extension sends, and where
- All traffic goes to exactly one place: the ComfyUI server address shown in the extension preferences. The default is
127.0.0.1, your own machine. - What is sent per job: the rendered input passes (images), the patched workflow JSON including your prompt text, and control requests (queue, status, cancel).
- Nothing else is transmitted. There is no telemetry, no account, no update-phone-home, no analytics.
What the extension will never do
- Silently download models or install ComfyUI custom nodes.
- Reconfigure or expose your ComfyUI server to the network.
- Store credentials in
.blendfiles or job metadata. - Accept a server URL with an embedded username and password — rejected outright, so credentials can't end up in logs or support bundles.
Remote servers
If you point the extension at a non-local address, your renders and prompts travel to that machine. Use https:// for anything outside your LAN. The interrupt warning matters on shared servers: cancelling your running job uses ComfyUI's interrupt, which affects whatever the server is executing — so the extension only fires it when your own job is the one running.
Support bundles
The support bundle zip contains system info and recent job history with all user paths reduced to basenames. It contains no images and no credentials. Prompts do appear in job history, so review the zip before sharing if your prompts are sensitive.
Third-party ComfyUI custom nodes
Custom nodes execute Python code inside ComfyUI with your user permissions. They are outside this extension's security boundary — install them from sources you trust.
Have questions about this product?
Login to message
| Blender Extension Compatible | Yes |
| Published | about 2 months ago |
| Blender Version | 4.5 - 5.2 |
| Extension Type | Add-on |
| Render Engine Used | Cycles, Eevee |
| License | GPL |
Discover more products like this
product photography lookdev depth map product-visualization render-passes comfyui stable-diffusion img2img concept art sdxl ai ControlNet