 skingxyz



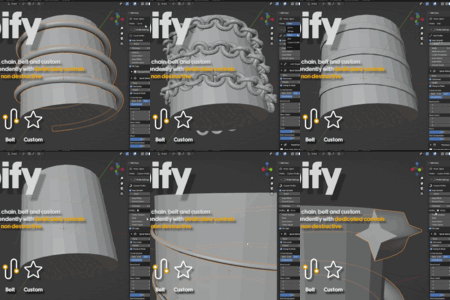
Ropify
Procedural ropes, cables, chains, and belts for Blender
User Documentation
Version 1.0
1. Introduction
Ropify generates ropes, cables, chains, belts, springs and custom profiles along curves, right in the 3D viewport. You draw a path over the surfaces of your objects and Ropify builds the geometry that follows it, with live updates: any change to the curve or to a parameter is reflected on the mesh instantly.
The addon is built around three ideas: the drawing Mode (how the path is created), the Profile (the shape of the rope's cross-section) and the Parameters (the fine-tuning of each profile). Everything is controlled from the side panel (N key) in the Ropify tab.
2. Installation
-
Open Blender, go to Edit → Preferences → Add-ons.
- Click Install… and select the Ropify .zip file
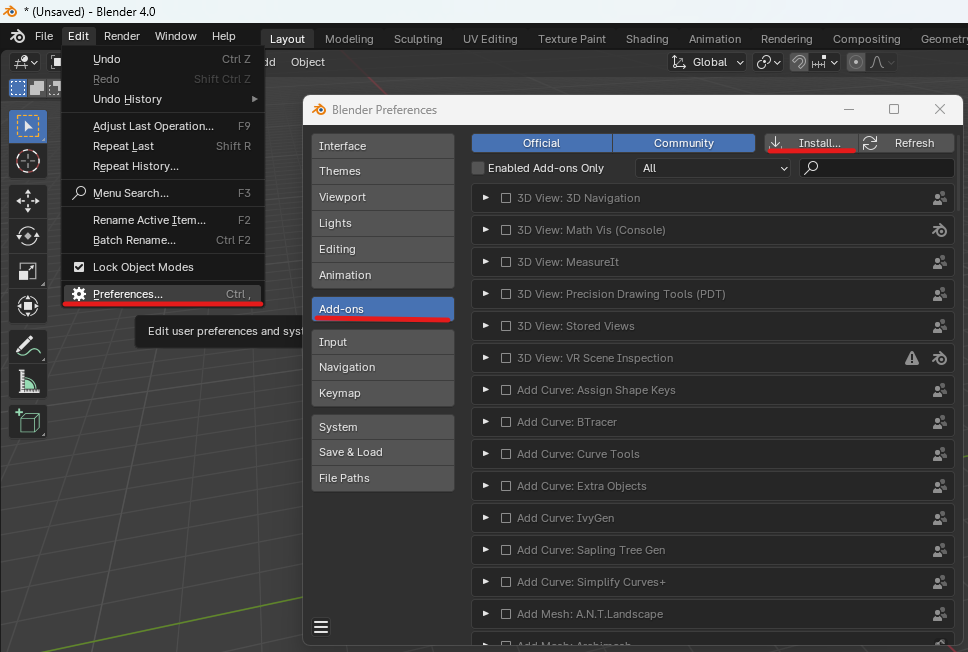
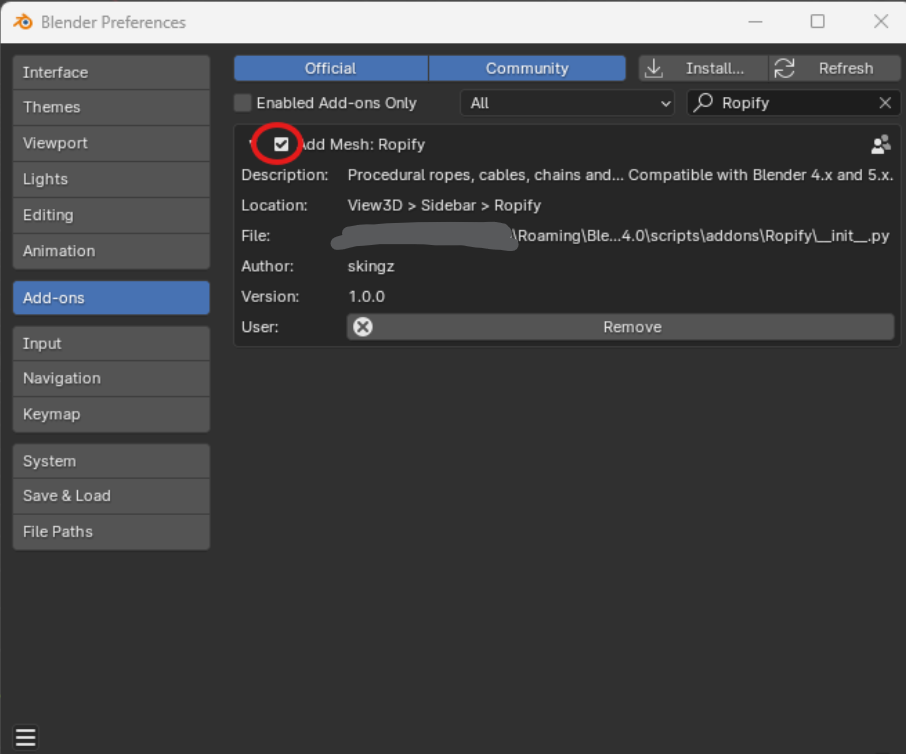
- Enable the addon by ticking the box next to its name.
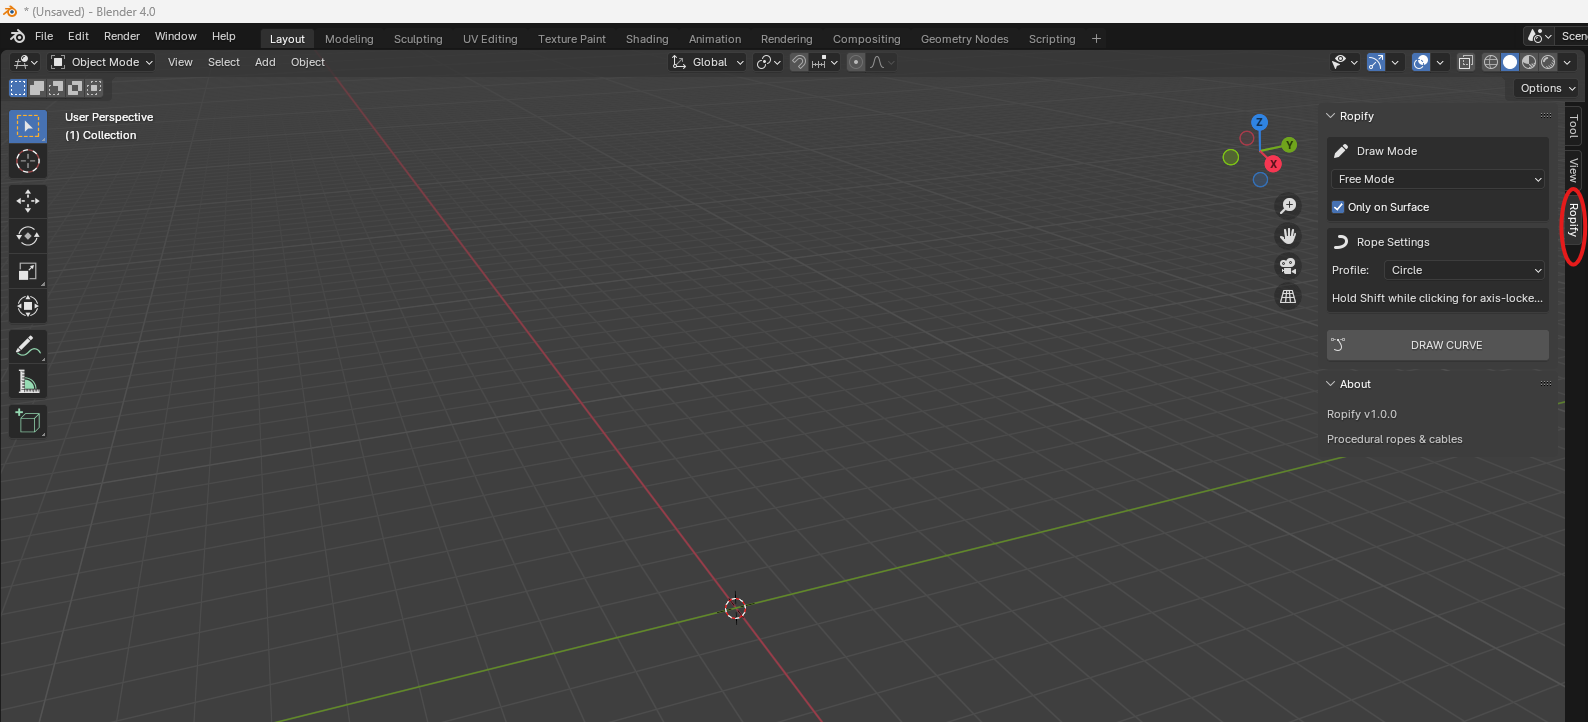
- The Ropify panel appears in the N-panel (right side of the 3D viewport) under the “Ropify” tab
Compatible with Blender 3.0 and newer.
3. Modes
3.1 Free Mode
- Snap to surface: If on, every click is projected onto the chosen surface. If off, clicks are placed at the depth of the previous point.
- Click the Draw button in the Ropify panel with mode set to Free.
- Click on any mesh in the viewport to place control points. Each click projects onto the surface under the cursor.
- Press Enter or right-click to finish. The rope is generated
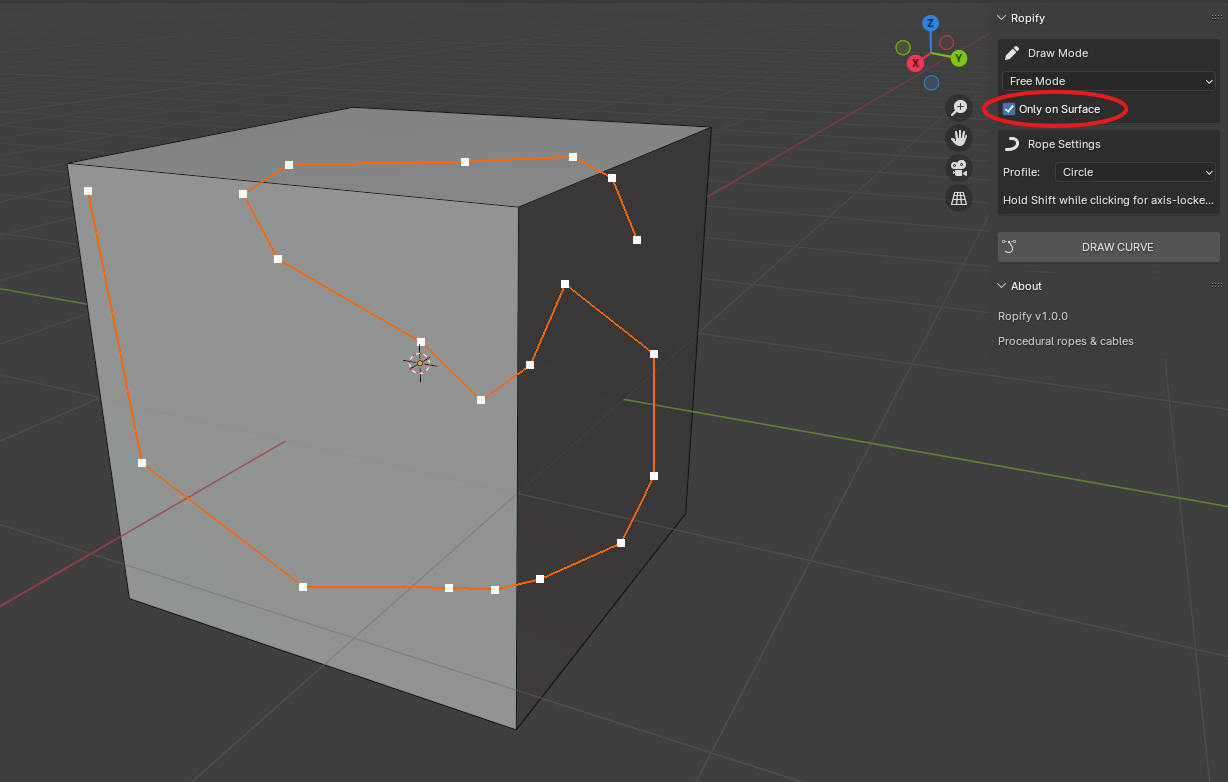
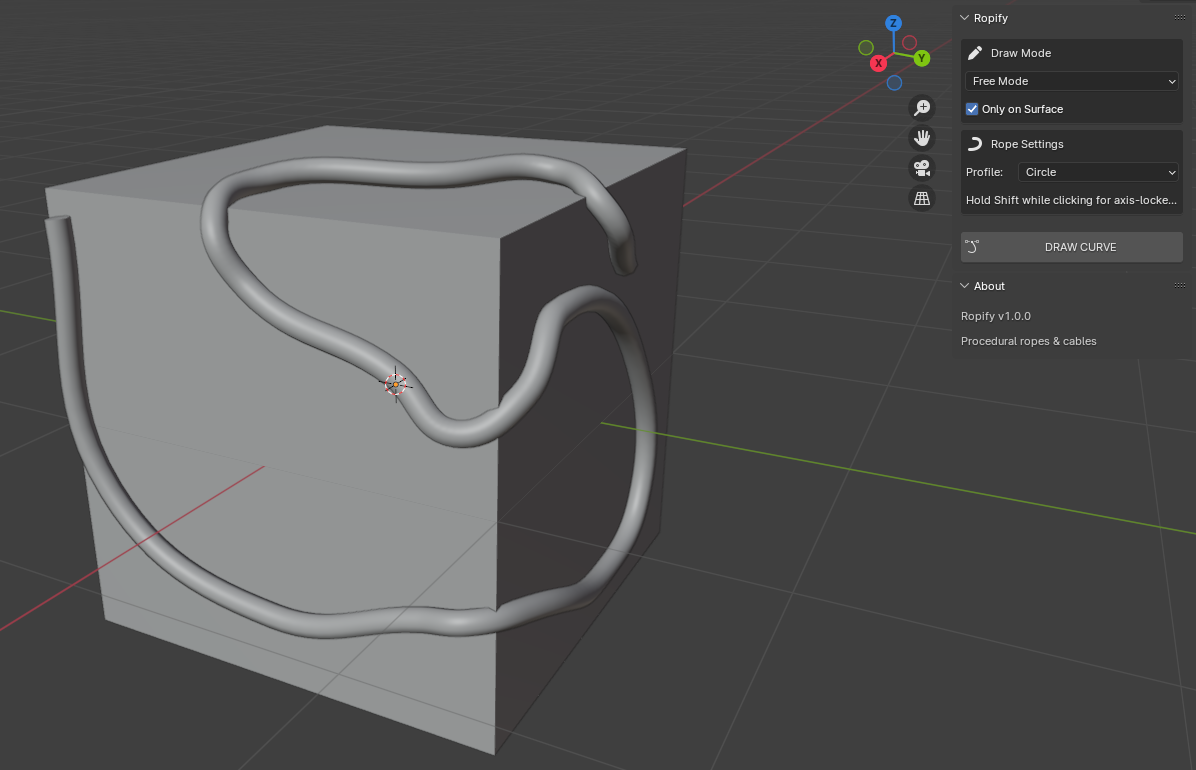
Only on surface ON
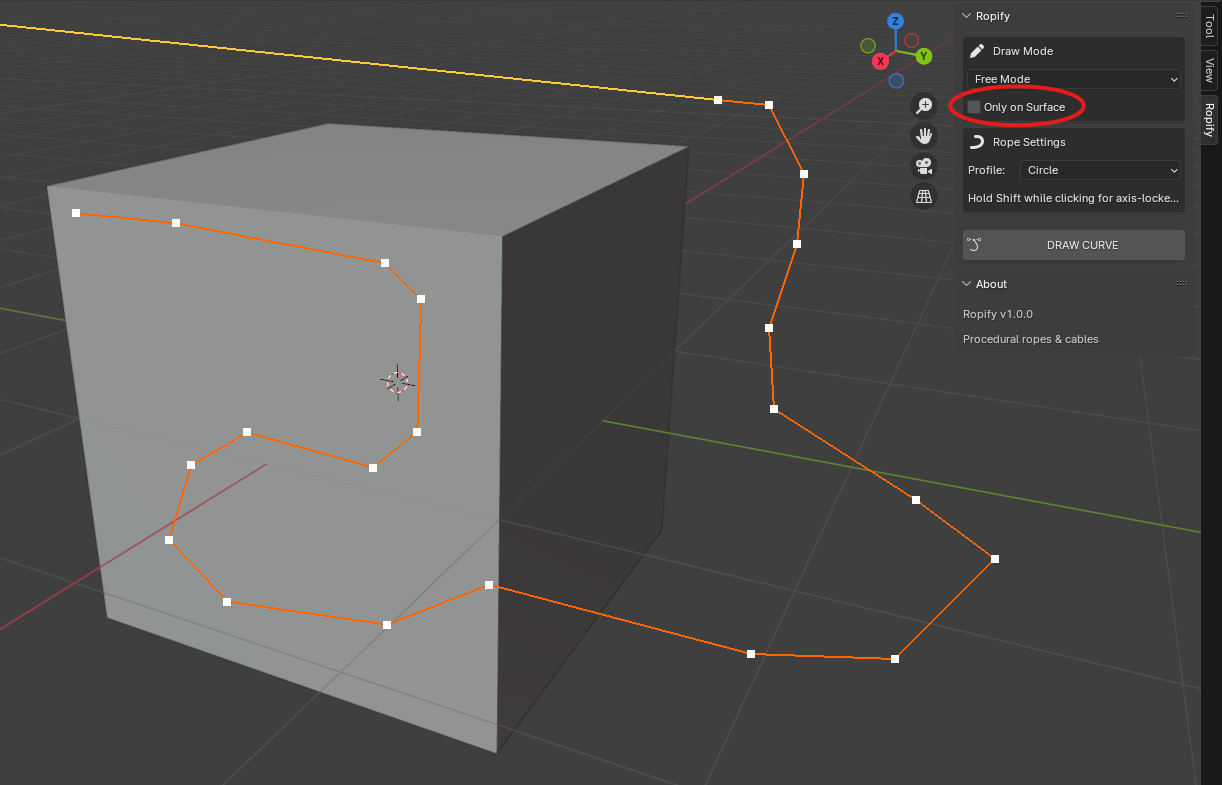
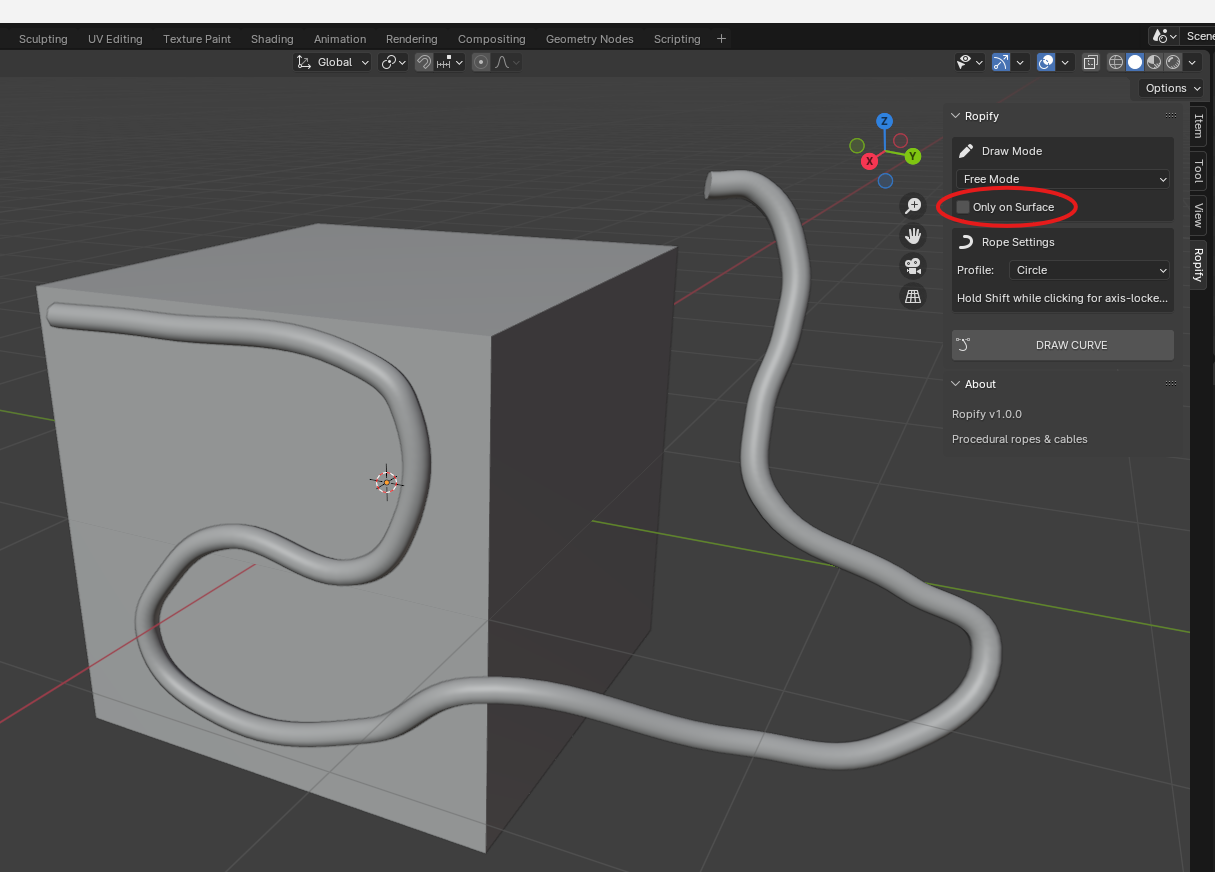
Only on surface OFF
3.2 Catenary Mode
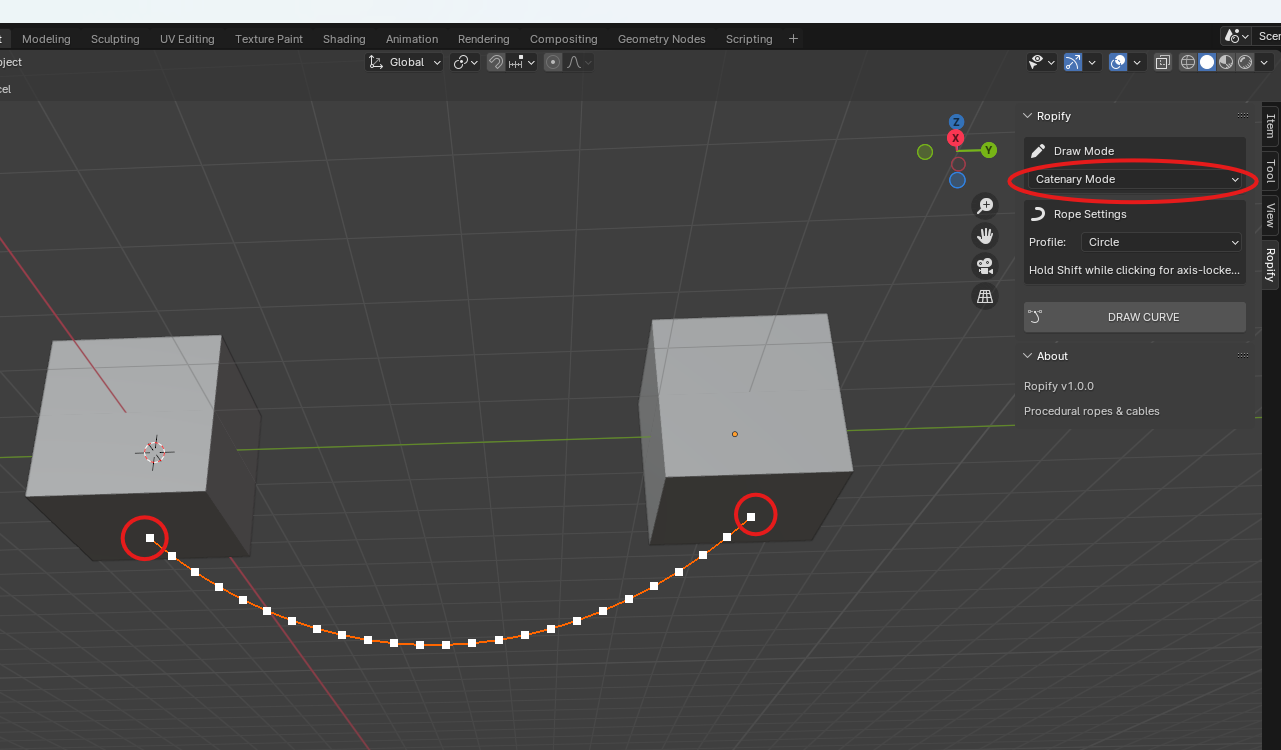
- Click Draw with mode set to Catenary.
- Click two points in the viewport. The rope appears between them with a natural sag.
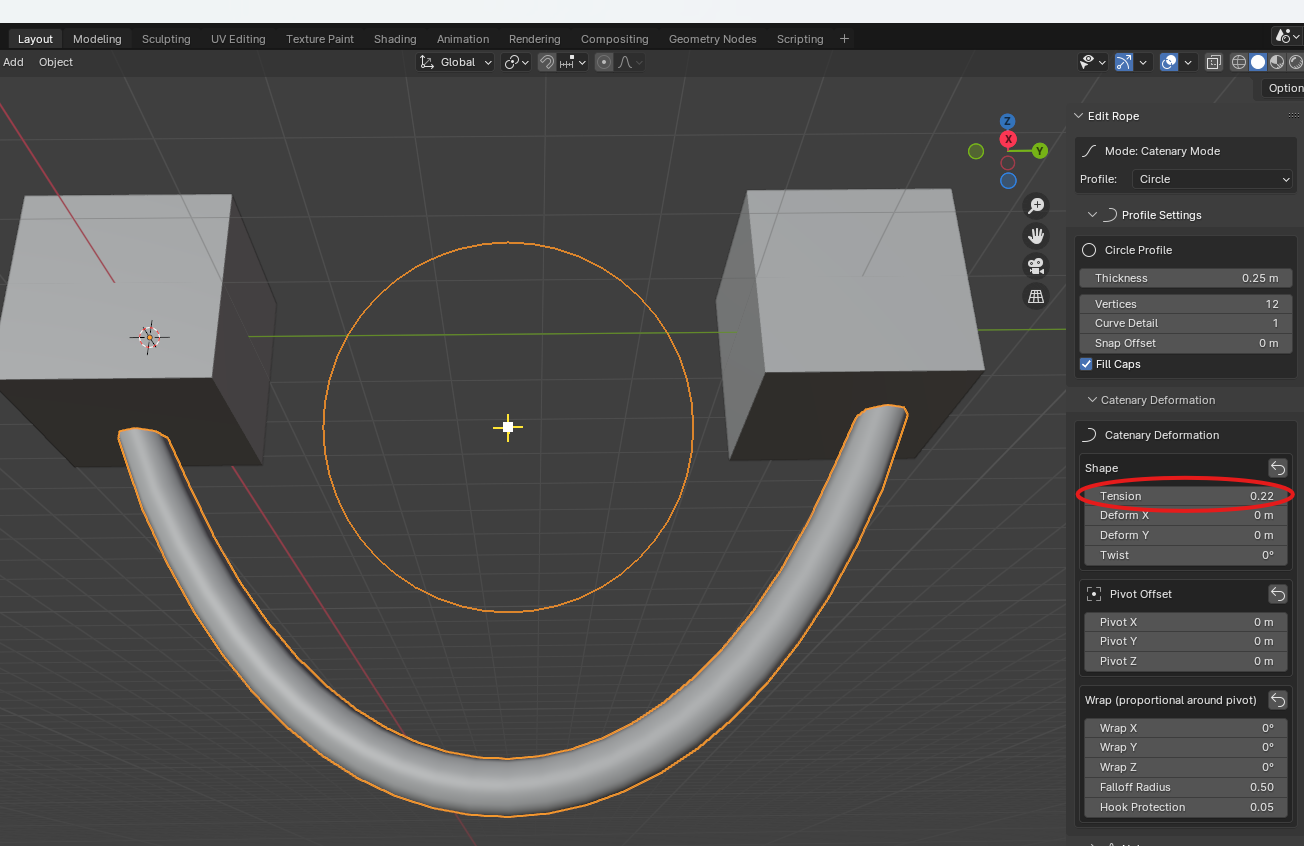
- Adjust the Tension parameter to control how much the rope droops.
3.3 Spiral Mode
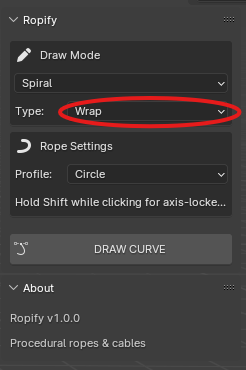
3.3.1 Wrap
-Used to coil a rope around an existing mesh (handle, beam, tree trunk).
- Click two points on the target mesh to define the start and end of the wrap. The addon raycasts the mesh to project each helix point onto the surface.
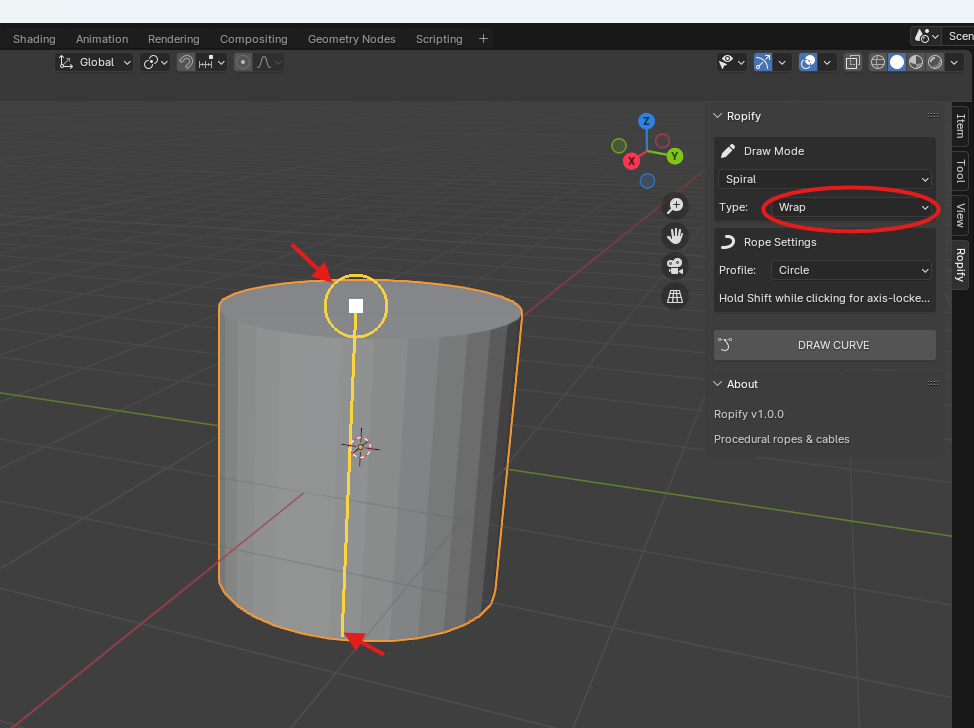
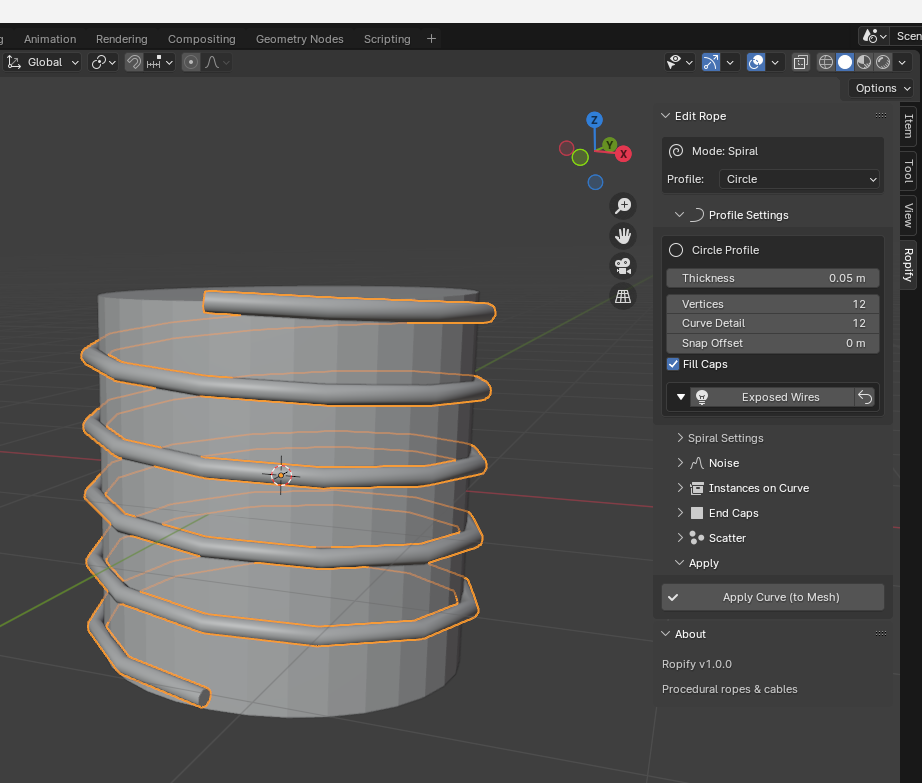
The Wrap type only works well with cylindrical objects, such as tree trunks, handles, etc. Expect poor results with complex meshes.
3.3.2 Spring
-Free-standing helix between two arbitrary points. Used for springs, coiled cables, slinkies.
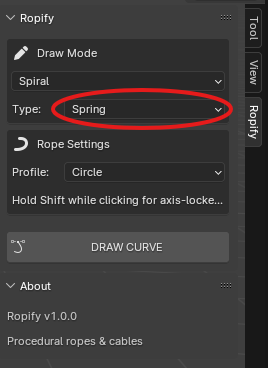
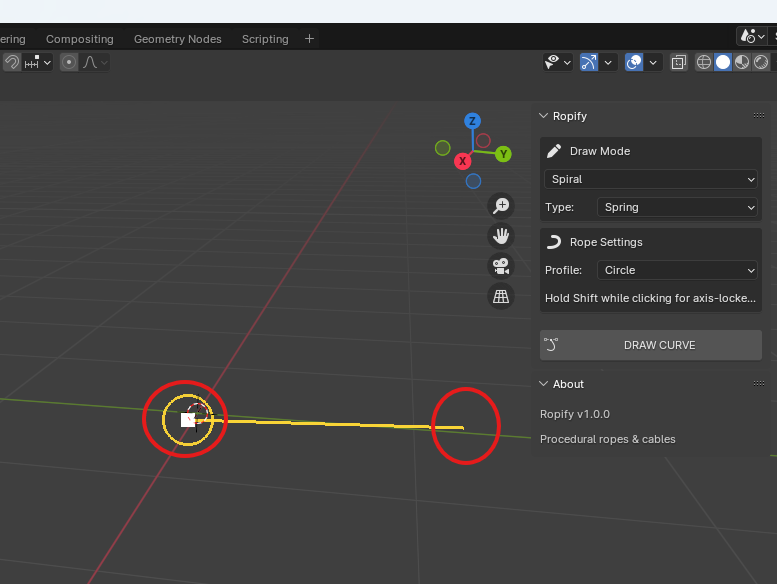
- Click two points anywhere in space — the spring is built between them and remains live-editable.
- Move / rotate / scale the spring object after creation: the helix follows the object transform in real time. This makes it easy to position the spring exactly where you want it before fine-tuning the parameters.
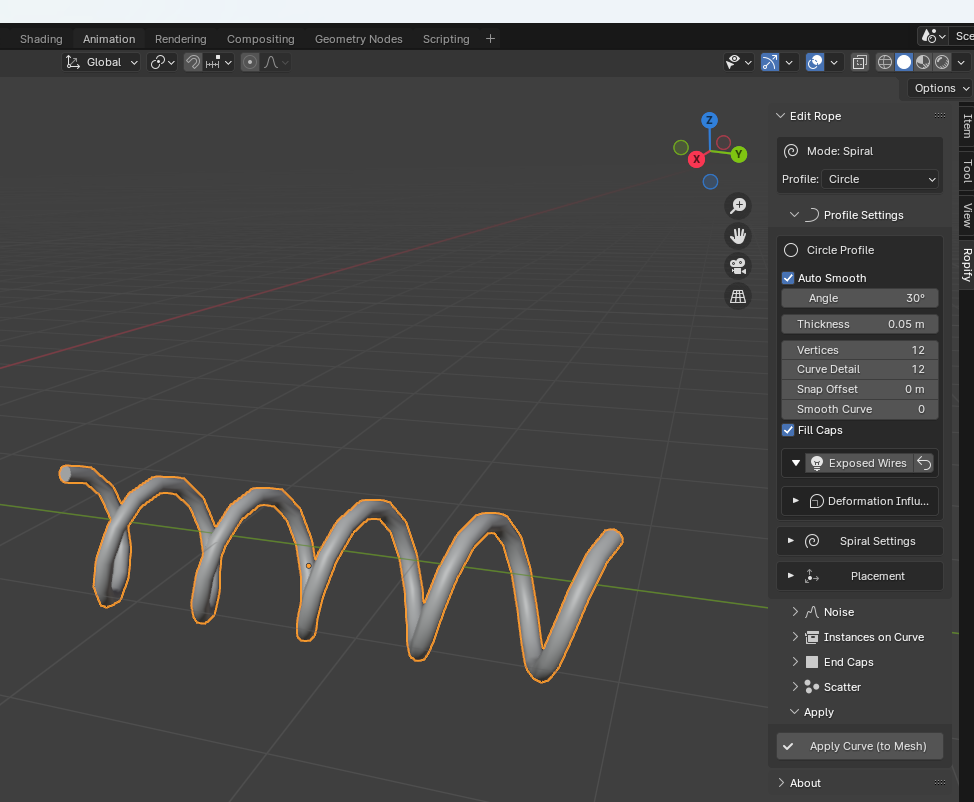
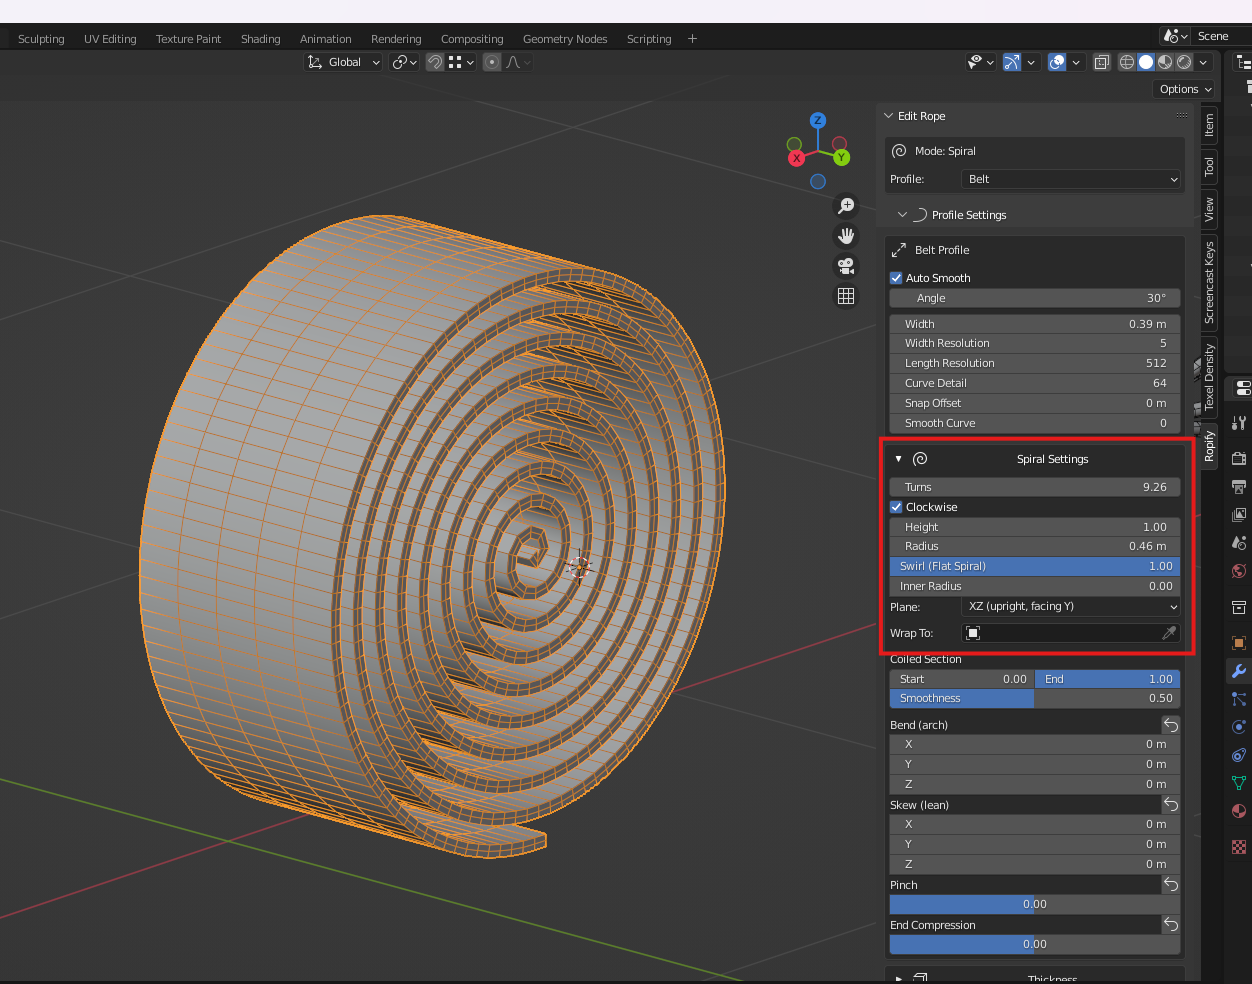
- Use the Swirl slider to create a self-coiling spiral effect
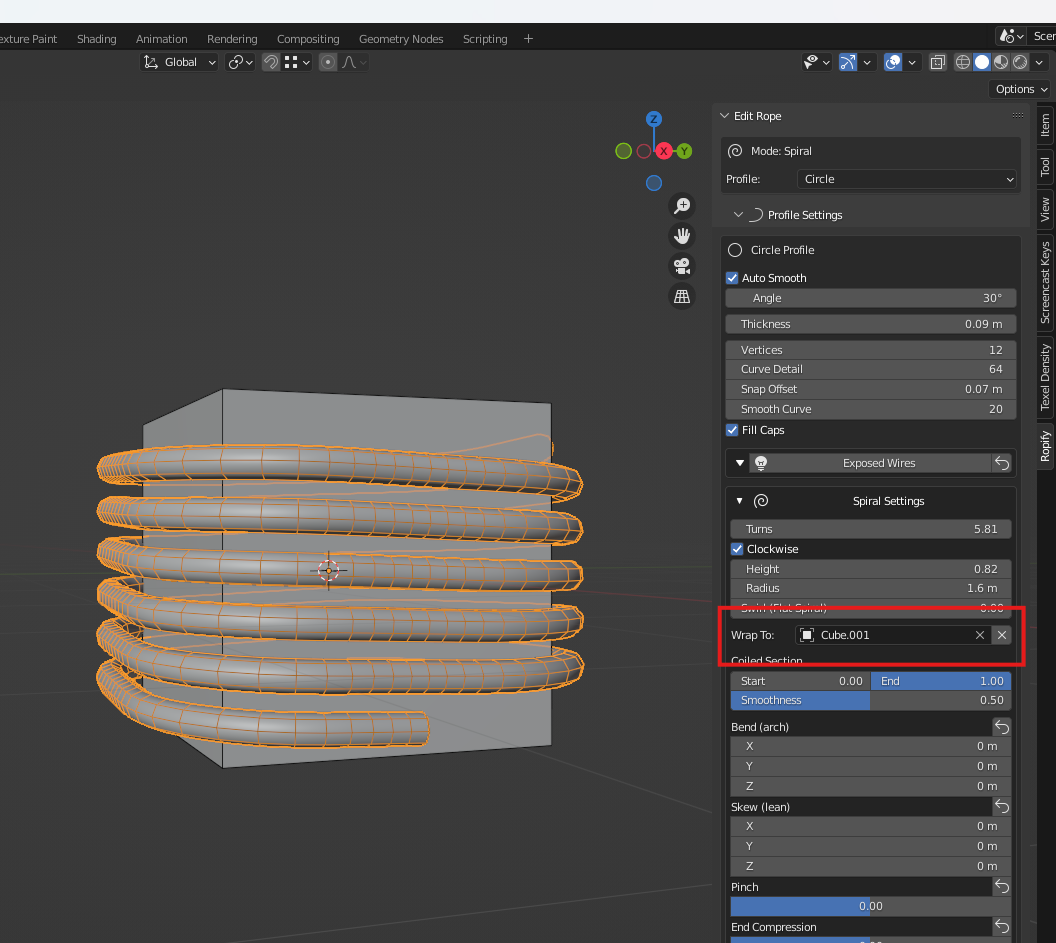
- You can also wrap more complex shapes in Spring mode, though you'll need to manually position the spiral onto the object you want to wrap
4. Profiles
The profile determines the shape of the rope's cross-section. Each profile has its own parameters, grouped into collapsible sections within the panel.
4.1 Circle (round cable)
-A rope or tube with a circular cross-section. It is the simplest profile and the basis for cables and hoses.
-
Thickness - the rope's radius.
-
Vertices - number of vertices in the circular cross-section. More vertices = rounder and more polygons.
-
Curve Detail - subdivisions along the curve. More detail = smoother curve.
-
Snap Offset - extra distance away from the surface.
-
Smooth Curve - smooths the path by averaging the control points. Useful to clean up a hand-drawn path.
- Fill Caps - closes the ends of the tube.
- The Exposed Wires section lets you strip the cable's ends to reveal inner conductors (a cut or stripped-cable look). Inside you will find controls for the number of wires, their length, diameter, spread, curl, gravity and the copper tip. This is an advanced feature aimed at electrical cables.
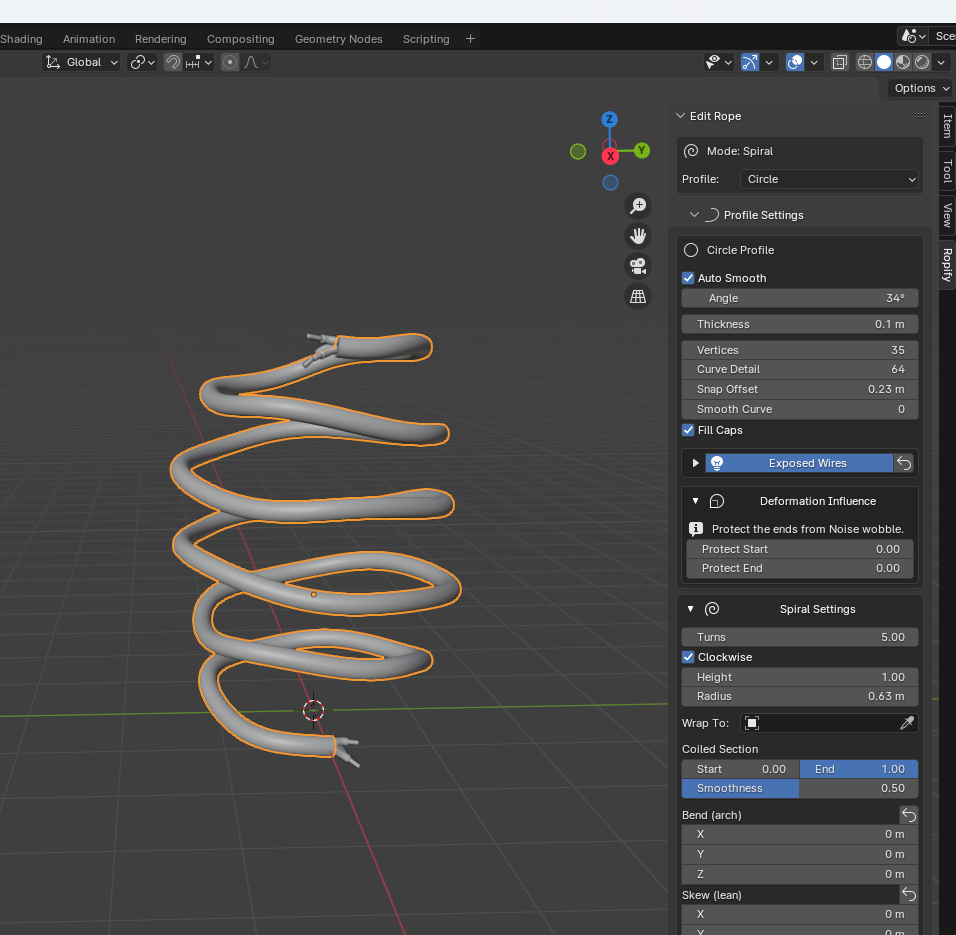
Example of the use of the circular profile, with adjustments to the deformation parameters, thickness, and exposed wires.
4.2 Strings (braided rope)
-A rope made of several twisted strands, like a cord or a braided rope.
Thickness — overall rope thickness.
Curve Detail — subdivisions along the curve.
Strings Resolution — steps per twist revolution. Higher = smoother twist.
-
Roundness — number of vertices per strand. More = rounder strands.
-The Strands section controls the twisting of the strands:
Twist Angle — total twist angle.
Twists— how many times the twist pattern repeats.
Count — number of strands.
Radius Variation — random variation of each strand's radius, for a less uniform look.
-
Spread — how far the strands spread from the rope's center.
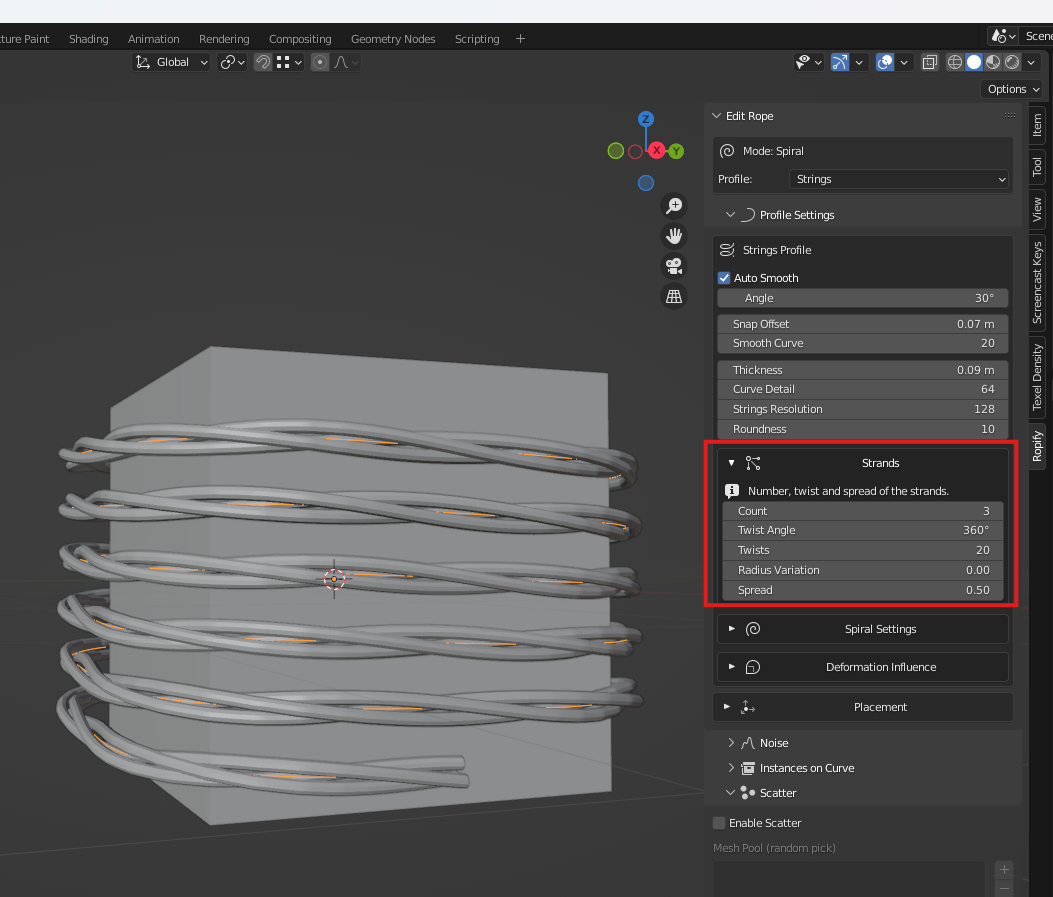
Example of the use of the String profile, tweaking parameters such as the number of strands, radius variation, and other settings.
4.3 Chain
-Repeats one or more objects (links) along the curve. Great for chains, but also for anything that repeats along a path: beads, vertebrae, bolts, and so on.
-
Chain Size — global scale of the links.
-
The Link Shapes section holds the list of meshes that repeat. You can add several and they will alternate along the chain. Each one has its own rotation and scale.
-
The Repetition section controls how many links are placed and how they are spaced:
-
Mode — choose between spacing by distance, by a fixed number of links, or fitted to the curve.
- Spacing / Number of Links / Link Length — the actual control changes depending on the chosen mode.
- The Random Variation section adds per-link random rotation and scale so the chain doesn't look repetitive. The Deformation Influence section protects the ends from noise.
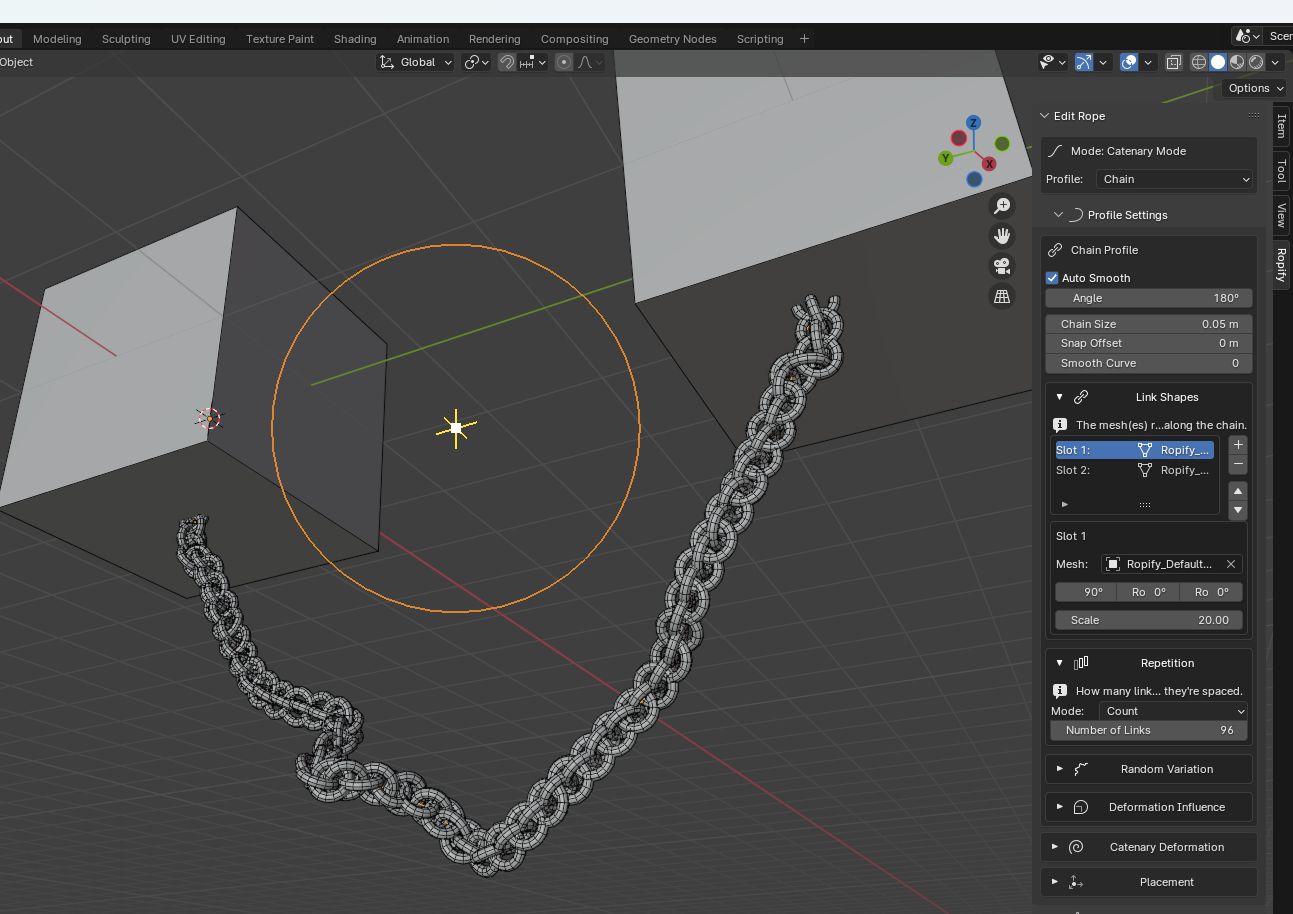
Example of the use of the Chain profile, adding a chain link and rotating successive links to create the chain pattern. Parameters such as random rotation, the number of links, and other settings can also be adjusted.
4.4 Belt (strap / band)
-A flat band that hugs the surface, like a belt, a strap or a strip of fabric. It is the most complete profile, with many shaping options.
Width — width of the band.
Width Resolution — subdivisions across the width.
Length Resolution — subdivisions along the length. The geometry is distributed evenly along the curve.
-The Belt's sections are:
Thickness — gives the flat band real depth, with its offset and depth resolution.
Wrinkles — adds fabric-like creases to the surface (strength, frequency, irregularity and random seed).
Edge Shaping — curls and twists the band: Side Curl (edge curling), Wrap Angle (wrapping) and Twist.
Rounded Ends — rounds the band's tips. Roundness controls how much rounding (0 = square, 1 = semicircle).
-
Deformation Influence — protects the ends from noise.
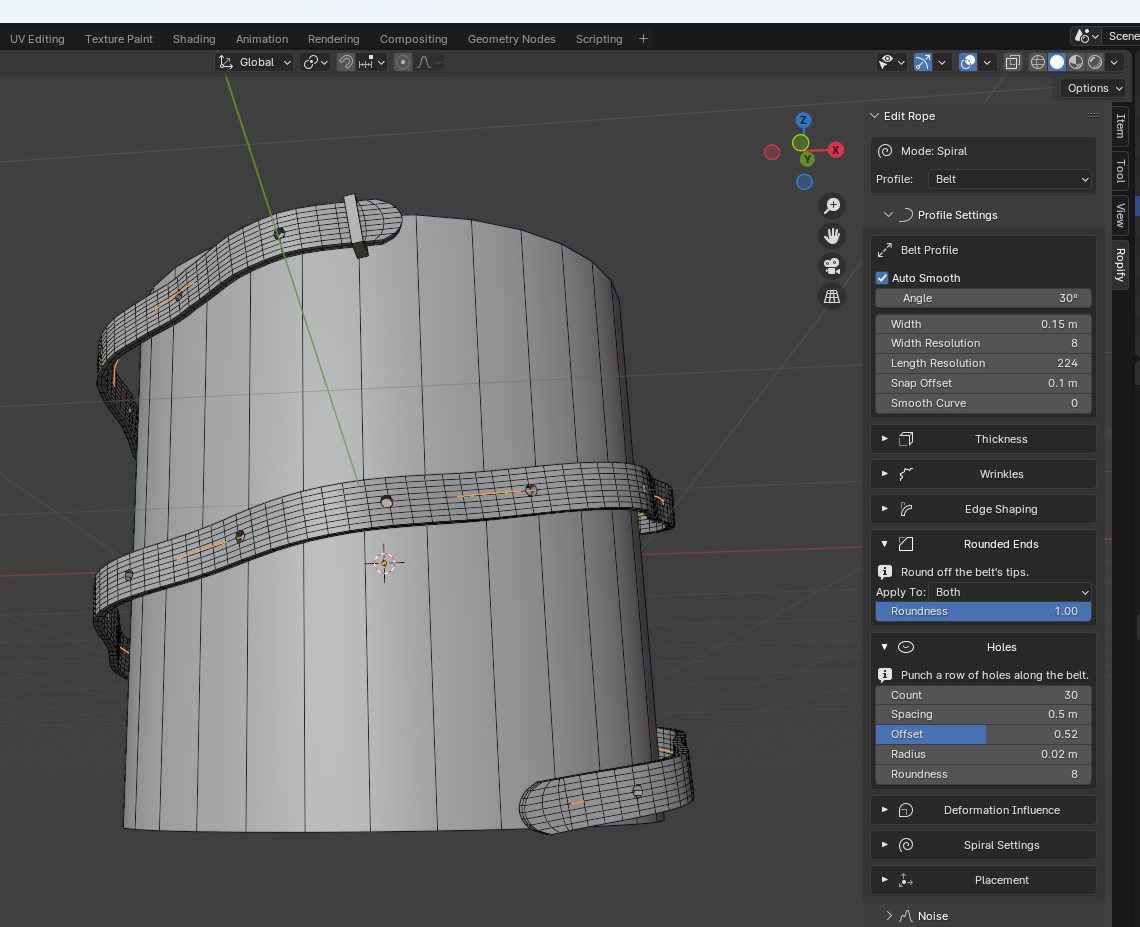
Example of using the Belt profile, creating a belt by tweaking parameters such as wrinkles, width, noise and rounded ends,
4.5 Custom
-Uses one of your own curves as the cross-section, instead of a predefined shape. Draw whatever silhouette you want (a hose shape, a moulding profile, etc.) and Ropify extrudes it along the path. It includes its own Wrinkles section to add surface variation.
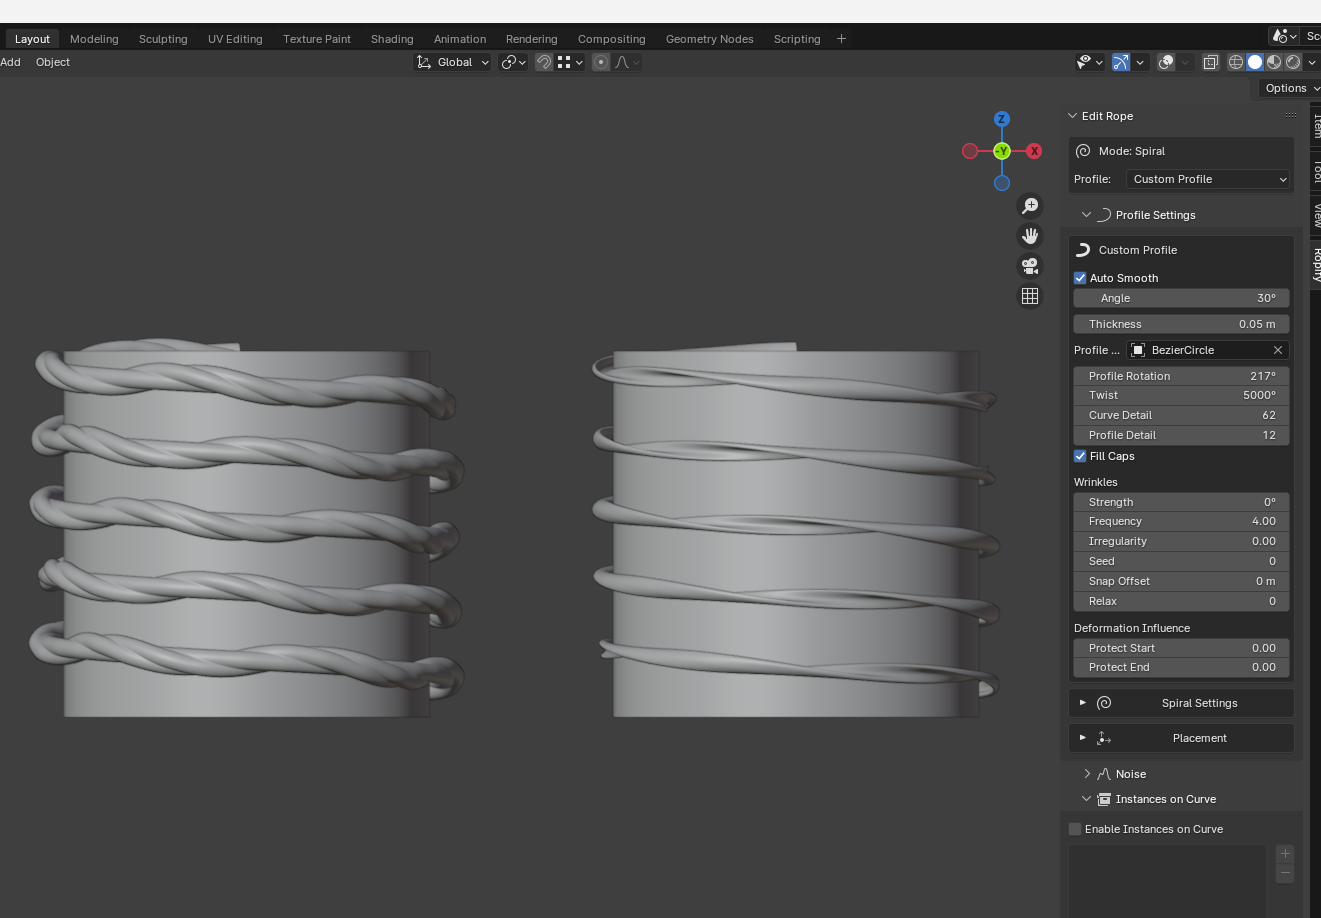
Example of two custom profile types. This feature only works with Bézier curves.
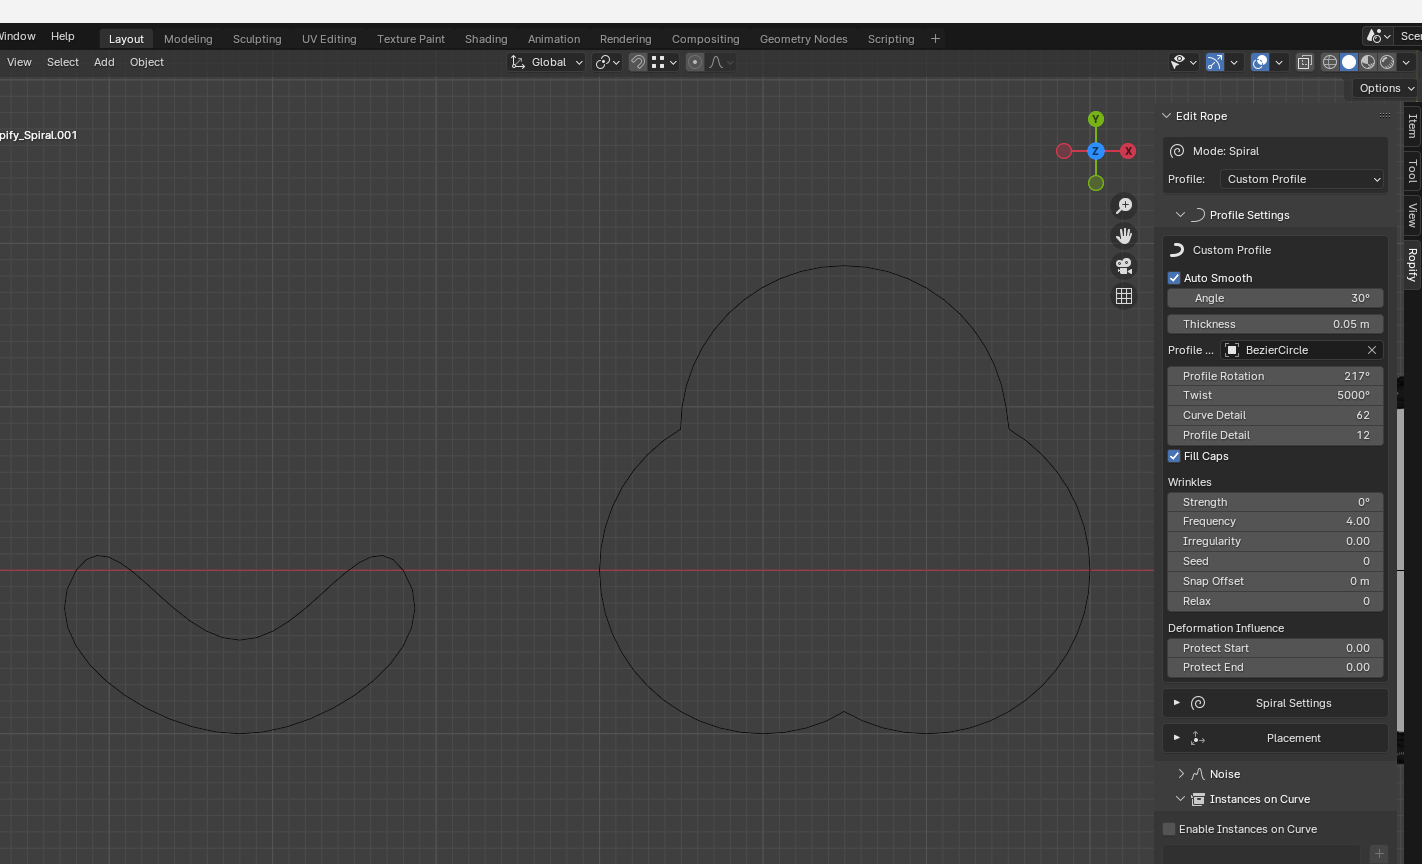
Example of Bézier curve profiles
5. Common settings
-Some controls appear in all, or nearly all, profiles.
5.1 Deformation influence
Protects the rope's ends from the Noise effect, so the tips stay in place.
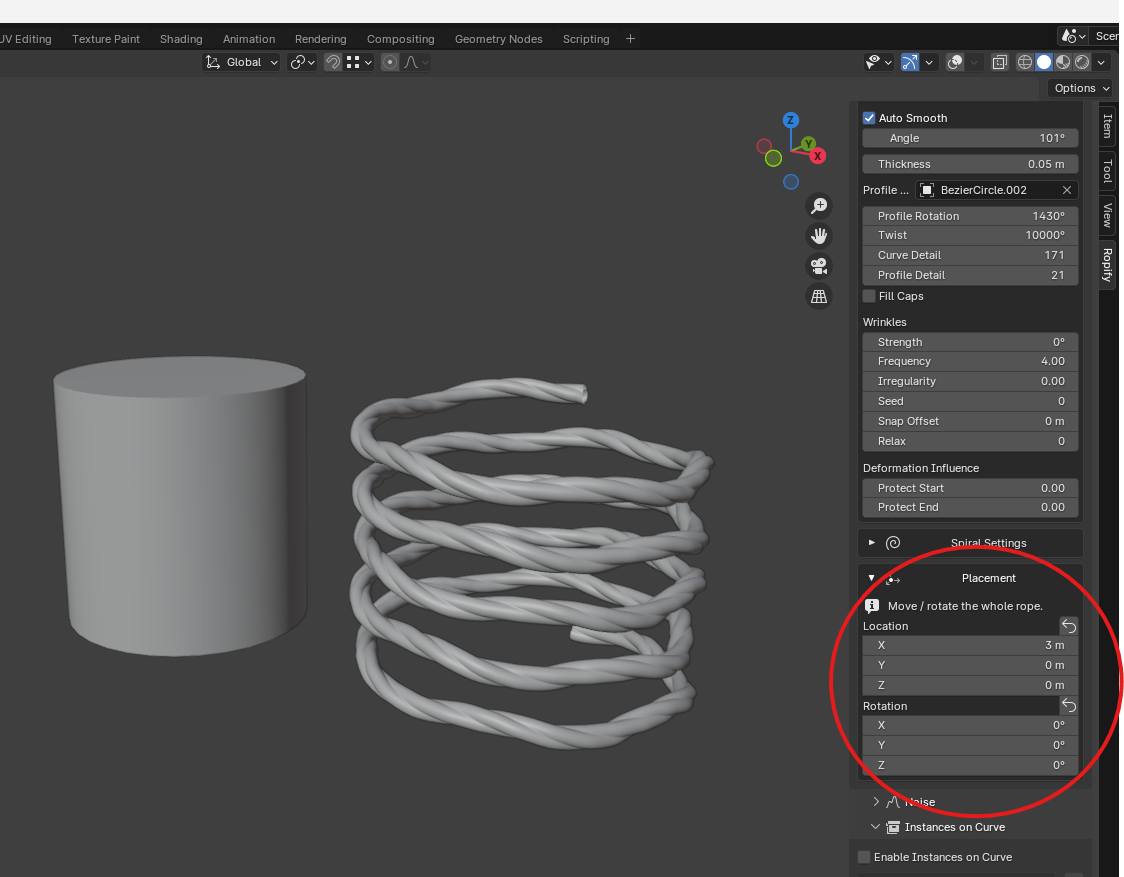
5.2 Placement
Move and rotate the whole rope through its Location and Rotation fields, or directly with G and R in the viewport: both ways stay in sync. Each section has its own reset button, which returns the rope to the position or rotation it had when you created it (not to the world origin).
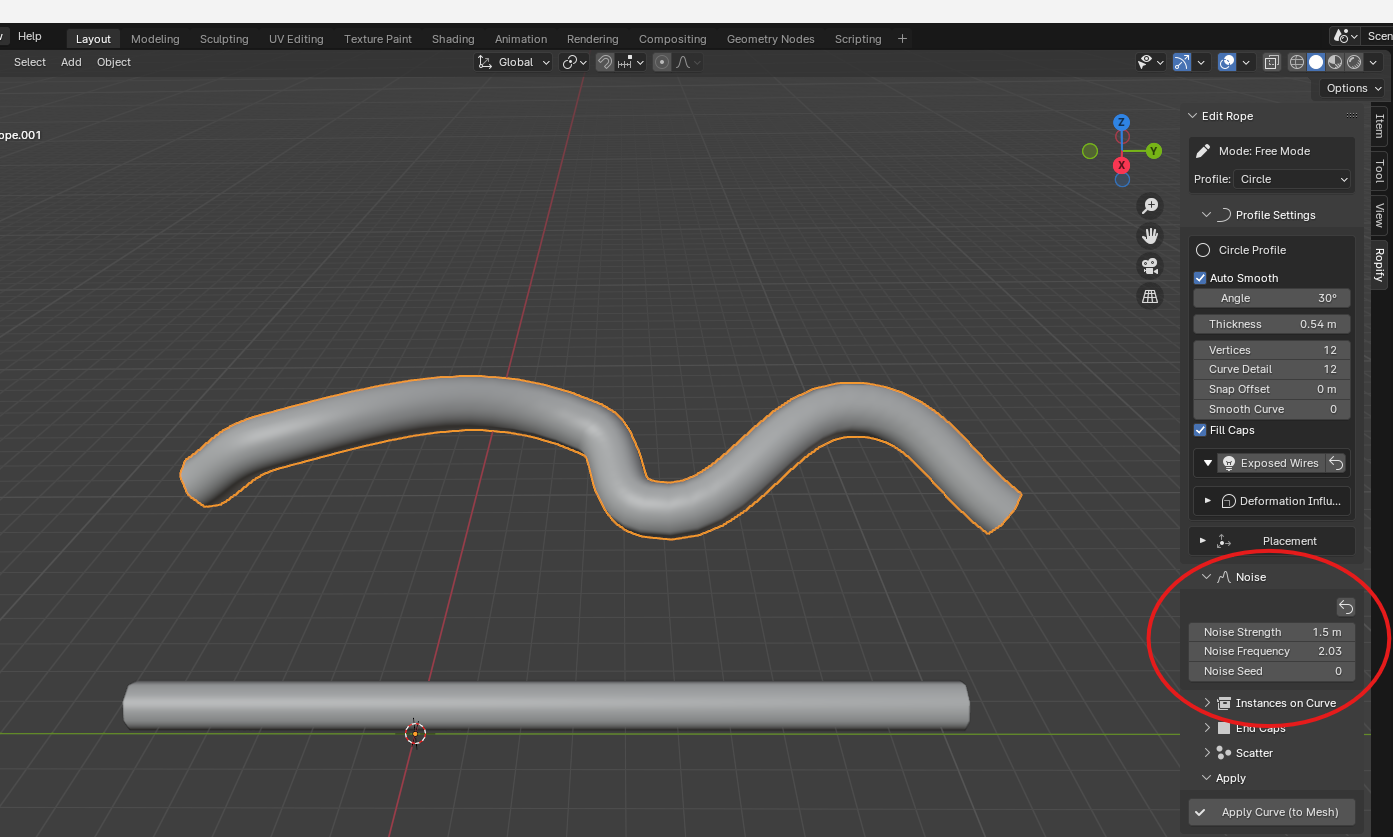
5.3 Noise
Adds random displacement to the curve for a more natural, less perfect look. You control its strength, frequency and seed. Each profile's Deformation Influence section lets you protect the ends so the noise doesn't move the tips out of place.
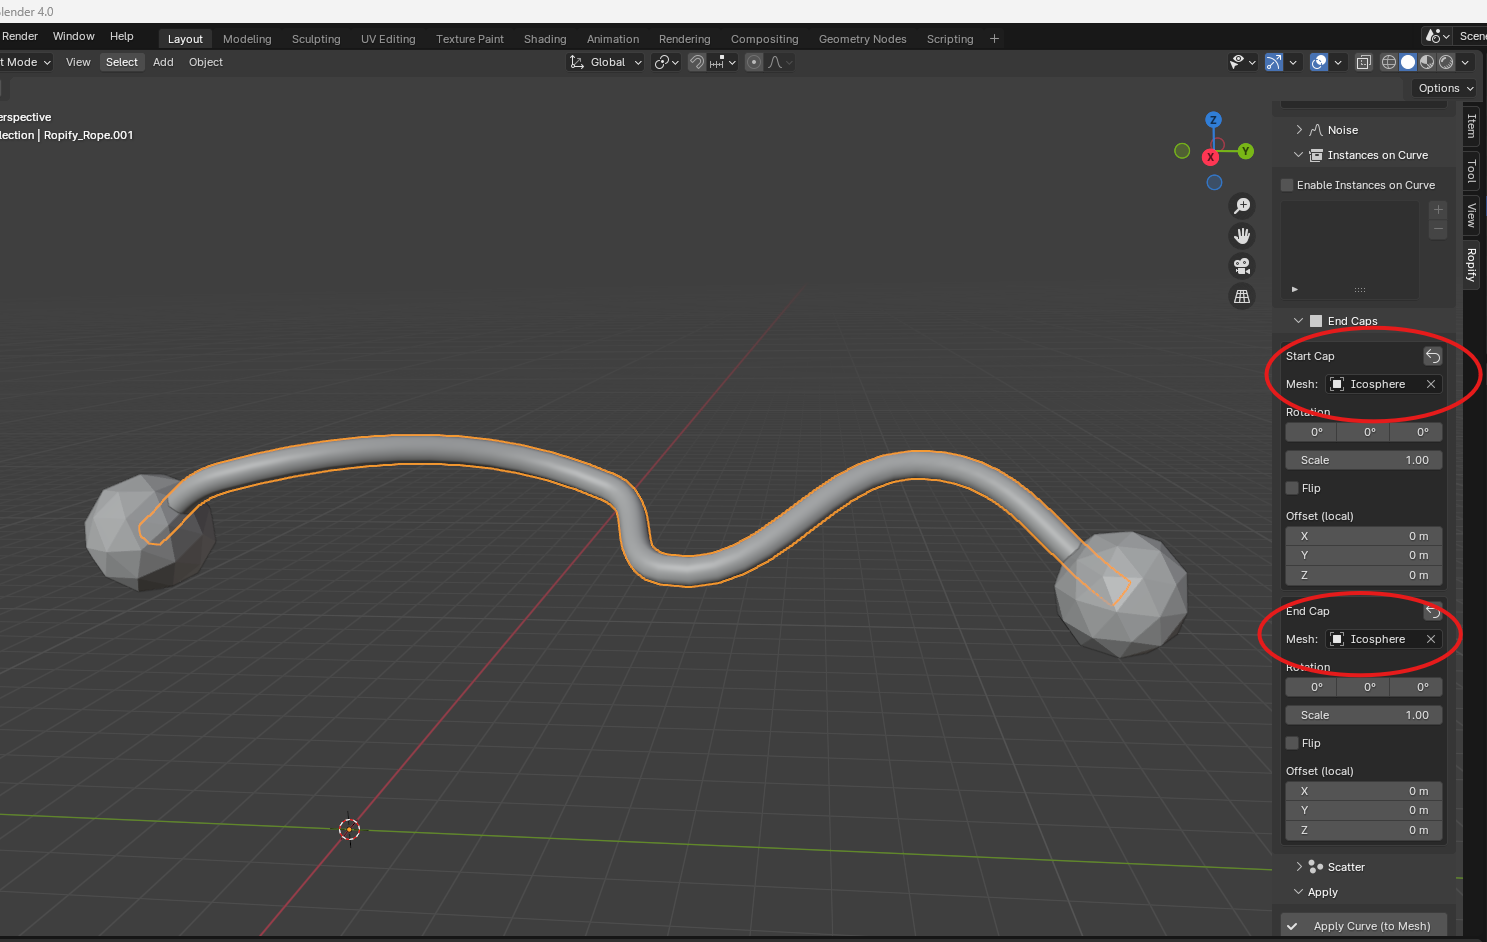
5.4 End Caps, Instances and Scatter
Ropify includes extra sub-panels to close the ends with custom caps (End Caps), distribute instanced objects along the rope (Instances) and scatter elements over it (Scatter). These are optional tools to enrich the result.
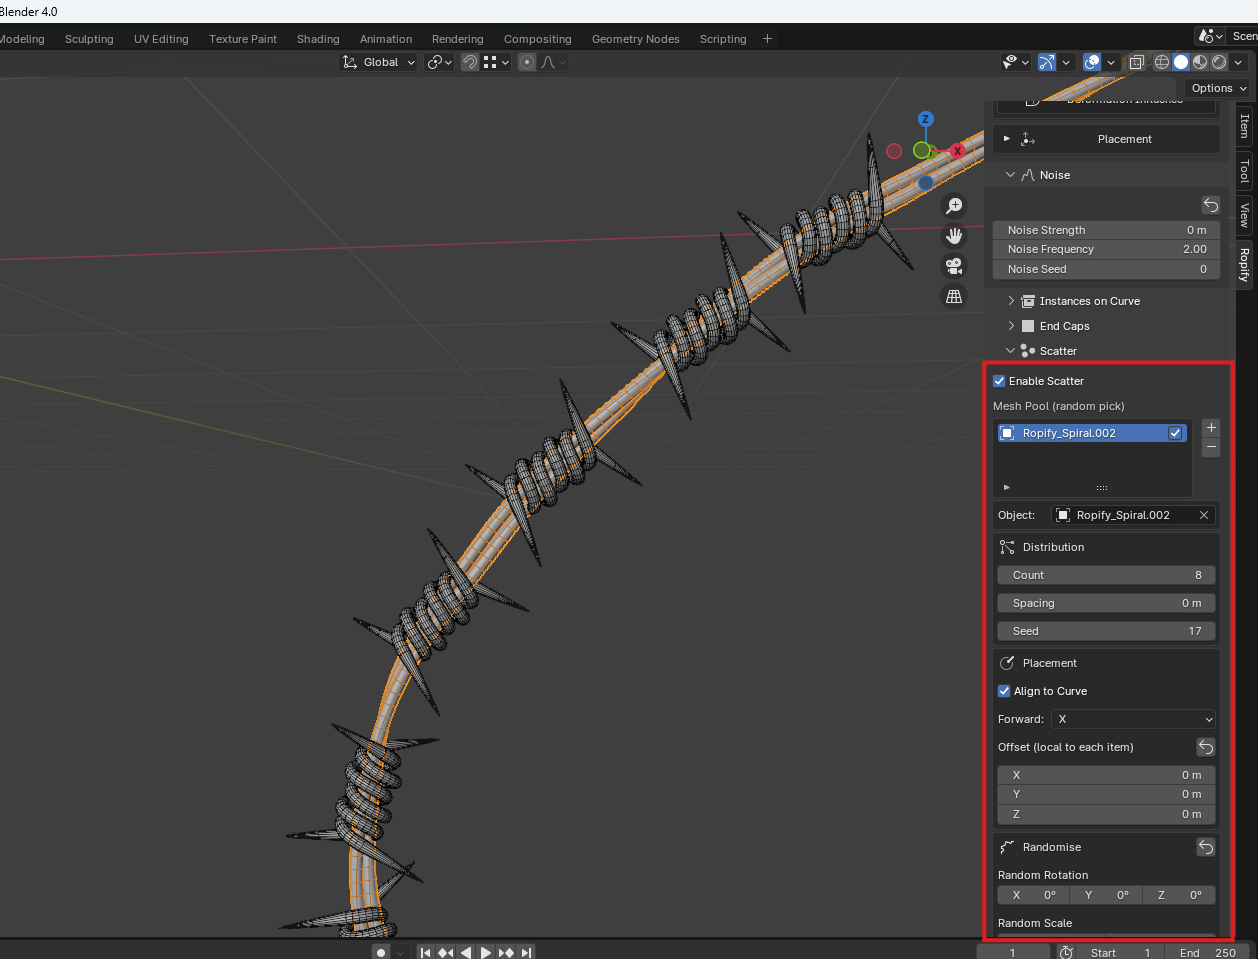
Scatter any object along the rope to create barbed wire, armored cables, braided designs and more
5.4 Apply
When you are happy with the result, the Apply button turns the procedural rope into a normal, editable mesh, baking all the geometry. From that point on you lose the live controls, so apply only when you have finished tweaking.
6. Convert any Blender curve to Ropify curve
-Turns any existing Blender bezier curve into a fully functional Ropify rope — no need to draw it from scratch. You keep your curve exactly as it is and gain instant access to all Ropify profiles, modes and parameters.
6.1 How to use it
- Select your existing bezier curve in the viewport.
- Open the Ropify panel in the N-panel sidebar.
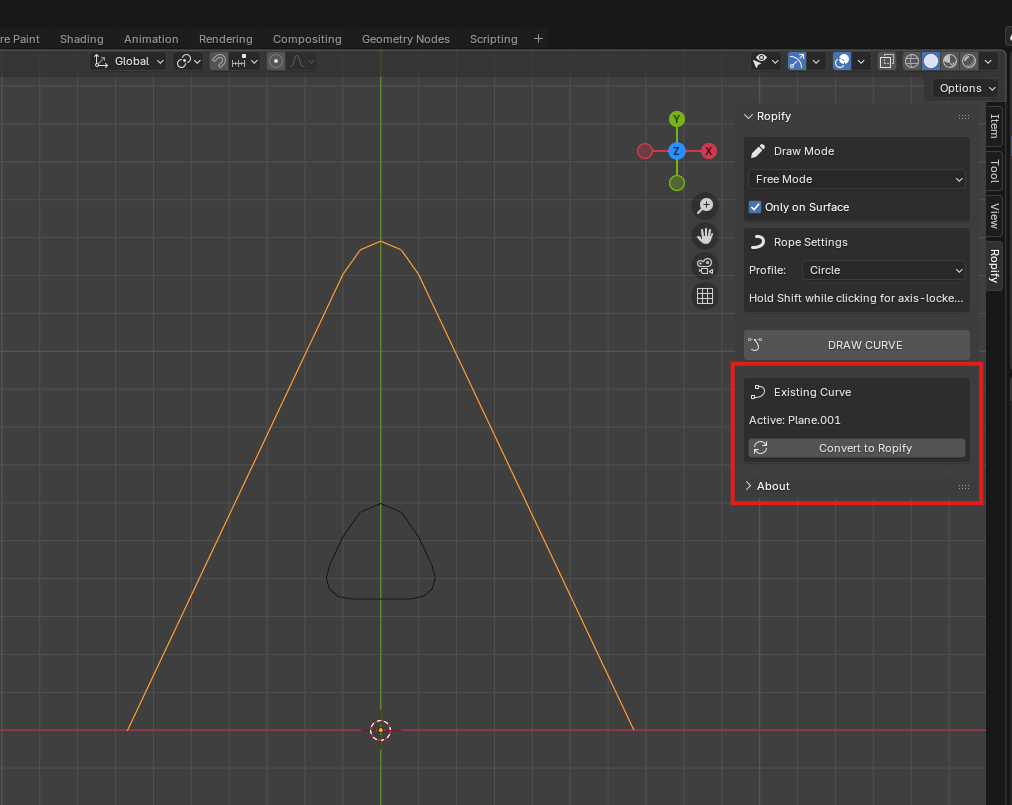
- If the "Convert to Ropify" panel does not appear, make sure the selected object is actually a curve
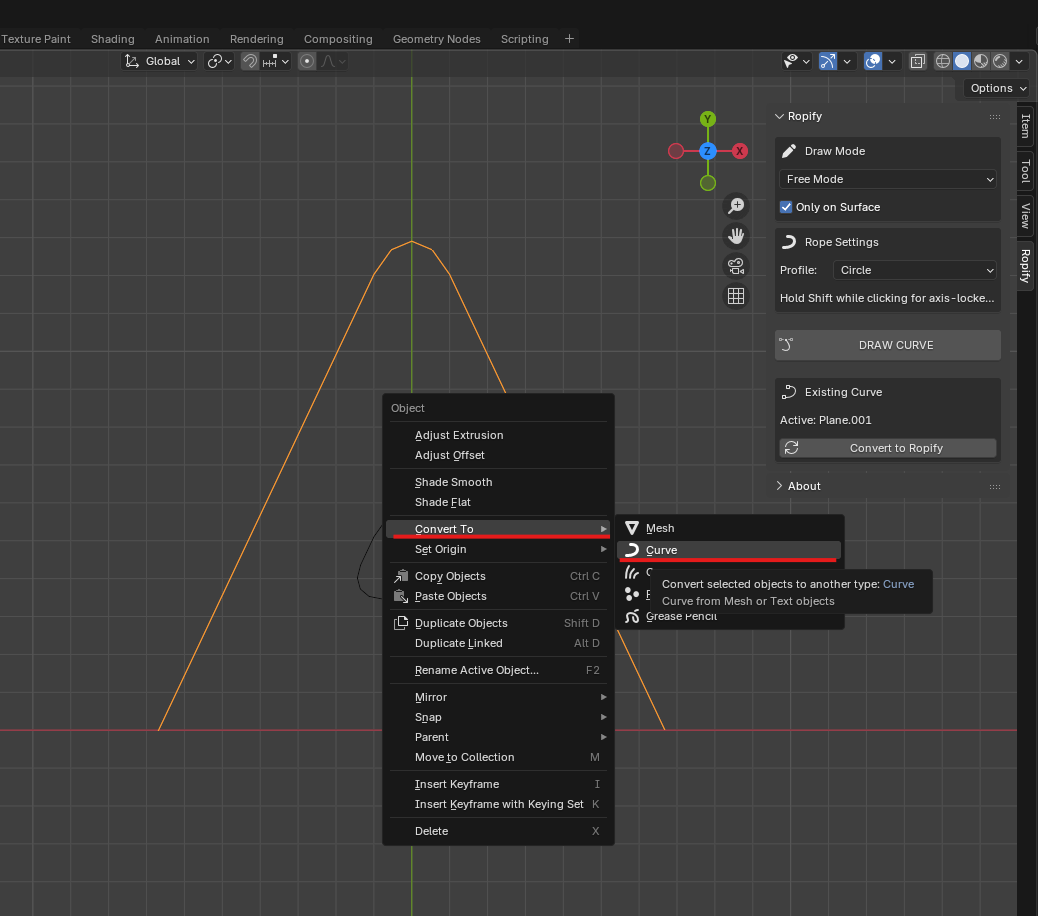
- Click "Convert to Ropify", choose the profile you want to use, and modify the parameters to customize the curve to your needs.
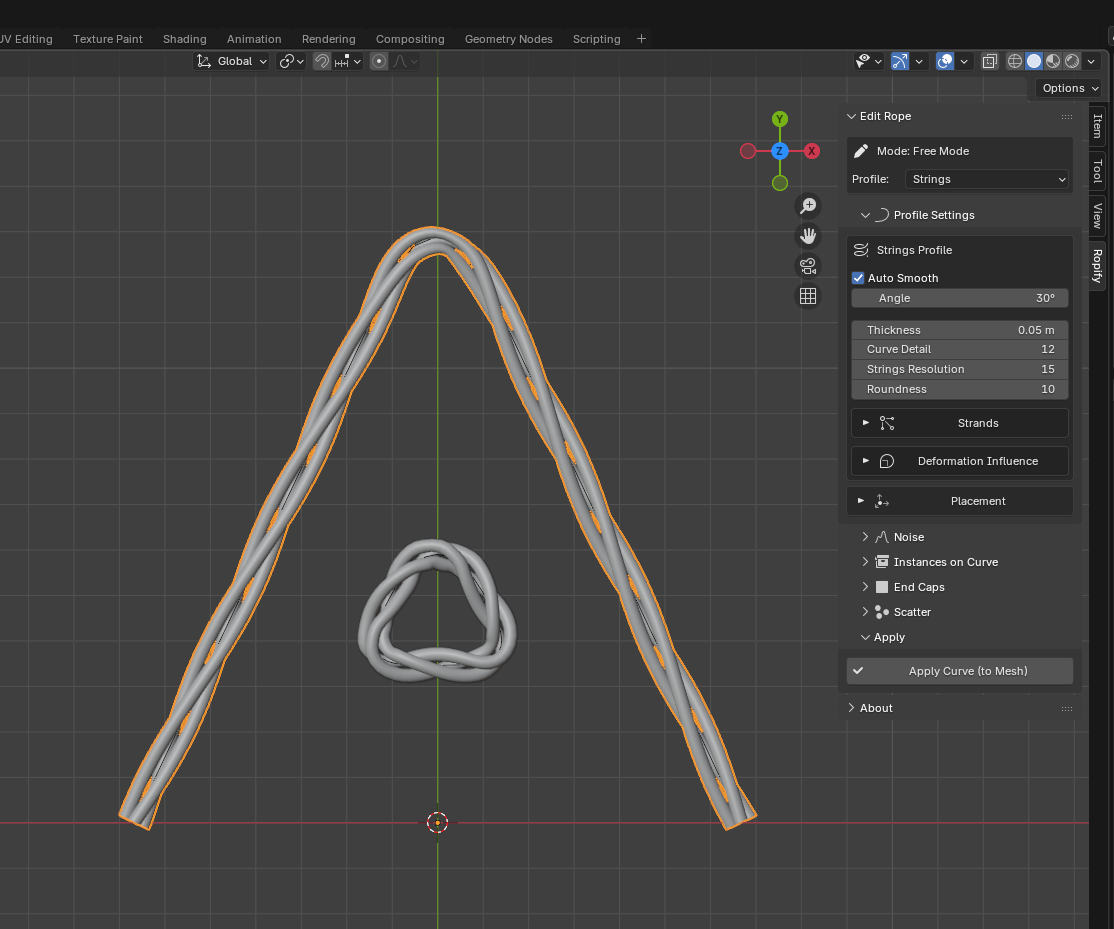
- The original curve shape is preserved — Ropify works on top of it non-destructively.
- Works best with bezier curves. Other curve types may need to be converted to bezier first.
- You can apply the result to mesh at any time using Apply Curve.
7. Stable use: avoiding problems
-Ropify rebuilds its geometry live, which makes intensive use of Blender's systems. For a smooth, stable experience, keep these recommendations in mind.
7.1 General recommendations
- Save often - as with any Blender project, save your work frequently, especially before large operations.
- Use a recent LTS release of Blender - older versions (such as 3.0) have their own bugs in the undo system. A 4.2 LTS or newer release is more stable.
- Avoid spamming many fast Ctrl+Z - undoing repeatedly and very quickly while the geometry is being rebuilt is the most demanding situation. If you need to undo several steps, do it at a normal pace rather than hammering the key.
- Apply finished ropes - if a scene has many active procedural ropes at once, every change recalculates them all. Applying the ones that are final turns them into normal meshes and lightens the scene considerably.
- Extreme resolution values - resolution and subdivision parameters accept very high values when typed by hand. Pushing them to extremes in a heavy scene can slow Blender down; use reasonable values unless you need a close-up.
- Very tight curves with thickness - a curve with very tight radii combined with a lot of thickness can make the geometry intersect itself. This is a physical limit of offsetting (it happens with Blender's own Solidify modifier too); smooth the curve or reduce the thickness.
- Save often - as with any Blender project, save your work frequently, especially before large operations.
- Use a recent LTS release of Blender - older versions (such as 3.0) have their own bugs in the undo system. A 4.2 LTS or newer release is more stable.
- Avoid spamming many fast Ctrl+Z - undoing repeatedly and very quickly while the geometry is being rebuilt is the most demanding situation. If you need to undo several steps, do it at a normal pace rather than hammering the key.
- Apply finished ropes - if a scene has many active procedural ropes at once, every change recalculates them all. Applying the ones that are final turns them into normal meshes and lightens the scene considerably.
- Extreme resolution values - resolution and subdivision parameters accept very high values when typed by hand. Pushing them to extremes in a heavy scene can slow Blender down; use reasonable values unless you need a close-up.
- Very tight curves with thickness - a curve with very tight radii combined with a lot of thickness can make the geometry intersect itself. This is a physical limit of offsetting (it happens with Blender's own Solidify modifier too); smooth the curve or reduce the thickness.
8. Tips and best practices
- For ropes resting on objects, use Free mode and click directly on the surfaces: Ropify snaps the rope to them automatically.
- For realistic hanging cables, use Catenary mode: you only mark the two ends and the curvature is physically correct.
- If your freehand path looks irregular, raise Smooth Curve a little instead of redrawing it.
- The Chain profile isn't limited to chains: any object you repeat along a curve (beads, links, mechanical segments) works as a link.
- Use Deformation Influence to pin a rope's ends to their anchor points when you add noise.
- Work with the collapsible sections folded and open only the one you are adjusting: the panel stays tidy.
- When a rope is finished, apply it (Apply) to bake it and lighten the scene.
 Included
Includes 12 months of
- Support from skingxyz
- Product updates
Extend this product’s Support Period +12 months: 50% of product price
Have questions before purchasing?
Login to message
| Blender Extension Compatible | Yes |
| Sales | 10+ |
| Published | 3 months ago |
| Blender Version | 3.0 - 5.0 |
| Extension Type | Add-on |
| Render Engine Used | Cycles, Eevee |
| License | GPL |
Discover more products like this
auto cables addon blender 2026 addon Create any cables 3d_hard_surface blender cables 3d-mesh-wrapping ropes auto-ropes