 ZibadMend




🚀 Blender Social Media Uploader Addon: Enhanced Installation Guide 🚀
This guide provides a concise and comprehensive overview of setting up your Blender addon, installing the necessary Python libraries, and configuring API connections for various platforms.
1. 📥 Downloading and Installing the Addon
- Prepare the Addon File: Ensure you have the addon's compressed (ZIP) file – do not extract it – saved on your system. 📁
- Launch Blender. 💻
-
Access Add-on Preferences: From Blender's top menu, navigate to
Edit > Preferences. -
Install the Addon: In the Preferences window, select the
Add-onstab. Click theInstall...button and choose the downloaded ZIP file of the addon. - Activate the Addon: After successful installation, locate "Social Media Video Uploader" in the add-ons list (you can use the search bar 🔎) and check the box next to it to enable the addon in Blender. ✅
2. 🐍 Installing Required Python Libraries 🐍
This addon relies on external Python libraries (such as requests, google-api-python-client, google-auth-oauthlib) to communicate with social media APIs. These libraries must be installed within your Blender's Python environment.
Important: The installation scripts (.bat for Windows, .sh for Linux/macOS) are located in the install folder inside your addon directory.
For Windows Users:
- Completely close Blender. 🛑
- Navigate to the addon's installation folder (typically:
C:\Users\YourUser\AppData\Roaming\Blender Foundation\Blender\\scripts\addons\social_media_uploader). - Find the file named
install_libs_windows.batinside theinstallsubfolder. - Right-click on this file and select "Run as administrator". 🛡️
- Wait briefly for the script to install all necessary libraries. You will see the message "Libraries installed successfully!". 🎉
-
Troubleshooting: If the script fails to automatically detect Blender's Python executable, you may need to manually set the
BLENDER_PYTHON_EXE_PATHvariable at the top of theinstall_libs_windows.batfile. Instructions are provided within the.batfile itself.
-
Troubleshooting: If the script fails to automatically detect Blender's Python executable, you may need to manually set the
For Linux/macOS Users:
- Completely close Blender. 🛑
- Navigate to the addon's installation folder (typically on Linux:
~/.config/blender//scripts/addons/social_media_uploaderor on macOS:~/Library/Application Support/Blender//scripts/addons/social_media_uploader). - Find the file named
install_libs_linux.shinside theinstallsubfolder. -
Grant Execution Permission: Open a terminal, navigate to the addon's folder, and execute the command
chmod +x install_libs_linux.sh. 🔒 -
Run the Script: In the terminal, execute the command
./install_libs_linux.sh. 🚀 - Wait for the libraries to install.
-
Troubleshooting: If the script fails to automatically detect Blender's Python executable, you may need to manually set the
BLENDER_PYTHON_EXE_PATHvariable at the top of theinstall_libs_linux.shfile. Instructions are provided within the.shfile itself.
-
Troubleshooting: If the script fails to automatically detect Blender's Python executable, you may need to manually set the
3. 🔑 API Connection Settings 🔑
For the addon to upload your videos to social media, you must configure the necessary API access. This step involves obtaining keys and credentials from each platform.
YouTube ▶️:
- Open Google Cloud Console: Go to https://console.cloud.google.com/.
- Create or Select a Project: Create a new project or choose an existing one. ➕
-
Enable
YouTube Data API v3: In the "APIs & Services > Library" section, search for "YouTube Data API v3" and enable it. -
Create
OAuth 2.0Credentials: Navigate to the "Credentials" section, click "Create Credentials," and select "OAuth client ID." - Application Type: Choose "Desktop app" and proceed through the configuration steps.
-
Download
client_secrets.json: After creating the credentials, you will see a JSON download button. Download this file and rename it toclient_secrets.json. ⬇️ -
Place the file in the addon folder: Copy the
client_secrets.jsonfile exactly into the same folder where your__init__.py(the addon's main file) is located. 📂 -
Verify Scope: During the OAuth consent screen setup (or when reviewing your OAuth client ID details), ensure the
https://www.googleapis.com/auth/youtube.uploadscope is correctly selected and enabled. This is crucial for video upload permissions. - Initial Authentication: The very first time you use the YouTube upload feature in Blender, a browser window will open for authentication. 🌐 Follow the steps in your browser to grant the addon permission.
TikTok 🎵:
-
High Complexity: Connecting to the TikTok API is more intricate and requires creating an application on https://developers.tiktok.com/ and setting up an
OAuth 2.0flow, which typically involves a local web server to manageCallbacks. 🚧 -
Keys: You will need a
Client KeyandClient Secretfor this setup.
Instagram 📸:
-
Strict Limitations: Uploading videos via the Instagram API (Graph API) is highly restricted. This functionality is usually only available for
BusinessorCreatoraccounts, after Facebook app review and with advanced permissions. 🔒 -
Recommendation: Implementing this API section reliably and consistently without official API access and complex
Facebook Developer Appconfigurations is very challenging.
4. 🎬 Using the Addon 🚀
- Open Blender.
-
Output Settings: Render your 3D scene or configure your render output path within
Output Properties(found in the Properties Editor). -
Access the Addon Panel: The "Social Media Uploader" panel is located in the same
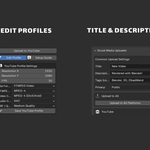
Output Propertiessection (on the right side of the Blender UI). - Fill in Details: Accurately enter the video title, description (multi-line), tags (multi-line), and privacy status. 📝
-
Upload:
- To upload to a specific platform, click the
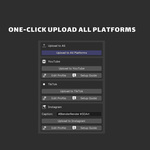
Upload to YouTube,Upload to TikTok, orUpload to Instagrambuttons. - To automatically upload to all three platforms with a combined progress bar, click the
Upload to All Platformsbutton. 📊
- To upload to a specific platform, click the
⚠️ Important Notes for Troubleshooting and Performance ⚠️
-
Blender System Console: Should you encounter any errors or issues while using the addon, always open the
Window > Toggle System Consolein Blender. Detailed error messages andDEBUG:messages (included for troubleshooting assistance) will be displayed there, helping you identify and resolve problems. 🐞 - API Simulation: Currently, actual uploads to TikTok and Instagram in your addon's code are simulated. To fully enable these functionalities, you will need to implement the complete API integrations yourself, as their APIs have specific complexities and limitations.
Have questions about this product?
Login to message
| Published | about 1 year ago |
| Blender Version | 3.6 - 4.5 |
| Extension Type | N/A |
| Render Engine Used | Cycles |
| License | GPL |
Discover more products like this
render and upload upload to instagram upload to youtube export to youtube tiktok upload to tiktok upload youtube instagram export to tiktok upload to platforms