Volume Forge
 Depth Optica





Volume Forge Documentation
This documentation is written for Superhive and mirrors the current Volume Forge help center. The live online documentation also includes a keyword search tool for faster navigation: https://depthoptica.com/docs/volume-forge/index.html.
Volume Forge creates localized volumetric objects in Blender. Depending on the mode, the volume behaves either like a stylized emitted light volume or like localized real fog.
Documentation map
| Chapter | Purpose |
|---|---|
| Overview | Understand Light Volume vs Real Fog, Cube vs From Faces, animation, presets, duplication, and the general addon logic. |
| Installation | Install the zip, enable the addon, open the panel, and understand what gets created in the scene. |
| Creation Tools | A practical overview of the four creation buttons before going into each one in detail. |
| Edit a Volume Forge volume | Learn the main editing controls: Selected Volume, Mask & Falloff, Look, Noise, Volume Shape, and Advanced Mask. |
| User Presets | Save, apply, delete, and locate reusable Volume Forge parameter presets. |
| Append and Duplicate | Move Volume Forge objects between blend files and choose between independent duplicates or intentionally shared material behavior. |
| Maintenance and Repair | Understand when to use Validate / Repair Selected Volume. |
| Differences Between Modes | Compare Cube vs From Faces and Light Volume vs Real Fog. |
| Normal Behavior and Expected Limits | Clarifies normal constraints, expected limits, transfer behavior, presets, and render context dependencies. |
| Troubleshooting | What to check when a button fails, a volume is barely visible, or a transferred volume needs repair. |
| Best Practices | Practical habits for cleaner setup, easier look control, presets, duplication, append, and repair. |
| Glossary | A quick reference for the main interface terms used by Volume Forge. |
Video tutorial
Quick start
- Install the addon and confirm that N opens the Volume Forge tab in the 3D View sidebar.
- Use a Cube button when you want to place a volume quickly at the 3D Cursor.
- Use a From Faces button when you need a volume built between two real quad faces in the scene.
- After creation, select the new object to reveal all of its editing controls in the panel.
- Use Duplicate Volume Forge when you need an independent copy with its own material and Noise Animation behavior.
- Use User Presets when you want to save a reusable setup and apply it to another Volume Forge object.
Only controls that display a small dot on the right side of the parameter in the addon UI can be animated directly. When that dot is available, click it to add a keyframe for that parameter. You can also right-click the parameter and choose Insert Keyframe, or use drivers for more advanced setups.
Overview
Volume Forge is built around two main choices: the volume type and the creation method.
| Axis | Option 1 | Option 2 | What changes |
|---|---|---|---|
| Volume type | Light Volume | Real Fog | The shader logic used inside the volume material. |
| Creation method | Cube | From Faces | How the volume geometry is created in the scene. |
Light Volume
Light Volume uses an emission-driven volume. It is usually faster to render and easier to push toward stylized light shafts, beams, or graphic atmospheric effects.
Real Fog
Real Fog uses a Principled Volume. It is generally more realistic, especially for localized haze or fog with believable shadows inside the volume, but it is also more expensive to render. Real Fog is not emissive, so it needs light in the scene to become clearly visible.
Cube vs From Faces
Cube is the fastest way to place a volume. The object is created at the 3D Cursor and can then be moved and scaled like any other mesh.
From Faces is more precise. The volume is built between two selected quad faces, and the selection order matters. The first selected object defines the source side of the volume, and the second selected object defines the target side. This creates the A → B direction used by the generated volume.
Reusable workflows
Volume Forge can save parameter presets from the active volume, apply those presets to another Volume Forge object, and duplicate the selected volume with an independent material setup. These tools are meant to speed up repeated looks without forcing several volumes to share the same material data.
Installation
Install the zip in Blender, enable the addon, and check where the panel appears.
Install the addon
- Open Blender.
- Go to Edit → Preferences → Add-ons.
- Click Install… and select the addon zip file.
- Enable the addon after installation.
- Open the 3D View sidebar with N and locate the Volume Forge tab.
Where the panel appears
The addon lives in the 3D View sidebar. The panel title is Volume Forge.
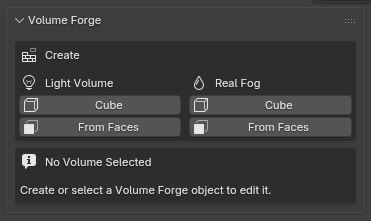
Volume Forge appears in the 3D View sidebar as soon as the addon is enabled.
What gets created in the scene
- A dedicated collection named Volume Forge.
- A mesh object for the created volume.
- A unique material for that object, so each volume keeps its own settings.
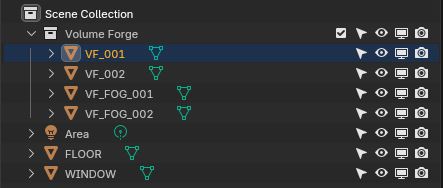
Each generated volume is stored in the Volume Forge collection with its own object and material.
Important note for Cube creation
Both Cube buttons create the object at the current 3D Cursor position. If the result appears far away, check the cursor location first.
User preset files
User Presets are stored in a Volume Forge preset file on disk, outside the scene. The exact folder can vary by system, so use Open Presets Folder in the panel or in the add-on preferences when you need to inspect or back up the file.
A custom preset folder can be set from the Volume Forge add-on preferences. Avoid placing that custom folder inside the add-on installation folder, because reinstalling or updating an add-on can replace that area.
Creation Tools Guide
The panel is easier to understand if you read it in two layers: first the creation buttons, then the editing controls that appear after a valid Volume Forge object is selected.
How the panel is organized
The top of the panel is the Create section. It always shows two columns: Light Volume and Real Fog, each with a Cube button and a From Faces button.
Once a valid volume is selected, the editing sections appear below it. If nothing valid is selected, the panel shows No Volume Selected and keeps only the creation tools visible. When a valid volume is selected, the panel also exposes workflow sections for presets, duplication, and maintenance.
The four creation buttons
- Create Light Volume (Cube) — Fast stylized light volume, no selection preparation required.
- Create Light Volume (From Faces) — Light volume built between two selected quad faces. The first selected object defines the source side (A) and the second selected object defines the target side (B).
- Create Real Fog (Cube) — Fog volume created at the 3D Cursor, useful for localized atmosphere.
- Create Real Fog (From Faces) — Fog volume guided by scene geometry, using the same selection logic as the light version.
For both Real Fog buttons, remember that the volume is not emissive. It needs light in the scene to become clearly visible.
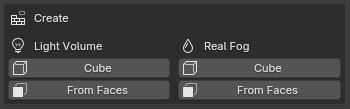
The Create section exposes the four entry points: Light Volume / Real Fog, each with Cube and From Faces.
Create Light Volume (Cube)
Use this button when you want a fast, stylized light volume with no selection setup before creation.
What the button does
This button creates a mesh cube, moves it into the Volume Forge collection, assigns a dedicated Volume Forge material, and configures it in Light Volume mode.
How to use it
No face or object selection is required. Place the 3D Cursor where you want the initial volume to appear, then click the button. After creation you can move, rotate, and scale the object freely.
When it makes sense
- Quick beam or atmospheric tests.
- Early look development.
- Stylized shafts that do not need to be built between two real surfaces.
- Shots where speed and flexibility matter more than geometric anchoring.
What becomes editable afterwards
Cube-created objects expose the full Fade Direction control in the panel, because their internal fade direction is not locked by geometry. They also expose all current creative sections of the addon: Selected Volume, Mask & Falloff, Look, Noise, Volume Shape, and Advanced Mask.
Create Light Volume (From Faces)
Use this button when you want a light volume anchored to real scene geometry instead of placing a cube by hand.
What you must prepare first
- Blender must be in Object Mode.
- You must have exactly two mesh objects selected.
- Each selected mesh must have exactly one selected quad face.
If any of those conditions is not met, the operator stops and returns a warning instead of creating a broken volume.
Why selection order matters
The addon reads the two selected mesh objects in a strict A → B order. The first selected object defines the source side of the volume (A), and the second selected object defines the target side (B). In Blender, that second selected object is typically also the active object.
This is important because the generated prism, the locked fade direction, and the spread logic are all built around that A → B construction. In practical terms, select the object that represents the light source first, for example a window, then select the object that represents the destination area second, for example the floor.
What happens when you click the button
The addon reads the two selected quad faces in world space, reorders face B to best match face A, then generates a prism between them. The created object receives a dedicated material configured in Light Volume mode, and the new object becomes the active selection.
Expected geometry behavior
If face A and face B do not match perfectly, the generated prism may differ slightly from the original B face. This is expected. The addon prioritizes planar faces in the generated prism to avoid twisted or deformed faces that could produce unstable volumetric results.
What changes after creation
Fade Direction is locked on From Faces objects because the object already has a built-in A → B direction. That control is hidden in the panel. Invert Fade remains available, so you can still reverse the internal fade without rebuilding the object.
Create Real Fog (Cube)
Use this button when you want a localized fog or haze volume without any geometry setup beforehand.
What the button does
This button creates a mesh cube at the 3D Cursor, puts it in the Volume Forge collection, assigns a unique material, and configures it in Real Fog mode using a Principled Volume.
How to use it
No object or face selection is required. Place the 3D Cursor where you want the fog to start, click the button, then adjust transform and settings from the panel.
Lighting reminder
Real Fog is not emissive. To see it clearly, the scene needs light passing through the volume. In a dim or unlit setup, the fog can remain very subtle or seem invisible even when Fog Density is set correctly.
When it makes sense
- Localized atmospheric haze.
- Fog banks or soft fog pockets.
- A more physically believable local volume than a stylized emission beam.
What becomes editable afterwards
As with the light cube version, Cube-created fog objects keep the Fade Direction control visible. They also expose Fog Density, Main Color, the complete Noise block, the Volume Shape controls, and the Advanced Mask controls.
Create Real Fog (From Faces)
Use this button when you want a fog volume that is shaped by actual scene geometry instead of a free cube.
What you must prepare first
- Blender must be in Object Mode.
- You must have exactly two mesh objects selected.
- Each selected mesh must have exactly one selected quad face.
Selection order and direction
This button follows the same A → B logic as the light version. The first selected object defines the source side of the volume (A), and the second selected object defines the target side (B). In Blender, that second selected object is typically also the active object.
In practical terms, select the object that represents the source area first, for example a window, then select the object that represents the destination area second, for example the floor. This order determines the direction of the generated fog volume.
Lighting reminder
Real Fog is not emissive. Even when the volume is placed correctly from source to target, it still needs light in the scene to become clearly visible.
What happens when you click the button
The addon builds a prism between the two selected quad faces, creates a dedicated material in Real Fog mode, and makes the new volume the active object so you can edit it immediately.
Expected geometry behavior
If the two faces do not correspond cleanly, the generated prism can be adjusted slightly on the B side. This is not a bug. It is how the addon keeps the generated faces planar and avoids warped geometry that would degrade the final render.
What changes after creation
Fade Direction is hidden because it is locked by the A → B construction. Invert Fade remains available, so you can still reverse the internal fade after the object exists.
Edit a Volume Forge volume
This section follows the main control sections in the addon panel, so you can navigate the documentation in the same sequence you see in the interface.
Selected Volume
Once a valid Volume Forge object is selected, the panel shows a Selected Volume box with the object name, the current mode (Light Volume or Real Fog), the Viewport Wire toggle, and the Duplicate Volume Forge button.
Use this section to confirm that you are editing the correct object or to create an independent copy of the active volume. If no valid volume is selected, the panel only shows the Create area and a No Volume Selected message. If an object is selected but its expected material setup is missing, the panel shows Selected Object Not Ready and points you toward the maintenance tool.
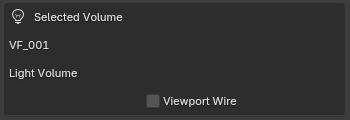
The Selected Volume section confirms which object is active and which mode is currently being edited.
Mask & Falloff
This section controls the internal fade and the overall mask of the volume.
- Fade Direction — Available on Cube-created objects. It defines the axis along which the internal fade travels through the volume.
- Fade Start — Controls where the visible fade of the volume ends.
- Invert Fade — Reverses the fade direction without changing the chosen axis.
- Fade Interpolation — Controls how soft or sharp the fade transition is between the visible side and the masked side of the volume.
- Edge Softness — Softens the falloff near the volume boundaries.
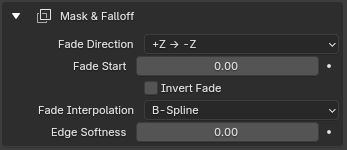 Mask & Falloff on a Cube volume, with Fade Direction available. | 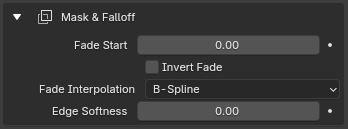 Mask & Falloff on a From Faces volume, where the source-to-target setup changes which controls are shown. |
Look
This section controls the main visual response of the volume.
- Emission Strength — Light Volume only. Controls how much light is emitted inside the volume. Increasing it makes the light volume read stronger and denser.
- Fog Density — Real Fog only. Controls the density of the localized fog volume.
- Main Color — The main visible color of the volume.
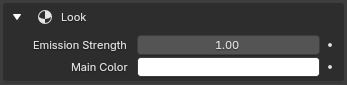 Look controls in Light Volume mode. | 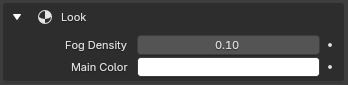 Look controls in Real Fog mode. |
Noise
The Noise section shapes variation inside the volume and is essential for beams, broken-up shafts, and more organic fog.
- Noise Amount — Overall influence of the noise.
- Noise Global Scale — Main scale value of the Noise Texture itself.
- Noise Detail, Noise Roughness, Noise Distortion — Standard procedural noise refinements.
- Noise Scale — The mapping scale vector. Lowering the Z value is a key technique for stretching the noise along the volume length to produce longer god-ray style streaks.
- Noise Location — Moves the noise pattern in 3D space without moving the mesh.
- Noise Rotation — Rotates the noise pattern.
- Ray Spread — Opens or tightens the internal pattern along the A → B travel of the volume.
- Invert Spread — Reverses the direction of the spread effect.
- Noise Animation — Animates the W dimension of the noise. A value of 0 keeps it static. Positive and negative values move it in opposite directions.
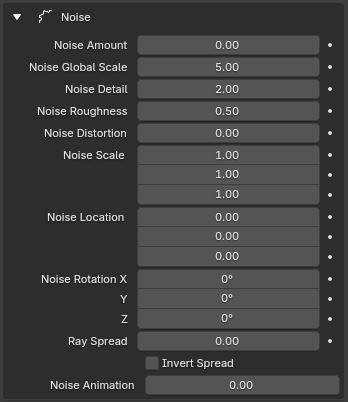
The Noise section groups the controls that shape, scale, animate, and spread the internal pattern.
 Reducing Noise Scale on Z is the key control for stretching the pattern along the volume length. |  Animated controls can be keyed directly when the dot button is available next to the parameter. |
Volume Shape
This section controls the tube-like rounding of the generated mesh.
- Enable Tube Bevel — Activates a non-destructive Bevel modifier limited to the relevant edges.
- Bevel Weight Direction — Available on Cube-created objects. It changes which axis the bevel edge weighting follows.
- Bevel Amount — Width of the bevel.
- Bevel Segments — Number of segments used by the bevel.
- Clamp Overlap — Helps prevent problematic self-overlap when the bevel becomes too large.
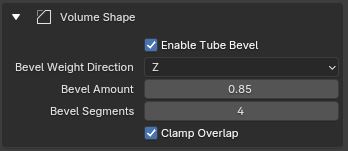 Volume Shape controls on a Cube volume. | 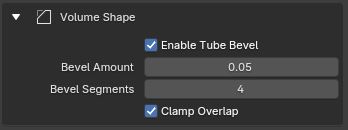 Volume Shape controls on a From Faces volume. |
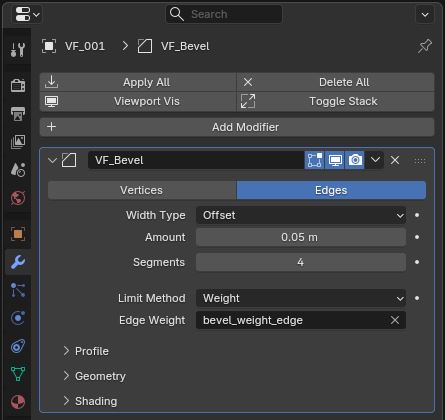
The Bevel controls remain non-destructive because the effect is driven by a modifier.
Advanced Mask
This section exposes the end of the fade and the darker side of the volume mask.
- Fade End — Controls where the fade reaches its end position.
- Shadow Color — The color used on the darker side of the volume mask.
Together with Fade Start, Main Color, and Invert Fade, this lets you shape how the volume fades from a cleaner visible side to a darker, more masked look.
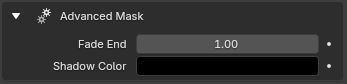
Advanced Mask controls for refining the internal masking behavior.
User Presets
User Presets let you save a reusable Volume Forge setup and apply it to another active Volume Forge object. They are useful when you want to reuse a look across several Volume Forge objects or projects.
User Presets save Volume Forge parameter values. They do not save Blender objects, meshes, or materials. They are meant to reuse a setup, not to replace Blender file saving or asset management.
Where it is
Select a valid Volume Forge object. The User Presets section appears in the Volume Forge panel, below Selected Volume.
Save a preset
- Select the Volume Forge object whose look you want to reuse.
- Open User Presets.
- Enter a name in Name.
- Click Save Preset.
If a preset with the same name already exists, saving with that name updates it.
Apply a preset
- Select the target Volume Forge object.
- Choose a saved preset from the Preset dropdown.
- Click Apply.
The preset is applied to the active Volume Forge object. Light-only and fog-only values are applied only when they match the current volume mode.
What is saved
User Presets save the main exposed Volume Forge parameters, including fade values, ramp colors, strength or density, noise settings, ray spread, viewport wire display, edge softness, and tube bevel settings.
Color values are saved from the volume ramp, so a preset can restore the visible colors and not only the slider values.
Delete a preset
Select a preset in the Preset dropdown and click Delete. This removes the preset from the user preset file on disk.
Preset folder
Click Open Presets Folder to open the current folder in your system file browser. Volume Forge stores the presets in a file named user_presets.json.
By default, the folder is created in Blender’s user configuration area under a Volume Forge folder. You can set a custom folder in the Volume Forge add-on preferences and reset it to the default folder from there.
Do not use the add-on installation folder as a custom preset folder. Add-on updates or reinstalls can replace installation files.
Append and Duplicate
Use this section when you want to copy a Volume Forge object cleanly or bring one from another Blender project.
Duplicate Volume Forge
The Duplicate Volume Forge button appears in the Selected Volume section when a valid Volume Forge object is selected.
Use it when you want a new copy of the active volume with its own mesh, independent material setup, node tree, and Noise Animation behavior. This is useful when each copy needs to be adjusted separately.
Normal Blender duplicate
Blender’s normal duplicate shortcut, such as Ctrl+D, can still be useful. Depending on Blender’s data-block behavior and how the object is managed, a normal duplicate can intentionally keep materials linked or shared.
This is not wrong. Linked or shared materials can be useful when several volumes should keep the same material setup. Use Duplicate Volume Forge when you want independent Volume Forge copies instead.
Append from another .blend file
To transfer a Volume Forge volume from another project, use Blender’s File → Append workflow and append the Volume Forge object from the source .blend file.
Copy/paste between two open Blender scenes or projects can still work, but Append is the safer documented workflow. It is usually cleaner and more predictable for Blender data-blocks when moving an object from one .blend file to another.
Noise Animation after duplicate or append
Noise Animation is designed to remain linked to the Volume Forge object that owns it. After a clean duplicate, append, save, or reload, the copied or appended volume should keep its own Noise Animation behavior.
If the noise animation looks wrong after a transfer, copy/paste, append, or reload, select the Volume Forge object and run Validate / Repair Selected Volume.
Recommended workflow
- Use Duplicate Volume Forge when each copy needs independent controls, independent materials, and its own Noise Animation behavior.
- Use Ctrl+D or normal Blender duplication if you intentionally want linked or shared material behavior.
- Use File → Append when bringing a Volume Forge object from another .blend file.
- Copy/paste may work between open projects, but Append is the cleaner recommended method for transfer between projects.
- Use Validate / Repair Selected Volume only if a transferred, appended, or copied volume seems incomplete or does not behave correctly.
Maintenance and Repair
Validate / Repair Selected Volume is a maintenance tool for checking and repairing a selected Volume Forge object.
Where it is
Select a Volume Forge object, then open Advanced / Maintenance at the bottom of the panel. The section contains Validate / Repair Selected Volume.
When to use it
- After updating Volume Forge and opening an older project.
- After appending a Volume Forge object from another .blend file.
- When the panel says Selected Object Not Ready.
- When Noise Animation does not behave after append, duplication, save, or reload.
- When a material or node setup appears incomplete after manual edits.
What it checks
The repair command checks the selected object as a Volume Forge volume, makes sure it is linked to the Volume Forge collection, verifies the material and node setup, and rebuilds the Noise Animation driver when needed.
If the selected object has a shared material, the repair process can make the material independent so the repaired volume does not unexpectedly drive another object.
You do not need to press this button during normal look development. It is meant for maintenance, transfer, update, and recovery situations.
After repair
After running the repair command, test the main controls that matter for the shot: Emission Strength or Fog Density, Main Color, Noise Amount, and Noise Animation.
Differences Between Modes
The four creation buttons are built from two separate decisions: volume type and creation method. Knowing which decision matters for your shot makes the addon easier to use.
Cube vs From Faces
| Point | Cube | From Faces |
|---|---|---|
| Preparation | No special face setup required. | Requires Object Mode, two mesh objects, one selected quad face on each. |
| Selection order | Not relevant. | Important: first selected object = source (A), second selected object = target (B). |
| Placement | Created at the 3D Cursor. | Built between two selected faces, from the first selected object (A, source) to the second selected object (B, target). |
| Fade Direction control | Visible. | Hidden because the object is locked to A → B. |
| Typical use | Fast placement and look development. | Geometry-driven, scene-anchored volume creation. |
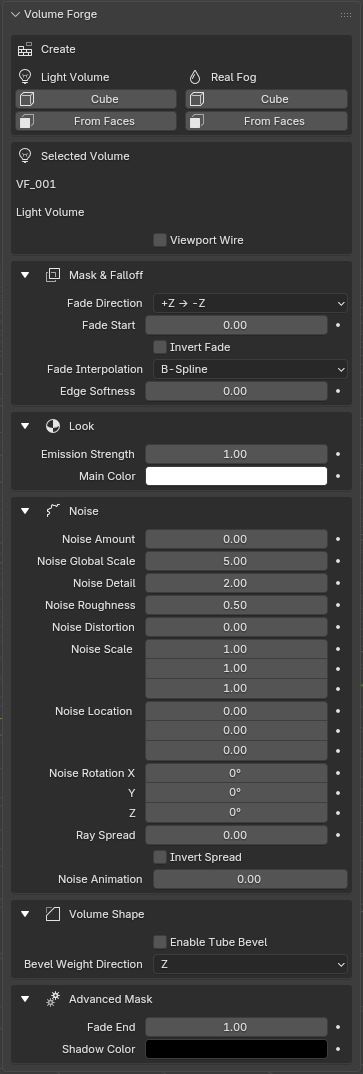 Full panel example for a Cube volume. | 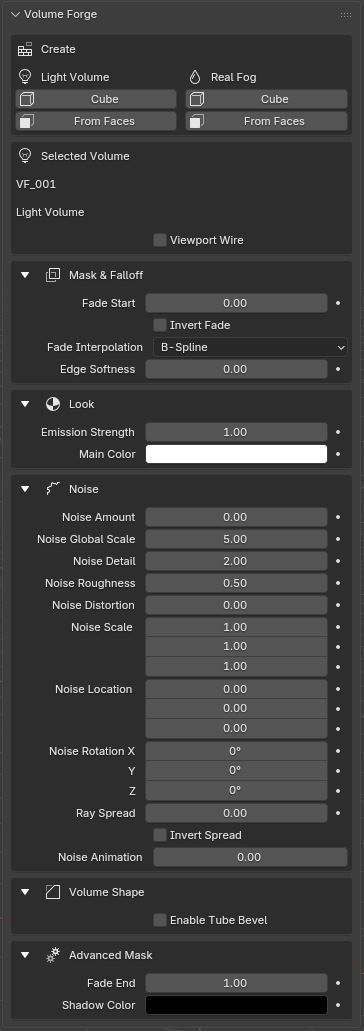 Full panel example for a From Faces volume. |
Light Volume vs Real Fog
| Point | Light Volume | Real Fog |
|---|---|---|
| Shader logic | Emission-based volume. | Principled Volume. |
| Main control | Emission Strength. | Fog Density. |
| Typical look | Stylized beams, light shafts, graphic atmospherics. | Localized fog, haze, and more realistic atmosphere. Real Fog is not emissive, so scene lighting is needed to reveal it clearly. |
| Performance | Usually faster. | Usually heavier but more realistic. |
Normal Behavior and Expected Limits
This section gathers behaviors that can look surprising at first, but are normal for Volume Forge.
From Faces constraints are normal
The From Faces tools only work in Object Mode, with exactly two selected mesh objects, and exactly one selected quad face on each. This is the normal input expected by the feature.
The second selected object defines side B
On From Faces creation, the first selected object defines side A (the source side), and the second selected object defines side B (the target side). In Blender, that second selected object is typically also the active object.
If the result looks reversed, check the order in which the objects were selected. A common setup is: source object first, for example a window, target object second, for example the floor.
Possible adjustment of face B
If the two selected faces do not match well, the generated prism can be adjusted on the B side. This is expected and helps keep the generated geometry planar and clean instead of producing twisted faces.
Volume Forge is not a smoke simulation system
Even in Real Fog mode, Volume Forge is still a localized volume tool driven by geometry and shader logic. It does not replace full smoke or fluid simulation.
Real Fog is not emissive
Unlike Light Volume, Real Fog does not emit light by itself. It becomes visible when the scene lighting reveals it, so an unlit or poorly lit setup can make the fog look much weaker than expected.
The final result depends on the render context
The look depends on the render engine, scene lighting, global volumetric settings, object scale, material values, and machine performance.
Edge Softness is uniform
In the current interface, edge softening is applied uniformly. It is not a per-face isolation tool.
Noise Animation is designed to survive transfer
Noise Animation is driven from the Volume Forge object instead of depending on the original source scene. This is important when duplicating a volume, appending it from another file, or reopening a saved project.
If Noise Animation still appears static or inconsistent after a transfer, select the Volume Forge object and run Validate / Repair Selected Volume.
User presets are stored on disk
User Presets are saved in a preset file on disk. They are meant for reusing parameter setups across projects, not for replacing Blender’s regular file saving workflow.
Troubleshooting
Use this section when a button fails, when the volume is barely visible, or when the result seems inconsistent with what you expected.
A From Faces button does not work
- Check that Blender is in Object Mode.
- Check that exactly two mesh objects are selected.
- Check that each selected object has exactly one selected quad face.
- Check the selection order: the first selected object is side A (source), and the second selected object is side B (target).
The volume exists but is barely visible
- Increase Emission Strength in Light Volume mode.
- Increase Fog Density in Real Fog mode.
- In Real Fog mode, remember that the volume is not emissive. If little or no light passes through it, it can stay almost invisible even with density values that seem correct.
- Check the internal mask through Fade Start, Fade End, Main Color, and Shadow Color.
- Temporarily reduce Noise Amount to recover a cleaner read.
Fog disappears in parts of the object
In Real Fog mode, the visible result is still shaped by the internal mask. Extreme dark masking or poorly balanced fade values can make parts of the volume appear almost empty.
The noise moves but you wanted a static pattern
Set Noise Animation back to 0. Positive and negative values animate the W dimension of the noise in opposite directions.
The volume looks too angular
Enable Tube Bevel, then adjust Bevel Amount and Bevel Segments. Keep in mind that a strong bevel changes the mesh silhouette for real.
A Cube volume appears in the wrong place
Check the 3D Cursor. Cube creation always uses that location as the starting point.
The panel says Selected Object Not Ready
This means the selected object looks like a Volume Forge object, but the expected material or node setup is incomplete. Open Advanced / Maintenance and click Validate / Repair Selected Volume. If the object was appended from another file, this is the first repair step to try.
Noise Animation does not behave after append or duplication
Use the built-in Duplicate Volume Forge button for clean independent copies. To bring a volume from another project, use Blender’s File → Append workflow and append the Volume Forge object from the source .blend file.
If a transferred volume still has static or inconsistent Noise Animation, select it and run Validate / Repair Selected Volume.
A saved preset is not visible
Check that the active preset folder is the one you expect. Use Open Presets Folder from the User Presets section or from the add-on preferences. If a custom folder is unavailable, Volume Forge falls back to the default user preset folder.
Best Practices
- Place the 3D Cursor before any Cube creation so the first placement is already close to the target area.
- Start with lower noise values to validate the main shape before adding breakup.
- Increase density or emission gradually instead of pushing every control at once.
- Use Viewport Wire when the volume makes navigation harder in the viewport.
- Keep in mind that a very dark internal mask can make a fog volume appear almost empty.
- When testing Real Fog, make sure the scene contains enough light to reveal the volume clearly.
- Choose Light Volume when you want a faster, more stylized result; choose Real Fog when you want a more realistic result and can accept a higher render cost.
- Use animation when the shot needs it: intensity, density, fade values, noise, spread, location, and many other controls can be keyframed or driven.
- Save useful looks as User Presets before moving to another shot or project.
- Use Duplicate Volume Forge instead of a normal shared material workflow when each copy needs independent controls.
- Use File → Append to bring a Volume Forge object from another .blend file. Copy/paste may work between open projects, but Append is the cleaner documented workflow.
- Use Validate / Repair Selected Volume only when a volume needs maintenance after update, append, reload, or unexpected material/driver behavior.
Glossary
A quick explanation of the main terms used throughout the documentation and the addon UI.
| Term | Meaning in Volume Forge |
|---|---|
| Light Volume | A volume driven by emission inside the material. |
| Real Fog | A volume driven by a Principled Volume shader. It is not emissive, so scene lighting is needed to reveal it clearly. |
| Cube | A volume object created at the 3D Cursor. |
| From Faces | A volume built between two selected quad faces. The first selected object defines the source side (A), and the second selected object defines the target side (B). |
| Fade Direction | The internal direction of the volume fade on Cube-created objects. |
| Invert Fade | Reverses that internal fade without changing the chosen axis. |
| Fade Start / Fade End | The two ramp positions shaping the internal mask. |
| Main Color / Shadow Color | The two colors of the internal ramp that shape the visible look of the volume. |
| Ray Spread | Changes how the internal pattern opens along the volume. |
| Noise Animation | Animates the noise through its W dimension. |
| Edge Softness | Softens the volume toward its outer boundaries. |
| Tube Bevel | A non-destructive bevel used to round the relevant edges of the mesh. |
| User Preset | A saved set of Volume Forge parameter values that can be applied to another active Volume Forge object. |
| Duplicate Volume Forge | A panel button that duplicates the selected Volume Forge object with its own mesh, material, node tree, and Noise Animation behavior. |
| Append | Blender’s File → Append workflow. Use it to bring a Volume Forge object from another .blend file into the current project. |
| Validate / Repair | A maintenance command that checks and repairs the selected Volume Forge object when material, node, collection, or Noise Animation data needs to be rebuilt. |
Discover more products like this
godrays volumetrics localized fog blender addon cinematic-lighting atmosphere atmospheric haze light shafts volumetric fog volumetric lighting god rays smoke