 kleinARt




insideOUT — Documentation
1. Installation
Blender 4.2 and later — Extensions tab (recommended)
- Download the zip for your platform from Superhive:
- Windows x64 →
insideOUT-1.2.0.zip(CPU + optional NVIDIA CUDA engine) - Linux x64 →
insideOUT-1.2.0-linux.zip - Linux arm64 →
insideOUT-1.2.0-linux-arm64.zip - macOS Apple Silicon →
insideOUT-1.2.0-macos-arm64.zip - macOS Intel →
insideOUT-1.2.0-macos-x64.zip
- Windows x64 →
- Open Blender. Go to Edit → Preferences → Get Extensions → Install from Disk (top-right dropdown).
- Select the zip. Blender installs and enables the extension automatically.
- Panel appears in View3D → Sidebar (N) → insideOUT.
Blender 3.6 – 4.1 — Legacy add-on installer
- Edit → Preferences → Add-ons → Install.
- Select the zip.
- Tick the checkbox next to insideOUT to enable.
- Panel appears in View3D → Sidebar (N) → insideOUT.
Platform notes
- Self-contained: no dependencies, no Python packages, no admin rights required.
- Native CPU helper is a tiny C++ binary bundled in the zip —
DeleteInsideFacesCore.exeon Windows,DeleteInsideFacesCoreon Linux/macOS (the add-on sets+xon first load if needed). - Windows x64 also includes
DeleteInsideFacesCoreCuda.exe, an optional NVIDIA CUDA accelerator. If it is present, insideOUT selects CUDA by default and shows an Engine selector. If it is missing, the UI hides the selector and uses CPU automatically. - Five platforms supported: Windows x64, Linux x64, Linux arm64, macOS Apple Silicon, macOS Intel. Linux and macOS builds are CPU-only in 1.2.0. No separate runtime install required.
2. Quick start
- Select one or more mesh objects.
- Open the N panel → insideOUT.
- Pick a mode (default Optimize Selected Together works for most assemblies).
- Click 1 · Coarse: Delete Interior Objects — fast first pass to strip fully-hidden objects.
- Click 2 · Fine: Quick Delete Interior Faces — second pass to remove individual hidden faces.
- For tight CAD geometry, use 3 · Precise: Deep Delete Interior Faces instead of step 5.
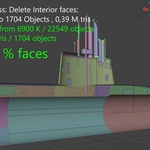
That's the whole tool. A numbered three-stage workflow, ten seconds of clicking, and scenes that used to weigh in at millions of polygons become clean.
3. The panel
The panel lives in the View3D sidebar under the insideOUT tab.
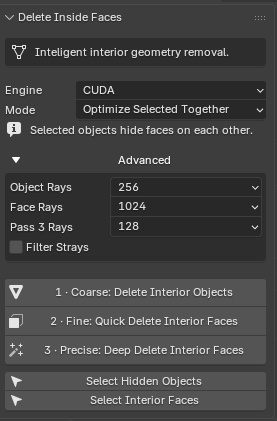 Run buttons are a numbered three-stage workflow:
- 1 · Coarse: Delete Interior Objects
- 2 · Fine: Quick Delete Interior Faces
- 3 · Precise: Deep Delete Interior Faces
Below them sit the non-destructive Select Hidden Objects and Select Interior Faces tools. On Windows, an Engine selector appears only when the CUDA helper is installed. Click the Advanced disclosure to expose ray-count tuning, post-filter settings, and diagnostic options.
After a run, the panel reports result lines: faces removed, Mesh Objects Changed, Mesh Objects Deleted, rays used, precision, and elapsed time.
4. Workflows
1 · Coarse: Delete Interior Objects
Fast first pass that removes entire objects when every face is occluded by other geometry.
Use it for:
- CAD assemblies with thousands of internal fasteners, bolts, brackets
- Kitbash scenes with bolt-on parts buried inside walls or hulls
- Any scene where many objects are completely enclosed
What it does: ray-casts every face of every object. If no face of an object is reachable from outside, the whole object is removed. Faces of partially-visible objects are not touched in this pass.
2 · Fine: Quick Delete Interior Faces
Second pass that removes individual hidden faces from the remaining meshes, at normal precision. Topology preserved — quads stay quads, n-gons stay n-gons.
Fast and right for most scenes. Use it after Coarse, or alone.
3 · Precise: Deep Delete Interior Faces
Same per-face cleanup as Fine, but with more aggressive validation — Candidates are checked on multiple interior sample points. Slower, but fewer misses on tight, complex geometry. The safe choice for precision CAD work.
Pick 2 · Fine or 3 · Precise — they do the same job at different precision. There is no separate precision setting; the button is the choice.
Select Interior Faces
Same ray-cast as Precise, but enters Edit Mode and selects the interior faces instead of deleting them. Use this to preview results, then either:
- Delete them yourself with
X → Faces - Adjust the ray count and re-run
- Inspect false positives before committing
Select Hidden Objects
Non-destructive counterpart to Coarse: selects the fully-hidden objects without deleting them, so you keep control over the deletion.
5. Settings reference
Engine
Controls the native compute backend. This selector is shown only when the optional Windows CUDA helper is installed.
- CUDA — NVIDIA GPU accelerator for Windows x64. Selected automatically when available.
- CPU — reference path. Used automatically on Linux, macOS, unsupported Windows systems, or when the CUDA helper is not present.
Mode
Controls how the selection is treated.
- Optimize Each Object Alone — every selected object is processed in isolation. Objects do not hide faces on each other. Use this when objects are not meant to interact (separate props, separate scenes).
- Optimize Selected Together (default) — all selected objects merged into one combined ray-cast scene. Objects hide faces on each other. This is what you want for CAD assemblies and kitbash scenes.
- Optimize Active Only — uses the whole selection as occluders, but only cleans the active object. Good for cleaning a single hero asset while letting surrounding parts contribute to occlusion.
Precision — chosen by button
There is no precision dropdown. Precision is the button you press:
- 2 · Fine runs normal precision — fast, good for most workflows.
- 3 · Precise runs high precision — Pass 3 candidates validated on multiple interior sample points. Recommended for tight CAD geometry where individual faces matter and false deletes are unacceptable.
Select Interior Faces always uses high precision.
Advanced — Object Rays
Quality preset for the Coarse pass (object-level occlusion). Range: 128 – 4096. Default: 256.
Higher counts catch borderline cases at the cost of speed.
Advanced — Face Rays
Quality preset for the Fine / Precise passes (per-face occlusion). Range: 512 – 8192. Default: 1024.
Increase for CAD geometry or scenes where the result is missing edge cases.
Advanced — Pass 3 Rays
Precise-only setting additional to face rays in 3rd pass. Max number of ray origins tested per face-interior sample. Range: 64 – 512. Default: 128.
Advanced — Filter Strays (post-filter)
On by default. After the main algorithm, performs a topology + visibility re-test that removes leftover stray exterior polygons (specks and small clusters) that survived ray-casting but are surrounded by interior faces.
Advanced — Aggressiveness
Cleanup strength for Filter Strays. Range: 1 – 2.
- 1 — remove isolated specks only (safest).
- 2 — also remove small clusters via cascade (default; better for messy CAD).
6. Recipes by use case
CAD imports (STEP/IGES/IFC)
- Apply all modifiers if any.
- Select the imported assembly objects.
- Mode: Optimize Selected Together.
- Run 1 · Coarse: Delete Interior Objects — kills internal fasteners, bolts, hidden parts.
- Run 3 · Precise: Deep Delete Interior Faces — strips remaining hidden faces, CAD-safe.
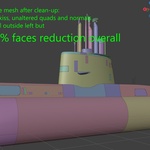
Expect 30–80% face reduction depending on assembly openness.
Archviz with kitbash assets
- Select the kitbash group.
- Mode: Optimize Selected Together.
- Run 2 · Fine: Quick Delete Interior Faces only — kitbash assets usually don't have fully enclosed sub-objects, so Coarse adds little.
Real-time / game asset optimization
- Process one hero asset at a time.
- Mode: Optimize Active Only if surrounding props occlude.
- Run Select Interior Faces first to verify before deletion.
- Switch to 2 · Fine (or 3 · Precise) once happy.
Cleaning a single complex mesh
- Select just that one mesh.
- Mode: Optimize Each Object Alone.
- Run 2 · Fine: Quick Delete Interior Faces (or 3 · Precise for tight geometry).
7. Troubleshooting
Result is too aggressive (visible faces got deleted)
- Use 3 · Precise: Deep Delete Interior Faces instead of Fine.
- Lower Face Rays if cranked very high without reason.
- Use Select Interior Faces to preview and confirm settings.
- Flipped normals on closed shells can confuse occlusion in extreme edge cases. insideOUT handles flipped normals in 99% of cases very well, but edge cases may confuse it.
Result is not aggressive enough (hidden faces remain)
- Increase Face Rays (try 2048 or 4096).
- Increase Aggressiveness to 2.
- Run the Fine / Precise pass a second time after the first — leftover stray clusters often clear on the second pass.
Cancel does nothing
The Cancel button kills the worker subprocess immediately. If the UI appears frozen for more than a second after pressing Cancel, your Blender install may be hung on a separate operation — check the system console for errors.
Glass/transparent objects occluding things they shouldn't
Material visibility is not respected by occlusion. Exclude glass/transparent objects from the selection before running, then re-add them afterwards.
"Exe not found" error
The native binary failed to install with the add-on. Try reinstalling the zip. On Linux: ensure your filesystem allows executables (some noexec mounts will block).
CUDA engine is not visible
The Engine selector appears only when the Windows CUDA helper is installed. If the selector is not shown, insideOUT is using the CPU backend automatically. CUDA is currently included only in the Windows x64 package.
macOS blocks the helper on first run
The macOS build includes an unsigned native helper binary. If macOS blocks it, remove quarantine from the installed add-on folder and restart Blender:
find "$HOME/Library/Application Support/Blender" -name DeleteInsideFacesCore -type f -printxattr -dr com.apple.quarantine "/path/to/insideout"chmod +x "/path/to/insideout/DeleteInsideFacesCore"
Apple Silicon users should install the macOS Apple Silicon build. Intel Mac users should install the macOS Intel build.
8. Limits & known caveats
-
Modifiers are ignored. The add-on reads
obj.data(the base mesh). Apply Subdivision/Mirror/Boolean/etc. before running if you want them included. - Material visibility (glass, alpha) is not respected. Exclude transparent objects.
- Open shells without a clear "outside" (e.g., single-sided planes, terrain with no underside) can confuse any occlusion algorithm. The Precise button helps.
- The ray-cast can be cancelled at any time, but mesh edit operations cannot be partially undone — Blender's undo treats each operator run as one unit.
9. FAQ
Will it damage my UVs, materials, or normals?
No. insideOUT only deletes whole face polygons. UVs, vertex normals, custom split normals, and material assignments on surviving faces are untouched.
Does it work on open meshes (shells, planes, single-sided geometry)?
Mostly yes — but accuracy improves with closed geometry. The Precise button helps significantly.
Does it support modifiers?
Modifiers are read on the base mesh only — apply them first if you want them included in the occlusion test.
Will my glass / transparent materials be respected?
No. Material visibility isn't supported. Exclude those objects from the selection before running.
Can I cancel a long run?
Yes. Cancel kills the background worker process immediately.
Does it work in headless / background mode?
The add-on uses Blender's modal operator system with a UI timer. Running it from a headless script is not officially supported (the modal loop needs an event loop).
Where does the native binary come from?
A standalone native C++ program written by the author, cross-compiled and shipped self-contained inside the zip. No external dependencies, no internet access, no telemetry.
Which platforms are supported?
Windows x64, Linux x64, Linux arm64, macOS Apple Silicon, and macOS Intel. Windows x64 includes the optional CUDA helper; Linux and macOS are CPU-only in 1.2.0.
Will updates be free?
Yes, version 1.x every update included.
10. Support
Questions, edge-case meshes, or feature requests?
- Use Superhive messages on the product page — the author replies personally.
- Include a screenshot of the panel settings, a screenshot of the mesh, and (if possible) a small .blend repro.
Bug reports with a repro file get priority.
-
$9.99
single-user licence
-
$45
5 users multi-seat save 10%
 Included
Includes 12 months of
- Support from kleinARt
- Product updates
Extend this product’s Support Period +12 months: 50% of product price
Have questions before purchasing?
Login to message
| Blender Extension Compatible | Yes |
| Sales | 10+ |
| Dev Fund Contributor | |
| Published | 4 months ago |
| Blender Version | 3.6 - 5.1 |
| Extension Type | Add-on |
| Render Engine Used | Arnold, Blender-Internal, Blender-Game-Engine, Cycles, Eevee, Freestyle, Luxrender, Mental-Ray, Octane, Vray, Yafaray |
| License | GPL |