Render Region Pro
 Pixel Makers Labs



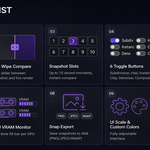

RenderRegion Pro 0.1
Snapshot. Compare. Control — Directly In Your Viewport.
Blender 5.0 or later required · Windows · macOS · Linux

RenderRegion Pro — Live compare mode with snapshot wipe slider
1. Introduction
RenderRegion Pro is a Blender 5 viewport addon that lets you focus Cycles or EEVEE on exactly the part of the scene that matters, compare moments side by side with a live wipe slider, and control common viewport toggles without leaving your viewport.
What it solves
- Waiting for a full viewport to re-render when you only care about one area
- Losing track of before/after states when adjusting materials or lighting
- Switching panels to toggle subdivision, hair, denoiser, or compositor
- Managing HDRI environments without opening a separate editor
2. Installation
- Download the addon ZIP file.
- In Blender go to Edit › Preferences › Add-ons.
- Click Install from Disk and select the downloaded ZIP.
- Enable the checkbox next to RenderRegion Pro.
- Press Ctrl+Shift+R in any 3D Viewport to begin.
Note: The default shortcut can be changed in the addon Preferences.
3. Getting Started
Activating the Tool
Press Ctrl+Shift+R in the 3D Viewport, or right-click and choose RenderRegion Pro — Draw Region.
 Viewport right-click menu |
 Region border context menu |
Drawing Your First Region
- Click and drag to draw a rectangle over the area you want to focus on.
- Release — Cycles immediately begins rendering only that region.
- The region is outlined with a white border.

Full interface — slots on left, toolbar top-right, info bar above, compare slider active
Closing the Tool
- Click the X button in the top-right of the toolbar.
- Or right-click the viewport and choose RenderRegion Pro — Clear Region.
Note: You can draw a new region at any time without deactivating first.
4. Core Region Controls
Drawing
Click and drag anywhere to draw a new region. The previous region is replaced immediately.
Resizing
Drag the border handle to resize. Hold Alt while dragging to resize symmetrically from center.
Moving
Click and drag along the region border (not the handle) to move the region.
Clearing
Use Ctrl+Shift+Alt+R or right-click › Clear Region.
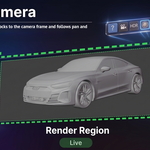
Camera View
In camera view, the region locks to the camera frame and follows pan and zoom automatically.
Multi-Viewport
Active in the viewport where you activated it. Clicking another viewport transfers the tool there.
Note: Saving the file while the region is active preserves the region.
5. Snapshot System
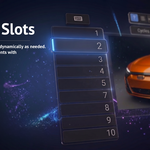
Capture the current render into a slot and compare it against the live viewport using a draggable slider.

|
|
Full Snap View
- Double-tap a number key or Ctrl+Click a slot to fill the region with the snapshot.
- Double-tapping a different slot switches directly to that slot.
Managing Snapshots
- Reset Slider: Click the Reset button.
- Delete Snapshot: Right-click a slot and drag. ESC cancels.
- Delete All: Press Ctrl+Shift+Del.
- Save to Disk: Snapshots auto-save as PNG, JPEG, or WebP.
- Open Folder: Ctrl+Shift+Alt+Click any slot.
Note: Ctrl+Scroll over a slot cycles through stored snapshots.
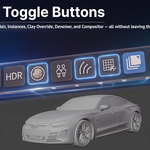
6. Toggle Buttons
Six one-click toggle buttons in the toolbar. All states fully restored on toggle back or when the region is cleared.

Toolbar buttons — Help, HDR, and all toggle controls
Subdivision (SubD) Globally disables all SubD modifiers. New objects auto-caught. States fully restored on toggle back or clear. |
Hair Hides particle, Curves, and GeoNodes hair. States restored on toggle back or clear. |
Instances Hides collection, vertex/face, particle, GeoNodes instances, library-linked objects, and Alt+D duplicates. One master kept per group. |
Clay Mode Applies neutral grey PBR override to the view layer. Shift+Click: open clay material. Alt+Click: reset to default. |
Denoiser Toggles viewport denoiser. Shift+Click: toggle both viewport and final render simultaneously. |
Compositor Toggles viewport compositor. Shift+Click: opens floating Compositor editor. |
Note — SubD inside GeoNodes: The Subdivision toggle only affects standard Subdivision Surface modifiers. Subdivision operations inside a GeoNodes tree (such as Subdivide Mesh or Subdivision Surface nodes) are not detected and will not be disabled by this toggle.
Note — GeoNodes instances: Detection is best-effort. It traces active connections from the Group Output and catches standard Instance on Points and Duplicate Elements setups, including nested groups. Highly custom node trees that replicate instancing through non-standard nodes may not be detected. Blender's object-level API does not fully expose GeoNodes instancing, so partial support is expected.
Drag-Select Multi-Toggle
Hold LMB and drag across SubD, Hair, and Instance buttons. All toggle together on release. ESC cancels.
7. HDRI Lighting
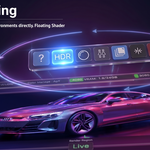
The HDR button manages a dedicated "RenderRegion Pro HDR" world for fast environment lighting during lookdev. The addon ships with 3 bundled HDRIs (outdoor, indoor, studio) ready to use out of the box. Point it to any custom folder of your own .hdr or .exr files from Preferences.
Toggle On / Off
Click the HDR button. Your original world is saved and restored on toggle off. The RRP HDR world stays in the scene after closing the tool. Manually switching to the RRP world activates the button automatically.
Cycling Files
Ctrl+Scroll over the HDR button to cycle available .hdr/.exr files. Flash message shows current index and filename.
Rotating the Environment
Ctrl+Shift+Scroll to rotate the environment on the Z axis. Flash message shows current angle.
Intensity Control
A small intensity slider appears directly above the HDR button whenever the active scene world has a Background node — this includes the RRP HDR world and any custom world with nodes. The slider is automatically hidden when the active world has no Background node or no nodes at all.
- Drag left/right — adjust intensity continuously. Shift for fast (×5), Ctrl for precise (÷10).
- Click — enter a specific value by typing. Press Enter or Tab to confirm, ESC to cancel.
- Backspace (while hovering) — reset intensity to 1.0.
- Works on any active world — not just the RRP HDR world. Change your world in the Shader Editor and the slider stays in sync automatically.
Shortcuts
- Shift+Click: Open Shader Editor — floating Shader Editor set to World
- Ctrl+Shift+Click: Choose HDRI Folder — folder picker dialog
- Ctrl+Shift+Alt+Click: Open Folder in Explorer
Note: To go back to the bundled HDRIs, clear the custom HDRI path in the addon Preferences.
8. Info Bar
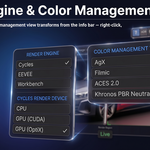
Appears above the region border when your mouse is near. Shows render engine pill, color management pill, and GPU VRAM monitor.
Render Engine Pill

|
|

Render engine selection menu
Color Management Pill

|
|

Color Management view transform menu
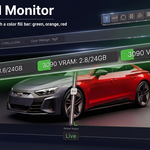
GPU VRAM Monitor

VRAM pills — green fill bars per GPU
- Real-time VRAM per GPU, updated every 2 seconds.
- Fill bar: green below 75%, orange at 85%, red at 95%.
- Multiple GPUs each get their own pill, stacking vertically when needed.
Layout Behavior
- Engine and Color Management pills centered in the safe zone.
- Color Management pill stacks above engine pill when space is tight.
- Pills shift outside region bounds when very tight — nothing ever hides.
9. UI Behavior
Auto-Hide
Toolbar buttons hide when the mouse moves away. Move back to reveal them.
Pin Mode
Click the Pin button to keep all buttons permanently visible.
Slot Layout
Keyboard button and slots always stack vertically on the outside left edge. Never hide.
Flash Messages
Two-color messages (white label + orange value) at top center — HDR toggle, cycle, rotation, slider reset, render pause/resume.
Render Pause
When Cycles viewport render is paused, region border turns orange. Resume to return to white.
Tooltips & Help List
Hover over any button for a tooltip. The Help (?) button shows the full two-column shortcut reference with section icons.

Help tooltip — full shortcut reference with section icons
Right-Click Context Menu
Right-click anywhere for the context menu. Right-click pills for their option menus. Menus always draw on top of all pills.
10. Preferences
Access via Edit › Preferences › Add-ons › RenderRegion Pro.

Preferences panel
Keyboard Shortcuts
Draw Region (Ctrl+Shift+R), Clear Region (Ctrl+Shift+Alt+R), Delete All (Ctrl+Shift+Del). Each shortcut has an enable/disable checkbox, Ctrl/Shift/Alt toggles, and a key picker.
Snapshot Storage
Custom folder path and format: PNG (default), JPEG, or WebP.
HDRI Lighting
Custom HDRI folder path. Leave empty to use the bundled folder.
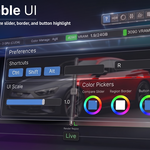
UI Options
UI Scale 0.5x–2.0x. Color pickers for Compare Slider, Region Border, and Button Active color.
Slot Shortcuts
Toggle to enable or disable 1–9 number key shortcuts for snapshot slots.
11. Keyboard Shortcuts Reference
Region Controls
| Action | Shortcut | Notes |
|---|---|---|
| Draw Region | Ctrl+Shift+R | Configurable |
| Clear Region | Ctrl+Shift+Alt+R | Configurable |
| Resize Region | Drag Handle | |
| Resize Symmetric | Alt + Drag Handle | From center |
| Move Region | Drag Border |
Snapshot Slots
| Action | Shortcut | Notes |
|---|---|---|
| Activate Slot | 1-9 or Click Slot | |
| Store Snapshot | Ctrl+1-9 or Middle-Click | |
| Full Snap View | Double-tap or Ctrl+Click | |
| Cycle Snapshots | Ctrl+Scroll on Slot | |
| Reset Slider | Reset Button | When snap active |
| Delete Snapshot | Right-Click + Drag | ESC to cancel |
| Delete All | Ctrl+Shift+Del | Configurable |
| Open Folder | Ctrl+Shift+Alt+Click Slot | Explorer/Finder |
HDRI Button
| Action | Shortcut | Notes |
|---|---|---|
| Toggle HDRI | Click HDR Button | |
| Cycle Files | Ctrl+Scroll on HDR | |
| Rotate Environment | Ctrl+Shift+Scroll on HDR | Z axis |
| Open Shader Editor | Shift+Click HDR | Floating window |
| Choose HDRI Folder | Ctrl+Shift+Click HDR | |
| Open in Explorer | Ctrl+Shift+Alt+Click HDR |
Info Bar Pills
| Action | Shortcut | Notes |
|---|---|---|
| Cycle Engine | Ctrl+Scroll on Engine Pill | |
| Engine Menu | Right-Click Engine Pill | |
| Render Properties | Shift+Click Engine Pill | |
| Reset to Cycles | Backspace on Engine Pill | |
| Cycle Color Management | Ctrl+Scroll on Color Management Pill | |
| Toggle False Color | Middle-Click Color Management Pill | |
| Reset to AgX | Backspace on Color Management Pill |
Note: Configurable shortcuts can be changed in Preferences.
12. Tips & Notes
Performance Tips
- Draw the region as small as practical — focused rendering is much faster than full frame.
- Toggle Subdivision off during lookdev to speed up redraws.
- Use the Denoiser toggle to compare with and without denoising quickly.
Compare Workflow
- Store a baseline snapshot before making changes (Ctrl+1).
- Make your adjustment — material, lighting, or settings.
- Press 1 and drag the slider to see exactly what changed.
💬 Join the Community
Got a question, found a bug, or want to share your work? Join our Discord server for direct support, update announcements, and feedback.
Join Discord Server →Snapshot. Compare. Control — Directly In Your Viewport.
Pixel Makers · RenderRegion Pro · Blender 5.0+
-
$28
Standard license for RenderRegion Pro. Includes all features.
Have questions about this product?
Login to message
| Dev Fund Contributor | |
| Published | 5 months ago |
| Blender Version | 5.0 - 5.1 |
| Extension Type | N/A |
| Render Engine Used | Cycles, Eevee |
| License | GPL |
Discover more products like this
blender addon Cycles snapshot compare render-optimization hdri-lighting render-region blender 5 GPU monitor lookdev viewport tools rendering material preview