Smoothing Groups
 Techqon core


Documentation
Smoothing Groups for Blender
Complete guide to mastering the shading control system
Table of Contents
1. Installation
2. Getting Started
3. Panel Overview
4. Group Types
5. Creating Groups
6. Group Linking
7. Auto Groups
8. Smart Select
9. Modifier Manager
10. Color Overlays
11. Interactive Tutorials
12. Keyboard Shortcuts
13. Settings
14. Tips & Best Practices
15. FAQ
1. Installation
Requirements
- • Blender 4.0 or newer
- • Windows, macOS, or Linux
Installation Steps
Step 1: Download the .zip file from your purchase
Step 2: Open Blender and go to Edit → Preferences
Step 3: Navigate to the Add-ons tab
Step 4: Click Install... and select the downloaded .zip file
Step 5: Enable the addon by checking the checkbox next to "Smoothing Groups"
Step 6: Save preferences (optional but recommended)
Note: Do not unzip the file before installing. Blender requires the .zip format.
2. Getting Started
Accessing the Panel
After installation, the Smoothing Groups panel is available in the N-Panel (sidebar) under the "Smoothing Groups" tab. Press N in the 3D Viewport to toggle the sidebar.
Tip: In Object Mode, you'll see "Switch to Edit Mode to create custom Smart Groups. Press Tab". Enter Edit Mode to access all features.
Quick Start Workflow
Select your mesh object
Enter Edit Mode (Tab)
Select faces/edges
Create Group
Click "Smooth Groups"
3. Panel Overview
The main panel is divided into several sections:
Groups Section
Contains the list of all your groups organized by feature type. Collapsible sections for: UV Seams, Bevel, Smoothing, Crease, and Selection. Includes Auto Groups and Smart Select buttons.
Active Group Settings
Controls for the currently selected group: Sharp/Smooth toggle, Boundary Only checkbox, Show Colors toggle, and value sliders for Crease/Bevel weights.
Action Buttons
Smooth Groups: Apply shading to all groups. Smooth Mesh: Apply to entire mesh. Plus "Create New Smoothing Group" button.
Automate Section
Create from Active Group: Quick convert to UV Seams, Crease, Bevel Weight, or Selection. Plus Group Linking configuration.
Panel Header Icons
• Tutorial icon: Access built-in interactive tutorials
• Help icon (?): Quick help and documentation
• Settings icon (gear): Open Smoothing Group Settings
• X icon: Close/reset panel
4. Group Types
Smoothing Groups supports 5 different group types, each serving a specific purpose in your workflow:
Smoothing Groups
Purpose: Control sharp and smooth shading on your mesh.
Use case: Hard-surface edges, panel lines, defining where smooth shading breaks.
Options: Smooth Shading, Sharp Edges, Boundary Only.
UV Seams
Purpose: Define UV unwrapping boundaries.
Use case: Texture mapping preparation. Edges in this group become UV seams when applied.
Options: UV Seams, Boundary Only.
Crease
Purpose: Control subdivision surface edge sharpness.
Use case: SubD modeling, maintaining sharp edges with subdivision modifier.
Options: Weight (0.0 - 1.0), Vertex Crease, Boundary Only.
Bevel Weight
Purpose: Per-edge control for the Bevel modifier.
Use case: Chamfered edges, fillets. Works with Bevel modifier set to "Weight" limit method.
Options: Weight (0.0 - 1.0), Vertex Bevel, Boundary Only.
Selection
Purpose: Store and recall complex selections.
Use case: Save frequently used selections for quick access. Great for complex meshes where you need to repeatedly select the same elements.
5. Creating Groups
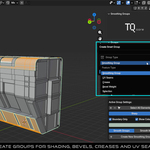
Method 1: Create Group Button
1. In Edit Mode, select faces or edges
2. Click "Create Group" in the panel
3. Choose the Group Type from the dropdown (Smoothing Group, UV Seams, Crease, Bevel Weight, Selection)
4. The group is created and your selection is assigned
Method 2: Quick Create Shortcut
Press Alt + G to quickly create a group using the last used group type.
This shortcut is customizable in the addon settings.
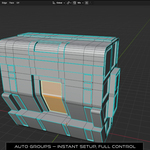
Method 3: Auto Groups
Click "Auto Groups" to automatically generate multiple groups based on mesh geometry. See the Auto Groups section for details.
6. Group Linking
One of the most powerful features. Link a Smoothing Group to other feature types so they stay synchronized.
How It Works
1. Create a Smoothing Group and assign faces/edges
2. Open "Configure Group Links" in the Automate section
3. Select which feature types to link (UV Seams, Crease, Bevel Weight, Selection)
4. Choose Unidirectional mode (edit master → linked groups update)
5. Click OK to create linked groups
Quick Convert (No Linking)
Use "Create from Active Group" in the Automate section to quickly convert a group to another type without linking:
Bulk Link All
Quickly link all existing Smoothing Groups to other feature types at once.
Quick Convert All
Convert all groups to a specific feature type without linking.
Save as Default
Save your linking configuration as the default for future groups.
7. Auto Groups
Automatically generate groups based on mesh geometry. Perfect for quick setup on complex models.
Detection Methods
Angle-Based Detection
Sharp edges above your angle threshold become separate groups. Ideal for mechanical parts and hard-surface models.
Normal-Based Grouping
Group faces by their orientation/normal direction. Great for architectural and product surfaces.
Island Detection
One group per disconnected mesh region. Perfect for complex assemblies with multiple parts.
Normal Merging
Combine disconnected regions with similar facing direction into one group.
Using Auto Groups
1. Select your mesh and enter Edit Mode
2. Click the "Auto Groups" button in the panel
3. Enable "Live Preview & Adjustments" to see results in real-time
4. Adjust settings (angle threshold, feature types)
5. Click "Live Preview" then adjust, and create when satisfied
8. Smart Select
Click one element and automatically select the entire group. A massive time-saver for complex meshes.
How to Use
1. Click "Smart Select" button in the panel to enable
2. Click on any face, edge, or vertex in the viewport
3. The entire group is selected automatically
4. Click the button again to disable and return to normal selection
Selection Tools
• Expand: Grow selection to adjacent groups
• Shrink: Reduce selection
• Linked: Select all connected elements
• Similar: Select groups with similar properties
• Boundary: Select only group edges
9. Modifier Manager
Built-in controls for Subdivision Surface and Bevel modifiers, directly in the Smoothing Groups panel. No need to switch to the modifier tab.
Subdivision Surface
Quick add button to add a Subdivision Surface modifier. Works perfectly with Crease groups for controlled subdivision.
Bevel Modifier
Full control over the Bevel modifier without leaving the panel:
- • Width & Segments
- • Affect: Edges
- • Limit Method: Weight (for Bevel Weight groups)
- • Outer/Inner Miter: Sharp
- • Profile controls (Superellipse/Custom)
- • Loop Slide, Mark Seams, Mark Sharp, Harden Normals
Tip: When using Bevel Weight groups, set the Bevel modifier's Limit Method to "Weight" for proper group-based beveling.
10. Color Overlays
Visualize all your groups at a glance with color-coded overlays directly in the viewport.
Overlay Mode
Colors are displayed as an overlay on top of your mesh. Non-destructive and toggleable. Best for quick visualization.
Vertex Colors Mode
Colors are applied as vertex colors. Useful when you need the colors to persist or be visible in certain render modes.
Color Overlay Settings
• Disable in Wireframe Mode: Hide colors when in wireframe view
• Reduce X-Ray Opacity: Adjust visibility in X-Ray mode
• X-Ray Factor: Control X-Ray transparency (default: 0.25)
• Color Overlay Blend Factor: Adjust overlay intensity (default: 0.50)
• Colors in Object Mode: Show colors even in Object Mode
• Colors in Render View: Show colors in rendered viewport
• Color to Group per Default: Auto-assign colors to new groups
11. Interactive Tutorials
Smoothing Groups includes a built-in tutorial system to help you learn the addon step-by-step. Access it by clicking the tutorial icon in the panel header.
Available Tutorials
Create a Group
Auto Groups
Modify a Group
Selection Tools
Modifier Tools
Settings & Customization
Each tutorial provides interactive, contextual guidance directly within Blender.
12. Keyboard Shortcuts
| Shortcut | Action | Description |
|---|---|---|
| Alt + Q | Pie Menu | Quick access to common operations |
| Alt + G | Quick Create Group | Create group with last used type |
Customizing Shortcuts
Go to the Smoothing Group Settings → Keyboard Shortcuts section. You can customize each shortcut by selecting Ctrl, Alt, Shift modifiers and the key. Click "Pie Manager" to customize pie menu slots.
Note: Restart Blender to apply keymap changes.
13. Settings
Access settings via the gear icon in the panel header. The settings are organized into several categories:
General Settings
• Auto-Activate New Groups: Automatically select newly created groups
• Reset Values on Element Remove: Clear values when removing elements from groups
• Reset Values on Group Delete: Clear values when deleting groups
Selection Behavior
• After Adding Elements: Select Group / Keep Selection
• After Removing Elements: Deselect Selection / Keep Selection
Group Creation Defaults
Crease Groups: Default Weight, Vertex Crease, Boundary Only
Bevel Groups: Default Weight, Vertex Bevel, Boundary Only
Smoothing Groups: Smooth Shading, Sharp Edges, Boundary Only
UV Seam Groups: UV Seams, Boundary Only
List Display
• Combined List: Show all groups in a single list
• Smart List: Intelligently organize groups by type
• Feature Lists: Show/hide individual feature type lists (UV Seams, Bevel, Crease, Shading, Selection)
Warning Settings
Disable warnings for specific feature types: UV Seams, Bevel, Crease, Shading, Selection
Development
• Show Base Layer List: For advanced debugging and development
14. Tips & Best Practices
Start with Auto Groups
On complex meshes, use Auto Groups first to get a base setup, then refine manually. This saves significant time.
Use Group Linking Early
Set up linked groups at the beginning of your project. When you edit your Smoothing Groups later, all linked features update automatically.
Boundary Only for Clean Results
Enable "Boundary Only" when you want features applied only to group edges, not interior faces. Essential for clean Crease and Bevel results.
Color Overlays for Review
Toggle Show Colors to quickly verify your groups are correctly assigned. Different colors make it easy to spot errors.
Name Your Groups
Give descriptive names to groups (e.g., "Outer Edges", "Panel Lines", "Buttons"). This makes complex projects much easier to manage.
Use the Built-in Tutorials
If you're new to the addon, start with the interactive tutorials. They guide you through each feature step-by-step directly in Blender.
Smoothing Groups for Blender — Documentation v1.1
© Techqon Core • www.techqon-core.com
Discover more products like this
subdivision auto selection tools shading smoothing modeling bevel 3d_hard_surface Edge Control sharp edges Workflow addon blender groups