Stigma
 Outlier Labs





STIGMA / THE FIELD GUIDE
From image
to impression.
Install Stigma, place your first decal and keep every mark editable. A practical guide to the controls, your texture library and shared groups.
Blender 4.2.23+ · Eevee + Cycles · Windows + Linux
Find your next step.
- Install and update
- Place your first decal
- Groups, layers and placements
- Move, resize and mirror
- Control which way a surface faces
- Build your texture library
- Layers, color and masks
- Give the decal its own finish
- Duplicate a placement or tile a pattern
- Share a group across objects
- Make marks follow an object
- Save, share and move your library
- Preview, inspect and recover
- Troubleshooting
- Compatibility, performance and scope
- Documentation, licenses and support
01 / STIGMA DOCUMENTATION
Install and update
Use Blender 4.2.23 or newer. Stigma works in Eevee and Cycles with local, editable mesh objects and a Principled BSDF connected directly to Material Output. Existing image textures and other inputs to that shader can remain connected.
- Download the Stigma add-on ZIP and keep it compressed.
- Open Edit → Preferences → Add-ons. Open the menu in the upper-right corner and choose Install from Disk. Select the ZIP.
- Search for Stigma and enable its checkbox if it is not already enabled.
- In the 3D Viewport, switch to Object Mode. Press N to open the sidebar and choose the Stigma tab.
- Switch viewport shading to Material Preview or Rendered so you can see the projected image.
Updating an existing installation
Save a copy of your project, disable Stigma, install the new ZIP and enable it again. Keep only one Stigma installation enabled. If you are replacing an older extension-format installation, uninstall that copy before enabling the current add-on.
If the tab is missing, check the Add-ons search filters and that Stigma is enabled. Restart Blender if an old installation remains loaded. Blender’s add-on installation reference.
02 / STIGMA DOCUMENTATION
Place your first decal
- Select the mesh objects that should receive the mark. Place the 3D cursor near the intended surface.
- Click Create Stigma. This creates a group, a layer with the default image and a placement. The selected meshes become its receivers.
- Select the placement in Placements. With its handles visible, click Change Texture, then click a library thumbnail.
- Use G / R / S to move, rotate and scale. Drag the central projection arrow onto a surface, or hold Ctrl while moving to align the placement to it.
- Adjust Depth or the depth handles until the volume intersects the intended surface. Keep the volume as shallow as your scene allows.
Start from the texture shelf
Press F3 → Change Texture, then drag a thumbnail onto a compatible mesh. If that mesh is already in the active group, the drop adds a layer there; otherwise it creates a new group for the mesh. This creates a new decal rather than replacing an existing layer image.
Place a PNG from your file browser
Drop one PNG onto a visible mesh and choose Drop PNG as Stigma in Blender’s importer menu. Stigma uses the original drop point. Blender’s ordinary image importer creates a different type of object. External file dragging has been tested on Linux/X11.

Library drag-and-drop followed by size and rotation adjustments.
03 / STIGMA DOCUMENTATION
Groups, layers and placements
These three levels let you share artwork while keeping individual marks easy to edit.
| Level | What it controls |
|---|---|
| Group | The objects receiving a shared stack of layers. Its anchor, if set, moves all placements in the group. |
| Layer | One image and its color, mask and material-finish settings. Several placements can share that image. |
| Placement | A position, orientation and projection volume for the layer image. Repeat, Facing and inversion are stored per placement. |
The active group remains selected when you click other objects in the viewport. Choose the intended group and layer before editing. Select a row in Placements to activate its projection; this does not move the camera. Hover over the viewport and use Numpad . / Frame Selected to locate it.
04 / STIGMA DOCUMENTATION
Move, resize and mirror
| Control | Action |
|---|---|
| G / R / S | Move, rotate or scale using Blender’s transform workflow. Press R twice for trackball rotation. |
| Ctrl while moving | Project onto the surface under the cursor and align the decal. The Ctrl Face Project toggle must be enabled. |
| Central arrow | Drag directly onto a surface to project and align without holding Ctrl. |
| Face handles | Resize width, height or depth while keeping the opposite face fixed. Crossing the opposite face mirrors that axis. |
| Depth | Limit the projection along its local depth axis. The receiving surface must intersect the volume. |
| Enter / left-click | Confirm a transform. Use Esc or right-click to cancel. |
| Ctrl+Z | Undo a completed scene edit. Library-folder organization has separate persistence; see the library section. |
Viewport Bounds, Handles and Blender’s Show Gizmos control the editing overlay. Hiding the overlay leaves the projected image visible. Click an outline edge to select a placement; clicking inside the box can select the geometry underneath.
Resize handles hide when an axis points almost straight at the view. Orbit slightly to reach them. Outline colors and widths are configurable in Stigma’s add-on preferences. Moving the projection never changes its explicit receiver list.
05 / STIGMA DOCUMENTATION
Control which way a surface faces
Enable Facing beside Repeat for the selected placement. It fades coverage where a surface turns away from the projection axis. It starts disabled.
- Angle: the largest angle that still receives full coverage. Lower it for a tighter orientation filter.
- Softness: the fade beyond that angle. Zero produces a hard cutoff.
- Rotating the placement changes the facing direction. Mirroring its depth axis reverses which side counts as facing the projector.
06 / STIGMA DOCUMENTATION
Build your texture library
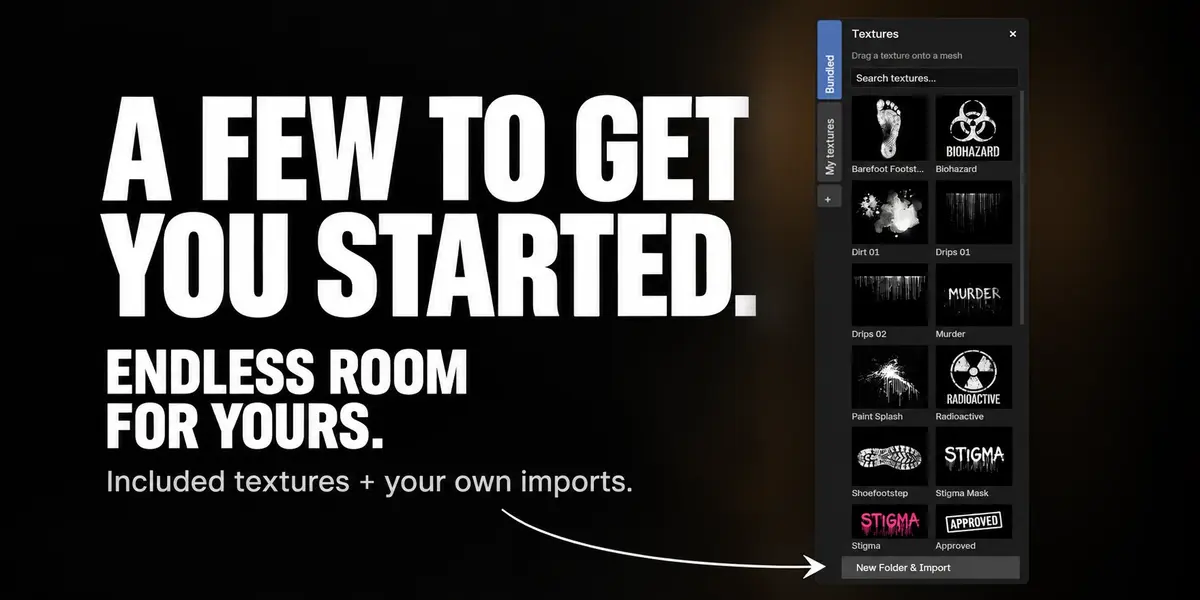
Change Texture opens the floating shelf. Drag its header to move it, scroll inside it and search by name. Search applies to the active folder. Click outside the search field to return keyboard shortcuts to the viewport.
The Bundled tab contains 26 textures. To replace a layer image, select its placement and keep Show Gizmos, Viewport Bounds and Handles enabled, then click a thumbnail. Dragging a thumbnail onto a mesh creates a new layer instead.
- Use + to create a personal folder. Double-click a folder tab to rename it.
- Import textures imports one or several images into the active personal folder. From Bundled, choose New Folder & Import first.
- Drag a thumbnail to another personal tab to move it. Dragging from Bundled copies it into your collection and leaves the included pack intact.
- Drop files onto a personal folder tab or its contents to import them. If Blender asks, choose Import into Stigma Folder.
Replacing a non-repeating image fits its proportions while preserving the placement’s center, orientation, depth, longest side and flips. With Repeat enabled, the volume stays fixed and the tile proportions adapt.

The searchable shelf contains bundled textures and your personal folders.
07 / STIGMA DOCUMENTATION
Layers, color and masks
Use + beside Layers to create a layer with the default image. To import multiple images as layers, use F3 → Add Decal Layer. The batch creates one layer per file; placements initially overlap and can be moved apart.
Higher groups and layers compose on top. Reorder them to change priority. Their enable checkboxes hide their contribution without discarding settings; disabled placements also hide their editing bounds.
| Control | Meaning |
|---|---|
| Color | Original keeps source colors. Solid Color substitutes a chosen color while retaining coverage. |
| Blend | One of 19 color blend modes, including Mix, Multiply, Screen and Overlay. The arrows step through modes. |
| Overlap | Topmost uses the placement with the strongest mask. Blend composites overlapping placements in sequence. |
| Layer Strength | Controls the layer’s effective coverage. |
| Mask Source | Alpha uses transparency. Luminance uses the original image’s brightness before recoloring: white reveals, black hides and gray gives partial coverage. |
| Contrast / Invert | Shape the mask. In Luminance mode, original transparency and the projection bounds still limit coverage when inverted. |
An opaque black background is still opaque in Alpha mode. Choose Luminance for a grayscale stencil. Image color space affects luminance; switching Mask Source does not silently change the color space of an existing artistic image.
08 / STIGMA DOCUMENTATION
Give the decal its own finish
Material Influence, below Contrast, blends the original surface finish with the layer’s settings. It starts at 0, preserving the surface. At 1, fully covered areas use the layer values.
- Select the layer and raise Material Influence.
- Expand the small triangle beside the slider to reveal the finish settings.
- For a non-metallic sticker, leave Metallic at 0. Adjust Roughness to make it glossy or rough, then tune Specular as needed.
| Setting | Use |
|---|---|
| Metallic | 0 for non-metallic; 1 for metallic. |
| Roughness | 0 is glossy; 1 is rough. Default: 0.5. |
| Specular | Controls Principled Specular IOR Level. Default: 0.5. A non-metallic sticker can still reflect light. |
The effective mask controls where the finish applies; the surrounding surface retains its original maps and values. A black area of an Alpha sticker still receives the finish. Color Blend modes do not alter these finish channels.
Overlapping placements within one layer use maximum coverage for finish. Separate layers and groups blend their finishes in stack order. These controls do not replace Normal, Bump, Coat, IOR or Transmission.

Raise Material Influence to give the image its own surface response.
09 / STIGMA DOCUMENTATION
Duplicate a placement or tile a pattern
Create separate placements
Select exactly one managed placement, then use Ctrl+D, Shift+D or Alt+D to duplicate and move it. Confirm to keep the copy as one Undo step; cancel to discard the provisional copy. Its image remains shared by the layer, while its transform is independent.
Tile inside one placement
- Select a placement and enable the Repeat toggle beside Invert.
- Use Size to set the tile’s longest side in scene units. It scales both image axes uniformly.
- Use X and Y to offset the pattern in tile units.
- Resize the projection bounds to reveal or crop repetitions without stretching the pattern. Depth still limits the projection.
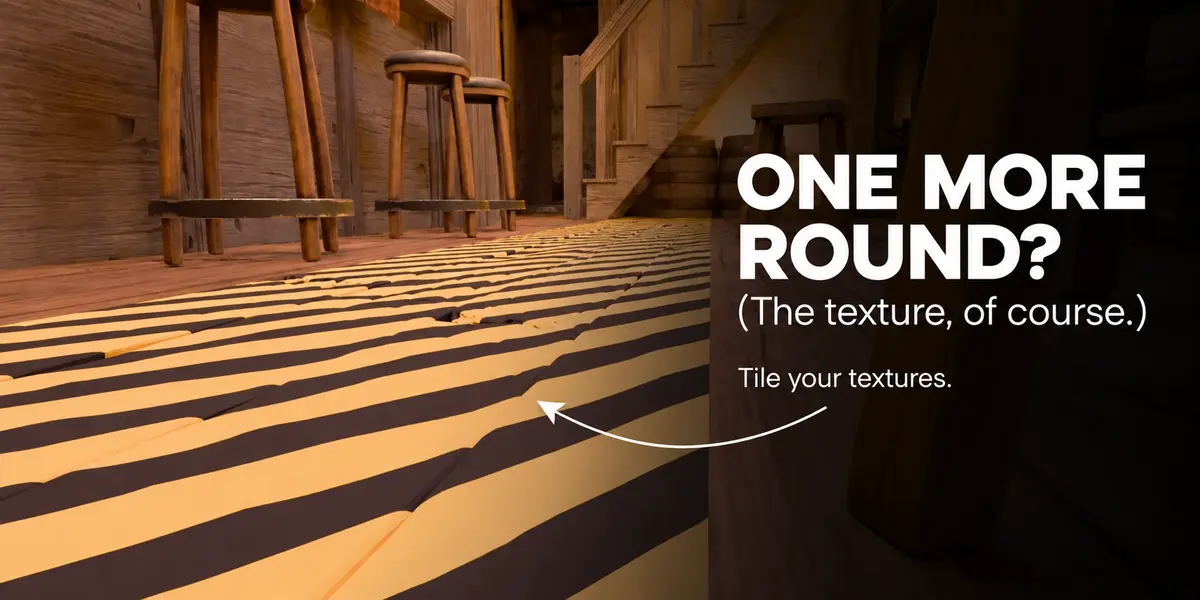
Repeat settings are stored per placement and copied when it is duplicated. Use a tileable source image for seamless joins; Repeat does not make an ordinary image seamless.

The first example uses Repeat; the STOP signs are separate placements.
10 / STIGMA DOCUMENTATION
Share a group across objects
- Select the meshes before Create Stigma to make them receivers of the new group.
- To add more, choose the group, select the additional meshes and click Add to Stigma.
- If every selected mesh is already a member, that action becomes Remove from Stigma. With a mixed selection it adds missing members.
- Use the header gear → Stigma Tools → Inspect Group… to inspect receivers, materials and recorded issues.
Moving or resizing the volume keeps membership fixed. A mesh can belong to multiple groups; their order controls composition. Join Group From Object… shares an existing group with selected meshes instead of copying its layers.

A shared group projects across several separate receiving meshes.
11 / STIGMA DOCUMENTATION
Make marks follow an object
Use the pin beside the group to anchor its placements to a receiver. A single-receiver group pins immediately. A shared group asks which receiver to follow; confirm the choice.
Click the highlighted pin to unpin. Assigning or removing an anchor preserves current world positions, so the placements do not jump. For a separate control object, such as an Empty, choose Stigma Tools → Choose Anchor… and select Follow Object.
- One anchor serves the entire group, including disabled placements.
- It follows object position, rotation and scale; it does not follow mesh deformation.
- Anchoring moves the placements, not the receiving geometry. Arrange the receivers’ motion separately when an entire assembly should move together.
- World leaves placements in world space. Removing an anchor does not change receiver membership.
12 / STIGMA DOCUMENTATION
Save, share and move your library
Save your project normally as a .blend. Images selected from the Stigma library are packed into it. The complete personal texture library is separate and is not included merely by saving that project.
Before moving a project to another computer, check its other external resources. Blender’s File → External Data → Pack Resources can embed supported external files; save again afterwards. You can also use Report Missing Files and Find Missing Files to inspect or restore external paths. Blender’s External Data reference.
Personal imports and folder metadata live under CONFIG/stigma/textures/ in Blender’s configuration. Back up and migrate that folder when moving computers or switching Blender’s major version. Folder changes are outside scene Undo and do not delete your original source files.
13 / STIGMA DOCUMENTATION
Preview, inspect and recover
Preview Auto Settle
Select the placement, then use the header gear → Stigma Tools → Preview Auto Settle, or search for it with F3. It samples supporting surfaces and proposes an orientation and volume. Inspect the preview before confirming with Enter; cancel with Esc or right-click.
Sampling, distance and plane tolerances are in Preferences → Add-ons → Stigma → Auto Settle. If the preview fails near edges or uneven surfaces, reduce sample spacing or reposition the placement. This is an explicit placement aid; it is not continuous tracking or a wrapping modifier.
Use the coverage Mask
The material’s Stigma Compositor → Mask output can drive your own shader connections. It reports maximum effective coverage across placements, layers and groups. Alpha/Luminance, clipping, strength, inversion and visibility affect it.
Mask does not accumulate opacity with Overlap: Blend, and color or stack order does not change its coverage. Existing consumers keep their connection through rebuilds; after the last group is removed, they receive zero.
Inspect and repair
- Inspect Group… offers Objects, Materials and Issues. Reopen it after changes to refresh its inspection results.
- Validate / Repair diagnoses the active group and repairs unambiguous inconsistencies. Missing images and ambiguous relationships can require your decision.
- Rebuild Materials regenerates Stigma’s managed shader groups. Keep custom artistic nodes outside those generated groups.
- For older files showing Migrate Data, save a copy first and run the explicit migration. It is not performed just by opening the panel.
14 / STIGMA DOCUMENTATION
Troubleshooting
| Symptom | What to check |
|---|---|
| The decal is invisible | Use Material Preview or Rendered shading. Check group/layer/placement enable boxes, image availability and Layer Strength. Confirm the mesh has a compatible material, belongs to the group and intersects the projection volume. |
| A black or white rectangle appears | The image may be opaque. Alpha reads transparency, not brightness. Use a transparent image or choose Luminance for a grayscale stencil. |
| Another object gets the mark | Inspect shared material users and projection depth. Use separate materials for strict object exclusion. Facing filters orientation, not occlusion. |
| Clicking a thumbnail does nothing | Select a placement, then enable Show Gizmos, Viewport Bounds and Handles. A remembered layer alone is not enough to replace its texture. |
| Every copy changes image | Those placements share a layer. Create another layer when an instance needs different artwork. |
| The finish stays unchanged | Raise Material Influence above zero, expand its settings and check the mask coverage. Judge the result in Material Preview or Rendered shading. |
| Handles or boxes disappeared | Check Show Gizmos, Viewport Bounds, Handles and the relevant enable boxes. Orbit the view if resize handles point almost directly at the camera. |
| Marks stay behind when an object moves | The group may be in World space. Use its pin or Choose Anchor to make placements follow the object. |
| Textures are missing or magenta | Check the image paths. Re-select the texture from the library or use Blender’s Find Missing Files. Inspect Group can help identify affected resources. |
| A repeated pattern has seams | Use a source image prepared for seamless tiling. Check Size, X/Y offsets and the projection boundaries. |
| The viewport pauses after an edit | Structural edits can rebuild nodes and compile shaders. Allow compilation to finish; reduce placements, layers or scene complexity if needed. See the performance notes below. |
15 / STIGMA DOCUMENTATION
Compatibility, performance and scope
- Blender: minimum 4.2.23. Tested on Windows and Linux. Linux validation records cover 4.2.23, 4.5.14 and 5.2.0. macOS has not yet been formally validated; external file dragging has been tested on Linux/X11.
- Rendering: Eevee and Cycles. Use compatible, local and editable Principled materials. Linked objects/materials, Library Overrides and arbitrary shader layouts are outside the supported workflow.
- Projection: clipped by its volume, without surface occlusion. Facing filters shaded-normal orientation. Receivers still need to intersect the volume.
- Cost: placements, layers, shared materials, hardware and scene complexity affect responsiveness. The 25-placement-per-layer and 50-layer warnings are advisory thresholds, not hard limits or performance promises.
- Compilation: some texture, blend and duplication edits in Eevee or Material Preview briefly retain the previous image while shaders compile. Navigating or interacting releases that image; this does not eliminate compilation time.
- Scope: this guide covers the normal manual-receiver workflow. Automatic reception is experimental and hidden by default. Baking and game-engine export are not current features.
16 / STIGMA DOCUMENTATION
Documentation, licenses and support
The bundled artwork may be used in personal and commercial projects, including client work, without attribution. Standalone redistribution as a texture library is excluded. Imported artwork retains its own license. The add-on code is GPL-3.0-or-later; artwork has separate terms in the supplied package.
For help, contact the creator through Superhive’s product support/contact option. Include your Blender and Stigma versions, operating system, render engine, the steps that reproduce the issue and a screenshot of the relevant settings. A small example .blend is useful when you can share one.
STIGMA / OUTLIER LABS
Leave a mark. Keep it editable.
-
$29
Complete Stigma add-on with all features and 26 bundled textures for personal and commercial projects. Includes 12 months of updates and support for one artist. Code licensed under GPL-3.0-or-later.
-
$119
Complete Stigma add-on with all features and 26 bundled textures for personal and commercial projects. Includes 12 months of updates and team support for up to 5 artists, coordinated through one contact. Team size defines support coverage; GPL rights remain unchanged.
 Included
Includes 12 months of
- Support from Outlier Labs
- Product updates
Extend this product’s Support Period +12 months: 50% of product price
Have questions before purchasing?
Login to message
| Dev Fund Contributor | |
| Published | about 21 hours ago |
| Blender Version | 4.2 - 5.2 |
| Extension Type | N/A |
| Render Engine Used | Cycles, Eevee |
| License | GPL |