Trimotion-Animation Optimizer
 Null Station


TRIMOTION - USER DOCUMENTATION
Version 1.4.0Installation
- Download the addon as a ZIP file (Trimotion.zip)
- In Blender 4.0 - 5.0+, go to Edit > Preferences > Add-ons
- Click Install... and select the Trimotion.zip file
- Enable the addon by checking the checkbox next to "Animation: Trimotion"
- The addon panel appears in 3D Viewport's N-panel under Trimotion tab
Quick Start
- Import Mocap: Load your high-fps mocap animation (BVH, FBX, etc.)
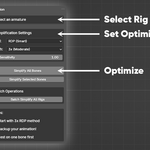
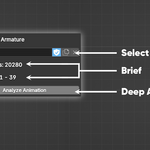
- Select Armature: Click on your animated rig
- Open Panel: Press N in 3D Viewport, find Trimotion tab
- Analyze: Click "Analyze Animation" to see current keyframe count
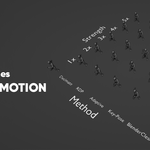
- Choose Method: Select "RDP (Smart)" for best results
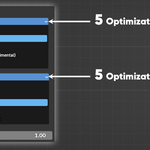
- Set Strength: Choose "3x (Moderate)" as a starting point
- Simplify: Click "Simplify All Bones"
- Review: Check the reduction statistics and play animation
Action & Slot Management (Blender 5.0+ Compatible)
Action Dropdown
- Click dropdown to switch between actions
- Click action name to rename it inline
- [+] button creates new action
- [X] button unlinks action (doesn't delete it)
NEW: Slot Management (Blender 5.0+)
Blender 5.0 introduced "Slotted Actions" - one action can contain multiple animation variations.- Slot dropdown appears below Action dropdown (Blender 5.0+ only)
- Select slot to choose which animation variant to work with
- [Duplicate] button creates new slot in current action
- [X] button unassigns slot from object
- Action = Animation data container
- Slot = Links animation to specific object
- Use dropdown to select/switch slots
- Multiple objects can use different slots from the same action
Simplification Methods Explained
RDP (Ramer-Douglas-Peucker) - RECOMMENDED ✨
Uses geometric curve simplification to preserve animation shape. Typically achieves 50-70% reduction with excellent quality. Best for general use.Settings:- RDP Sensitivity: 0.1-10.0 (default 1.0)
- Lower = more keyframes kept, higher quality
- Higher = more aggressive reduction
Key Pose (Experimental) 🎨
Detects key poses like an animator - peaks, valleys, direction changes, and acceleration points. Removes linear transition frames, making animation fully editable. Achieves 70-90% reduction. Perfect for creating animator-style editable curves.Settings:- Key Pose Sensitivity: 0.1-5.0 (default 1.0)
- Lower = keeps more transition frames
- Higher = removes more, keeps only key poses
- Detects local extrema (peaks/valleys)
- Finds direction changes
- Identifies significant acceleration
- Fills gaps in non-linear sections only
- Sets interpolation to LINEAR for clean curves
Decimate
Simple frame-skipping that keeps every Nth keyframe. Fast and predictable. Good for quick tests and when you need exact frame rate reduction (100fps → 50fps).Adaptive
Tests each keyframe removal impact. Only removes if interpolated value stays within error threshold. Balanced approach between quality and reduction. Great for subtle animations.Settings:- Adaptive Sensitivity: 0.1-10.0 (default 1.0)
- Lower = stricter error tolerance
- Higher = allows more error, more reduction
Blender Clean
Removes nearly-identical adjacent keyframes. Conservative approach for simple cleanup. Use when animation already has good keyframe placement.NEW: Advanced Features
Frame Range Limiter 🎯
Location: Advanced section → Frame RangeOnly simplify specific parts of your animation!Options:- Use Frame Range checkbox enables range limiting
- Use Scene Range (default ON) - uses Timeline's Start/End frames
- Custom Range - set your own Start/End frames manually
- From Action: Sets range to action's keyframe range
- From Playhead: Sets start frame to current timeline position
- Keep intro/outro intact, simplify middle section
- Simplify loop cycles without touching transition frames
- Preserve hand-keyed sections while cleaning mocap parts
Smooth Curves 🌊
Location: Advanced section → Smooth CurvesNEW FEATURE: Reduce jitter and noise in mocap animation!Settings:- Smooth Factor (0.0-1.0, default 0.5): How much to blend with neighbors
- 0.0 = no change
- 0.5 = balanced smoothing
- 1.0 = full average with neighbors
- Iterations (1-10, default 2): Number of smoothing passes
- More passes = smoother curves (but may lose detail)
- Applies weighted moving average to keyframes
- Blends each keyframe with its neighbors
- Respects frame range settings (if enabled)
- Noisy mocap data from cheaper systems
- High-frequency jitter in finger/facial animation
- After aggressive simplification to smooth transitions
- Before simplification to reduce noise spikes
Frame Rate Converter 🔄
Location: Advanced section → Frame Rate ConverterNEW FEATURE: Convert animation to different frame rates!Settings:- Source FPS: Original frame rate (0 = auto-detect from scene)
- Target FPS: Choose from presets or custom
- 24 fps (Film)
- 25 fps (PAL)
- 30 fps (NTSC)
- 60 fps (Games)
- 120 fps (High)
- Custom (1.0-240.0)
- Rescales all keyframe timings proportionally
- Preserves interpolation types and handles
- Updates scene render FPS automatically
- Handles fractional frame rates (e.g., 29.97)
- Convert 120fps mocap to 30fps game animation
- Match animation timing to different project frame rates
- Adjust imported animation to target platform
Batch Operations 📦
Location: Advanced section → Batch OperationsProcess ALL armatures in the scene at once!Button: "Batch Simplify All Rigs"Features:- Finds all armatures with animation
- Applies same settings to all
- Shows total keyframe reduction across all rigs
- Respects frame range settings
Settings Reference
Strength Levels
- 1x (Mild): 10-30% reduction, highest quality
- 2x (Light): 30-45% reduction, very high quality
- 3x (Moderate): 45-65% reduction, high quality ⭐ RECOMMENDED
- 4x (Strong): 65-80% reduction, good quality
- 5x (Very Strong): 80-90% reduction, acceptable quality
Workflow Examples
Example 1: Rococo Full-Body Mocap (100fps)
1. Import Rococo BVH (typically 15,000+ keyframes for 3 seconds)
2. Select armature
3. Click "Analyze Animation" (shows 15,000 keyframes)
4. Method: RDP (Smart)
5. Strength: 3x (Moderate)
6. Click "Simplify All Bones"
7. Result: ~5,000 keyframes (67% reduction), near-identical quality
8. Export to Unity/Unreal with optimized file size
Example 2: Making Editable Animation
1. Import Rococo BVH (typically 15,000+ keyframes for 3 seconds)
2. Select armature
3. Click "Analyze Animation" (shows 15,000 keyframes)
4. Method: RDP (Smart)
5. Strength: 3x (Moderate)
6. Click "Simplify All Bones"
7. Result: ~5,000 keyframes (67% reduction), near-identical quality
8. Export to Unity/Unreal with optimized file size
Example 3: Facial Animation Cleanup
1. Select facial rig
2. Enter Pose Mode (Tab)
3. Select facial bones only
4. Method: RDP (Smart)
5. Strength: 2x (Light) - be conservative with facial
6. Click "Simplify Selected Bones"
7. Review and adjust if needed
NEW Example 4: Simplify Middle Section Only
1. Select armature with animation
2. Enable "Use Frame Range" in Advanced section
3. Set Start: 50, End: 200
4. Method: RDP (Smart)
5. Strength: 4x (Strong)
6. Click "Simplify All Bones"
7. Result: Frames 1-49 and 201+ untouched, middle simplified
NEW Example 5: Smooth Noisy Mocap
1. Select armature
2. Analyze animation - notice jittery curves
3. Go to Advanced → Smooth Curves
4. Factor: 0.5, Iterations: 3
5. Click "Smooth Animation Curves"
6. Then simplify with RDP 3x for optimal result
NEW Example 6: Convert Frame Rate
1. Import 120fps mocap animation
2. Go to Advanced → Frame Rate Converter
3. Source: 120 (or leave at 0 for auto-detect)
4. Target: 30 fps (Games)
5. Click "Convert Frame Rate"
6. Animation now plays at 30fps with correct timing
Example 7: Batch Processing Multiple Characters
1. Import multiple animated characters
2. Don't select anything (or select any object)
3. Method: RDP (Smart)
4. Strength: 3x (Moderate)
5. Go to Advanced → Batch Operations
6. Click "Batch Simplify All Rigs"
7. All armatures in scene processed simultaneously
Tips & Best Practices
General
- ✅ Always save your file before simplifying (Ctrl+S)
- ✅ Use "Analyze Animation" first to understand your data
- ✅ Start with 3x RDP - works for 90% of cases
- ✅ Test on one bone first using "Simplify Selected Bones"
- ✅ Duplicate actions ([+] button) before simplifying for backup
By Animation Type
- Facial animation: Use 2x strength, be conservative
- Body animation: Use 3x-4x strength for good optimization
- Finger animation: Use 2x + smooth curves for best results
- Background characters: Use 4x-5x for maximum optimization
Advanced Techniques
- Key Pose method: Creates animator-style editable curves
- Check Graph Editor after simplification to verify quality
- Extreme optimization: Simplify in stages (3x, then 2x on result)
- Noisy mocap: Smooth first (3 passes), then simplify
- Frame Range: Simplify loops without touching transitions
- Batch mode: Process entire scene for consistent results
NEW: Workflow Combinations
- Smooth → Simplify → Smooth: Best quality for noisy data
- Frame Rate Convert → Simplify: Match target platform first
- RDP → Key Pose: Reduce data, then make editable
- Simplify with Range: Preserve hand-keyed intro/outro
Performance Notes
Processing time depends on rig complexity:Optimization tips:- Decimate method is ~5x faster than RDP for very large datasets
- Frame Range limiting speeds up processing
- Batch mode is efficient for multiple rigs
Requirements
- Blender 4.0.0 or later (tested through 5.0+)
- Works with all armature types
- Compatible with BVH, FBX, and any keyframed animation
- Blender 5.0+ Slot support included
- No external dependencies required
Built-in Manual
The addon includes a collapsible Manual section in the panel with:- Getting Started guide
- Action & Slot explanation
- Method descriptions
- Strength guide
- Advanced features overview
- Quick tips
Troubleshooting
"No bones selected" error
- Make sure you're in Pose Mode (Tab key)
- Select bones in the viewport or outliner
- The addon now supports both Blender 4.x and 5.0+ selection APIs
Blender 5.0 slot issues
- Use the slot dropdown to assign a slot
- Click [Duplicate] to create new slot if needed
- The addon auto-assigns first slot when action is selected
Frame range not working
- Enable "Use Frame Range" checkbox first
- Check Start/End values are correct
- Use "From Action" button to auto-set range
Copyright (C) 2026 Null StationWebsite: https://www.nullstation.coSupport: info@nullstation.co
-
$32
Solo User License
-
$120
2-5 people sit license
-
$269
6-14 people sit license.
Have questions about this product?
Login to message