Turntable Viewport
 CGJackB


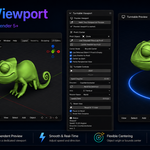
Turntable Viewport Lite — Documentation
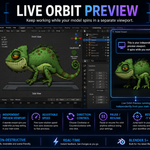
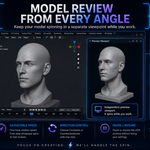
Turntable Viewport Lite is a Blender 5+ add-on that creates a live, independent turntable preview in a separate 3D viewport. It lets you keep working in your main viewport while the selected object is previewed from a rotating view in another one.
Unlike a traditional turntable setup, this add-on rotates the viewport view, not the object, camera, or scene. That means your asset stays untouched while you monitor it from a presentation angle in real time.
Requirements
- Blender 5.0 or newer
What’s Included in Lite
- Independent live turntable preview in a separate viewport
- Pivot object selection
- Centering options
- Adjustable turntable speed
- Clockwise or counterclockwise rotation
- Pause and resume controls
- Axis selection
- Rotation space options
-
Reset to a front-style
-Yview - Non-destructive workflow
Installation
- Download the ZIP file.
- Open Blender.
- Go to Edit > Preferences > Add-ons.
- Click Install from Disk.
- Select the add-on ZIP.
- Enable Turntable Viewport Lite.
Where to Find It
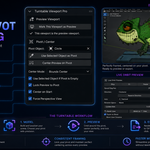
Open the 3D Viewport, press N to open the sidebar, and look for the Turntable tab.
Basic Workflow
- Split your Blender workspace so you have two 3D Viewports.
- Click inside the viewport you want to use as the preview viewport.
- In the Turntable panel, click Mark This Viewport as Preview.
- Select the object you want to preview, or assign it in the Pivot Object field.
- Click Use Selected Object as Pivot if needed.
- Press Start to begin the turntable preview.
- Continue working in your other viewport while the preview spins independently.
Panel Overview
Preview Viewport
-
Mark This Viewport as Preview
Marks the current 3D viewport as the dedicated turntable preview viewport.
Pivot / Center
-
Pivot Object
The object the preview will center on. -
Use Selected Object as Pivot
Sets the currently selected object as the pivot. -
Center Preview on Pivot
Re-centers the preview viewport. -
Center Mode
- Object Origin — center on the object’s origin
- Bounds Center — center on the object’s bounding box center
-
Use Selected Object if Pivot is Empty
Automatically uses the currently selected object if no pivot object is assigned. -
Lock Preview to Pivot
Keeps the preview centered while rotating. -
Center on Start
Automatically centers when the preview begins. -
Force Perspective View
Keeps the preview viewport in perspective mode.
Turntable Controls
-
Start
Starts the live preview rotation. -
Pause
Pauses the rotation. -
Speed Deg/Sec
Controls rotation speed in degrees per second. -
Direction
Choose clockwise or counterclockwise. -
Reverse Direction
Quickly flips the current direction. -
Axis
Choose the axis to rotate around. -
Rotation Space
- World — rotates using world axes
- Local — rotates relative to the current view orientation
-
Update Rate
Controls how often the preview updates. Lower values are smoother, higher values are lighter on performance.
Reset View
-
Reset to -Y View
Returns the preview to the default front-style orientation. -
Pause on Reset
Pauses the preview when resetting the view. -
Reset View Distance
Optionally reset the preview viewport distance.
Status
Displays:
- Running state
- Speed
- Direction
- Axis
Notes
- Turntable Viewport Lite rotates the preview view only.
- It does not animate the object.
- It does not modify camera settings.
- It does not create keyframes.
- It is designed as a non-destructive preview tool.
Best Use Cases
- Modeling
- Sculpting
- Product visualization
- Character review
- Asset presentation
- General workflow preview
Troubleshooting
The preview is not rotating
- Make sure a viewport has been marked as the preview viewport.
- Make sure a pivot object is assigned or selected.
- Confirm the preview is not paused.
- Check that the update rate is not set too high.
The preview is off-center
- Click Center Preview on Pivot.
- Try switching Center Mode from Object Origin to Bounds Center.
The preview view looks wrong
- Click Reset to -Y View.
- Confirm Force Perspective View is enabled if desired.
Support
If you run into issues, please include:
- Blender version
- Add-on version
- A short description of the issue
-
Steps to reproduce the problem
Turntable Viewport Pro — Documentation
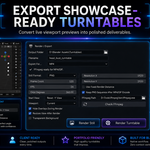
Turntable Viewport Pro expands Turntable Viewport Lite with render and export tools for creating still images, image sequences, MP4 videos, GIF loops, and animated character turntables directly from the marked preview viewport.
Pro is designed for artists who want to turn their live viewport preview into presentation-ready output without setting up a camera, rotating the actual object, or creating extra scene animation.
Requirements
Blender 5.0 or newer
FFmpeg is required for MP4 export
FFmpeg is required for GIF export
FFmpeg is not required for still image export
FFmpeg is not required for PNG image sequence export
What’s Included in Pro
In addition to the Lite features, Pro includes:
Viewport still rendering
Turntable render export
PNG image sequence export
MP4 export
GIF export
Animated character turntable support
Scene timeline support
Custom frame range support
Animation timing options
Recalculate center each frame for moving characters
Custom frame count
Custom FPS
Custom orbit degrees
Custom output resolution
Viewport shading options for export
Hide overlays during render
Transparent background option where supported
Fixed render distance option
Restore preview view after render
Restore timeline after render
FFmpeg path field
FFmpeg check/support workflow
Installation
Download the ZIP file.
Open Blender.
Go to Edit > Preferences > Add-ons.
Click Install from Disk.
Select the add-on ZIP.
Enable Turntable Viewport Pro.
Where to Find It
Open the 3D Viewport, press N to open the sidebar, and look for the Turntable Pro tab.
Pro Export Workflow
Set up the preview viewport using the normal Turntable Viewport workflow.
Assign or select the object, character, mesh, or armature you want to preview.
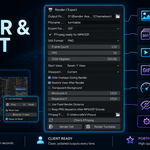
Choose your export settings in the Render / Export section.
-
Select an export format:
Still Image
PNG Image Sequence
MP4
GIF
Set frame count, FPS, orbit degrees, resolution, and shading mode.
Choose whether to use the current preview angle or reset to the front-style
-Yview.Click Render Still or Render Turntable.
Render / Export Panel Overview
Output Folder
Sets the folder where rendered files will be saved.
Filename Prefix
Sets the base name used for exported files.
Example:
turntable
May output files such as:
turntable_still.pngturntable_0001.pngturntable.mp4turntable.gif
Export Format
Choose the turntable output format.
MP4 — exports a video file using FFmpeg
GIF — exports a looping GIF using FFmpeg
Image Sequence — exports PNG frames without requiring FFmpeg
Still Format
Choose the format used for still renders.
Supported still formats:
PNG
JPEG
WEBP
Frame Count
Controls how many frames are rendered for the turntable.
Higher frame counts create smoother motion but take longer to render.
FPS
Controls the playback speed for MP4 and GIF exports.
Example:
24 FPS for standard animation preview
30 FPS for smoother social media/video output
12–15 FPS for lighter GIF output
Orbit Degrees
Controls how far the viewport rotates during the export.
Common values:
90— quarter turn180— half turn360— full turntable720— two full rotations
Start View
Controls the starting angle for the render.
Current Preview View — starts from the current marked preview viewport angle
Reset -Y View — starts from the front-style
-Yorientation
Viewport Shading
Choose the viewport shading mode used during export.
Options may include:
Current
Wireframe
Solid
Material Preview
Rendered
Use Material Preview or Rendered for polished presentation output.
Hide Overlays During Render
Temporarily hides viewport overlays while rendering.
This is useful for cleaner marketplace, portfolio, and client-preview output.
Restore View After Render
Restores the marked preview viewport after the render completes.
This helps keep your working setup intact after exporting.
Transparent Background
Attempts to use a transparent background when supported by the selected output format and viewport/render setup.
PNG is usually the best format for transparency.
Resolution X / Y
Controls the output resolution.
Examples:
1080 x 1080for square social posts1920 x 1080for HD video1200 x 600for 2:1 marketplace images1080 x 1920for vertical video workflows
Use Fixed Render Distance
Locks the preview viewport to a specific distance during export.
This helps keep framing consistent across the full turntable render.
Fixed Render Distance
Sets the distance used when Use Fixed Render Distance is enabled.
Keep PNG Sequence After MP4/GIF Encode
Keeps the rendered PNG frames after MP4 or GIF encoding.
Disable this if you only want the final MP4 or GIF file.
Enable this if you want backup frames or plan to edit the sequence later.
FFmpeg Path
Sets the path to FFmpeg for MP4 and GIF export.
If FFmpeg is already installed and added to your system PATH, this can usually be left blank.
If FFmpeg is not detected automatically, browse to your ffmpeg.exe file.
Animated Character Support
Turntable Viewport Pro can render a viewport turntable while Blender’s timeline animation plays.
This allows you to export rotating previews of:
Animated characters
Posed characters
Armatures
Moving meshes
Walk cycles
Action previews
Product animations
Mechanical animations
The object itself is still not rotated by the add-on. The viewport rotates while Blender advances the timeline.
Animated Character Workflow
Select the animated character, mesh, or armature.
Click Use Selected Object as Pivot.
Set the desired export format.
In the animation settings, choose an animation source.
Choose the timing mode.
Enable Recalculate Center Each Frame if the character moves through space.
Enable Restore Timeline After Render if you want Blender to return to the original frame after export.
Click Render Turntable.
Animation Source Options
Current Pose Only
Renders the turntable from the current pose or current frame only.
Use this for static character poses, product models, props, and non-animated assets.
Use Scene Timeline
Uses the current Blender scene frame range.
This is useful when your animation is already set up in the timeline.
Custom Frame Range
Allows you to define a specific start and end frame for the export.
Use this when you only want to render part of an animation.
Animation Timing Options
Stretch Range to Output
Maps the selected animation range across the full exported turntable frame count.
This is useful when you want the animation to fit exactly inside the rendered preview.
Step and Hold
Advances through the animation using frame steps.
This can be useful for slower previews, stepped previews, or stylized animation review.
Loop Range
Loops the selected animation range across the exported turntable.
This is useful for walk cycles, idle animations, looping product animations, and GIF exports.
Recalculate Center Each Frame
When enabled, the add-on updates the viewport center during each rendered frame.
This is useful for characters or objects that move away from their starting position.
Recommended for:
Walking characters
Root motion animation
Moving vehicles
Animated props
Large pose changes
Characters with shifting bounds
Restore Timeline After Render
Restores Blender’s original timeline frame after the render finishes.
This helps keep your scene exactly where it was before exporting.
FFmpeg Notes
MP4 and GIF export require FFmpeg.
If FFmpeg is missing, Pro can still export:
Still images
PNG image sequences
If MP4 or GIF export fails:
Confirm FFmpeg is installed.
Confirm FFmpeg is added to your system PATH, or set the FFmpeg Path manually.
Try exporting a PNG image sequence first.
If the PNG sequence works, the issue is likely FFmpeg path or encoding related.
Recommended Export Settings
Marketplace Preview
Format: MP4
Resolution: 1920 x 1080 or 1200 x 600
FPS: 24 or 30
Orbit Degrees: 360
Shading: Material Preview or Rendered
Hide Overlays: Enabled
GIF Preview
Format: GIF
Resolution: 800 x 800 or 1080 x 1080
FPS: 12–15
Orbit Degrees: 360
Frame Count: 48–90
Hide Overlays: Enabled
Portfolio Turntable
Format: MP4
Resolution: 1920 x 1080
FPS: 24 or 30
Orbit Degrees: 360
Shading: Rendered
Hide Overlays: Enabled
Compositing / Editing
Format: Image Sequence
Resolution: As needed
FPS: As needed
Keep PNG Sequence: Enabled
Transparent Background: Enabled if supported
Notes
Turntable Viewport Pro renders from the marked preview viewport.
It does not rotate the actual object.
It does not create object animation keyframes.
It does not require a camera setup.
It can render static assets or animated characters.
MP4 and GIF export require FFmpeg.
PNG image sequence export is the safest fallback if video encoding fails.
Best Use Cases
Character turntables
Animated character previews
Walk cycle previews
Product model showcases
Hard surface asset previews
Client review videos
Marketplace listing videos
Portfolio presentation renders
GIF loops for social media
Quick viewport playblasts
Troubleshooting
MP4 or GIF export fails
Confirm FFmpeg is installed.
Confirm the FFmpeg path is correct.
Try leaving the FFmpeg path blank if FFmpeg is already in your system PATH.
Try setting the path directly to
ffmpeg.exe.Export a PNG image sequence first to confirm the viewport render pipeline is working.
The turntable renders but the MP4/GIF does not appear
Check the output folder.
Confirm the PNG frames were created.
Confirm FFmpeg is installed correctly.
Try enabling Keep PNG Sequence After MP4/GIF Encode.
Try a shorter frame count for testing.
Animated character does not move during export
Make sure Animation Source is not set to Current Pose Only.
Use Scene Timeline or Custom Frame Range.
Confirm the character animation plays normally in Blender.
Confirm the frame range includes the animated section.
Animated character moves out of frame
Enable Recalculate Center Each Frame.
Use the armature or root object as the pivot.
Try Bounds Center instead of Object Origin.
Enable Fixed Render Distance for more consistent framing.
Render is too slow
Lower the resolution.
Lower the frame count.
Use Solid or Material Preview instead of Rendered.
Export an image sequence first.
Reduce the number of orbit degrees if a full 360 is not needed.
Output is off-center
Click Center Preview on Pivot before rendering.
Use Bounds Center.
Use Fixed Render Distance.
Re-mark the preview viewport if needed.
Support
If you run into issues, please include:
Blender version
Add-on version
Operating system
Export format used
Whether FFmpeg is installed
Whether you are rendering a static or animated asset
A short description of the issue
Steps to reproduce the problem
Have questions about this product?
Login to message
| Blender Extension Compatible | Yes |
| Dev Fund Contributor | |
| Published | 5 months ago |
| Blender Version | 5.0 - 5.1 |
| Extension Type | Add-on |
| License | GPL |

Discover more products like this
3d tools Workflow Blender Add-on turntable Modeling tools sculpting tools 3d viewport model preview viewport orbit Asset Preview object preview blender 5