UV Stretch Monitor
 Shapko Tools


UV Stretch Monitor
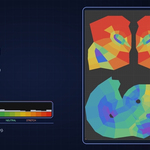
UV Stretch Monitor is a professional UV quality-analysis add-on for Blender. It helps you detect compression, directional stretching, inconsistent texel density, and unusually sized UV islands.
The add-on provides an interactive Color Map Bar in the UV Editor and optional 3D Problem Zones visualization in the 3D Viewport. It is suitable for game assets, props, characters, environments, and any workflow where consistent UV quality matters.
Compatibility
Choose the ZIP package matching your Blender version:
- Blender 4.2–4.4
- Blender 5.0–5.2
No external libraries or additional installation steps are required.
Installation
- Download the ZIP package for your Blender version.
- Open Blender and go to Edit → Preferences.
- Open the Add-ons or Get Extensions section.
- Open the menu in the top-right corner and choose Install from Disk.
- Select the downloaded ZIP file.
- Enable UV Stretch Monitor.
- Open the UV Editor, press N, and select the UV Stretch tab.
Quick Start
- Select one or more mesh objects with an active UV map.
- Open the UV Editor.
- In the UV Stretch panel, click UV Stretch Monitor: ON/OFF.
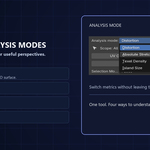
- Choose an Analysis Mode.
- Enable UV Colors to display the analysis on UV faces.
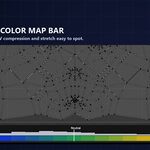
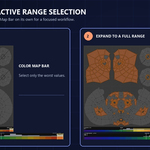
- Use the Color Map Bar at the bottom of the UV Editor to inspect the value distribution and select problematic ranges.
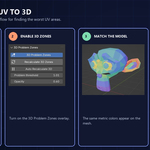
- Enable 3D Problem Zones to visualize UV issues directly on the 3D model.
The monitor is disabled by default. It does not modify UV coordinates, mesh geometry, materials, or Blender’s standard UV tools.
Analysis Modes
Distortion
Compares the relative UV area with the corresponding 3D surface area.
Values close to 1.0 are considered neutral. Lower values indicate compression, while higher values indicate stretching.
Absolute Stretch
Shows the strongest directional UV stretch on each face.
This mode helps find long, narrow, or directionally distorted UV faces, even when their total UV area appears correct.
Texel Density
Visualizes relative texture density across the model.
Use it to identify inconsistent texture detail and maintain a more even resolution across different parts of an asset.
Island Size
Compares each UV island with the typical island size of the same object.
This helps identify islands that are unusually small or unusually large compared with the rest of the UV layout.
Color Map Bar
The Color Map Bar is displayed at the bottom of the UV Editor.
- Blue and purple indicate compression.
- Green represents the neutral range.
- Yellow and red indicate stretching or values above the reference range.
The bar includes a histogram, minimum and maximum values, a neutral marker, and Compression, Neutral, and Stretch labels.
Selecting UVs from the Color Map Bar
- Click the Color Map Bar to select matching UV faces or islands.
- Click and drag to select a custom value range.
- Use Selection Mode to choose between Faces and UV Islands.
- Use the selection actions to Replace, Add, Remove, or Clear the current selection.
- Enable Keep Color Bar Selection in Advanced Settings to keep the selected range active after clicking empty space.
UV Colors
Enable UV Colors to display the selected analysis mode directly on UV faces.
This makes it easy to identify compressed, neutral, and stretched polygons or islands. Hidden geometry in Edit Mode is excluded from the UV overlay.
3D Problem Zones
Enable 3D Problem Zones to visualize UV issues directly on the 3D model.
This allows you to inspect distortion in context without constantly switching between the UV Editor and the mesh.
Available controls include:
- Problem Threshold filtering
- Color Map Bar range filtering
- Selected-faces-only filtering
- Adjustable opacity
- Manual or automatic recalculation
Use Problem Threshold to focus on the most severe UV issues.
Recalculate and Auto Recalculate
Recalculate Selected Meshes
Forces a new analysis of the selected mesh objects.
Use this when Auto Recalculate is disabled or when you want full manual control over recalculation.
Auto Recalculate
Automatically refreshes the analysis after UV edits or relevant mesh changes.
The update is delayed briefly after editing to avoid starting a heavy calculation during every transform event. For dense meshes, manual recalculation may provide better performance control.
Advanced Settings
Neutral Low and Neutral High
Define the acceptable value range around the neutral target.
For example, a range of 0.95–1.05 treats values within 5% of the target as neutral.
Display Range
Controls how broadly the color gradient is distributed.
A smaller range makes color changes more sensitive. A larger range is useful for inspecting broad variations without excessive clamping.
Color Scheme
Switches between the available visualization color schemes.
UV Overlay Opacity
Controls the transparency of UV Colors in the UV Editor.
Histogram Bins
Controls the number of value ranges displayed in the histogram.
More bins provide more detail, while fewer bins provide a simpler overview.
Recalculate Delay
Sets the delay before automatic recalculation begins after an edit has finished.
Chunk Size and Update Frequency
Performance controls for large meshes. The default values are recommended for most workflows.
Show Color Bar Summary
Displays object, polygon, and island counts in the Color Map Bar.
Performance and Caching
UV Stretch Monitor uses cached per-object results to avoid unnecessary recalculation.
- Unchanged selected objects can reuse cached results.
- Color Map Bar interaction uses prepared analysis data instead of rescanning the mesh.
- Large calculations are processed in chunks to keep Blender responsive.
- Previous valid results remain visible while a new analysis is being prepared.
Requirements and Limitations
- A selected mesh object must have an active UV map.
- Invalid or zero-area UV faces are skipped safely.
- Results depend on the currently active UV layer.
- UV Colors are intended for use in the UV Editor.
- 3D Problem Zones can be viewed in Object Mode and Edit Mode.
- The add-on analyzes UV quality. It does not automatically edit, optimize, pack, unwrap, or modify UVs.
Interface Location
- Main controls: UV Editor → N Sidebar → UV Stretch
- Color Map Bar: Bottom of the UV Editor
- 3D Problem Zones: Controlled from the UV Stretch panel and displayed in the 3D Viewport
Author
Created and maintained by Shapko Tools.
Discover more products like this
UV Checker uv unwrapping uv editor mesh analysis 3d modeling texel density uv mapping uv islands UV Stretch UV analysis uv UV Distortion