 Blaze
Blaze


FULL TUTORIAL
Watch the complete Blaze AutoPose tutorial
Installation, rig setup, constraint posing, foot contact, Manual Pose, keying, recording, preferences, and support in one video.
BLAZE AUTOPOSE DOCUMENTATION
Setup, pose, refine, and animate
This product page contains the core documentation for Blaze AutoPose. The live documentation is easier to search and may contain newer screenshots, videos, and support notes.
Open the live documentationOVERVIEW
Blaze AutoPose
Blaze AutoPose is an interactive full-body posing tool for Blender. Move a few viewport handles and AutoPose adapts the rest of the body around them. The result is applied to the FK controllers already used by your rig.
Direct full-body posing
Drag a wrist, foot, chest, head, or other body control. AutoPose adjusts connected joints and the rest of the body in the same solve.
Works on your rig
Map the character once. AutoPose then writes the finished pose to those FK body controllers so you can refine and key them normally.
Persistent constraints
Active constraints continue guiding later drags. Keep only the constraints the pose needs so the rest of the body remains free to adjust.
Manual refinement
Switch to Manual Pose whenever you need regular Blender posing, finger or facial controls, IK snapping, or an exact final correction.
The AutoPose workflow - start a session and build a pose with a few constraints.
Set Base is a checkpoint
Set Base saves a pose that Restore can return to. It is not the pose every solve works from. Each drag starts from the pose visible immediately before that drag.
Minimum Requirements
| Blender | 4.5 or newer |
|---|---|
| Platforms | Windows x64, Linux x64, macOS Intel, macOS Apple Silicon |
| Processor | 64-bit Intel, AMD, or Apple Silicon CPU |
| Graphics | No dedicated GPU required. AutoPose solves on the CPU. |
Limitations
- Humanoid character rigs. Non-humanoid rigs are not supported.
- FK body controls. To continue in IK, use your rig's FK-to-IK snap after posing.
- Body posing. Fingers and facial controls are not supported. Pose them manually.
- Maximum 16 active constraints. Using fewer gives the rest of the body more freedom to adjust.
- Soft guidance. Constraints and foot contact guide the pose instead of locking controls in place. Small shifts can occur when constraints compete.
GETTING STARTED
Quick Start
The shortest path from a fresh installation to a finished pose on your own rig.
- Select the character. Open the Blaze AutoPose panel in the 3D Viewport sidebar and choose the armature in Character Rig.
- Map the rig. Apply a preset, use Auto Detect, or fill the five controller chains manually.
- Reconstruct. Open step 3 and press Reconstruct AutoPose Rig.
- Confirm the T-pose. Confirm the generated T-pose from the front and top views.
- Start AutoPose. Switch to AutoPose and press Start AutoPose.
- Drag and finish. Move a few handles, press I if you want a keyed pose, then press Esc or Finish AutoPose.
Rig setup happens once per character
When you return to the same character later, select it, switch to AutoPose, and start a session.
A first pose - start AutoPose, place the wrist, then add an ankle constraint.
Keeping The Result
| Action | What it does |
|---|---|
| Finish AutoPose / Esc | Ends the session and leaves the current pose on the FK controllers. |
| I | Inserts normal Blender keyframes at the current frame. |
| Record | Captures consecutive solved poses and bakes them to the timeline. |
GETTING STARTED
Installation
Blaze AutoPose installs as a Blender extension. The pose model and runtime are included in the archive, so there is no separate runtime setup after installation.
- Download the package. Download the build for your operating system from your Superhive orders. Keep it zipped.
- Open Blender Preferences. Go to Edit > Preferences.
- Install the zip. Drag the zip into Blender, or open Get Extensions, choose Install from Disk..., and select the archive.
- Enable Blaze AutoPose. If the panel does not appear, disable and re-enable the extension or restart Blender.
- Open the panel. In the 3D Viewport, press N and choose the Blaze AutoPose tab.
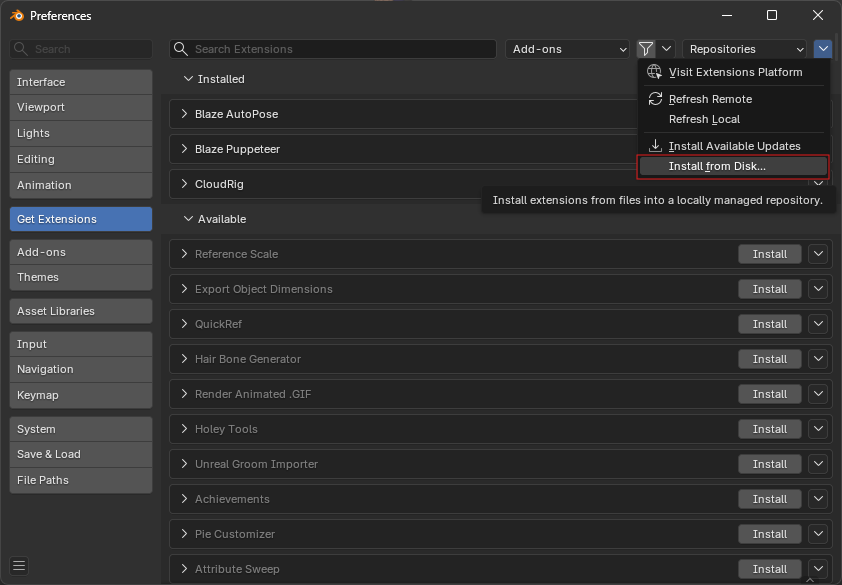
Install from Disk
Installing and enabling Blaze AutoPose
Updating
Install the new zip through the same Blender flow. You do not need to uninstall the old build first. Rig mapping is stored on the character armature inside the blend file, so an add-on update does not remove your setup.
CHARACTER SETUP
Rig Setup
Rig Setup tells AutoPose which FK body controllers receive the pose and the order of each body chain. You normally complete it once per character.
Rig Setup end to end
1. Choose Rig Mapping
AutoPose includes presets for Rigify, Auto-Rig Pro, CloudRig, Mixamo, and Puppet Studio. Custom rigs use the same workflow after manual mapping.
| Control | What it does |
|---|---|
| Preset + Apply Preset | Fills all five chains for a supported rig family. |
| Auto Detect | Checks the rig's controller names and applies a matching preset. |
| Mirror Left / Right | Mirrors edits to the opposite limb while mapping. |
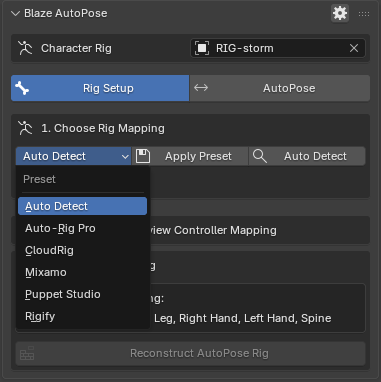
Choose Rig Mapping
2. Review Controller Mapping
All five chains must read Valid. Always inspect a preset before reconstructing because rig versions and custom changes can alter controller names.
| Chain | Required order |
|---|---|
| Leg R / Leg L | Toe, foot, shin, thigh. |
| Hand R / Hand L | Hand, forearm, upper arm, shoulder. |
| Spine | Lower torso upward through chest, neck, and head. |
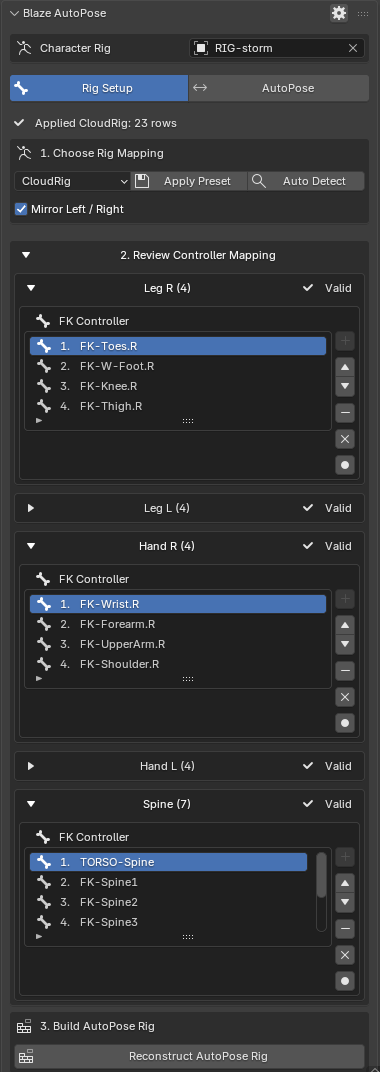
Review Controller Mapping
For manual mapping, use + to add the active Pose Mode controller, the arrows to reorder it, - to remove it, X to clear a chain, or REC to capture controllers as you click them in order.
Map FK body controllers
Do not map deform bones, IK controls, helper controls, or finger controls. The first spine entry is the character base and can receive location and rotation. Other mapped controllers receive rotation.
3. Build AutoPose Rig
Press Reconstruct AutoPose Rig. If it is disabled, finish any active REC mode and fix every chain marked Needs attention.
| Helper rig | Purpose |
|---|---|
| YourRig_Blazed | The proxy rig AutoPose poses on. |
| YourRig_AutoPose100 | The bridge between the proxy and your controllers. |
| YourRig_TPOSE | The rig used to confirm the reference T-pose. |
T-Pose Confirmation
- Front view. Straighten the arms out to the sides and the legs downward. Press Confirm Front View.
- Top view. Confirm the arms are not swept forward or backward, then press Finalize T-Pose.
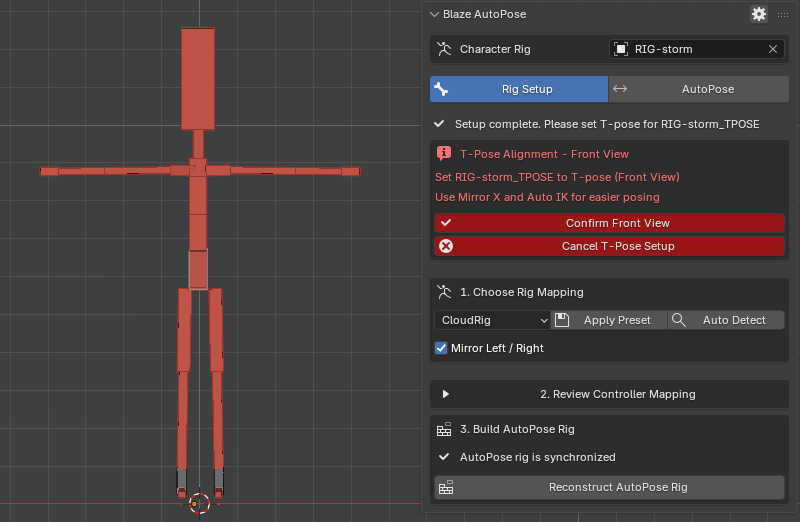
T-pose alignment
Do not rename, delete, constrain, or animate the generated helper rigs. If the controller mapping changes later, run Reconstruct again. Linked and library-overridden rigs must be made fully local before setup.
CORE WORKFLOW
Posing With Constraints
Start a session and drag viewport handles to guide the pose. AutoPose considers the active constraints and adjusts the body relative to the pose visible before the current drag.
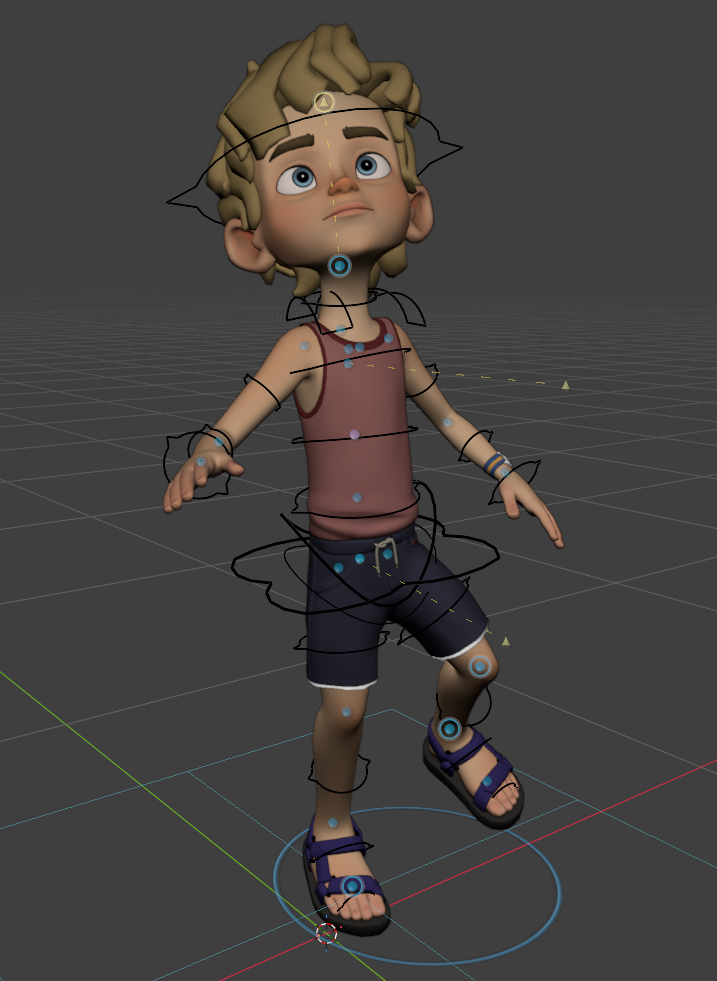
A running AutoPose session
Untouched joints can move
The body can respond as a whole because unconstrained joints remain free.
Active constraints continue applying
A target placed earlier still guides later drags, although soft constraints may shift when instructions compete.
Use fewer constraints
AutoPose supports up to 16 active constraints, but three or four is often enough. Deactivate constraints after they have done their job.
Constraint Types
| Type | Colour | What it controls |
|---|---|---|
| Position | Guides a joint toward a point. | |
| Rotation | Guides a joint toward an orientation. | |
| Look At | Orients the hips, chest, or head toward a target. | |
| World | Moves the whole character in the scene. It is not part of the pose solve. |
Position, Rotation, and Look At
Working With Handles
| Action | Result |
|---|---|
| LMB drag | Move or rotate the handle under the pointer. |
| LMB click | Select and activate the handle, then show its gizmo. |
| Shift + LMB | Add another position handle to the selected group. |
| Alt + LMB | Switch the hovered handle between Position and Rotation. |
| G / R | Start Blender's move or rotate transform on the selected handle. |
| Ctrl + Z / Ctrl + Shift + Z | Undo or redo an AutoPose drag or state change. |
Deactivate
RMB on an active handle removes it from the solve without moving the current pose.
Freeze
Alt + F prevents editing. If the constraint is active, it continues guiding the solve. Freeze does not make it rigid.
Hide
RMB on an inactive handle hides it. Hiding changes only visibility. Alt + H shows every hidden AutoPose handle.
Constraint Manager
The Constraint Manager lists every handle by body section. Use section controls to show, hide, freeze, unfreeze, or deactivate a whole group. Use row controls for a single handle. Visibility never changes the solve, and a frozen active constraint stays active.
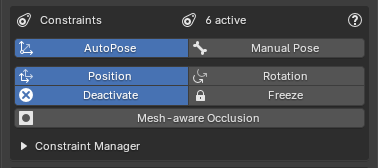
The Constraints panel
Manual Pose
Press Shift + R or choose Manual Pose to work directly on the rig in Blender's Pose Mode. Press it again to return. Your manual edit stays visible and becomes the starting pose for the next drag. Use Manual Pose for fingers, facial controls, IK snapping, and precise corrections.
Manual Pose and back
GROUND SUPPORT
Foot Contact & Ground
Use foot contact when a character should keep one or both feet near the ground while you adjust the rest of the body.
- Fit the ground. Enable Preserve Foot Contact and press Fit Ground.
- Check the supporting foot. Its state should read Contact.
- Pose normally. AutoPose includes the supporting foot in later solves.
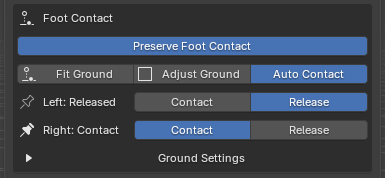
Foot Contact controls
Fit Ground
Moves the plane under the lowest foot and refreshes the contact states.
Adjust Ground
Shows a movable plane. Drag its blue Z axis and press Finish Adjust.
Ground Height
Sets an exact world-space height in Ground Settings.
| State | Meaning |
|---|---|
| Contact | The foot contributes ground support. |
| Released | The foot does not contribute ground support. |
If the panel shows Free, the foot was not close enough to the ground to count as contact when checked. It contributes no support. Press Contact to plant it or Release to keep it free.
Foot contact is soft
A foot in Contact is considered planted, but it is not frozen in place. Slight sliding or lifting can occur while AutoPose balances it with the rest of the body and other active constraints.
Foot contact while posing
KEEP THE RESULT
Poses & Animation
Save a checkpoint, move poses between frames, insert keyframes, or record a continuous take.
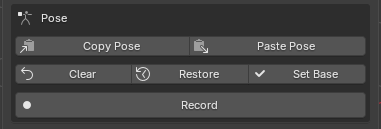
The Pose panel
| Control | What it does |
|---|---|
| Set Base / Enter | Saves the visible pose as the Restore checkpoint and deactivates every constraint. |
| Restore | Returns to the saved checkpoint and deactivates every constraint. |
| Clear | Deactivates every constraint and keeps the visible pose. |
| Copy / Paste | Copies a pose for the same reconstructed character. Paste also saves it as the Restore checkpoint. |
| I | Inserts regular Blender keyframes on the mapped FK controllers and character world location. |
Set Base, Restore, and Clear
Recording A Take
- Move to the first timeline frame of the take.
- Press Record. The initial pose is captured.
- Keep dragging constraints. Each completed solve is captured on the next frame.
- Press Record again or Esc. Wait for the take to finish baking.
Recording and baking a take
During recording and baking
Copy Pose, Paste Pose, Clear, Restore, Set Base, and Manual Pose are unavailable. Let the bake finish before continuing.
WORKSPACE
Interface & Preferences
This section covers the main panel, viewport dock, handle appearance, shortcut settings, and support tools.
The Panel
At the top, choose the Character Rig, switch between Rig Setup and AutoPose, and read the status line. Most errors appear in that status line with a direct explanation.
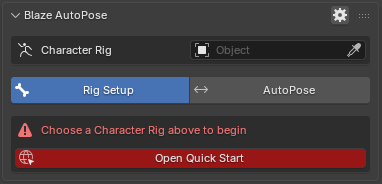
Character Rig, mode selection, and status
Viewport Dock
Enable the dock under Preferences > Viewport Controls > Viewport Dock. It places common actions over the viewport: Set Base, Restore, Clear, Record, AutoPose or Manual Pose, Preserve Foot Contact, Mesh-aware Occlusion, Position, Rotation, Freeze, Unfreeze, and Unhide All.
Drag its grip to move it, click the grip to collapse it, and push it against the left or right edge for a vertical layout. Reset Dock Position returns it to the center.
Viewport Controls And Colours
| Setting | What it changes |
|---|---|
| Constraint Size | Scales every viewport handle and active indicator. |
| Constraint Opacity | Controls the opacity of resting handles. |
| Viewport Dock | Shows the floating dock during a session. |
| Dock Scale | Scales the dock relative to Blender's UI. |
Position, Rotation, Look At, World, Frozen, Active Accent, Hover Accent, Ground, and Shadow colours can all be changed. Restore Default Colors returns the full palette.
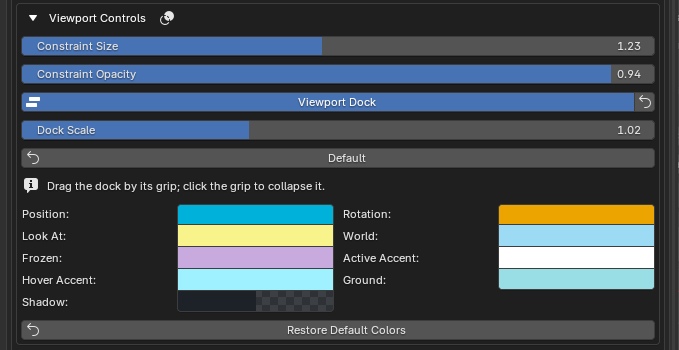
Viewport controls and colours
Support Tools
- Save Support Bundle: writes a text report containing the version, device, rig setup summary, recent statuses, and log tail.
- Open Log Folder: opens the folder containing the current and recent session logs.
- Quick Start: opens the getting-started documentation.
- Report a Bug: opens the Blaze creator page on Superhive so you can send a message.
- Debug Logging: records detailed diagnostics while you reproduce a problem.
REFERENCE
Shortcuts
Every shortcut can be rebound under Preferences > Add-ons > Blaze AutoPose > Shortcuts.
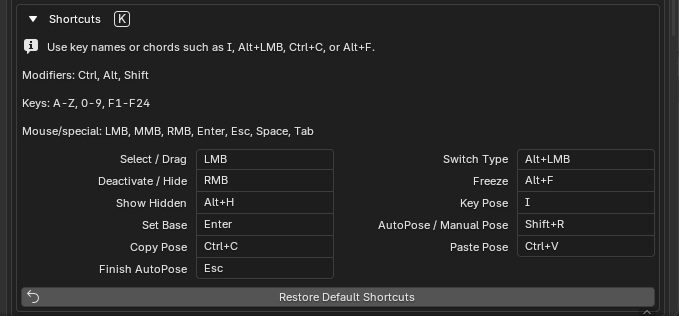
Editable shortcut bindings
| Shortcut | Action |
|---|---|
| LMB drag | Move or rotate the constraint under the pointer. |
| LMB click | Select and activate a constraint, then show its gizmo. |
| Shift + LMB | Add a position constraint to the selected group. |
| Alt + LMB | Switch Position and Rotation. |
| RMB | Deactivate an active constraint, hide an inactive one, or cancel the current transform. |
| Alt + F | Freeze or unfreeze the hovered constraint. |
| Alt + H | Show every hidden AutoPose handle. |
| G / R | Use Position or Rotation on the selected handle and begin the transform. |
| Enter | Save a Restore checkpoint and deactivate all constraints. |
| I | Key the character's FK pose at the current frame. |
| Ctrl + C / Ctrl + V | Copy or paste the AutoPose pose. |
| Shift + R | Switch between AutoPose and Manual Pose. |
| Esc | Finish the AutoPose session or stop a recording. |
| Ctrl + Z / Ctrl + Shift + Z | Undo or redo an AutoPose change. |
Axis locks, numeric entry, local axes, fine movement with Shift, and the usual Blender transform controls work while moving or rotating a handle. The question-mark button in the Constraints header shows your current bindings.
REFERENCE
Troubleshooting
Read the status line at the top of the AutoPose panel first. Most setup and session errors name the required correction there.
Start Here
- Confirm the correct armature is selected in Character Rig.
- Open Review Controller Mapping and confirm every chain reads Valid.
- Step 3 should report that the AutoPose rig is synchronized.
- Confirm the T-pose workflow was completed, not cancelled.
- Confirm you are in AutoPose rather than Manual Pose.
Common Setup Messages
| Message | What to do |
|---|---|
| Choose a Character Rig above to begin | Select the character armature at the top of the panel. |
| This rig cannot be set up by AutoPose | The rig is linked or overridden. Make the armature fully local. |
| Map: ... | One or more chains are empty. Apply a preset or fill them. |
| Finish controller recording | A REC button is still enabled. Turn it off. |
| Controller mapping changed | Run Reconstruct AutoPose Rig again. |
| AutoPose rig is not ready | Finish Rig Setup and reconstruction for this character. |
The Handles Are Missing
- The big button should read Finish AutoPose. If it reads Start AutoPose, start the session.
- Press Alt + H to show hidden handles.
- Raise Constraint Size and Constraint Opacity in preferences.
- Turn off Mesh-aware Occlusion if the mesh is hiding the controls you need.
The Pose Feels Stiff
Too many constraints are active. Press Clear to deactivate them without changing the visible pose, then add only the few targets the pose needs.
A Drag Went Wrong
Press RMB while dragging to cancel the transform, Ctrl + Z to undo the last AutoPose change, or Restore to return to the saved checkpoint.
Foot Contact Moves More Than Expected
Foot contact is soft and does not guarantee a frozen foot. Confirm Preserve Foot Contact is enabled, the foot reads Contact, and the ground plane is at the expected height. Small sliding or lifting can be normal.
Recording Problems
- Start AutoPose before recording solves: start a posing session before pressing Record.
- Finish the active transform before baking: release or finish the current drag before stopping.
- Buttons are unavailable: wait for recording or baking to finish.
Reporting A Problem
- Enable Debug Logging in AutoPose preferences.
- Reproduce the problem.
- Press Save Support Bundle.
- Use Report a Bug to open the Blaze creator page on Superhive, then attach the bundle to your message.
Error status and support actions
For the newest screenshots, videos, and updates, use docs.blazeanimation.com/autopose.
 Included
Includes 12 months of
- Support from Blaze
- Product updates
Extend this product’s Support Period +12 months: 25% of product price
Have questions before purchasing?
Login to message