


Max Stack - Max Modifiers and Stack

kleinARt in Modeling


MAXSTACK DOCUMENTATION · 1.3

All 39 modifiers at a glance

Every MAXStack tool is a modifier on Blender's normal stack. Add them via Add Modifier > MAXStack, place them with viewport gizmos, and let selections flow from one to the next.

Quick start

  • Install the extension and restart Blender once — the MAXStack category appears in Add Modifier after the asset index rebuilds.
  • Select a mesh (or a curve, for the spline modifiers) and open Add Modifier > MAXStack.
  • The MAXStack panel sits above the modifier stack: toolbar, stack list with selection lanes, and the tools for the active modifier. Prefer the viewport? Move it to the sidebar (N-panel) in the add-on preferences.
  • Gizmos appear for the active modifier. Drag cage faces / edges / corners to size, use the move / rotate widget to place. Fit to Object snaps the gizmo around the mesh.
  • For Edit Mesh and FFD, make the modifier active and press Tab; Tab again returns to the object.

DEFORM — 15 MODIFIERS

Bend Bend around an axis by angle and direction, with upper/lower limits, a fixed anchor (first / center / last end) and a cage gizmo that bends with the mesh.
Twist Twist around an axis; Bias concentrates the rotation toward one end. Limits and deforming cage included.
Taper Scale the cross-section along the axis — Amount sets the end scale, Curve bows the sides outward or inward.
Skew Shear the mesh along an axis in a chosen direction, with limits.
Stretch Volume-preserving squash & stretch; Amplify exaggerates the mid-length bulge.
Squeeze Pinch or bulge the cross-section (Radial) and the length (Axial) around the centre.
Wave Sine deformer with two types: Wave (planar wavefronts) or Ripple (concentric rings). Amplitude, wavelength, phase, decay — and Cyclic auto-animates with no keyframes.
Displace Push vertices along their normals by an image's brightness. Map it through the gizmo box (Planar) or an existing UV map; Strength and Mid Level control the range.
Spherify Morph the mesh toward a sphere by a percentage, inside a placeable gizmo.
Path Deform Deform the mesh along a target curve — stretch to fit, slide with Offset, twist, choose the travel and up axes.
Transform Move / rotate / scale geometry at this point in the stack around a movable pivot. Its cage IS the transform: drag faces to move, edges to rotate, corners to scale.
Push Inflate or deflate along vertex normals by a single Amount.
Noise Fractal noise displacement with size, detail and roughness. Phase/Seed offsets the pattern; Cyclic auto-animates it. The gizmo shows a live preview of the distortion.
FFD 3ds Max Free Form Deformation inside a gizmo box — 2 to 10 control points per axis (default 4×4×4). A fresh FFD fits itself around the incoming mesh. Press Tab to move the control points with Blender's own tools (grab, rotate, scale, proportional editing); the object deforms live. Only In Volume or the whole mesh, selection mask, Reset Lattice.
Relax Smooth the surface toward its neighbours — Amount per iteration and Iterations, Keep Boundary pins open edges, Keep Volume stops it from shrinking.

MODELING — 10 MODIFIERS

Edit Mesh An editable level in the middle of the stack, like 3ds Max's Edit Poly. Press Tab and edit the result of the modifiers above with Blender's own edit tools, while the modifiers below stay live. Delta mode keeps the modifiers above adjustable; Replace mode for topology, UV and material edits. See Editing inside the stack below.
Array Clone the object on a 1D / 2D / 3D lattice inside a draggable box. Count mode fits the clones into the box; Spacing mode keeps a fixed distance and adds clones as you drag. Anchor keeps the source fixed, Generate % randomly thins the clones, plus per-clone random position / rotation / scale.
Symmetry Mirror across a plane gizmo — one-click X / Y / Z axis buttons, drag edge handles to tilt the plane, corners to move it. Optional slice at the plane and weld along the seam.
Slice Planar cut with a plane gizmo: keep either side, cap the opening with a chosen material and projected UVs, or output the cut as a selection.
Weld Merge vertices by distance — optionally only connected ones, respecting normals so opposite thin walls don't fuse, with loose-geometry cleanup.
Subdivide Linear (non-smoothing) subdivision to a target edge length — the standard prep step before the deformers.
Shell Give a surface thickness: Inner / Outer Amount, rim Segments, Even Thickness for a constant wall at corners, Smooth Edges, optional material slots for the rim and the inner side, and Select Inner / Outer / Edges as a selection. Open surfaces become closed solids.
Cap Holes Fill open boundary holes — flat caps with correct shading, optional material assignment and projected cap UVs. Great for scans.
Lattice 3ds Max Lattice: edges become struts (radius, sides, segments, end caps) and vertices become joints (tetra / octa / icosa), each part with its own material slot and selection. With a mask, only the selected part turns into a lattice.
Delete Mesh Delete the incoming selection — as Faces (faces whose vertices are all selected) or Vertices (and everything attached).

SPLINES — 6 MODIFIERS

Every spline modifier takes a curve object or edges drawn inside a mesh (a mesh's faces pass through untouched), and the object keeps its materials. Spline Resolution sits right on the modifier — 0 uses the curve's own resolution, which the MAXStack panel shows as an editable field.

Lathe 3ds Max Lathe: revolve a profile around the gizmo axis — Degrees, Segments, Direction X / Y / Z, Align Free / Min / Center / Max, Weld Core, caps for partial revolves, Smooth and UVs. Normals come out right whichever side you drew on; the axis is drawn in the viewport.
Sweep 3ds Max Sweep: ten built-in sections (Angle, Bar, Channel, Cylinder, Half Round, Pipe, Quarter Round, Tee, Tube, Wide Flange) or any custom section object along a path — size, thickness, corner radius, mirror, offsets, angle, 9-point pivot alignment, constant-width mitred corners, caps, real-world UVs.
Bevel 3ds Max Bevel: turn a closed outline into a solid through a Start Outline and up to three Height / Outline levels. Rounding gives true quarter-round edges (+) or fillets (−), outlines stay an even width at corners, outlines always grow outward and holes shrink however the spline was drawn. Caps and Start / End / Sides selections.
Extrude Extrude splines into capped solids (inset, segments, bend), or extrude the selected faces of a mesh — and write Start / End / Wall selections for the modifiers below.
Renderable Spline Turn splines or edge paths into round (Thickness, Sides) or rectangular (Length × Width) tubes with Angle, capped ends, Auto Smooth and a material slot.
Normalize Spline Re-space the spline points evenly — by Segment Length or by Count — ready for deforms and sweeps.

SELECTION — 5 MODIFIERS

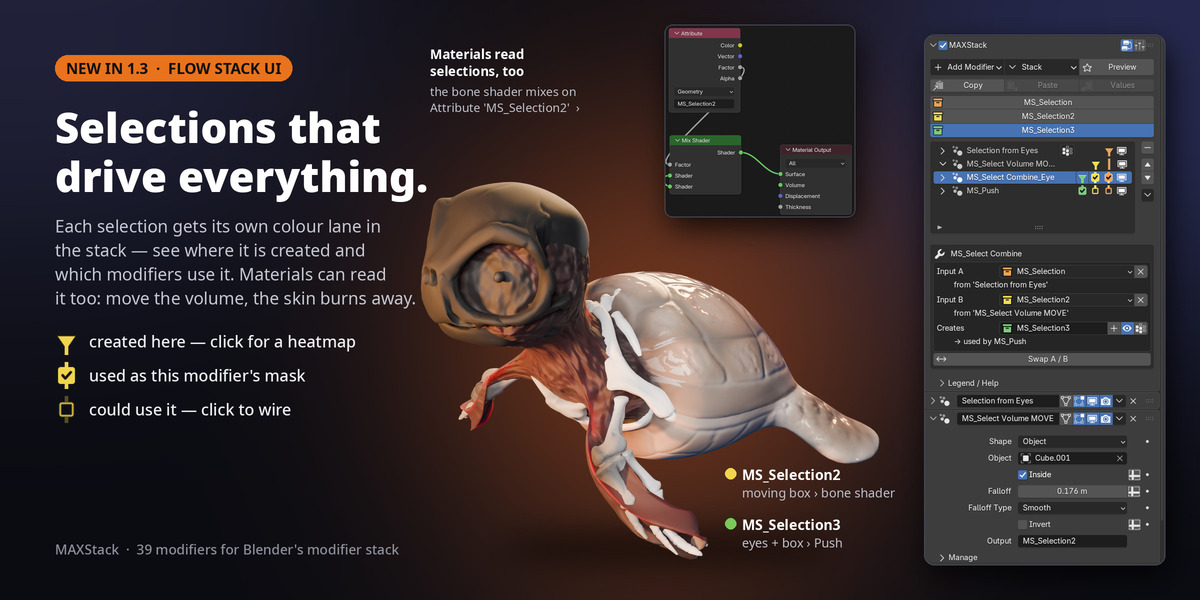
A selection modifier creates a live selection that any modifier below can use as its mask — every deformer, UV Map, Material, Delete Mesh and more. The stack list shows where each selection is created and used, the viewport shows it as a heatmap, and you can bake it to a vertex group any time. New selections are numbered automatically (MS_Selection, MS_Selection 2, …) so a new one never replaces an existing one. Selections are real mesh attributes, so materials can read them too: use the shader editor's Attribute node with the selection name to blend shaders or drive values.

Selection Paint Paint a vertex selection with a brush (wheel resizes, Ctrl subtracts) or drag box-select rectangles — only visible vertices, or through the whole model with the X-ray toggle.
Select By Procedural selection by face Normal (rotate-gizmo direction + soft falloff angle), Sharp Edges, Random (single elements or contiguous patches), or Proximity to another object.
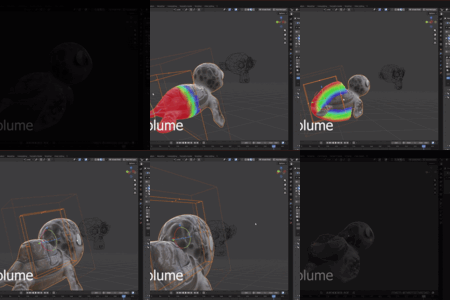
Select Volume Select everything inside a shape gizmo — box, sphere, cylinder, point, line or another object — with a soft falloff band at the border.
Select Combine Combine two selections — union, intersect, subtract or exclude — with a soft falloff on the result.
Select Ops Grow, shrink, invert and soften a selection, with soft falloff.

UV & MATERIAL — 3 MODIFIERS

UV Map Planar / Box / Cylindrical / Spherical UV projection with a full viewport gizmo — move, rotate and scale the projection box, drag the tile boundaries, or switch to real-world scale. Takes a selection or vertex group: only those faces are remapped, the rest keep their UVs.
UV Transform Tile, offset, rotate and flip an existing UV map around a pivot — non-destructively, at any point in the stack. Masks like UV Map: feed it a selection and only those faces transform.
Material Set a material slot on the masked faces — Fixed, or a random slot per connected element or per face out of a range, with a Seed (3ds Max Material + MaterialByElement). The panel shows which material each slot number points at.

Editing inside the stack

  • Edit Mesh — make it active and press Tab. The result of the modifiers above is captured and you edit it with every normal Blender edit tool; the modifiers below stay live. Your base mesh is never touched, and each Edit Mesh keeps its own edits.
  • Delta mode (default): your vertex moves ride on the live input, so changing a modifier above (Noise, Bend …) still flows through. Replace mode: the edited mesh is used as-is — needed for topology, UV and material edits. Topology edits switch to Replace automatically.
  • When the stack above changes in a way Edit Mesh can't follow, it turns red in the stack list. Recapture takes a fresh snapshot (your edits are discarded); Rebase carries your moves onto the new input when the topology still matches.
  • FFD — make it active and press Tab (or Edit Control Points): the lattice appears on its box and you move the points with Blender's own tools, proportional editing included. Changing the point count keeps the shape; Reset Lattice starts over.
  • Tab keeps its normal behaviour whenever the active modifier isn't an Edit Mesh or FFD.

The MAXStack panel & stack tools

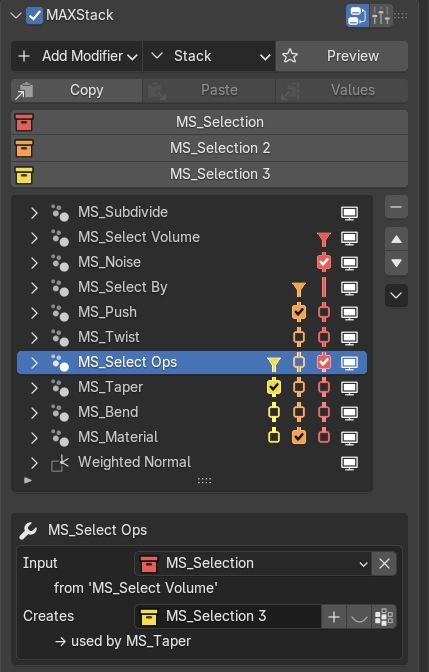
  • Selection chips: every live selection as a named colour chip above the list. Click one to show it as a heatmap in the viewport; hover it to see who creates and who uses it.
  • Selection lanes: each selection runs down the stack list in its own colour, like a subway map. ▼ = created on this row (click: heatmap), a solid line = carried down to its last user, ☑ = this modifier uses it as its mask (click to stop), ☐ = this modifier could use it (click to use), a dim line = it still exists but nothing below uses it, a second ▼ = replaced under the same name. A vertex-group mask shows as its own chip, a mask that can't work as a red warning.
  • Mask / Creates box for the active modifier, in plain words — "Mask: Top, from Select By", "Creates: MS_Selection 3, used by Taper". Pick a mask from the selections created above, a vertex group, a mesh attribute or the whole mesh; Invert and clear right next to it. Type into the Creates field to rename a selection — the modifiers using it follow along. + gives the modifier a fresh selection of its own; the eye shows it as a heatmap; the vertex-group button bakes it.
  • Stack list: a native Blender list — click to make a modifier active, double-click to rename, filter by name; remove, move up / down and the ⋮ actions menu sit beside it.
  • Toolbar: Add Modifier, the Stack menu (Hide / Show All, Collapse / Expand All, Copy Active to Selected, Copy Whole Stack to Selected, Selection from Vertex Group, Apply All, Delete All) and Preview.
  • Preview Up To Active (Ctrl+Alt+E): the 3ds Max "Show End Result" toggle — hides everything below the active modifier and follows you as you click through the stack.
  • Copy / Paste / Paste Values: the 3ds Max stack clipboard. Copy any single modifier — MAXStack or native — and paste it on any object, right below the active one, with all settings and selection wiring intact. Paste Values overwrites a same-type modifier's settings without adding a new one. Also in the ⋮ menu.
  • Per-modifier tools: Fit to Object, Align Gizmo to Face (live drag across the surface), UV map picker, mirror-axis buttons, Paint Selection and Box Select, material names behind every material slot number, curve resolution for spline modifiers.
  • Classic UI: prefer the earlier colour-column list? Switch the Stack UI to Classic in the panel header, the Stack menu or the add-on preferences. Lane Marks offers three looks: Checkbox, Check Disc, Dots.
  • Hotkeys: Ctrl+Alt+E preview up to active · Alt+PageUp / PageDown step the active modifier · Tab edits the active Edit Mesh / FFD (all editable in the add-on preferences).

Good to know

  • Scenes render and open without the add-on installed — placed modifiers live in your .blend. The add-on is only needed to add new ones and use the gizmos and panel.
  • Updates auto-upgrade modifiers already placed in your files, carrying your values across.
  • Selections survive Array clones and topology changes; bake to a vertex group whenever a native modifier needs one. Real vertex groups do not survive an Array (Blender limitation) — keep masks as selections above it.
  • A mask that points at a selection nobody creates — or one only created further down the stack — has no effect, and the modifier works on the whole mesh. The panel flags it in red.
  • Since 1.3 a newly added Select Ops creates its own selection (MS_Selection 2) instead of overwriting the one it reads. To refine a selection in place, type its name into the Creates field.
  • If another add-on also draws at the top of the modifier stack, move the MAXStack panel to the viewport sidebar in the add-on preferences.
  • Requires Blender 4.3 or newer (tested up to 5.2 LTS) · Windows, Linux, macOS · GPL-3.0 licensed.
  • personal licence

    $20
  • 5 artists team license - save 10%

    $90
$20

Support Period Included

Includes 12 months of

Extend this product’s Support Period +12 months: 50% of product price

Have questions before purchasing?
Login to message

Details
Blender Extension Compatible Yes
Sales 10
Rating
1 ratings
Dev Fund Contributor
Published 3 months ago
Blender Version 4.2 - 5.2
Extension Type Add-on
Render Engine Used Arnold, Blender-Internal, Blender-Game-Engine, Cycles, Eevee, Freestyle, Luxrender, Mental-Ray, Octane, Vray, Yafaray
License GPL